|
|
||
|---|---|---|
| .. | ||
| Package | ||
| ASCRecommendationPolicy.json | ||
| ASCRecommendationPolicySub.json | ||
| ASCRecommendationPolicyUI.json | ||
| HTDeployFunc.zip | ||
| README.md | ||
| azCliScript.sh | ||
README.md
Microsoft Sentinel Deception (HoneyTokens) Solution - Community Supported
For more details:
Blog post: https://aka.ms/honeytokensblog
IMPORTANT
The Microsoft Sentinel Deception (Honey Tokens) solution is offered in a community supported model by the Microsoft SIEM & XDR Community. Any support required can be raised as an issue on GitHub where the Microsoft Sentinel community can assist.
This article describes how to use the Microsoft Sentinel Deception (Honey Tokens) solution to plant decoy Azure Key Vault keys and secrets, called honeytokens, into existing workloads.
Use the analytics rules, watchlists, and workbooks provided by the solution to monitor access to the deployed honeytokens.
When using honeytokens in your system, detection principles remains the same. Because there is no legitimate reason to access a honeytoken, any activity will indicate the presence of a user who is not familiar with the environment, and could potentially be an attacker.
Before you begin
In order to start using the Microsoft Sentinel Deception (Honey Tokens) solution, make sure that you have:
-
Required roles: You must be a tenant admin to install the Microsoft Sentinel Deception (Honey Tokens) solution. Once the solution is installed, you can share the workbook with key vault owners so that they can deploy their own honeytokens.
-
Required data connectors: Make sure that you've deployed the Azure Key Vault and the Azure Activity data connectors in your workspace, and that they're connected.
Verify that data routing succeeded and that the KeyVault and AzureActivity data is flowing into Microsoft Sentinel. For more information, see:
Install the solution
Install the Microsoft Sentinel Deception (Honey Tokens) solution as you would other solutions. On the Microsoft Sentinel Deception solution page, select Start to get started.

To install the Deception solution:
The following steps describe specific actions required for the Microsoft Sentinel Deception (Honey Tokens) solution.
-
On the Basics tab, select the same resource group where your Microsoft Sentinel workspace is located.
-
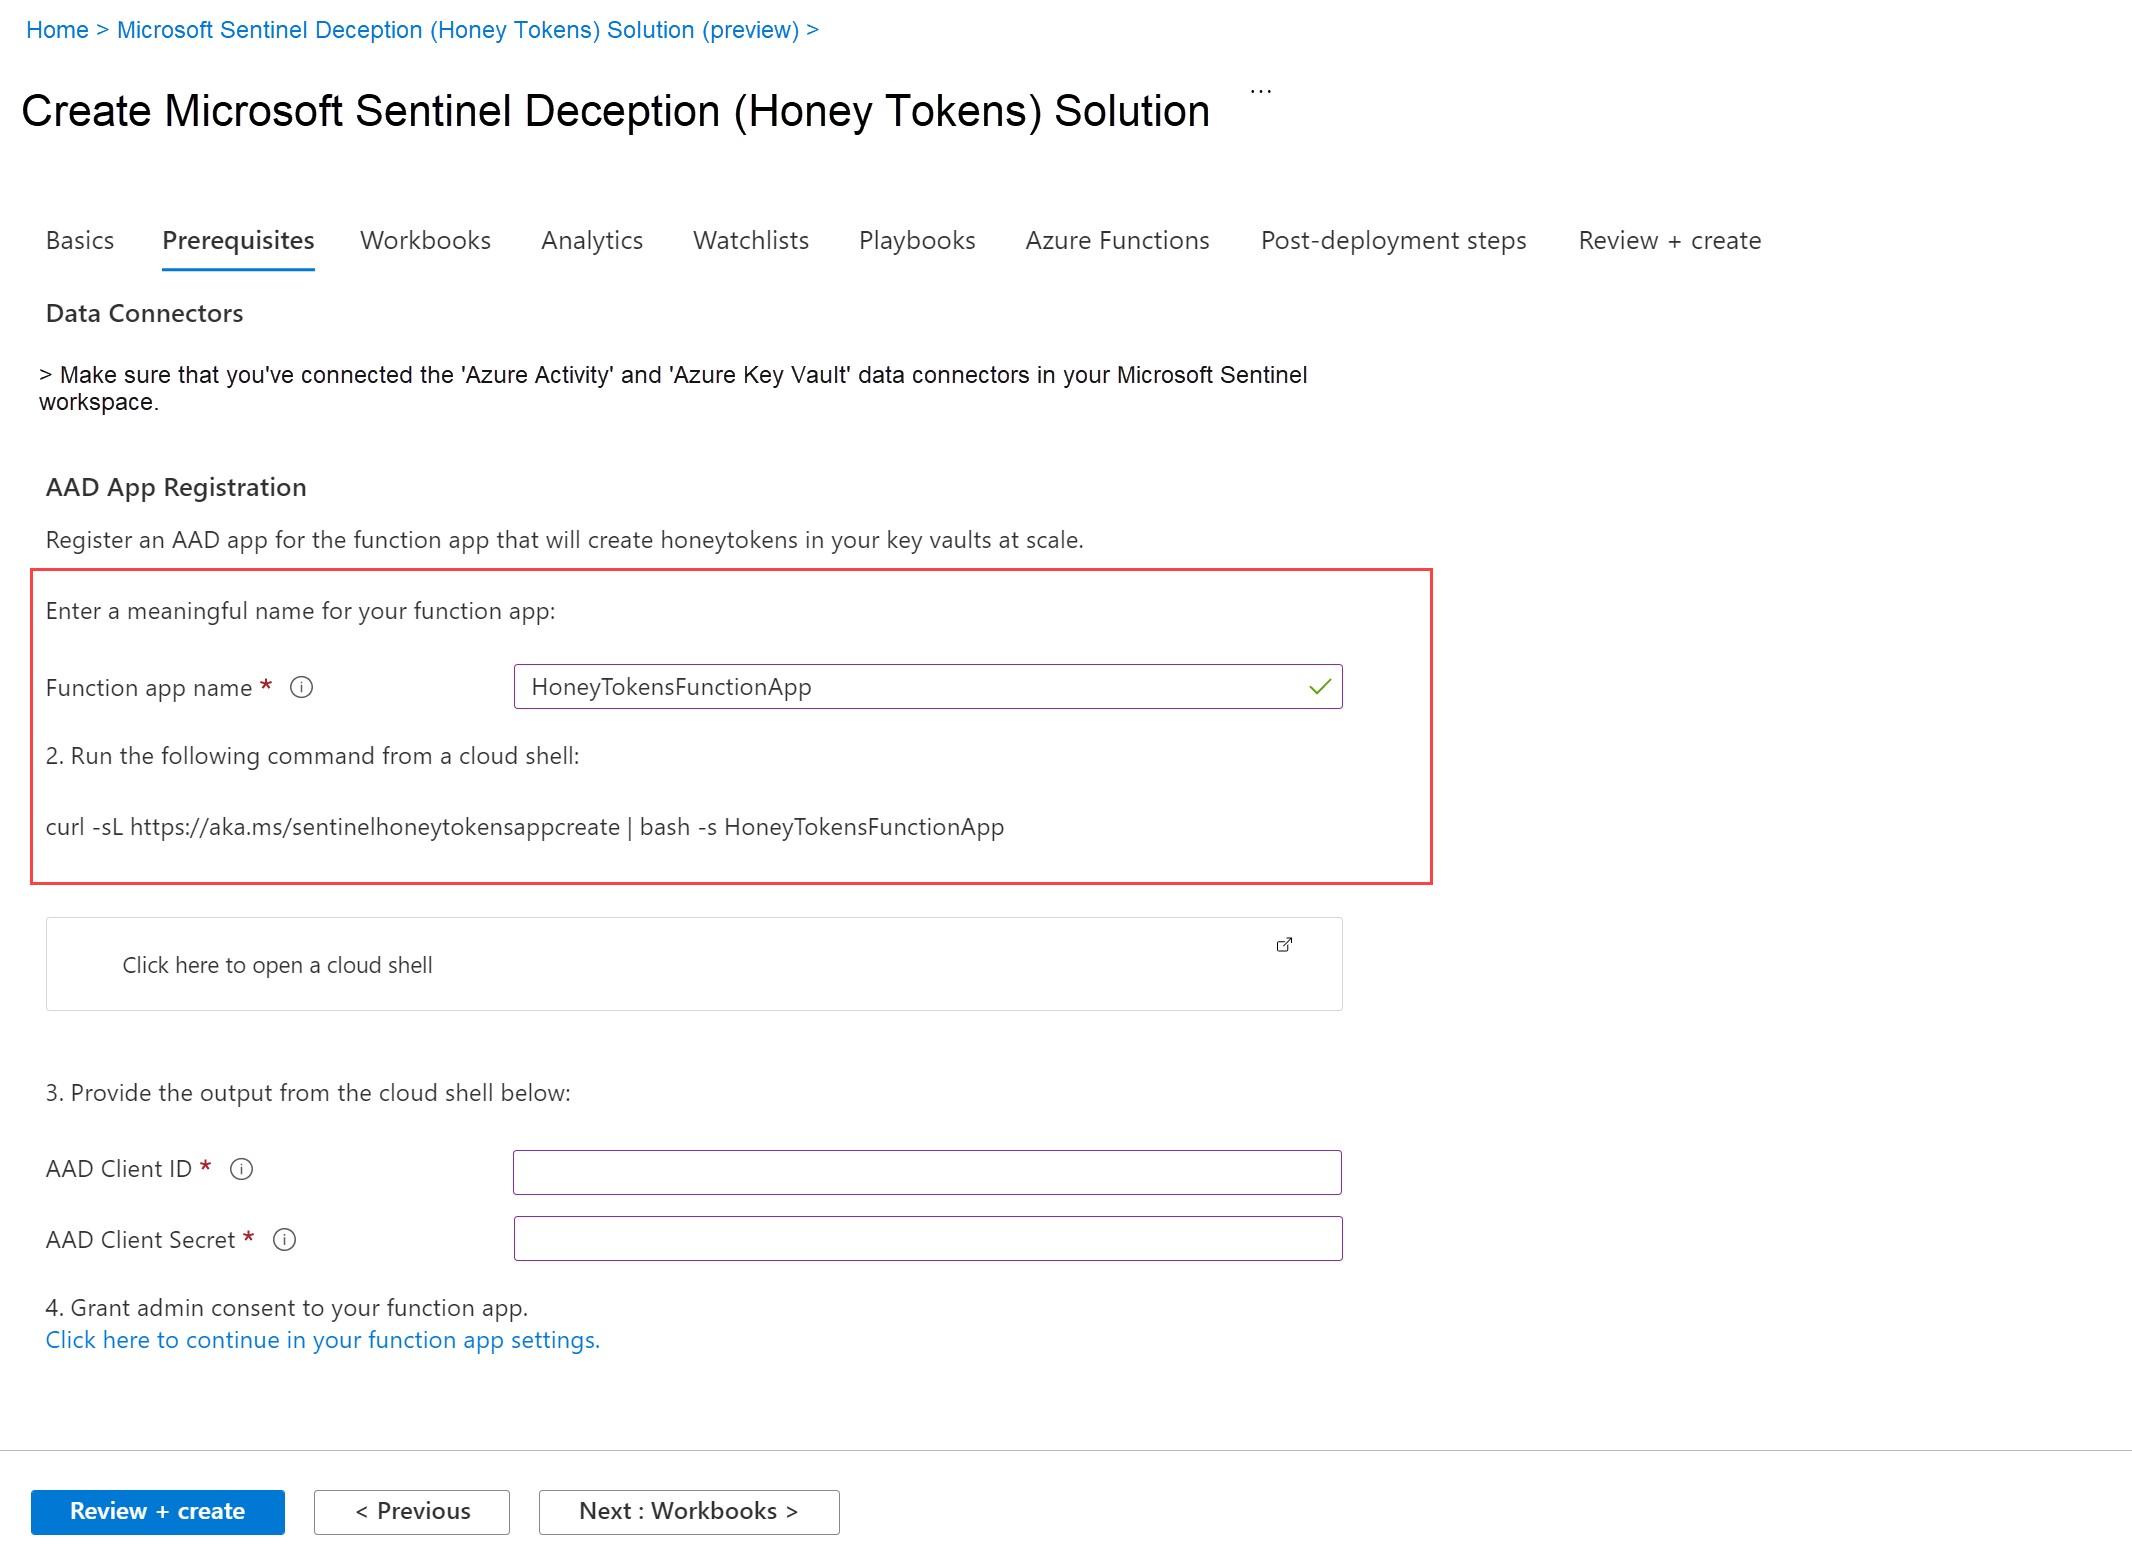
On the Prerequisites tab, in the Function app name field, enter a meaningful name for the Azure function app that will create honeytokens in your key vaults.
The function app name must be unique, between 2-22 characters in length, and alphanumeric characters only.
A command is displayed below with the name you've defined. For example:
-
Select Click here to open a cloud shell to open a Cloud Shell tab. Sign in if prompted, and then run the command displayed.
The script you run creates an Azure AD (AAD) function app, which will deploy your honeytokens. For example:
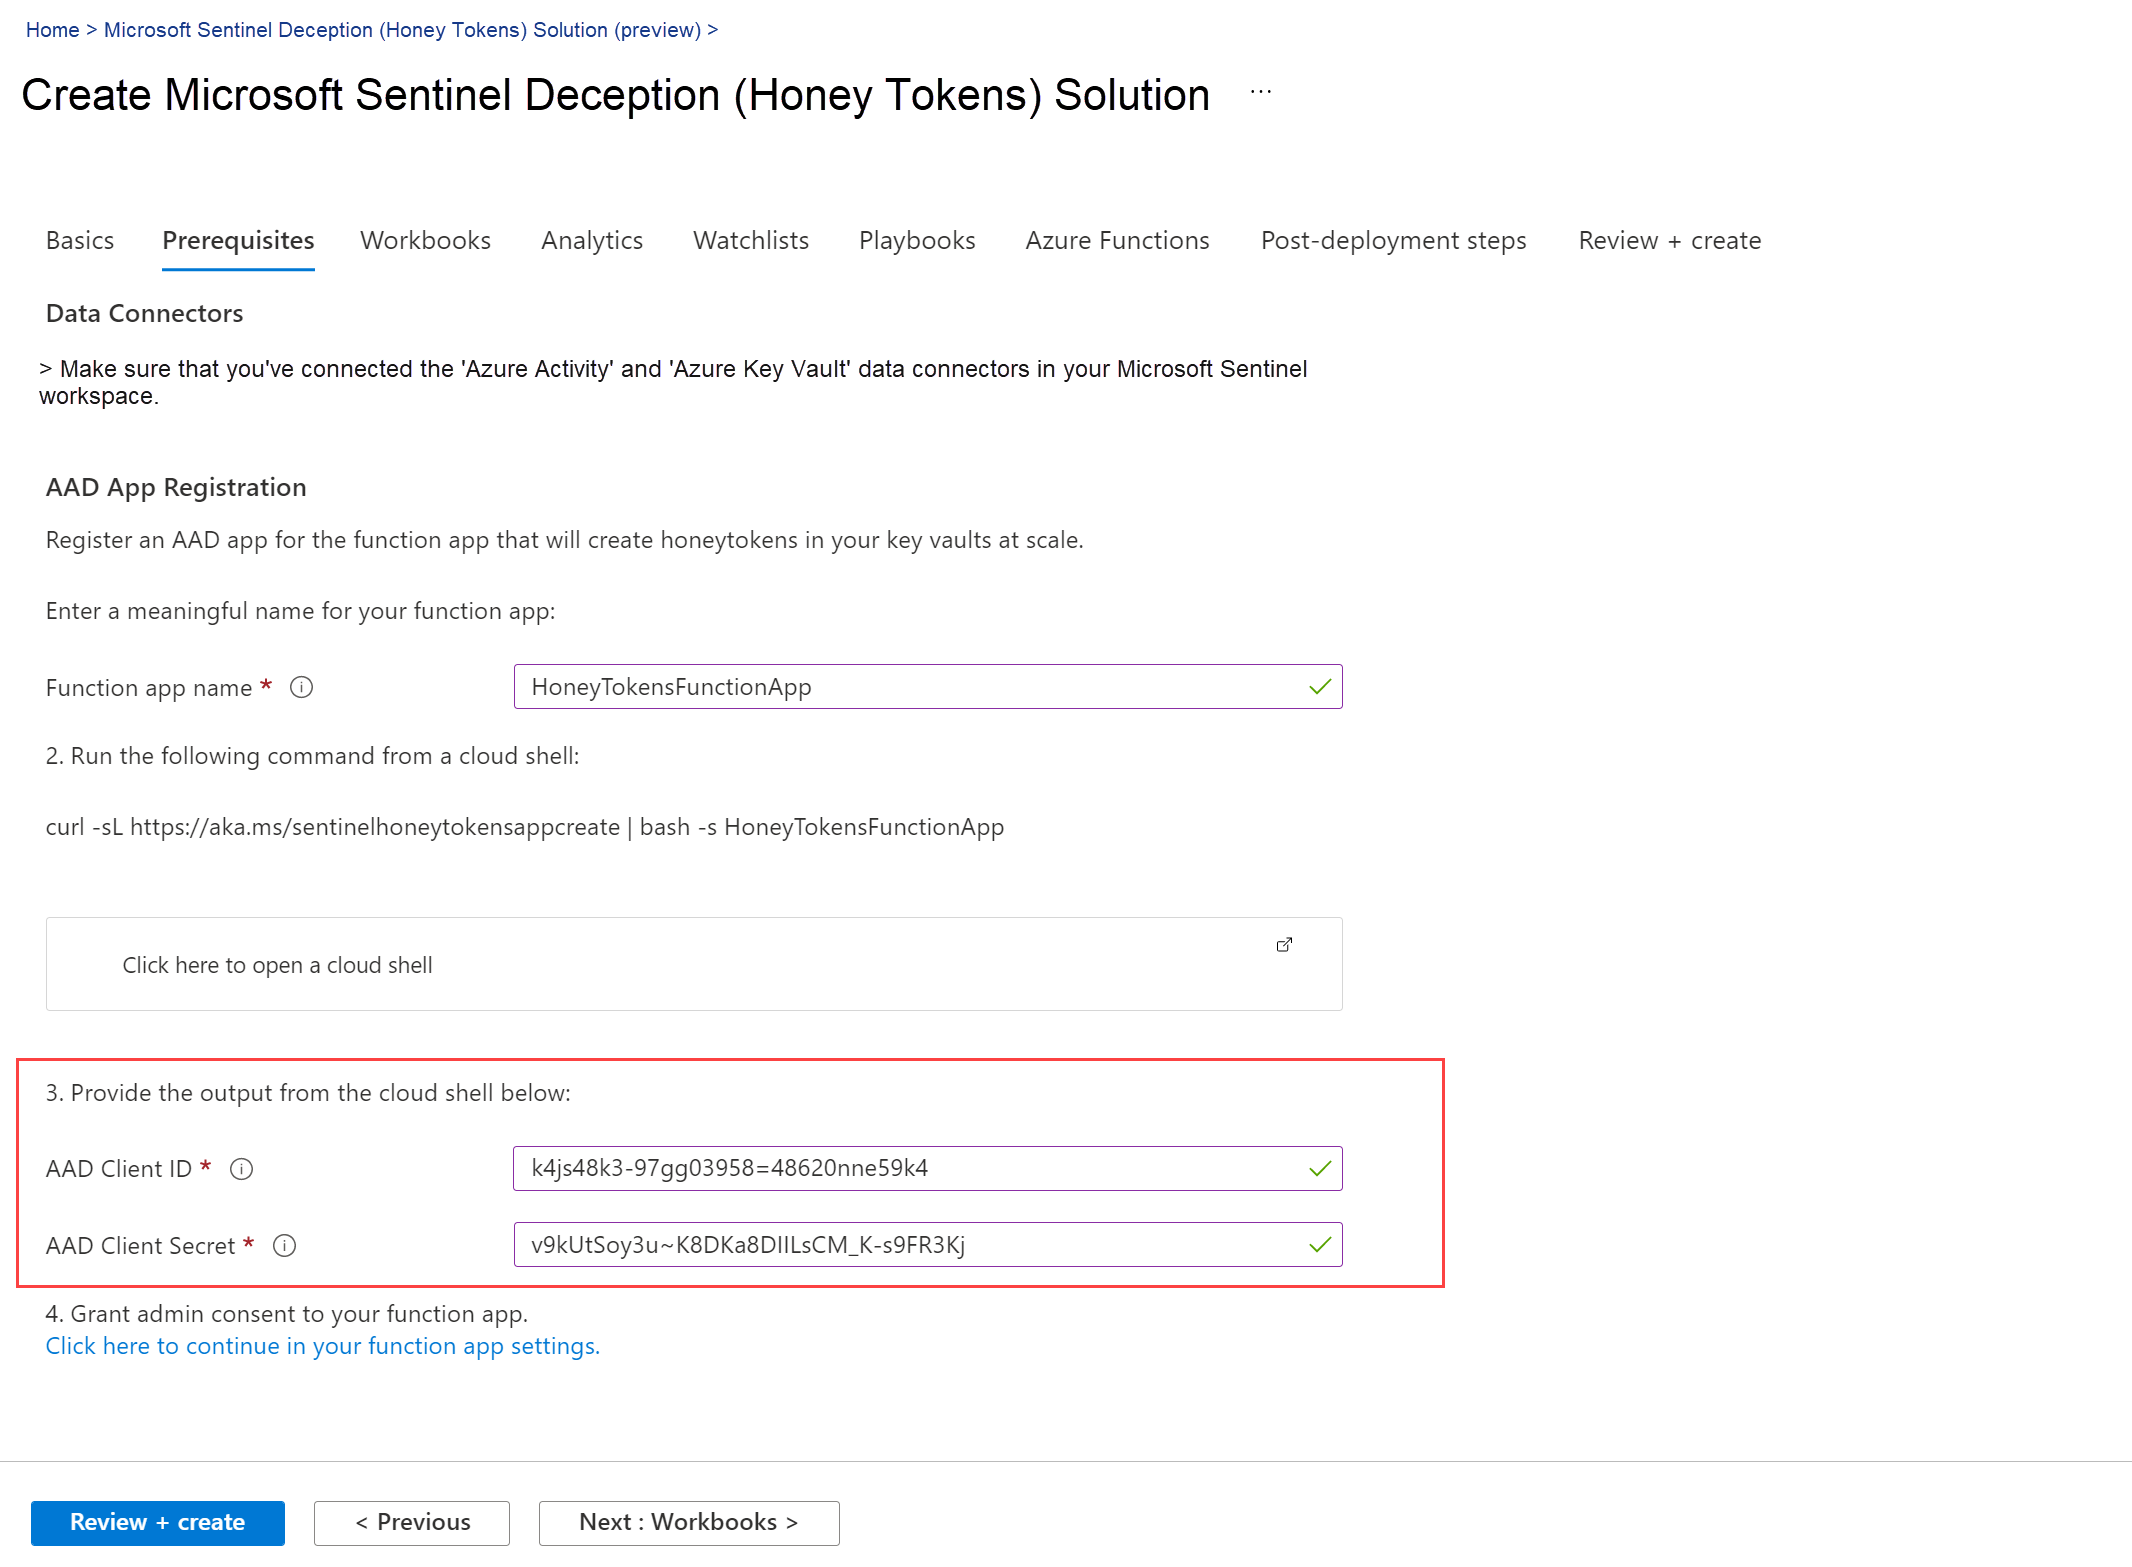
Requesting a Cloud Shell.Succeeded
Connecting terminal...

Welcome to Azure Cloud Shell

Type "az" to use Azure CLI
Type "help" to learn about Cloud Shell

maria@Azure:~$curl -sL https://aka.ms/sentinelhoneytokensappcreate | bash -s HoneyTokenFunctionApp
The script output includes the AAD app ID and secret. For example:
WARNING: The output includes credentials that you must protect. Be sure that you do not include these credentials in your code or check the credentials into your source control. For more information, see https://aka.ms/azadsp-cli function app name: HoneyTokenFunctionApp AAD App Id: k4js48k3-97gg-3958=sl8d=48620nne59k4 AAD App secret: v9kUtSoy3u~K8DKa8DlILsCM_K-s9FR3Kj maria@Azure:~$ -
Back in Microsoft Sentinel, at the bottom of Prerequisites tab, enter the AAD app ID and secret into the relevant fields. For example:
-
Select Click here to continue in your function app settings under step 4. A new browser tab opens in the Azure AD application settings.
Sign in if prompted, and then select Grant admin consent for
<your directory name>to continue. For example: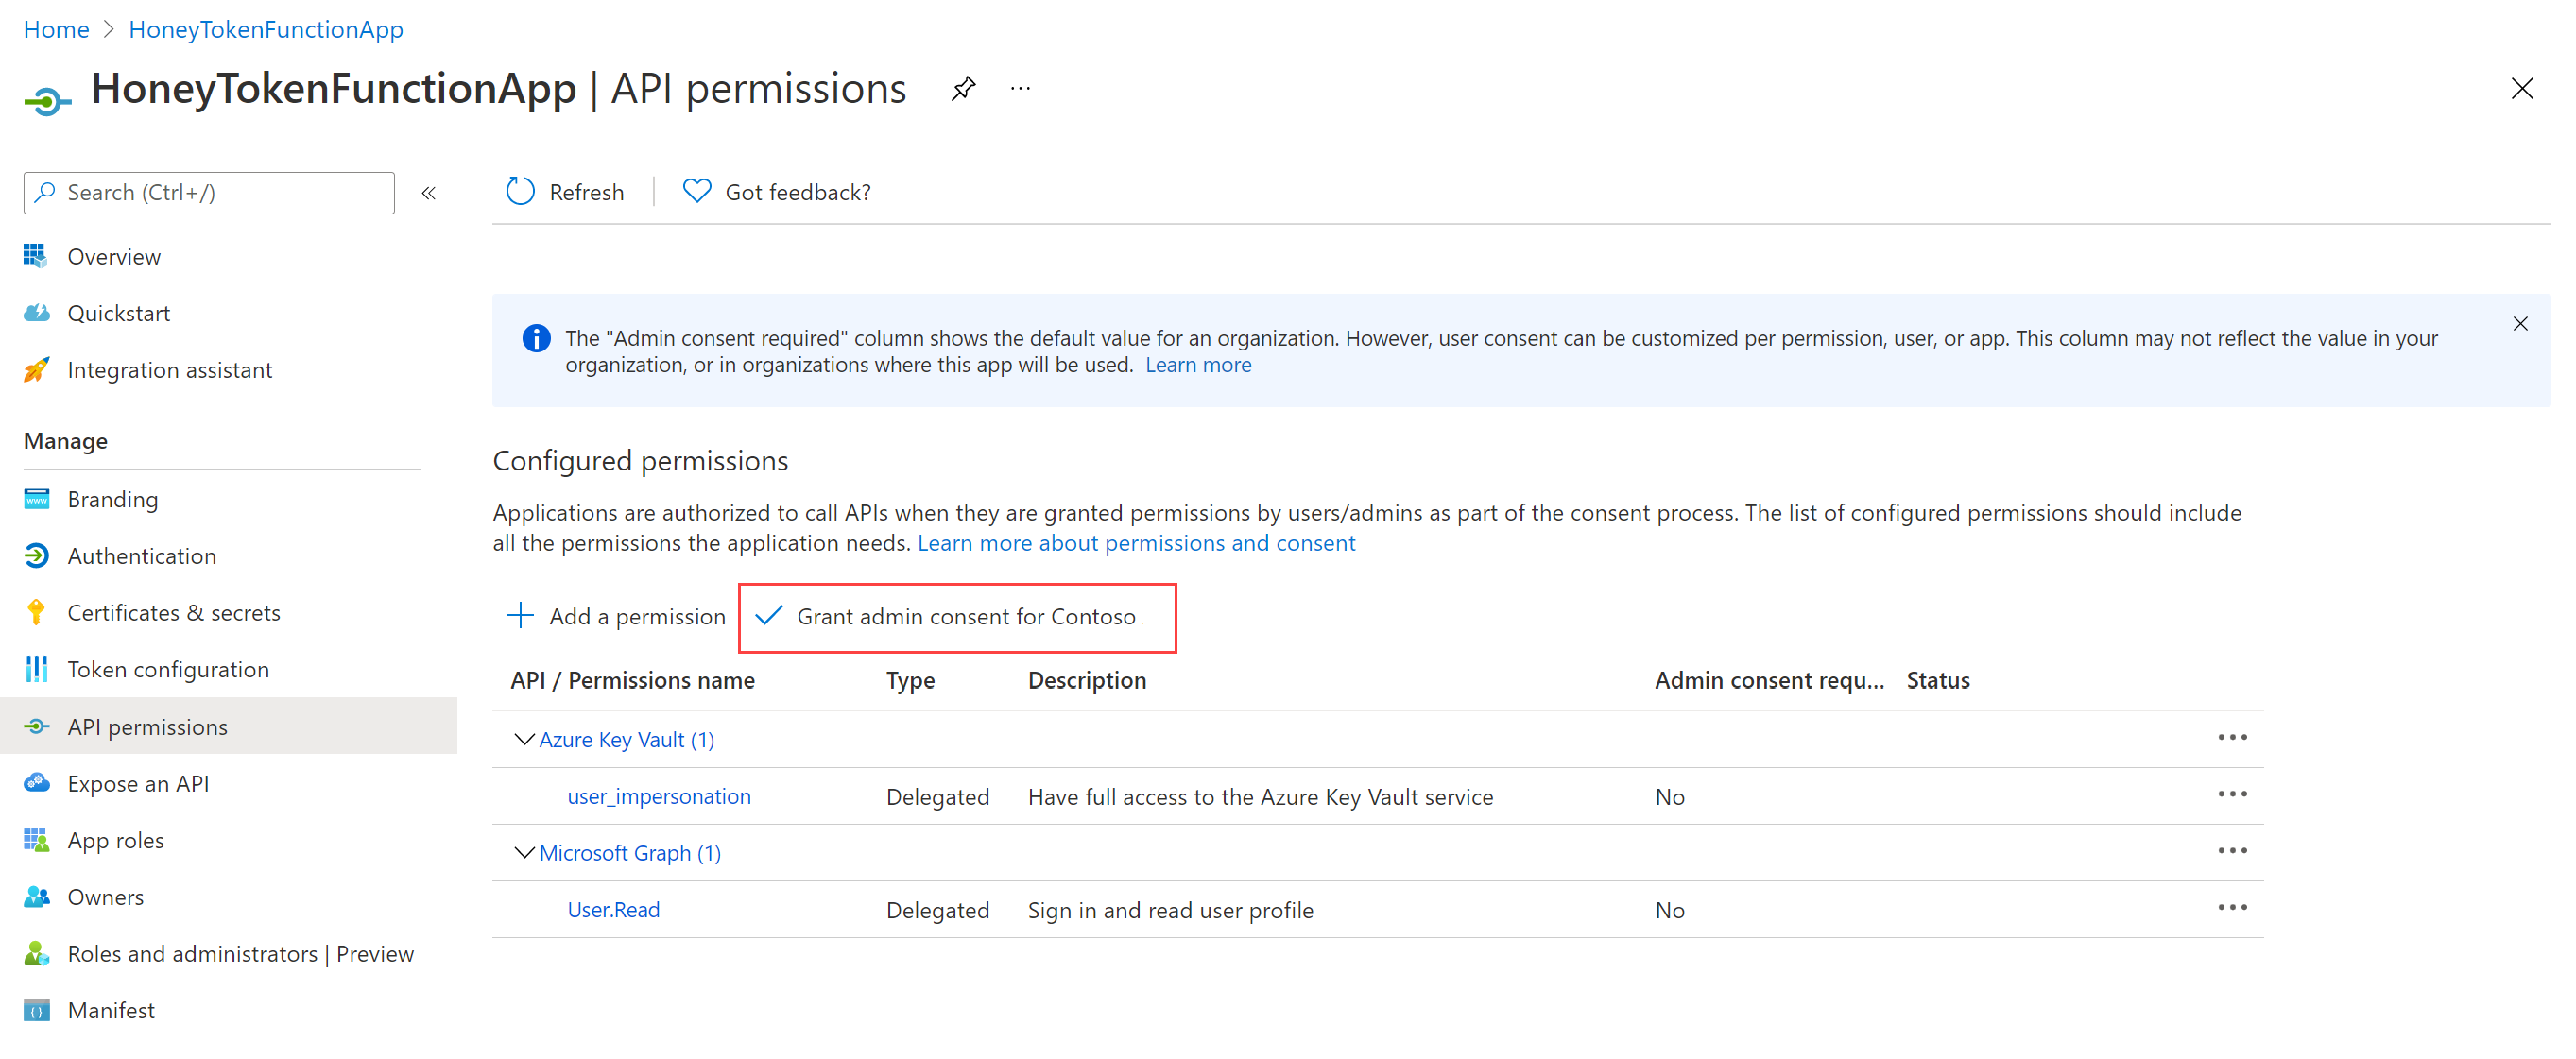
For more information, see Grant admin consent in App registrations.
-
Back in Microsoft Sentinel again, on the Workbooks, Analytics, Watchlists, and Playbooks tabs, note the security content that will be created, and modify the names as needed.
NOTE
Other instructions in this article refer to the HoneyTokensIncidents and SOCHTManagement workbooks. If you change the names of these workbooks, make sure to note the new workbook names for your own reference and use them as needed instead of the default names. -
On the Azure Functions tab, define the following values:
Key vault configuration: The following fields define values for the key vault where you'll store your AAD app's secret. These fields do not not define the the key vault where you'll be deploying honeytokens.
Field Description Service plan Select whether you want to use a Premium or Consumption plan for your function app. For more information, see Azure Functions Consumption plan hosting and Azure Functions Premium plan. Should a new KeyVault be created Select new to create a new key vault for your app's secret, or existing to use an already existing key vault. KeyVault name Displayed only when you've selected to create a new key vault.
Enter the name of the key vault you want to use to store your app's secret. This name must be globally unique.KeyVault resource group Displayed only when you've selected to create a new key vault.
Select the name of the resource group where you want to store the key vault for your application key.Existing key vaults Displayed only when you've selected to use an existing key vault. Select the key vault you want to use. KeyVault secret name Enter a name for the secret where you want to store your AAD app's secret. You'd created this AAP app back in step 3. Honeytoken configuration: The following fields define settings used for the keys and secrets used in your honeytokens. Use naming conventions that will blend in with your organization's naming requirements so that attackers will not be able to tell the difference.
Field Description Keys keywords Enter comma-separated lists of values you want to use with your decoy honeytoken names. For example, key,prod,dev. Values must be alphanumeric only.Secrets Enter comma-separated lists of values you want to use with your decoy honeytoken secrets. For example, secret,secretProd,secretDev. Values must be alphanumeric only.Additional HoneyToken Probability Enter a value between 0and1, such as0.6. This value defines the probability of more than one honeytoken being added to the Key Vault. -
Select Next: Review + create to finish installing your solution.
After the solution is installed, the following items are displayed:
-
A link to your SOCHTManagement workbook. You may have modified this name on the Workbooks tab earlier in this procedure.
-
The URL for a custom ARM template. You can use this ARM template to deploy an Azure Policy initiative, connected to an Microsoft Defender for Cloud custom recommendation, which distributes the SOCHTManagement workbook to key vault owners in your organization.
-
-
The Post-deployment Steps tab notes that you can use the information displayed in the deployment output to distribute the Microsoft Defender for Cloud custom recommendation to all key vault owners in your organization, recommending that they deploy honeytokens in their key vaults.
Use the custom ARM template URL shown in the installation output to open the linked template's Custom deployment page.
For more information, see Distribute the SOCHTManagement workbook.
Deploy your honeytokens
After you've installed the Microsoft Sentinel Deception (Honey Tokens) solution, you're ready to start deploying honeytokens in your key vaults using the steps in the SOCHTManagement workbook.
We recommend that you share the SOCHTManagement workbook with key vault owners in your organization so that they can create their own honeytokens in their key vaults. You may have renamed this workbook when installing the solution. When sharing, make sure to grant Read permissions only.
Deploy honeytokens in your key vaults:
-
In Microsoft Sentinel, go to Workbooks > My Workbooks and open the SOCHTManagement workbook. You may have modified this name when deploying the solution.
-
Select View saved workbook > Add as trusted. For example:
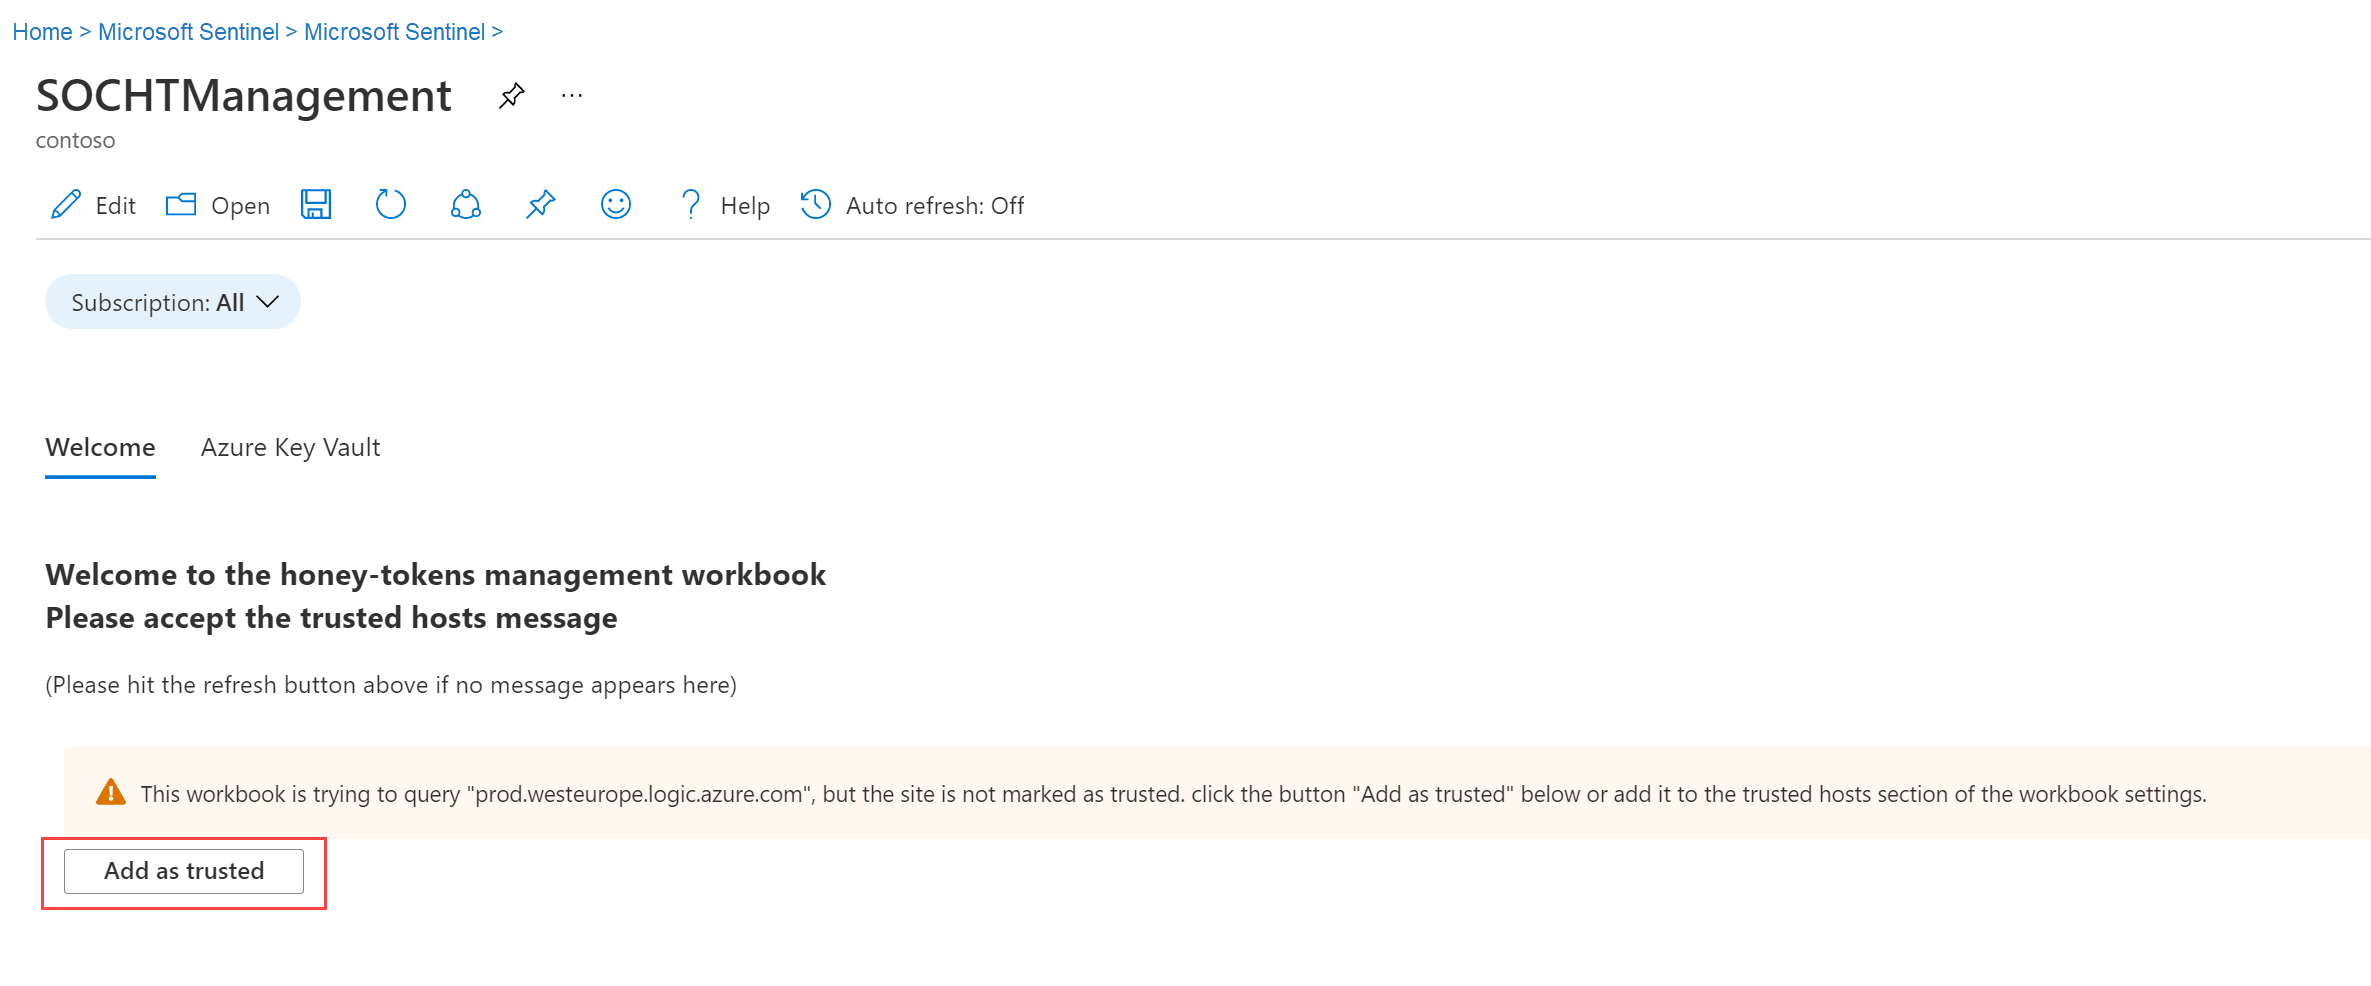
Infrastructure is deployed in your key vaults to allow for the honeytoken deployment.
-
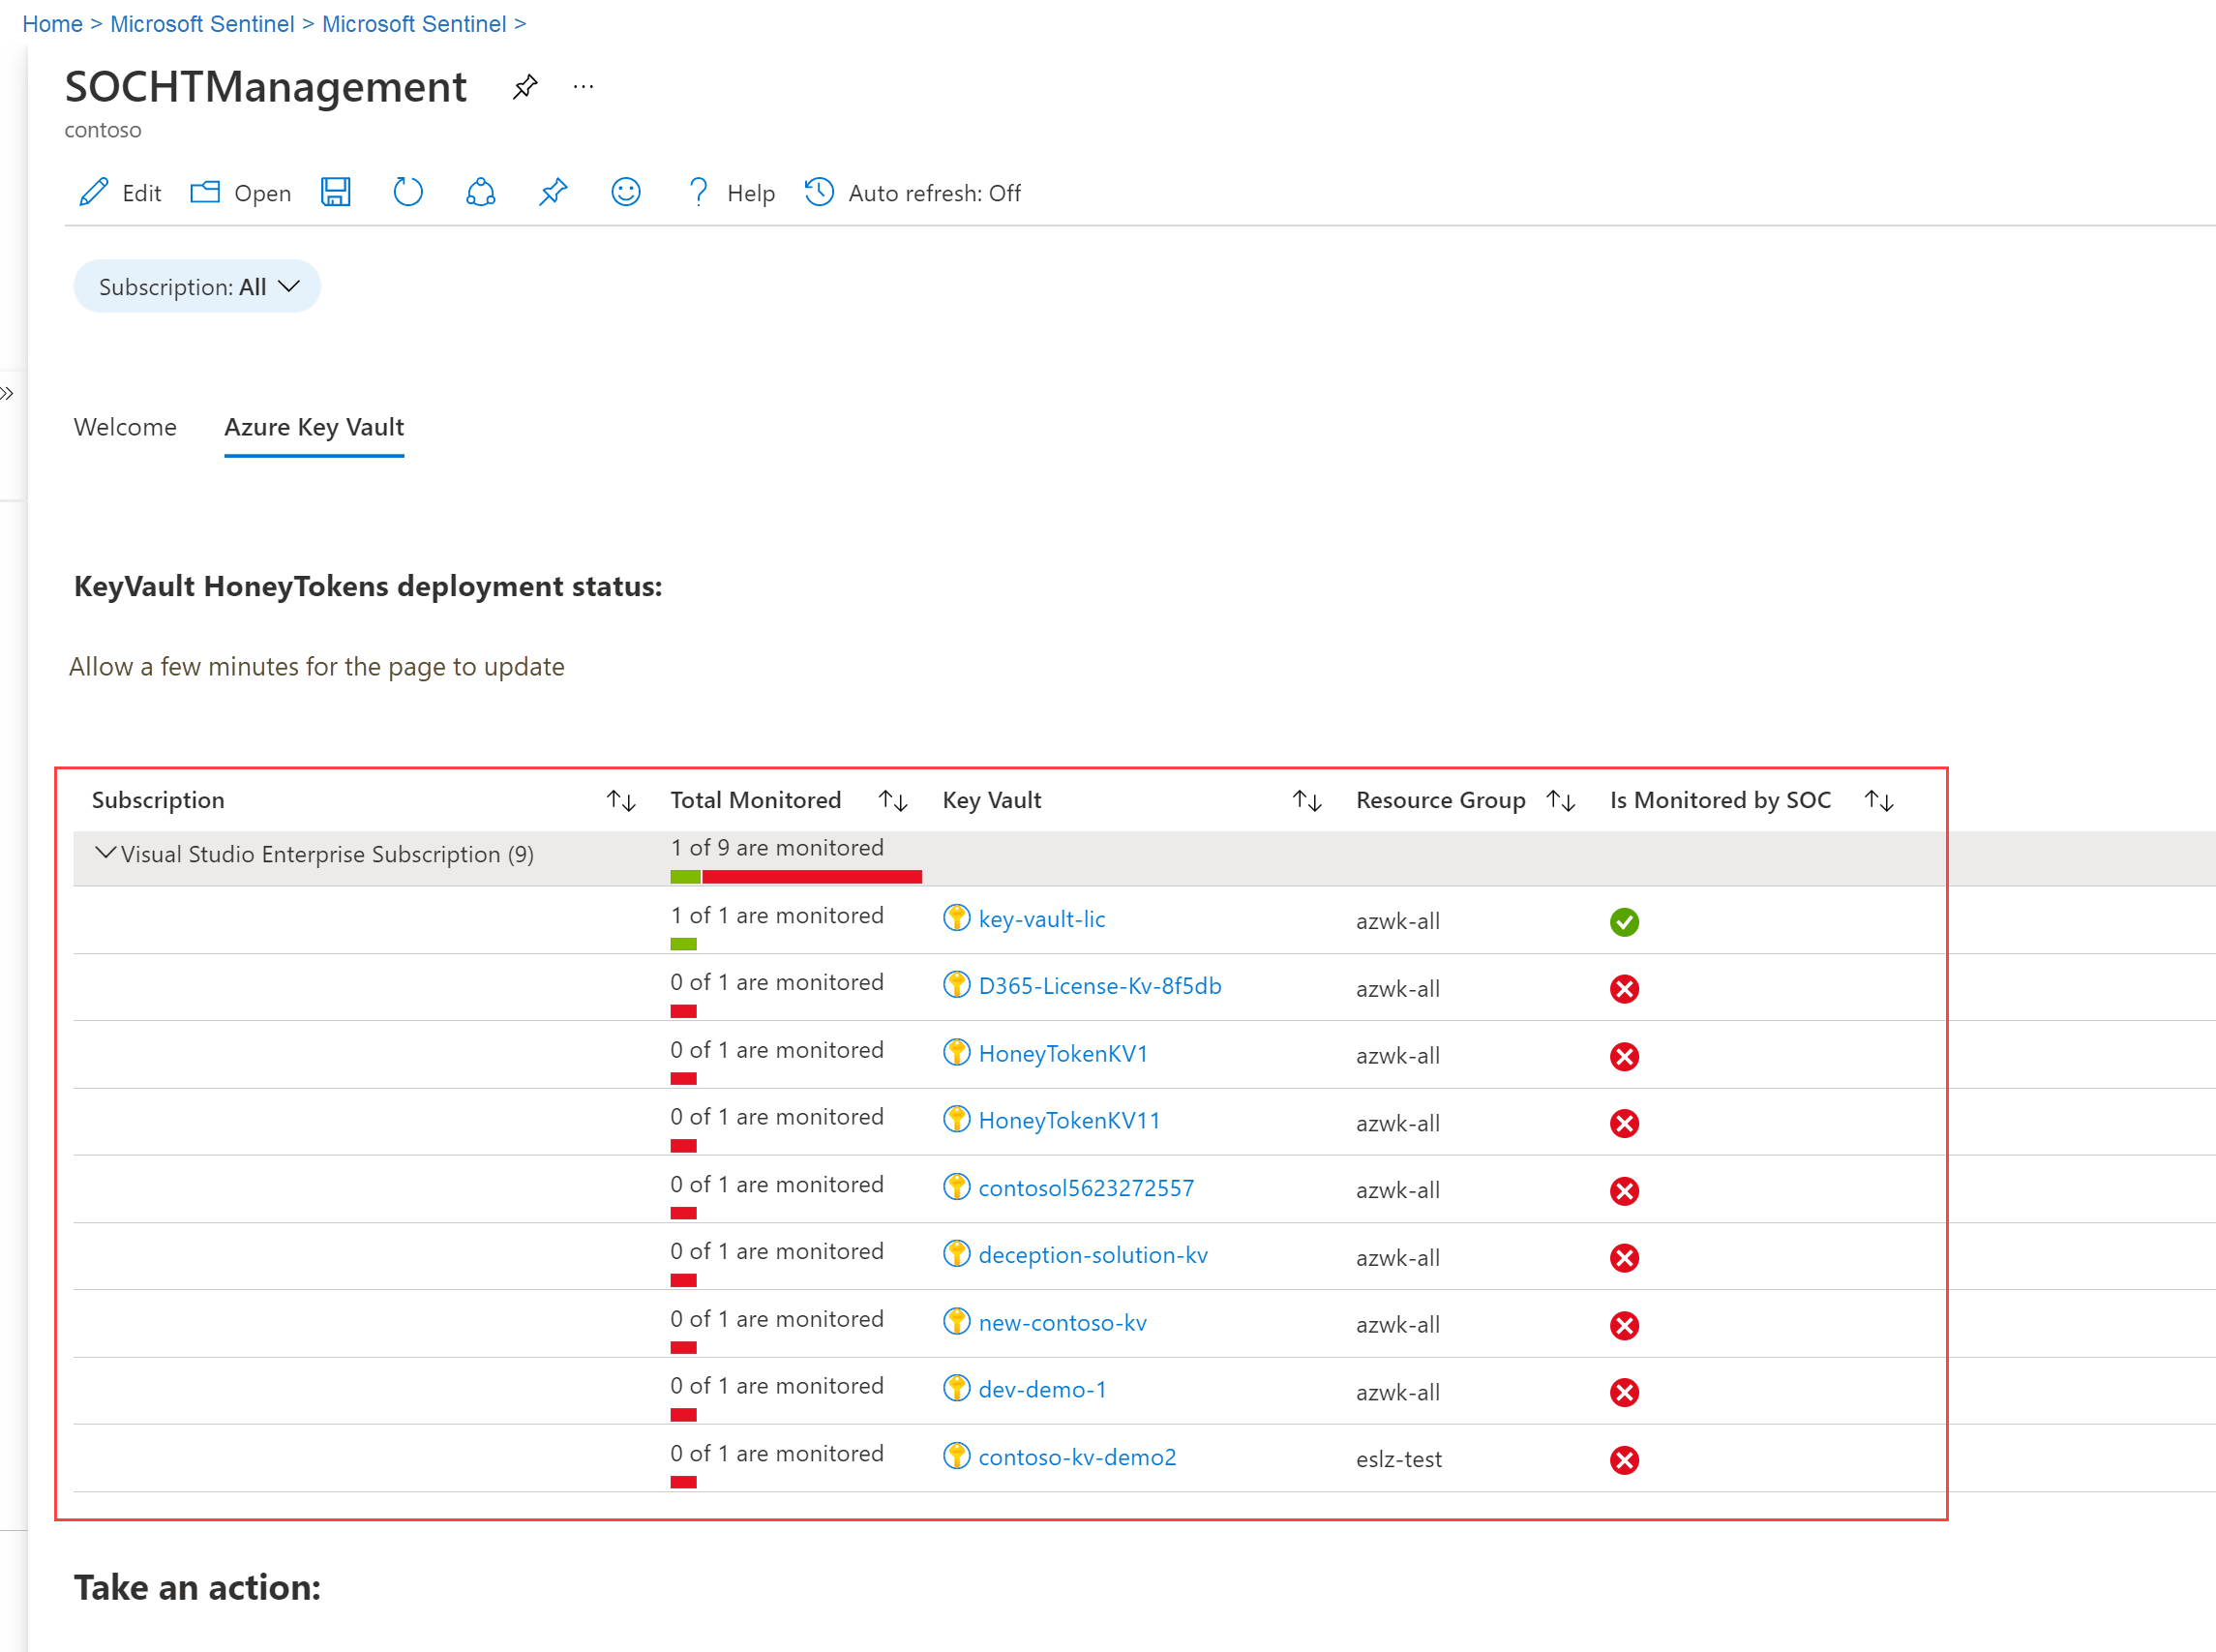
In the workbook's Key Vault tab, expand your subscription to view the key vaults ready to deploy honeytokens and any key vaults with honeytokens already deployed.
In the Is Monitored by SOC column, a green checkmark :::image type="icon" source="media/monitor-key-vault-honeytokens/checkmark.png" border="false"::: indicates that the key vault already has honeytokens. A red x-mark :::image type="icon" source="media/monitor-key-vault-honeytokens/xmark.png" border="false"::: indicates that the key vault does not yet have honeytokens. For example:
-
Scroll down on the workbook page and use the instructions and links in the Take an action section to deploy honeytokens to all key vaults at scale, or deploy them manually one at a time.
Deploy at scale
To deploy honeytokens at scale:
-
Select the Enable user link to deploy an ARM template that deploys a key vault access policy, granting the user ID specified with rights to create the honeytokens.
Sign in if prompted, and enter values for the Project details and Instance details areas for your ARM template deployment. Find your Tenant ID and User object ID on the Azure Active Directory home page for your users.
When you're done, select Review + Create to deploy the ARM template. For example:
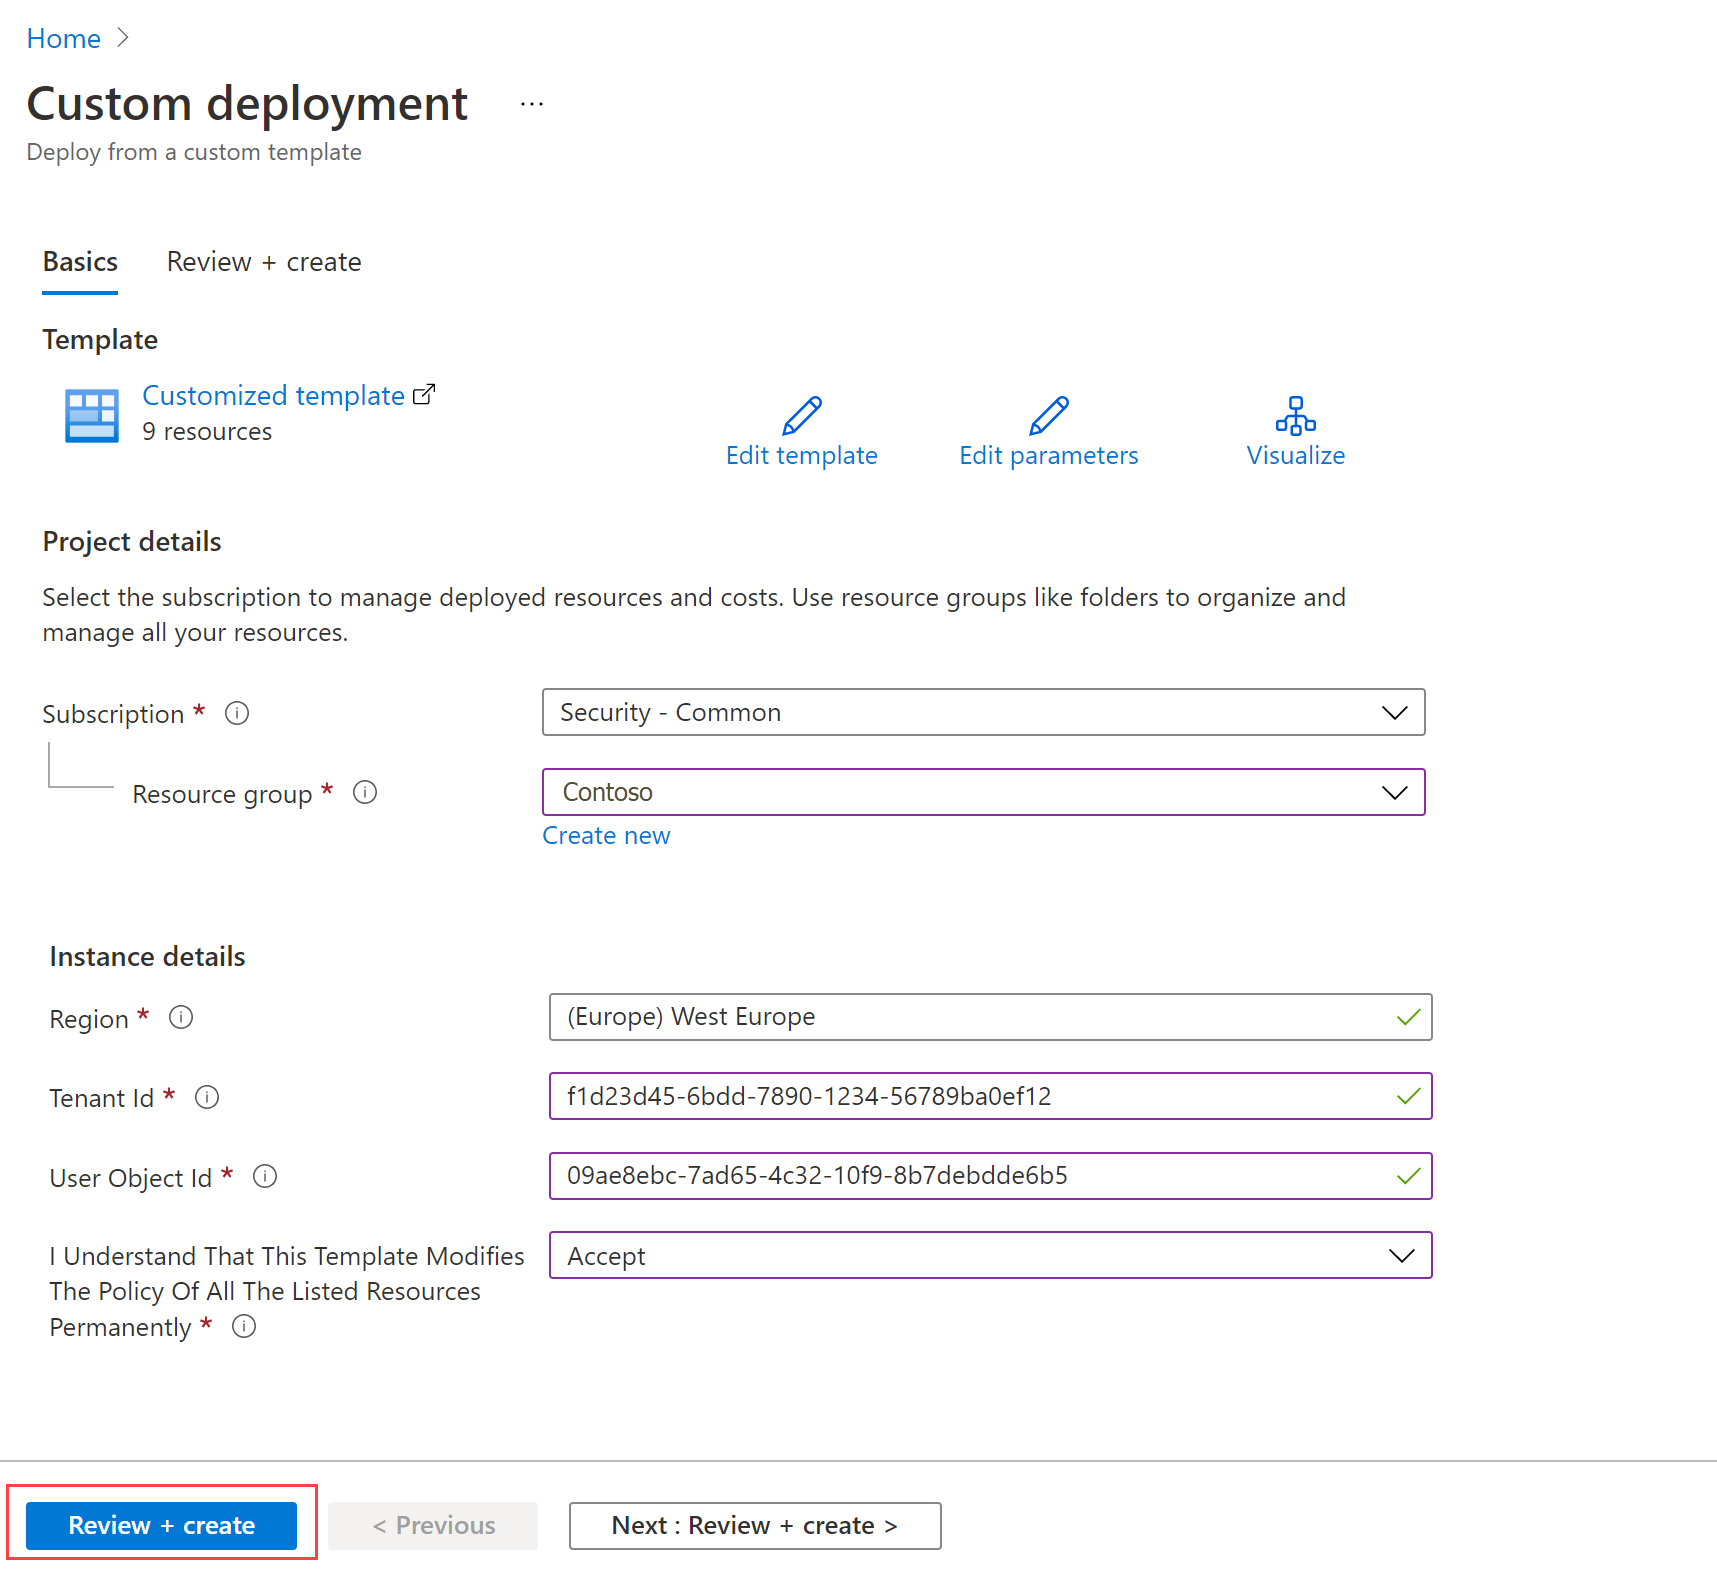
Your settings are validated, and when the validation passes, a confirmation is displayed: Validation Passed
At the bottom of the page, select Create to deploy your ARM template, and watch for a successful deployment confirmation page.
-
Back in Microsoft Sentinel, in your SOCHTManagement workbook > Take an action > Deploy at scale area, select the Click to deploy link to add honeytokens to all key vaults that you have access to in the selected subscription.
When complete, your honeytoken deployment results are shown in a table on a new tab.
-
Make sure to select the Disable your user link to remove the access policy that you'd created earlier. Sign in again if prompted, enter values for your custom ARM deployment, and then deploy the ARM template. This step deploys a key vault access policy that removes the user rights to create keys and secrets.
Deploy a single honeytoken
To deploy a single honeytoken manually:
-
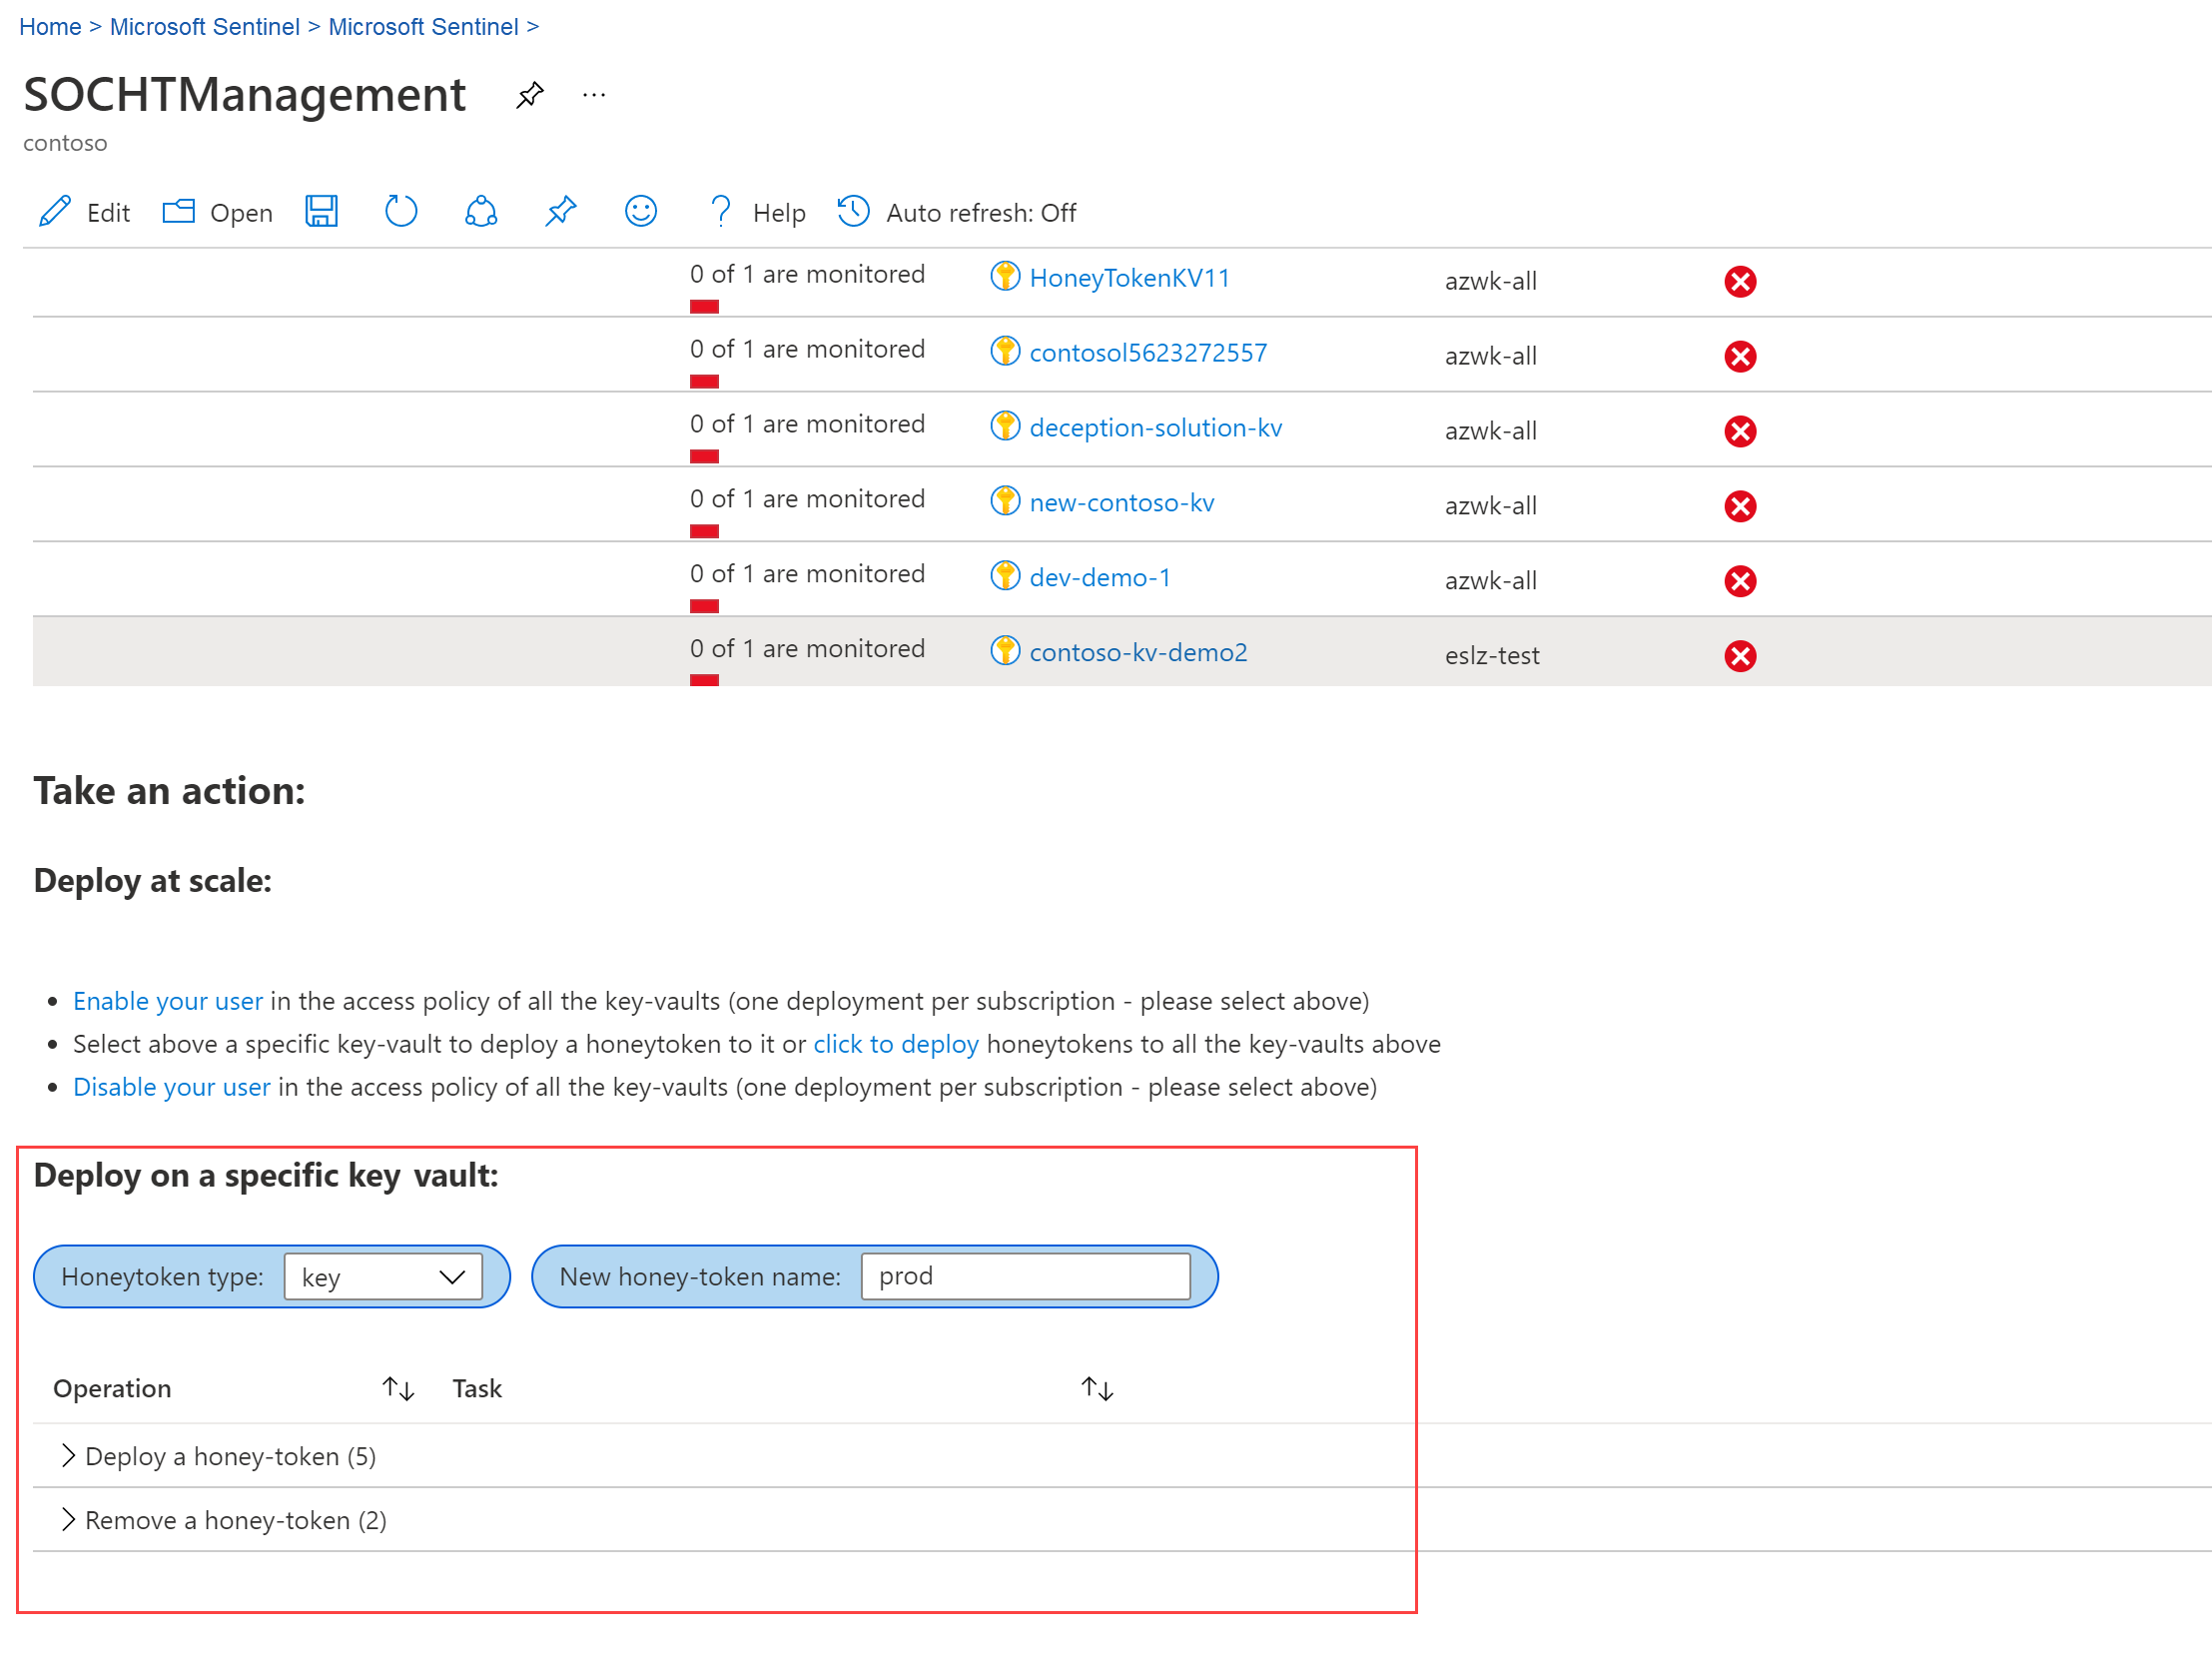
In the table at the top of the page, select the key vault where you want to deploy your honeytoken. The Deploy on a specific key-vault: section appears at the bottom of the page.
-
Scroll down, and in the Honeytoken type dropdown, select whether you want to create a key or a secret. In the New honeytoken name field, enter a meaningful name for your honeytoken. For example:
-
In the Operation table, expand the Deploy a honeytoken section, and select each task name to perform the required steps. Sign in if prompted.
- Select Click to validate the key-vault is audited. In Azure Key Vault, verify that your key vault diagnostic settings are set to send audit events to Log Analytics.
- Select Enable your user in the key-vault's policy if missing. In Azure Key Vault, make sure that your user has access to deploy honeytokens to your required locations. Select Save to save any changes.
- Select Click to add a honeytoken to the key-vault to open Azure Key Vault. Add a new honeytoken, like a new secret, to the configured key vault.
- Select Click to add monitoring in the SOC. If successful, a confirmation message is displayed on a new tab:
Honey-token was successfully added to monitored list.
For more information, see the Azure Key Vault documentation.
NOTE
Make sure to select the Disable back your user in the key-vault's policy if needed link to remove the access policy created grant rights to create the honeytokens.Remove a honeytoken
To remove a specific honeytoken:
-
In the table at the top of the page, select the key vault where you want to remove a honeytoken. The Deploy on a specific key-vault: section appears at the bottom of the page.
-
In the Operation table, expand the Remove a honeytoken section, and select each task name to perform the required steps. Sign in if prompted.
- Select Click to delete the honeytoken from the key-vault to open Azure Key Vault to the page where you can remove your honeytoken.
- Select Send an email to update the SOC. An email is opened in your default email client to the SOC, recommending that they remove honeytoken monitoring for the selected keyvault.
TIP
We recommend that you clearly communicate with your SOC about honeytokens that you delete.
-
You may need to wait a few minutes as the data is populated and permissions are updated. Refresh the page to show any updates in your key vault deployment.
Test the solution functionality
To test that you get alerted for any access attempted to your honeytokens:
-
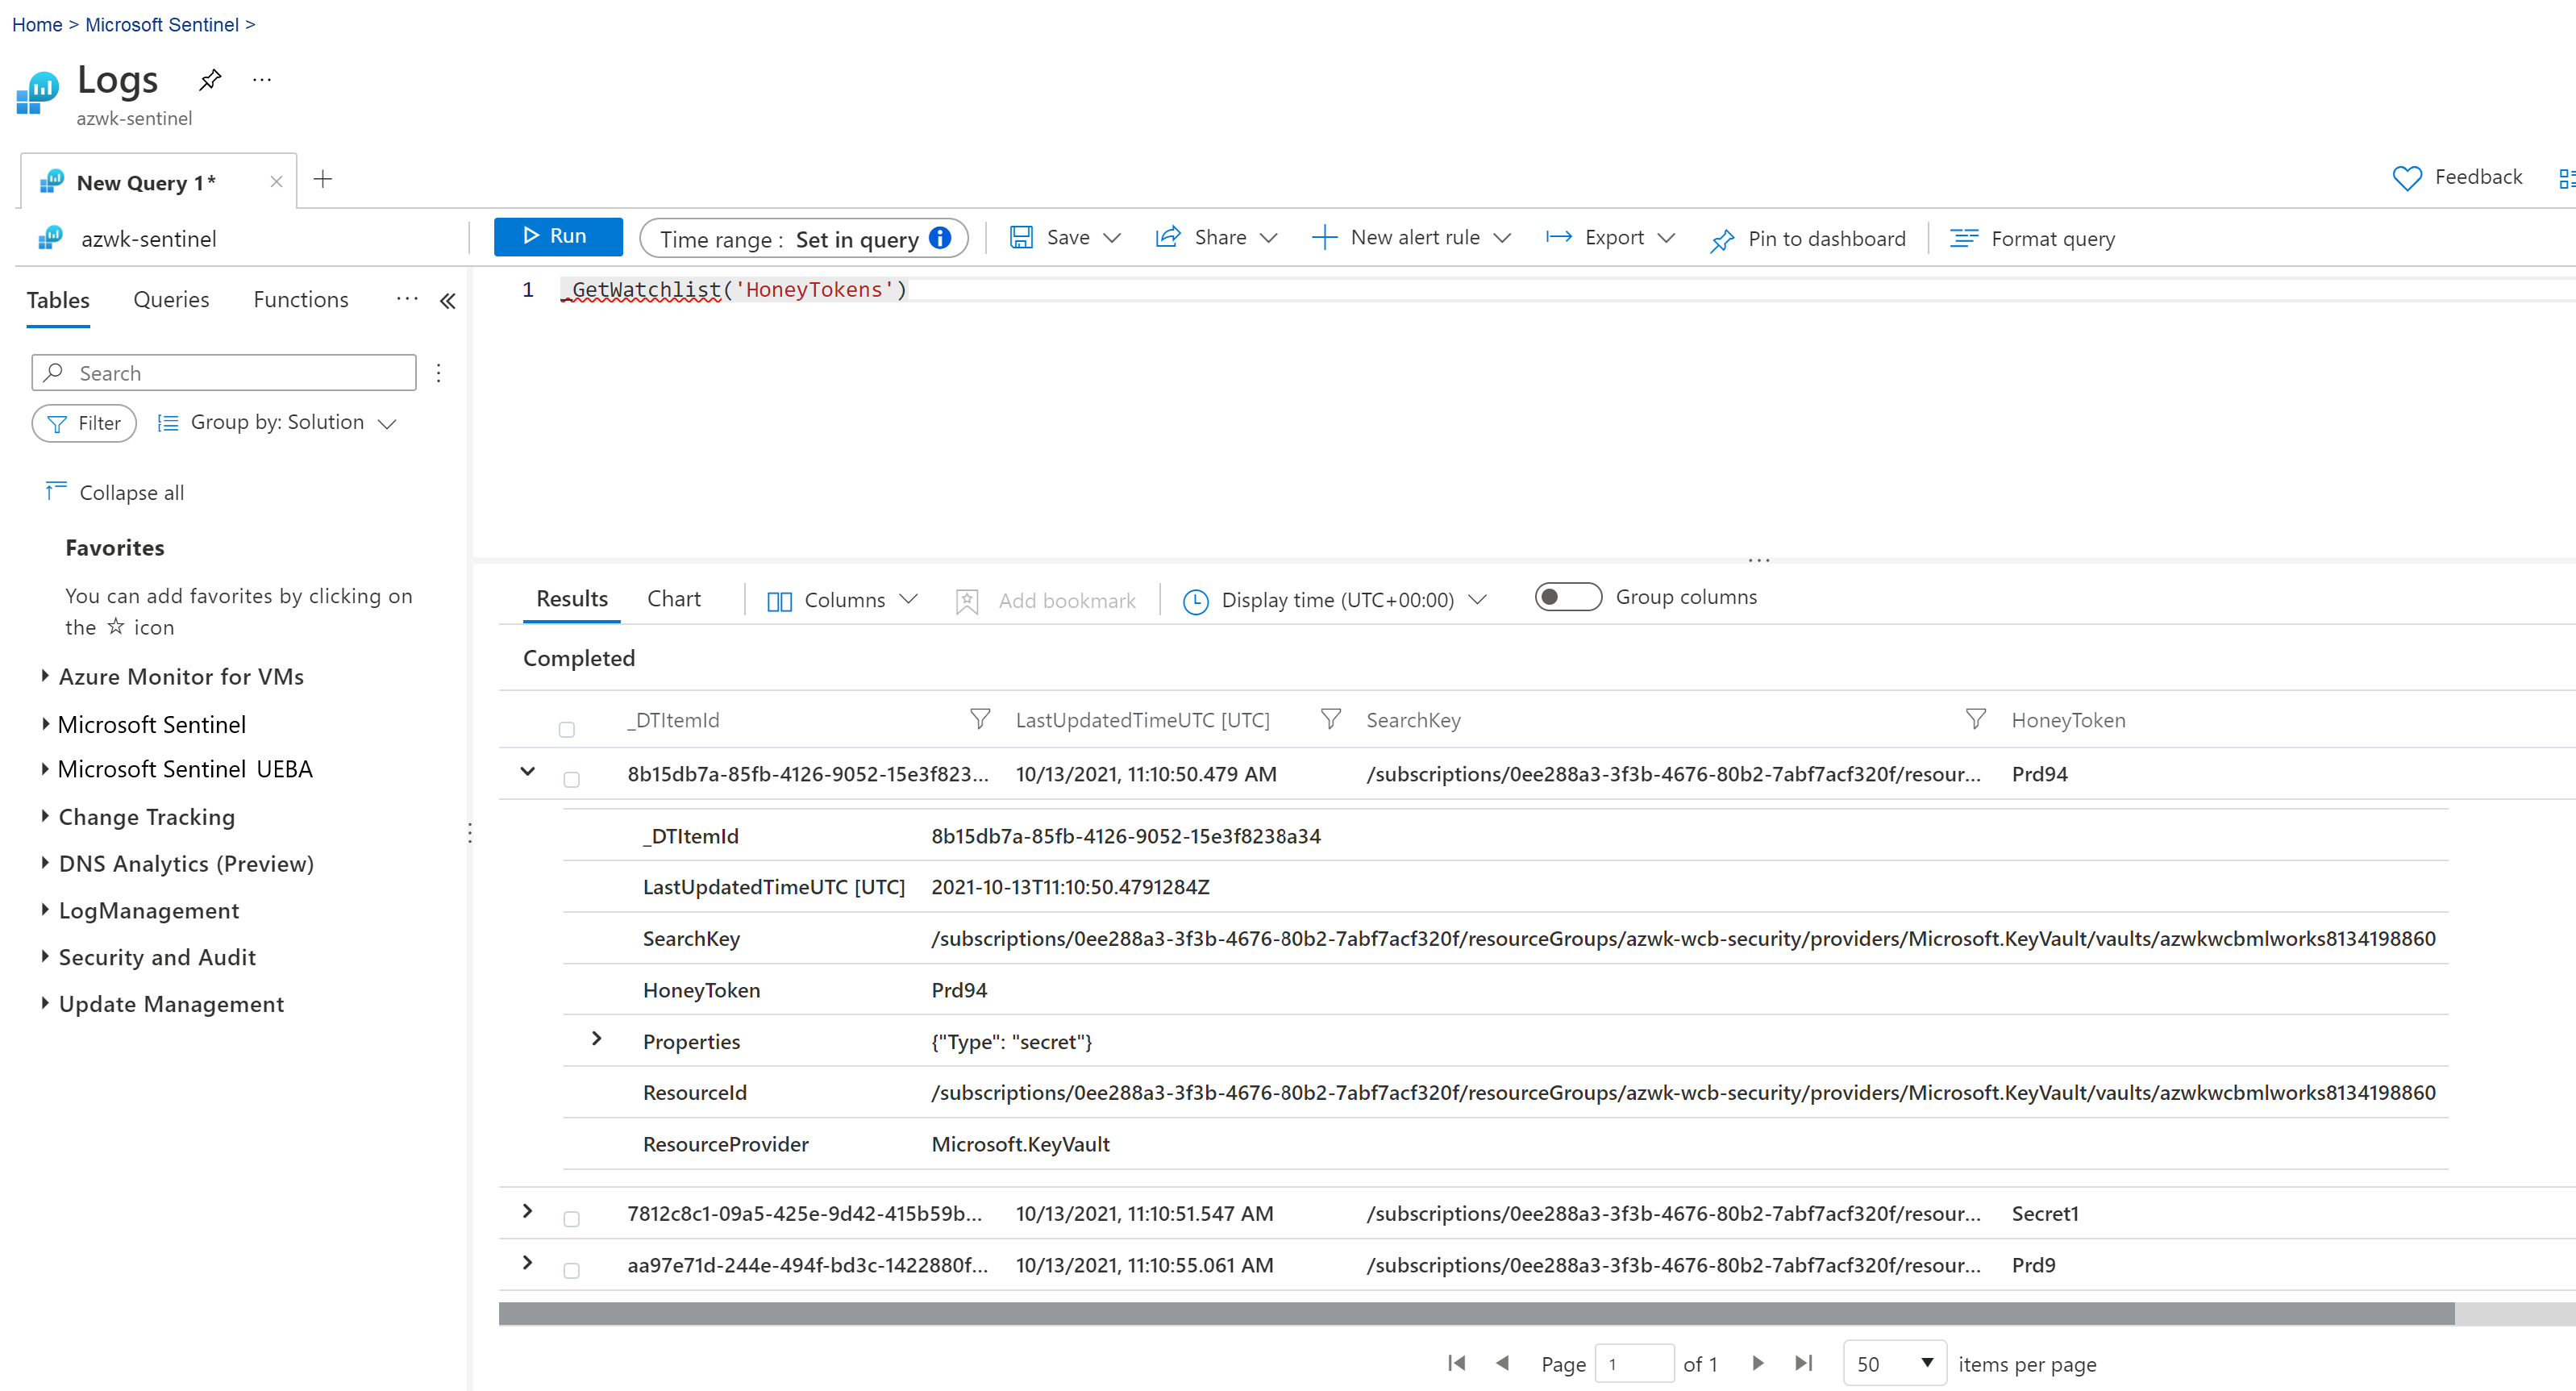
In the Microsoft Sentinel Watchlists page, select the My watchlists tab, and then select the HoneyTokens watchlist.
Select View in Log Analytics to view a list of the current honeytoken values found. In the Logs page, the items in your watchlist are automatically extracted for your query. For example:
For more information, see Use Microsoft Sentinel watchlists.
-
From the list in Log Analytics, choose a honeytoken value to test.
Then, go to Azure Key Vault, and download the public key or view the secret for your chosen honeytoken.
For example, select your honeytoken and then select Download public key. This action creates a
KeyGetorSecretGetlog that triggers an alert in Microsoft Sentinel.For more information, see the Key Vault documentation.
-
Back in Microsoft Sentinel, go to the Incidents page. You might need to wait five minutes or so, but you should should see a new incident, named for example HoneyTokens: KeyVault HoneyTokens key accessed.
Select the incident to view its details, such as the key operation performed, the user who accessed the honeytoken key, and the name of the compromised key vault.
TIP
Any access or operation with the honeytoken keys and secrets will generate incidents that you can investigate in Microsoft Sentinel. Since there's no reason to actually use honeytoken keys and secrets, any similar activity in your workspace may be malicious and should be investigated. -
View honeytoken activity in the HoneyTokensIncident workbook. In the Microsoft Sentinel Workbooks page, search for and open the HoneyTokensIncident workbook.
This workbook displays all honeytoken-related incidents, the related entities, compromised key vaults, key operations performed, and accessed honeytokens.
Select specific incidents and operations to investigate all related activity further.
Distribute the SOCHTManagement workbook
We recommend that you deploy honeytokens in as many key vaults as possible to ensure optimal detection abilities in your organization.
However, many SOC teams don't have access to key vaults. To help cover this gap, distribute the SOCHTManagement workbook to all key vault owners in your tenant, so that your SOC teams can deploy their own honeytokens. You may have modified the name of this workbook when you installed the solution.
You can always share the direct link to the workbook. Alternately, this procedure describes how to use an ARM template to deploy an Azure Policy initiative, connected to an Microsoft Defender for Cloud custom recommendation, which distributes the SOCHTManagement workbook to key vault owners in your organization.
NOTE
Whenever you distribute the workbook, make sure to grant Read access only.
To distribute the SOCHTManagement workbook via Azure Policy initiative
-
From the following table, select a Deploy to Azure buttons to open the ARM template to the Custom deployment page, depending on how you to want to deploy the ARM template. Use the GitHUb links to view the details of what's included in the ARM template, or to customize the ARM template for your environment.
The Deploy to Azure buttons use the same URLs that are shown on the Output tab after the solution installation.
Deployment option Description Deploy to Azure GitHub link Management group Recommended for enterprise-wide deployment 
Example in GitHub Subscription Recommended for testing in a single subscription Example in GitHub Sign in when prompted.
-
On the ARM template's Deception Solution Policy Deployment > Basics tab, select your management group value and region. Then, select Next: Deployment Target > to continue.
-
On the Deployment Target tab, select your management group again, and then select Next: Management Workbook >.
-
On the Management Workbook tab, paste the link to your SOCHTManagement workbook.
You can find the workbook link from the SOCHTManagement workbook in Microsoft Sentinel, and it was also included in the solution deployment's Output tab.
For example, to find the link in the workbook, select Workbooks > My workbooks > SOCHTManagement, and then select Copy link in the toolbar.
-
After entering your workbook link, select Next: Review + create > to continue. Wait for a confirmation message that the validation has passed, and then select Create.
-
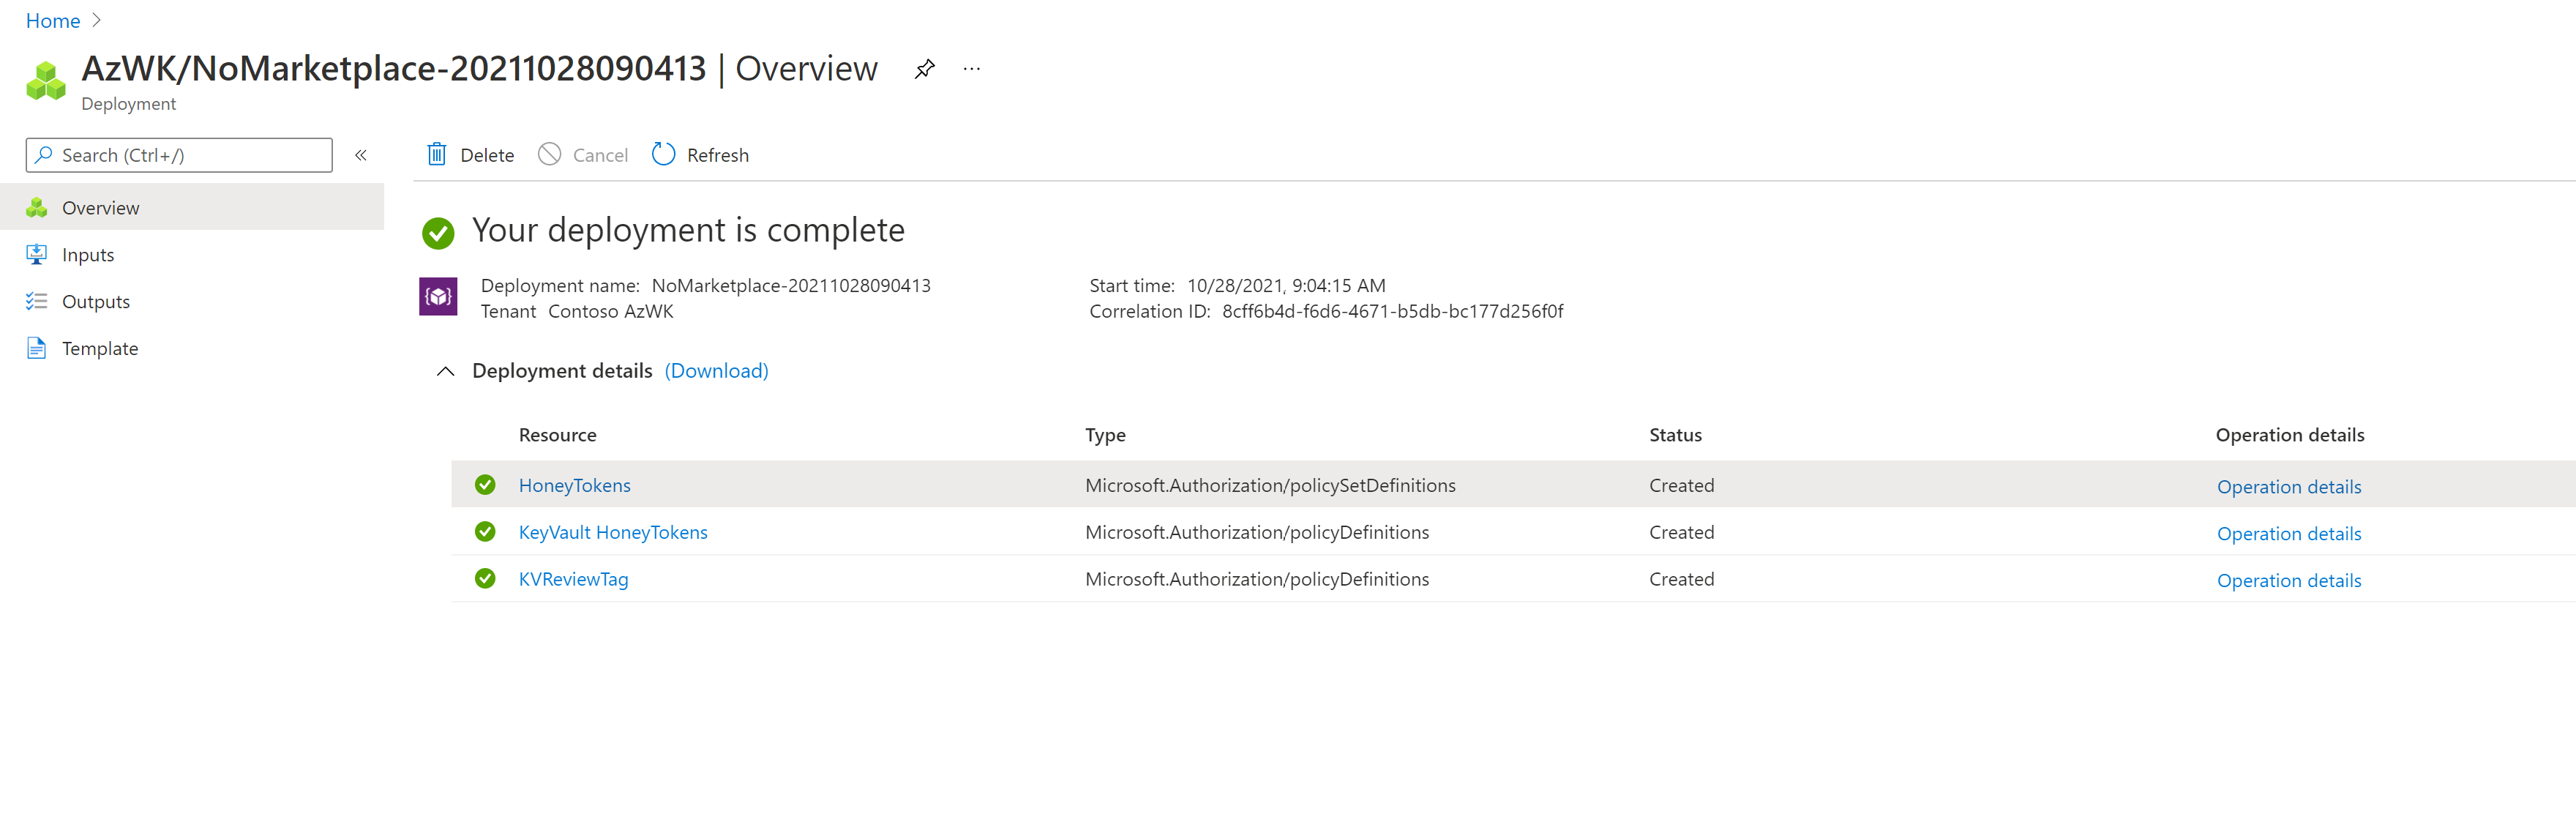
After the deployment is complete, you'll see that the deployment includes a new HoneyTokens initiative and two new policies, named KeyVault HoneyTokens and KVReviewTag. For example:
-
In Azure Policy, assign the new KVReviewTag policy with the scope you need. This assignment adds the KVReview tag and a value of ReviewNeeded to all key vaults in the selected scope.
-
In Azure Policy, under Authoring on the left, select Definitions. Locate your KVReviewTag policy row, and select the options menu on the right.
-
On the Deploy Diagnostic Settings for Activity Log to Log Analytics workspace page, enter required values to deploy the diagnostic settings for your environment.
On the Remediation tab, make sure to select the Create a remediation task option to apply the tag to existing key vaults.
For more information, see the Azure Policy documentation.
-
-
In Microsoft Defender for Cloud, add an audit recommendation to all key vaults in the selected scope:
-
Select Regulatory compliance > Manage compliance policies, and then select your scope.
-
In the details page for the selected scope, scroll down and in the Your custom initatives section, select Add custom initiative.
-
In the HoneyTokens initiative row, select Add.
-
An audit recommendation, with a link to the SOCHTManagement workbook, is added to all key vaults in the selected scope. You may have modified the name of this workbook when installing the solution.
For more information, see the Microsoft Defender for Cloud documentation.
Known issues:
-
If you have Azure firewall enabled, you should approve the IP of the function app that is being deployed with the solution. (You can choose to set a static IP)
See IP addresses in Azure Functions to find the IP of the function.
-
After some non-active time, the function app might switch to sleeping mode. To keep it always on, you can go to the function app > configuration and set “always on” to ‘On’.
-
Sometime the LogicApp HoneyTokensAdd2WLKV shows an error on the API connection. To fix this you should manually connect it following the steps below:
a. Delete the existing API
b. Create a new 'watchlist - add a new watchlist item' node in the same place in the workflow
c. Connect it with a managed identity
d. Copy the body from the failing node to this new node
e. Delete the old (failing) node
Watch our end-to-end demo video
Next steps
For more information, see: