minor fixes - arm endpoint isn't self explaining |
||
|---|---|---|
| .. | ||
| Hybrid-Deployment | ||
| Northwind.Insurance.Website | ||
| Northwind.Insurance.Website.sln | ||
| README.md | ||
README.md
Azure Stack to Azure Hybrid Connection with WebApp
Technical guidance
Contents
1.1 Context and Considerations
4 Deploying Azure Stack Resources
4.1 Preparing Parameters (Azure Stack)
4.2 Deploying Template (Azure Stack)
5.1 Preparing Parameters (Azure)
5.2 Deploying Template (Azure)
6.1 Azure Stack Connection Configuration
6.2 Azure Connection Configuration 14
7 Configuring WebApp for VNET Routing
7.1 Configuring Point to Site Connection
7.2 Configuring Vnet Integration for WebApp
7.3 Syncing Routes and Cert for Appserver
8.1 Verifying Azure VPN tunnel
8.2 Verifying WebApp Application Settings
8.3 Verifying Appsettings.Json file
9.1 Configuring BGP for Azure Stack Development Kit Only
9.2 Using the North Wind WebApp
Overview
This reference article details environmental requirements and steps for setting up Azure to Azure Stack Hybrid Connections.
Microsoft is the only cloud provider that offers a truly consistent hybrid cloud platform, including a consistent hybrid networking experience. Setting a hybrid connection between an Azure Virtual Network and Azure Stack Virtual Network is simple, using the same process in each cloud.
The hybrid network provides secure access between a virtual network in Azure and a virtual network in Azure Stack. Endpoints in Azure, including App Service applications linked to a virtual network, can communicate with endpoints in Azure Stack as if they were on the same network.
Context and Considerations
There are some distinctions between one-node Azure Stack Development Kit (ASDK), and multi-node Azure Stack Integrated System (ASIS).
ASDK utilizes a public IP address, while maintaining its own VM with a separate and defined private network.
Azure Stack Integrated System integrates with your datacenter and has an entire IP address range to delegate to the system during installation. This requires some specialized setup and configuration for the Azure stack isolated environment. Software-defined networking requires only four cables connecting an Azure Stack machine to the outside network.
When to Use This Pattern
Use hybrid cloud resources to implement a Hybrid Connection
-
Hybrid Connectivity is a foundational pattern that allows you securely access resources in an Azure Stack deployment from Azure.
-
Certain data must live on-premises because of privacy or regulatory requirements.
-
Maintain a legacy system while utilizing cloud-scaled app deployment.
Prerequisites
Azure Stack
-
Firewall and or router appliance needs to know how to route traffic to and from Azure Stack environment
-
An Azure Stack Environment.
For information on how to deploy Azure Stack Development Kit see ASDK-Install
-
Azure Stack environment has SQLRP deployed and configured.
For information on how to deploy Azure Stack Development Kit see Azure Stack-SQL-Resource-Provider-Deploy
-
SQL Server 2016 image added to your Azure Stack Marketplace.
For information on how to add Marketplace images from Azure Marketplace see Adding-Images
-
Plans, Offers and Quotas Configured.
For information on how to configure Quotas, Offers and Plans see Plan-Offer-Quota-Overview
-
A tenant subscribed to your Azure Stack Offer/Plan.
For information on how to Subscribe to an offer see. Subscribe-to-an-Offer
Azure
- An Azure Subscription
If you don't have an Azure subscription, create a free account before you begin.
-
The Azure user needs to have a GitHub Account linked to email
-
The Azure user needs to have access to the GitHub Repository
For information on how to add Collaborators see Adding-Collaborators
-
You must approve a connection from Azure to GitHub before you begin the deployment. This can be accomplished by manually creating a WebApp from the Azure portal, clicking on the Deployments options and setting up the access to the GitHub repository.
Before you begin
Verify that you have met the following criteria before beginning your configuration:
-
Verify that you have an externally facing public IPv4 address for your VPN device. This IP address cannot run through network address translation (NAT).
-
Ensure all resources are deployed in the same region/location.
For more information about VPN Gateway settings in general, see About VPN Gateway Settings.
Note: If you are using an ASDK environment please Complete Appendix Section 9.1
Reference Architecture
This section details the reference architecture that can be used as a guidance to implement the offer.
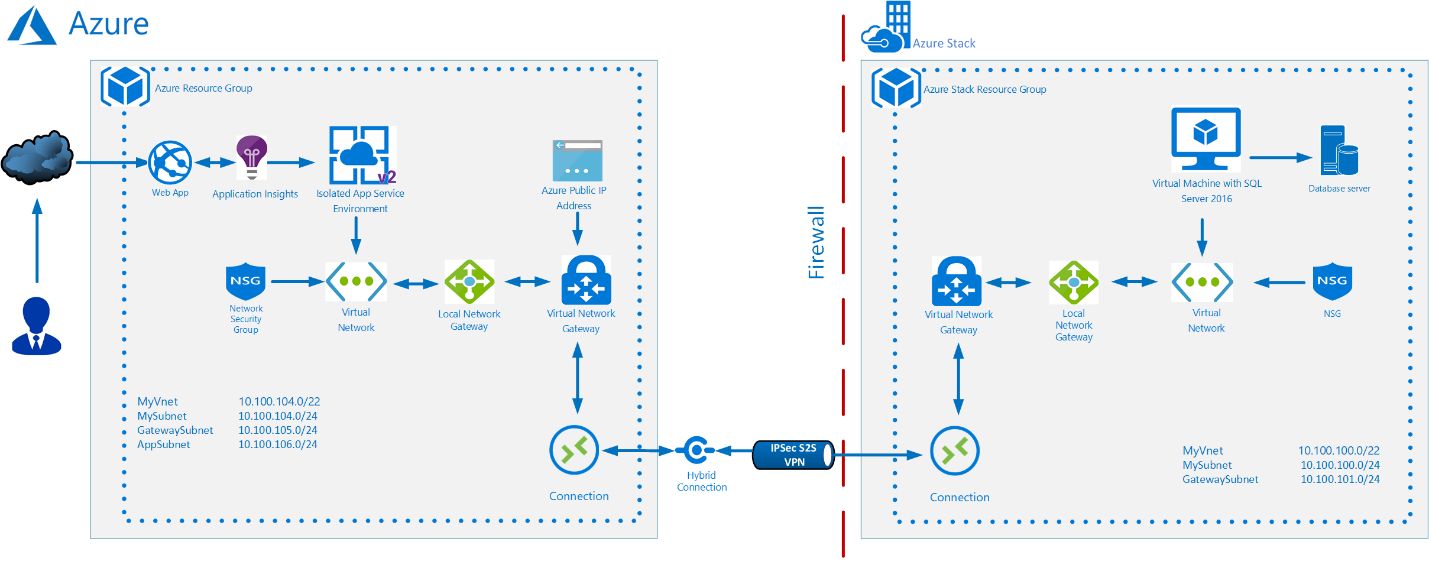
This architecture consists of the following components:
Azure Resources
-
Azure App Services. Build, deploy, and scale enterprise-grade web, mobile, and serverless compute applications and as well as leveraging RESTful APIs running on any platform with Platform-as-a-service (PaaS) offerings. For more information about Azure App Services see Microsoft Azure App Services Overview.
-
Azure Virtual Network. Azure Virtual Network enables many types of Azure resources, such as Azure Virtual Machines (VM), to securely communicate with each other, the internet, and on-premises networks.
- Application Subnet. Dividing the Azure Virtual Network into two or more logical, IP subdivisions via subnets provides a custom private IP address space using public and private (RFC 1918) addresses. This subnet will be where many of the resources will be deployed.
- Gateway Subnet. The gateway subnet is part of the virtual network IP address range specified when configuring the virtual network, and contains the IP addresses that the virtual network gateway resources and services use.
- Azure Local Network Gateway. The local network gateway typically refers to the on-premises location. Azure refers to the site name and specifies the IP address of the local VPN device to connect to.
-
Azure Virtual Network Gateway. The Azure Virtual Network Gateway acts as a Site-to-Site VPN gateway connection that is used to connect the on-premises network to an Azure virtual network over an IPsec/IKE (IKEv1 or IKEv2) VPN tunnel.
-
Azure Public IP. Public IP addresses allow Internet resources to communicate inbound to Azure resource, and enable Azure resources to communicate outbound to Internet and public-facing Azure services with an IP address assigned to the resource.
-
Azure Point to Site Application VPN. A Point-to-Site (P2S) VPN connection allows a secure connection to the virtual network from an individual client computer. This solution is useful for telecommuters needing to connect to Azure VNets from a remote location.
Azure Stack Resources
-
Azure Stack IaaS for Hosting a Microsoft SQL Server VM. Use the same application model, self-service portal, and APIs enabled by Azure. Azure Stack IaaS allows for a broad range of open source technologies for consistent hybrid cloud deployments.
-
Azure Stack Virtual Network. The Azure Stack Virtual Network, works exactly like the Azure Virtual Network, and enables many types of Azure resources, such as Azure Virtual Machines (VM), to securely communicate with each other, the internet, and on-premises networks.
-
Application Subnet. Dividing the Azure Virtual Network into two or more logical, IP subdivisions via subnets provides a custom private IP address space using public and private (RFC 1918) addresses. This subnet will be where the majority of the resources will be deployed.
-
Gateway Subnet. The gateway subnet is part of the virtual network IP address range specified when configuring the virtual network, and contains the IP addresses that the virtual network gateway resources and services use.
-
-
Azure Stack Virtual Network Gateway. Send network traffic between Azure virtual network and an on-premises site by creating a virtual network gateway.
-
Azure Stack Local Network Gateway. The local network gateway typically refers to the on-premises location. Azure refers to the site name and specifies the IP address of the local VPN device to connect to.
Azure Stack Public IP. The Azure Stack Public IP addresses work like the Azure Public IP addresses, allowing Internet resources to communicate inbound to Azure resource, and enable Azure resources to communicate outbound to Internet and public-facing Azure services with an IP address assigned to the resource. As note, please work with the Hardware OEM Partners to make Azure Stack services (such as the portals, Azure Resource Manager, DNS, etc.) available to external networks.
Deploying Azure Stack Resources
In This section you will provision all the necessary resources required to create a Site-to-Site connection between Azure Stack and Azure. The resources deployed are as follows:
-
VM’s (All associated resources i.e. NIC’s, Public IP Addresses, V-Net, etc.)
-
Network Security Groups
-
Standard Storage Account
-
Local Network Gateway
-
Virtual Network Gateway
-
Connection
Preparing Parameters (Azure Stack)
| Step | Step Details |
|---|---|
| 1 | Download the Hybrid project and save it your local machine |
| 2 | Navigate to the Azurestackdeploy.paramaters.json file It is located in the Hybrid-AzureStack folder |
| 3 | Fill in Parameter values. Below is a description of the parameters |
| Parameter | Description | Value |
|---|---|---|
| dnsNameForPublicIP | FQDN for Virtual Machine. | Ener a Value |
| AddressPrefix | Virtual Network IP Range | 10.100.100.0/22 If you enter your own values make sure they do not overlap with your Azure Network Range |
| Subnet | Network subnet IP Range (Must be inline with Virtual Network Range) | 10.100.100.0/24 |
| GatewaySubnet | Network subnet for Virtual Network gateway (Must be inline with Virtual Network Range | 10.100.101.0/24 |
| LocalGatewayIPAddress | IP Address of you Azure Gateway Public IP | Leave this value as is. You will not get this value until you deploy your azure resources. |
| LocalGatewayAddressPrefix | The Network IP Address range in your Azure Environment | 10.100.104.0/22 |
| baseURL | leave blank as this value gets populated and updated automatically after running script. |
Deploying Template (Azure Stack)
| Step | Step Details |
|---|---|
| 1 | Open a PowerShell ISE window as an Administrator and navigate to the hybrid-Deployment Directory |
| 2 | Now run the Deploy-SolutionAzureStack.ps1 with the following parameters .\Deploy-SolutionAzureStack.ps1 -rg {enterValue} -presharedkey {enterValue} -storageAccountName {enterValue} -targetStorageContainer {enterValue} -location {enterValue} -tenantID {enterValue} -azureStackArmEndpoint https://management.{region.fqdn} -Verbose |
| 3 | You will be prompted to enter Credentials. This will be the credentials for your Azure Stack Tenant Subscription |
| 4 | You will get progress output periodically |
| 5 | After your Azure Stack Resources have been deployed you will be prompted to Update Local Network Gateway. At this point please Minimize the PowerShell ISE window. |
| 6 | We need to get IP value from section 5.2 before we resume deployment |
Deploying Azure Resources
In This section you will provision all the necessary resources required to create a Site-to-Site connection between Azure and Azure Stack. The resources deployed are as follows:
-
WebApp
-
App Insights
-
Network Security Groups
-
Local Network Gateway
-
Virtual Network Gateway
-
Connection
Preparing Parameters (Azure)
| Step | Step Details |
|---|---|
| 1 | Navigate to Hybrid-Deployment\Hybrid-Azure folder as we need to edit the Azuredeploy.paramaters.json file |
| 2 | Edit the Highlighted values. Below is a table with the parameter descriptions. |
| Parameter | Description | Value |
|---|---|---|
| AddressPrefix | Virtual Network IP Range | 10.100.104.0/22 If you enter your own values make sure they do not overlap with your Azure Stack Network Range |
| Subnet | Network subnet IP Range (Must be inline with Virtual Network Range) | 10.100.104.0/24 |
| GatewaySubnet | Network subnet for Virtual Network gateway (Must be inline with Virtual Network Range | 10.100.105.0/24 |
| LocalGatewayIPAddress | External Facing IP Address, cannot be behind NAT | Enter value |
| SiteName | Name of your Website which is hosted on your WebApp Server | Enter value |
| HostingPlanName | Name or your WebApp Server | Enter value |
| EnvrinmentName | Name for the Environment which is Hosting your Isolated Web App Server | Enter value |
| repoURL | This is the URL where the Hybrid Deployment project accessed | Enter Value |
Deploying Template (Azure)
| Step | Step Details |
|---|---|
| 1 | Open a PowerShell window as Administrator and navigate to the hybrid-Deployment Directory |
| 2 | Now run the Deploy-SolutionAzure.ps1 with the following parameters: .\Deploy-SolutionAzureStack.ps1 -rg {enterValue} - -presharedkey {enterValue} -ADAppPassword {enterValue} -emailNotification {enterValue} -Verbose Be sure to use the same preshared key value used earlier |
| 3 | You will be prompted to enter Credentials. This will be the credentials for your Azure Subscription |
| 4 | You will get progress output periodically |
| 5 | Once Azure resources are deployed you will be prompted to Change Values of your Local Network Gateway in Azure Stack Copy this value as we are going to use it in a later section At this point please minimize the PowerShell window. |
Configuring VPN Connection
In this Section we will configure our Local Network Gateways with the outputted values given from both the PowerShell ISE and PowerShell windows.
Azure Stack Connection Configuration
| Step | Step Details |
|---|---|
| 1 | Log into your Azure Stack Portal |
| 2 | Navigate to the resource group created in Step 2 in Section 4.2 Click on the Local Network Gateway icon |
| 3 | Click on the Configurations tab |
| 4 | Paste the value of IP address given in Section 5.2 step 6 And Click Save |
| 5 | Navigate back to your PowerShell ISE window Be sure that it is the ISE Window that is associated to your Azure Stack Press Any Key to Continue |
| 6 | Once you see that the Connection has succeeded Copy the Value as we will need this for the next section |
Azure Connection Configuration
| Step | Step Details |
|---|---|
| 1 | Log into Azure Public Portal |
| 2 | Navigate to the resource group created in Step 2 in Section 5.2 Click on the Local Network Gateway icon |
| 3 | Click on the Configurations tab |
| 4 | Paste the value of IP address given in Section 6.1 Step 6 And Click Save |
| 5 | After pressing Enter you should see a provisioning State Succeeded you have now completed the VPN Connection between Azure and Azure Stack |
Configuring WebApp for VNET Routing
A common scenario where you would use VNet Integration is enabling access from your web app to a database or a web service running on a virtual machine in your Azure virtual network. With VNet Integration, you don't need to expose a public endpoint for applications on your VM but can use the private non-internet routable addresses instead.
The VNet Integration feature:
-
Requires a Standard, Premium, or Isolated pricing plan
-
Works with Classic or Resource Manager VNet
-
Supports TCP and UDP
-
Works with Web, Mobile, API apps and Function apps
-
Enables an app to connect to only 1 VNet at a time
-
Enables up to five VNets to be integrated with in an App Service Plan
-
Allows the same VNet to be used by multiple apps in an App Service Plan
-
Supports a 99.9% SLA due to the SLA on the VNet Gateway
There are some things that VNet Integration does not support, including:
-
mounting a drive
-
AD integration
-
NetBios
-
private site access
Here are some things to keep in mind before connecting your web app to a virtual network:
-
VNet Integration only works with apps in a Standard, Premium, or Isolated pricing plan. If you enable the feature, and then scale your App Service Plan to an unsupported pricing plan your apps lose their connections to the VNets they are using.
-
If your target virtual network already exists, it must have point-to-site VPN enabled with a Dynamic routing gateway before it can be connected to an app. If your gateway is configured with Static routing, you cannot enable point-to-site Virtual Private Network (VPN).
-
The VNet must be in the same subscription as your App Service Plan(ASP).
-
If your gateway already exists with point-to-site enabled, and it is not in the basic SKU, IKEV2 must be disabled in your point-to-site configuration.
-
The apps that integrate with a VNet use the DNS that is specified for that VNet.
-
By default your integrating apps only route traffic into your VNet based on the routes that are defined in your VNet.
Configuring Point to Site Connection
In this section we will need to configure our routes between our Azure and Azure Stack Networks. This is done by configuring the VNET Routing.
| Step | Step Details |
|---|---|
| 1 | Log into your Azure Subscription. Then navigate to your Virtual Network Gateway. |
| 2 | Click on Point-to-Site Configuration. |
| 3 | Click on Configure Now |
| 4 | Under Address Pool. Enter 172.16.0.0/24
Be sure that SSL VPN is checked And Click Save |
Configuring VNET Integration for WebApp
| Step | Step Details |
|---|---|
| 1 | Navigate to your resource group window and Click on your WebApp |
| 2 | Scroll down and Click on Network |
| 3 | Click Setup |
| 4 | Chose myVnet |
| 5 | Getting a Failure is expected. If you refresh the page. You will see that your VNET integration is in a Connected state |
Syncing Routes and Cert for Appserver
| Step | Step Details |
|---|---|
| 1 | Navigate to your resource group window and Click on your AppServer |
| 2 | Scroll down and Click on Network |
| 3 | Click Manage |
| 4 | Click on myVnet |
| 5 | Next Click on Sync Network. Then click Yes |
| 6 | A Cmak error is expected here. This happens because of the IKEv2 and External Radius Settings configured in Section 7.1 |
| 6 | In your PowerShell Window (the one Connected to Azure public) Type .\cmak_error_fix.ps1 |
| 7 | Enter Azure Credentials |
| 8 | Once the script is finished running, Go back to your Azure Public Portal. |
| 9 | Clear all notifications |
| 10 | Now try Syncing Network again |
| 11 | Click Yes |
| 12 | You should now see 3 green Check Marks stating that Certificates, routes and Data have initialized a sync. You have now successfully configured routes between your Azure and Azure Stack Networks. |
Add DNS Host Name to Azure Stack Web App
| Step | Step Details |
|---|---|
| 1 | Navigate to your Azure Stack portal and click on WebApp |
| 2 | Click on Custom Domains Tab |
| 3 | Click on Add HostName |
| 4 | Paste value outputted in the Powersehll window with traffic manager endpoint |
| 5 | Click on Add Host Name |
| 6 | Then in the PowerShell Window hit enter to continue |
Getting Key Secrets
| Step | Step Details |
|---|---|
| 1 | Click on App Registration |
| 2 | Click on App Registration |
| 3 | Click on Add HostName |
| 4 | Locate the “Trigger” app and click on it Note: You might have to switch drop down box to All Apps |
| 5 | Click On Keys |
| 6 | Enter a Name under Description change expiration to 2 years and Click Save |
| 7 | Copy And Paste the Secret given to you into the Power Shell window Be Sure not to Close Window without Copying as you will not see this Secret Again |
| 8 | Once you have pasted the Secret in PowerShell press Enter |
Upload Files to Azure Function
| Step | Step Details |
|---|---|
| 1 | Navigate to your Function Web App |
| 2 | Click on Http Trigger |
| 3 | On the Right Column click on View Files |
| 4 | Here we need to replace the files in this App with the file located in .\cross-cloud-scale\httpTrigger |
| 5 | Upload One By One overwriting files |
Appendix
Configuring BGP for Azure Stack Development Kit Only
| Step | Step Details |
|---|---|
| 1 | Log in to the Azure Stack physical host for your ASDK |
| 2 | From the Hyper-V Manager Console Click the VM, say, AZS-BGPNAT01 On the lower window click on Networking tab Take note of the IP address for the NAT Adapter that uses the PublicSwitch |
| 3 | Right Click AZS-BGPNAT01 and click Connect button |
| 4 | Sign into VM |
| 5 | Verify that IP’s match by typing ipconfig /all One of your IP addresses should match to the value from the Networking Tab in previous step |
| 6 | In the command prompt type Start PowerShell And press Enter |
| 7 | Enter the PowerShell command To designate the external NAT address for the ports that the IKE Authentication tunnel will use. Remember to change the IP Address to the values taken from Section 8.1 step 2 |
| 8 | Enter the PowerShell command Create a static NAT mapping to map the external address to the Gateway Public IP Address. This maps the ISAKMP port 500 for PHASE 1 of the IPSEC tunnel Add-NetNatStaticMapping -NatName BGPNAT -Protocol UDP -ExternalIPAddress 10.16.169.131 -InternalIPAddress 192.168.102.1 -ExternalPort 500 -InternalPort 5 |
| 9 | Finally, we will need to do NAT traversal which uses port 4500 to successfully establish the complete IPSEC tunnel over NAT devices Add-NetNatStaticMapping -NatName BGPNAT -Protocol UDP -ExternalIPAddress 10.16.169.131 -InternalIPAddress 192.168.102.1 -ExternalPort 4500 -InternalPort 4500 |
| 10 | If you run a Get-NetNatExternalAddress -Natname BGPNAT You should see similar results Get-NetNatExternalAddress -Natname BGPNAT |
Using the North Wind WebApp
| Step | Step Details | |
|---|---|---|
| 1 | Navigate to your website, on the landing page Fill out dummy information and click the Show Plans Button | |
| 2 | On the Plans page choose an option by clicking Buy Now | |
| 3 | On the Apply for a Plan Page fill out dummy information and click Submit Application | |
| 4 | You should now receive a Confirmation Code |
Verify Data in Database
| Step | Step Details |
|---|---|
| 1 | From your Azure Stack host remote to your SQLVM |
| 2 | Open SQL Server Management Studio |
| 3 | Log into your SQL Server, Expand Northwinddb, Tables, Right-Click and chose “Select Top 1000 rows” |
| 4 | The result of the Query should show the Person created in Step 3 Section 8.2 |
Troubleshooting
Verifying Azure VPN tunnel
In this section we will go over the steps needed to verify deployment.
| Step | Step Details |
|---|---|
| 1 | Log into your Azure (Public) portal Navigate to the recent created connection, you should now see a “Connected” status Below are screen grabs of both Azure and Azure Stack Connections |
| 2 | Log into your Azure Stack Tenant portal Navigate to the recent created connection, you should now see a “Connected” status |
Verifying WebApp Application Settings
| Step | Step Details |
|---|---|
| 1 | Click on your Web app |
| 2 | Click the Application Settings Tab and verify that the value of your connection string |
| 3 | Connection String Name = SQLWM Value = Data Source={Internal IP Address of SQLVM},1433;Initial Catalog=NorthwindDb;User ID={Name used for adminUsername in Paramters};Password={value of adminPassword in Paramters}Asynchronous Processing=True Type = SQLServer |
Verifying Appsettings.Json file
| Step | Step Details |
|---|---|
| 1 | Scroll down and Click on Advanced Tools, then Click Go |
| 2 | From Kudu Window Click on Debug Console, then on CMD |
| 3 | Click On Site,wwwroot, then the Pencil icon to the left of the appsettings.json file |
| 4 | Verify that the Default connection string matches the value displayed in Step 2 of Section 7.1 |
| 5 | Verify that the App insights value matches. You can see the value of App insights from the Portal. See next step to validate |
| 6 | From the Azure Portal click App Insights Icon, Instrumentation Key is on the top right of window |
WebApp Connectivity
| Step Details |
|---|
Next use Tcpping to check connectivity between the WebApp and SQLVM using port 1433 In the lower window type: Tcpping 10.00.100.4:1433 >You should get a successful response Note: If you are following guidance using default values enter the above IP Address. If you used other network segments in deployment use the value of SQLIP in the test.csv file located in the Root folder of Hybrid-Deployment with a :1433 |