|
|
||
|---|---|---|
| IoTCIntegration | ||
| assets | ||
| .gitignore | ||
| LICENSE | ||
| README.md | ||
| azuredeploy.json | ||
| iotc-bridge-az-function.zip | ||
README.md
Azure IoT Central Device Bridge
This repository contains everything you need create a device bridge to connect other IoT clouds such as Sigfox, Particle, and The Things Network (TTN) to IoT Central. The device bridge forwards the messages your devices send to other clouds to your IoT Central app. In your IoT Central app, you can build rules and run analytics on that data, create workflows in Microsoft Flow and Azure Logic apps, export that data, and much more. This solution will provision several Azure resources into your Azure subscription that work together to transform and forward device messages through a webhook integration in Azure Functions.
To use the device bridge solution, you will need the following:
- an Azure account. You can create a free Azure account from here
- an Azure IoT Central application to connect the devices. Create a free app by following these instructions
Instructions
Take the following steps to deploy an Azure Function into your subscription and set up the device bridge.
-
Click the
Deploy to Azurebutton above. This opens up a custom ARM template in the Azure Portal to deploy the Azure Function. -
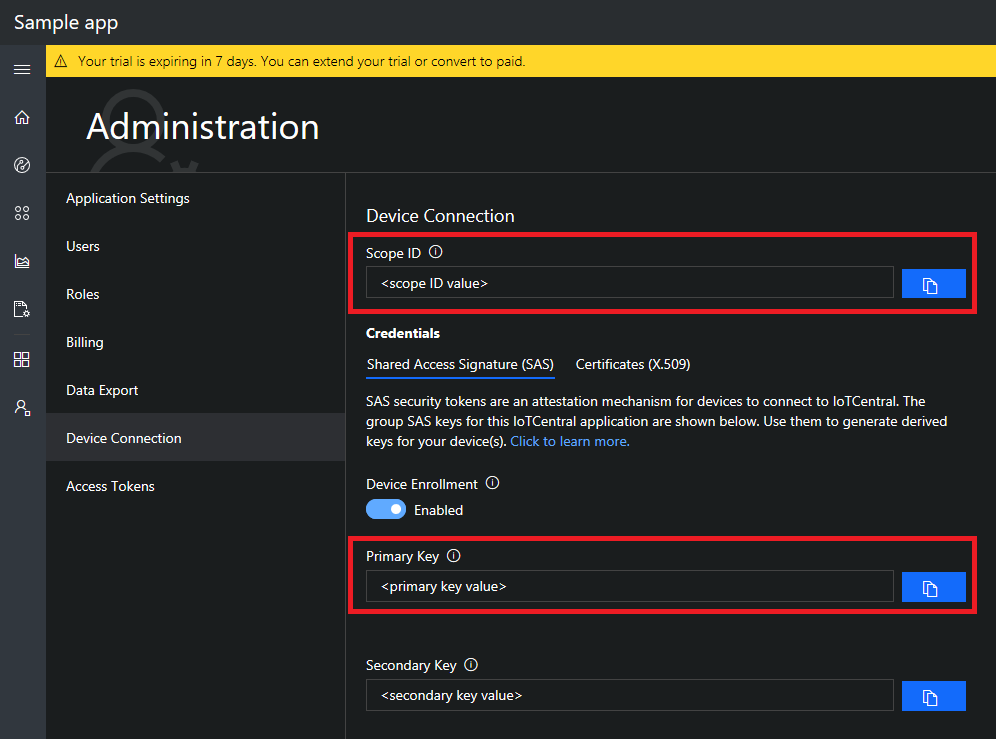
Go to your IoT Central application, and navigate to the
Administration > Device Connectionarea.
- Copy the
Scope IDand paste it into theScope IDfield the custom template. - Copy one of the SAS keys, so either the
Primary Keyor theSecondary Key, and paste it into theIot Central SAS Keyfield. (this key will be stored in a Key Vault provisioned with the function).
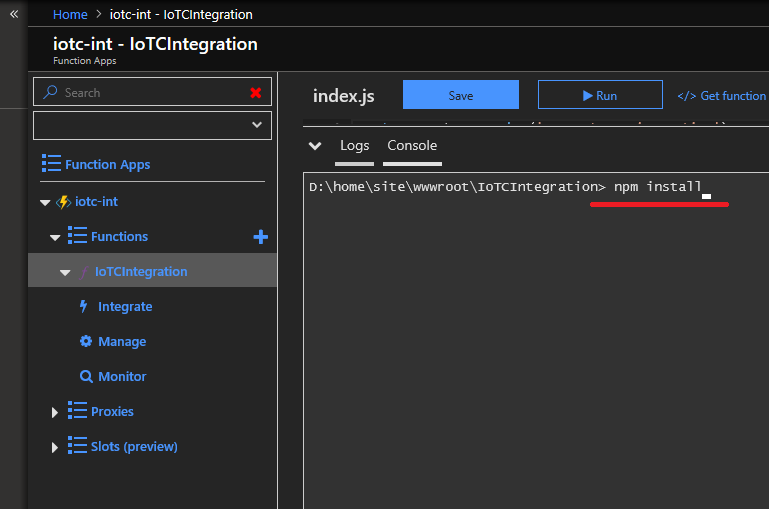
- After the deployment is done, install the required NPM packages in the function. To do this,
go to the Function App that was deployed to your subscription in the
Functions > IoTCIntegration > Consoletab. In the console, run the commandnpm install(this command takes ~20 minutes to complete, so feel free to do something else in that time).
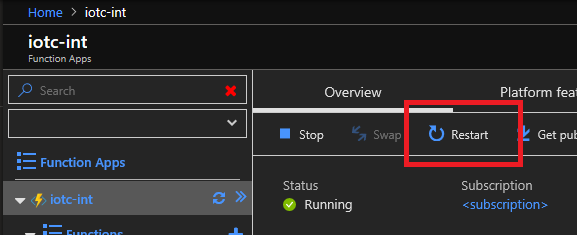
- After the package installation finishes, the Function App needs to be restarted by clicking the
Restartbutton inOverviewpage.
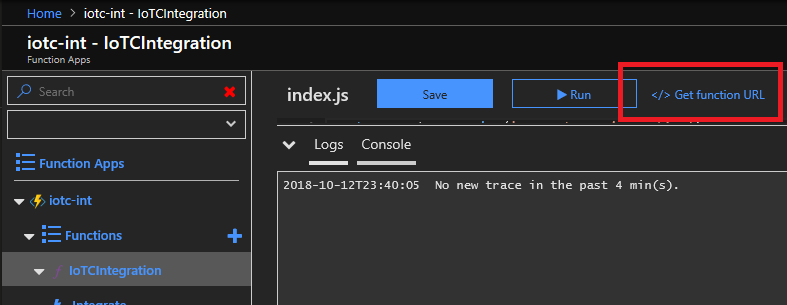
- The function is now ready to use. External systems can feed device data through this device bridge and into your IoT Central app by making HTTP POST requests to the function URL. The URL can be obtained in the newly created function App in
Functions > IoTCIntegration > Get function URL.
Messages sent to the device bridge must have the following format in the body:
{
    "device": {
        "deviceId": "my-cloud-device"
    },
    "measurements": {
        "temp": 20.31,
        "pressure": 50,
        "humidity": 8.5,
        "ledColor": "blue"
    }
}
An optional timestamp field can be included in the body, to specify the UTC date and time of the message.
This field must be in ISO format (e.g., YYYY-MM-DDTHH:mm:ss.sssZ). If timestamp is not provided,
the current date and time will be used.
NOTE:
deviceIdmust be alphanumeric, lowercase, and may contain hyphens. The values of the fields inmeasurementsmust be numbers or strings.
- When a message with a new
deviceIdis sent to IoT Central by the device bridge, a device will be created as an Unassociated device. Unassociated devices appear in your IoT Central application inDevice Explorer > Unassociated devices. ClickAssociateand choose a device template to start receiving incoming measurements from that device in IoT Central.
NOTE: Until the device is associated to a template, HTTP calls to the function will return a 403 error status.
What is being provisioned? (pricing)
The custom template in this repository will provision the following Azure resources:
- Key Vault, needed to store your IoT Central key
- Storage Account
- Function App
- Consumption Plan
The Function App runs on a consumption plan. While this option does not offer dedicated compute resources, it allows device bridge to handle hundreds of device messages per minute, suitable for smaller fleets of devices or devices that send messages less frequently. If your application depends on streaming a large number of device messages, you may choose to replace the consumption plan by dedicated a App Service Plan. This plan offers dedicated compute resources, which leads to faster server response times. Using a standard App Service Plan, the maximum observed performance of the Azure Function in this repository was around 1,500 device messages per minute. You can learn more about the Azure Function hosting options in documentation.
To use a dedicated App Service Plan instead of a consumption plan, edit the custom template before deploying. Click the Edit template button.
Replace the segment
{
  "type": "Microsoft.Web/serverfarms",
  "apiVersion": "2015-04-01",
  "name": "[variables('planName')]",
  "location": "[resourceGroup().location]",
  "properties": {
    "name": "[variables('planName')]",
    "computeMode": "Dynamic",
    "sku": "Dynamic"
  }
},
with
{
  "type": "Microsoft.Web/serverfarms",
  "sku": {
      "name": "S1",
      "tier": "Standard",
      "size": "S1",
      "family": "S",
      "capacity": 1
  },
  "kind": "app",
  "name": "[variables('planName')]",
  "apiVersion": "2016-09-01",
  "location": "[resourceGroup().location]",
  "tags": {
      "iotCentral": "device-bridge",
      "iotCentralDeviceBridge": "app-service-plan"
  },
  "properties": {
      "name": "[variables('planName')]"
  }
},
Additionally, edit the template to include "alwaysOn": true in the configurations of the Function App resource (under properties > siteConfig, right before appSettings). The alwaysOn configuration ensures that the function app is running at all times.
Example 1: Connecting Particle devices through the device bridge
To connect a Particle device through the device bridge to IoT Central, go to the Particle console and create a new webhook integration. Set the Request Format to JSON and, under Advanced Settings, use the following custom body format:
{
  "device": {
    "deviceId": "{{{PARTICLE_DEVICE_ID}}}"
  },
  "measurements": {
    "{{{PARTICLE_EVENT_NAME}}}": {{{PARTICLE_EVENT_VALUE}}}
  }
}
Paste in the function URL from your Azure Function, and you should see Particle devices appear as unassociated devices in IoT Central.
Example 2: Connecting Sigfox devices through the device bridge
Some platforms may not allow you to specify the format of device messages sent through a webhook. For such systems, the message payload must be converted to the expected body format before it can be processed by the device bridge. This conversion can be performed in the same Azure Function that runs the device bridge.
In this section, we demonstrate this concept by showing how the payload of a Sigfox webhook
integration can be converted to the body format expected by this solution. Device data is
transmitted from the Sigfox cloud in a hexadecimal string format. For convenience, we have
provided a conversion function for this format, which accepts a subset of the possible
field types in a Sigfox device payload (int and uint of 8, 16, 32, or 64 bits;
float of 32 or 64 bits; little-endian and big-endian). To process messages from a
Sigfox webhook integration, the following changes are needed to the IoTCIntegration/index.js
file of the Function App:
- To convert the message payload, add the following code before the call to
handleMessagein line 21 (replacingpayloadDefinitionby your Sigfox payload definition):
const payloadDefinition = 'gforce::uint:8 lat::uint:8 lon::uint:16'; // Replace this with your payload definition

req.body = {
    device: {
        deviceId: req.body.device
    },
    measurements: require('./converters/sigfox')(payloadDefinition, req.body.data)
};
- Sigfox devices expect a
204response code. To do this, add the following code snippet after the call tohandleMessagein line 21:
context.res = {
    status: 204
};
Example 3: Connecting devices from The Things Network through the device bridge
Devices in The Things Network (TTN) can be easily connected to IoT Central through this solution.
To do so, add a new HTTP integration to you application in The Things Network console (Application > Integrations > add integration > HTTP Integration).
Also make sure that your application has a decoder function defined (Application > Payload Functions > decoder),
so the payload of your device messages can be automatically converted to JSON before being sent to
the Azure Function. In the following sample, we show a JavaScript decoder function that can be used
to decode common numeric types from binary data.
function Decoder(bytes, port) {
    function bytesToFloat(bytes, decimalPlaces) {
        var bits = (bytes[3] << 24) | (bytes[2] << 16) | (bytes[1] << 8) | bytes[0];
        var sign = (bits >>> 31 === 0) ? 1.0 : -1.0;
        var e = bits >>> 23 & 0xff;
        var m = (e === 0) ? (bits & 0x7fffff) << 1 : (bits & 0x7fffff) | 0x800000;
        var f = Math.round((sign * m * Math.pow(2, e - 150)) * Math.pow(10, decimalPlaces)) / Math.pow(10, decimalPlaces);
        return f;
    }

    function bytesToInt32(bytes, signed) {
        var bits = bytes[0] | (bytes[1] << 8) | (bytes[2] << 16) | (bytes[3] << 24);
        var sign = 1;

        if (signed && bits >>> 31 === 1) {
            sign = -1;
            bits = bits & 0x7FFFFFFF;
        }

        return bits * sign;
    }

    function bytesToShort(bytes, signed) {
        var bits = bytes[0] | (bytes[1] << 8);
        var sign = 1;

        if (signed && bits >>> 15 === 1) {
            sign = -1;
            bits = bits & 0x7FFF;
        }

        return bits * sign;
    }

    return {
        temperature: bytesToFloat(bytes.slice(0, 4), 2),
        presscounter: bytesToInt32(bytes.slice(4, 8), true),
        blueLux: bytesToShort(bytes.slice(8, 10), false)
    };
}
After the integration has been defined, add the following code before the call to handleMessage
in line 21 of the IoTCIntegration/index.js file of your Azure Function. This will translate
the body of your HTTP integration to the expected format.
req.body = {
    device: {
        deviceId: req.body.hardware_serial
    },
    measurements: req.body.payload_fields
};
Limitations
This device bridge only forwards messages to IoT Central, and does not send messages back to devices. Due to the unidirectional nature of this solution, settings and commands will not work for devices that connect to IoT Central through this device bridge. Because device twin operations are also not supported, it's not possible to update device properties through this setup. To use these features, a device must be connected directly to IoT Central using one of the Azure IoT device SDKs.
Package integrity
The template provided here deploys a packaged version of the code in this repository to an Azure
Function. You can check the integrity of the code being deployed by verifying that the SHA256 hash
of the iotc-bridge-az-function.zip file in the root of this repository matches the following:
EAEF80420054196F05F7D36E436BA168AF5DCD7A6E31753C8A86F71607C39312
Contributing
This project welcomes contributions and suggestions. Most contributions require you to agree to a Contributor License Agreement (CLA) declaring that you have the right to, and actually do, grant us the rights to use your contribution. For details, visit https://cla.microsoft.com.
When you submit a pull request, a CLA-bot will automatically determine whether you need to provide a CLA and decorate the PR appropriately (e.g., label, comment). Simply follow the instructions provided by the bot. You will only need to do this once across all repos using our CLA.
This project has adopted the Microsoft Open Source Code of Conduct. For more information see the Code of Conduct FAQ or contact opencode@microsoft.com with any additional questions or comments.


