|
|
||
|---|---|---|
| .. | ||
| BackgroundMatting | ||
| Images | ||
| KinectMaskGenerator | ||
| Speaker.Recorder | ||
| README.md | ||
README.md
Virtual Stage
The Virtual Stage lab allows speakers to record themselves at an usual environment as their home or office, and generates a video like they were in a professional studio with a green screen.
It consists of two applications:
- Speaker Recorder App: allows you to record a lecture using an Azure Kinect device.
- Background Matting: processes the video to remove the background with great quality.
- Kinect Mask Generator: CLI that generates the body segmentation from an Azure Kinect Video
How to capture videos
Camera must be in a fixed base like a tripod.
For Azure Kinect video capturing, use the Azure Kinect recorder or the Speaker Recorder app.
Five seconds of background (no person in the camera) must be recorded at the beginning. To this end, start recording standing outside the scene. Then, after five seconds, enter the scene and start your performance.
Speaker Kit
All the speakers that used this tecnology to record their sesions for MS BUILD 2020 received a pack with the following items:
- 1 x Laptop
- 9th Generation Intel Core i7
- NVIDIA dedicated graphics card
- 16GB RAM
- 512GB M.2 SSD
- 2 x USB 3.0
- (Optional) extra 1 x USB 3.0 or 1 x USB-C
- 2 x Microsoft Azure Kinect
- 2 x Tripods for the MS Azure Kinects
- (optional) 1 x USB Presenter. Used to pass the slides on the PowerPoint presentation.
- (optional) 1 x Wireless Microphone. For a better sound quality.
- (optional) 1 x USB Hub - To conect USB presenter and Wireless Microphone
- (optional) 2 x Light diffusers
Speaker Environment setup
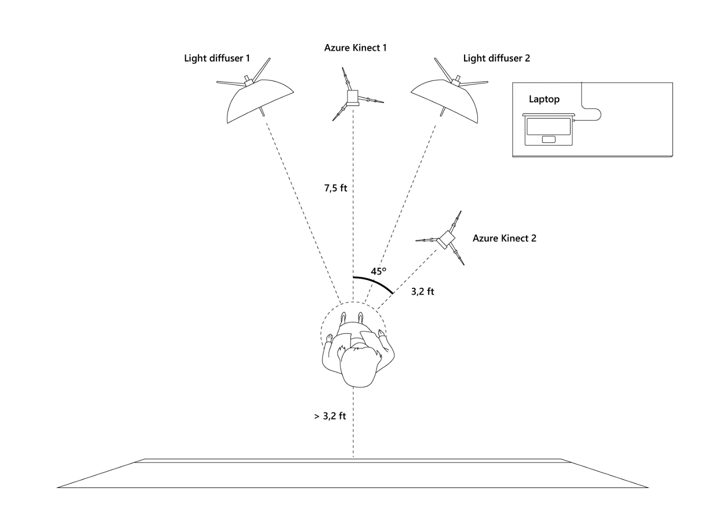
The following ilustration shows the environment that was asked to the speakers to prepare at their homes to make the recording.
- A clear space of at least 11.5ft/3.5m x 11.5ft/3.5m is needed.
- Select the place where the speaker will present. Behind the speaker there should be at least 3.2ft/1m of free space and no windows or light or reflection sources. It could be good to put a mark on the floor.
- The back of the speaker must be mostly static, ideally walls, and its color as much as possible complementary to the speaker clothes and hair.
- Mount the first Azure Kinect on the tripod and place it in front of the speaker, at 7.5ft/2.3m away from the speaker position. The Azure Kinect should be 3.6ft/1.1m height above the ground. Later you can adjust the position better.
- Mount the second Azure Kinect on the tripod and place it at about 45 degrees in front of the presenter and 3.3ft/1m away. Later we will adjust the position better.
- Assemble the light diffusers and position them approximately as shown in the image.
- Find a stable place (like a table) between both Azure Kinects to put the laptop on and place it approximately as it is shown in the image.
Notes on environment set-up
For best results capture images following these guidelines:
- Results choose a background that is mostly static. It can be both indoor and outdoor.
- Avoid casting any shadows of the speaker on the background.
- The speaker should be at least 4 feet away from the background.
- if possible adjust the lighting to avoid strong shadows on the background.
- Avoid reflections in the background and the subject (for example glasses reflections could introduce some errors).
- Avoid large color coincidences between subject and background. (e.g. Do not wear a white shirt in front of a white wall background.)
- In general, background colors should be as complementary as possible to the speaker ones.
- Avoid scenes where the subject moves in front of a background that have many color changes.
- If there is some part of the background that is causing errors, and changing the background is not possible, the speaker could try to hide that part with some element. If using a fabric, be sure to put it in a way that it does not have wrinkles. Otherwise results may not improve.
- To minimize shadows/errors in certain floors, a carpet or rug can help.
- If using a general camera, lock AE/AF (Auto-exposure and Auto-focus) of the camera
If using an Azure Kinect camera, take into account these recommendations as well:
- Lock the exposure of the camera (Speaker Recorder App already do that for the speaker).
- Avoid using loose/airy clothes like big skirts.
- Large black zones in clothes cannot be seen by the Azure Kinect Depth sensor.
Speaker Recorder App
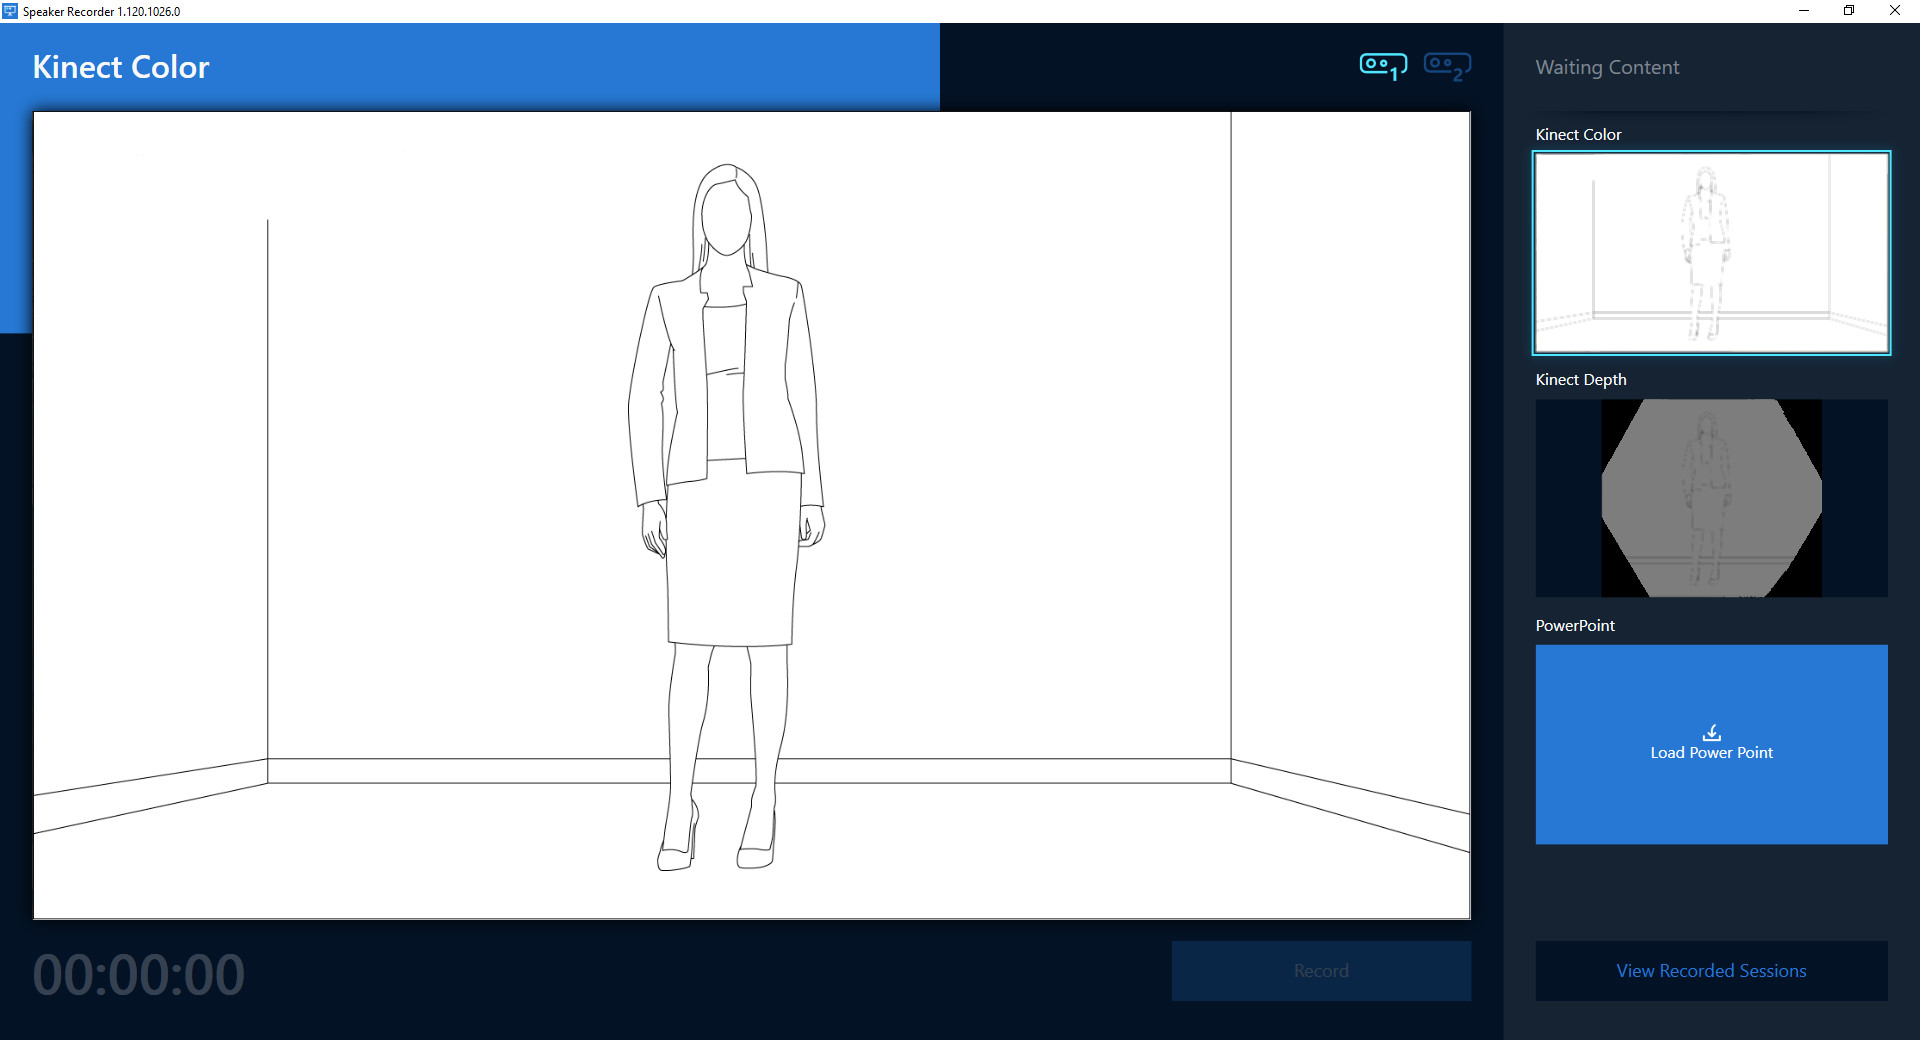
Speaker Recorder is a Windows application to record from one or two Azure Kinect devices and a PowerPoint file including audio from the default input device.
Speaker Recorder is a .Net Core 3 app built using WPF and UWP APIs, that offers the following features:
Video recording
- Record from up to two Azure Kinect devices.
- Using Azure Kinect SDK custom built from pull request #822.
- Record a PowerPoint slide show including the audio from the default input device.
- Using the UWP GraphicsCaptureItem API and NAudio.
When the application starts, it will recognize the connected Azure Kinect devices and users see the camera video. If the second Azure Kinect is connected, users can switch the visible device using the icons in the top of the application.
Video player
- Play all videos to review the result.
- The player has been implemented using XAML Islands, to benefit from the performance of the UWP MediaPlayerElement.
- Upload the result to Azure Storage (you must configure the ConnectionString in the app.settings.json file).
- The Azure Storage Data Movement Library allows us to manage the upload of the recorded files due to their huge size.
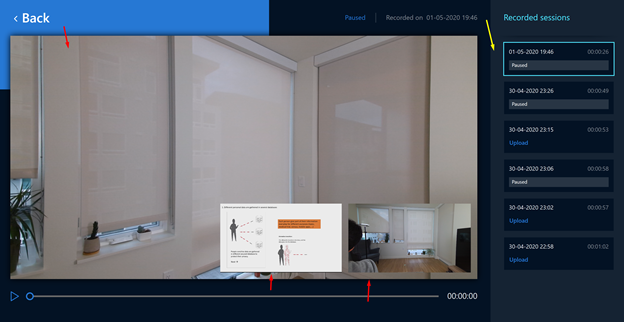
In the bottom right corner of the recorder page there is a button "View Recorded Sesions" that allow the speaker to see all the recordings that have been done. Each recording is label with date and time on the right panel.
The player allows the speaker to watch video of each of the Azure Kinects and PowerPoint video if this was used at the time of recording. By clicking on the miniature it swaps it with the video on the main player.
If the speaker want to delete or recover the videos to process them. The videos are located in the folder "C:\Users{user-name}\Documents\My recorded sesions". Another way to access each specific sesion is by right-click on each of the recordings on the right panel and click "Open Sesion Folder" button
Requirements
To build the Speaker Recorder app the following prerequisites must be installed:
- Windows 10 64 bits, version 1903, or a later release
- Windows 10 SDK, version 10.0.18362
- Visual Studio 2019 16.5.5
To run the application, the following prerequisites must be installed:
- Windows 10 64 bits, version 1903, or a later release
- .Net Core 3.1 Desktop Runtime
- HEVC Video Extensions
- Visual C++ Redistributable
Record a session
When the environment is setup, all the prerequisites are installed and the app is already running, you can start to record. If you have loaded a PowerPoint in the application and the cameras are ON, all content is ready, and the application Record button is enabled.
First, select the view you need to see in the main viewer during the presentation, normally the Power Point, clicking in the image.
After clicking on the "Record" button the application warns you that before starting the presentation it is necessary to record a few seconds without anyone.
Click OK, a warning message will remain visible, and you must stay out of the captured image while the warning message is shown.
When this time is finished, a message will appear indicating that you can start your presentation.
When you end your presentation, click on the ‘Stop Recording’ button. And a message is shown indicating that the session is saved.
Background Matting
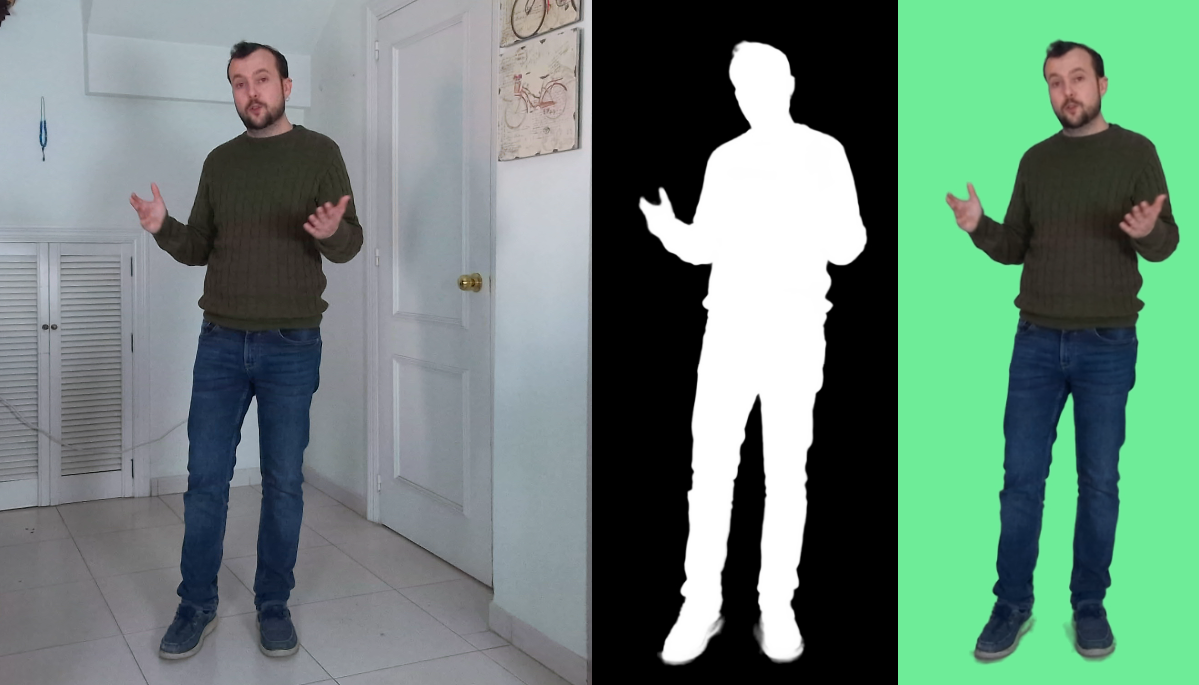
Given a set of videos recorded with Azure Kinect in which a speaker gives a talk, this command line tool removes the speaker's background and generates an alpha layer of the foreground.
This work is based on Background Matting: The World is Your Green Screen
Improvements over the original work
By using the Azure Kinect sensor depth capabilities to segment the speaker we improve the precision of the background matting, and reduce the errors considerably when processing videos with non favorable backgrounds.
Due to the lack of labeled training data showcasing people standing, the AI is trained with 512x512 square images/videos where the AI cannot see more than people's hips or knees, resulting in not good quality when matting full HD videos of people standing.
This implementation manage to obtain fine-grain quality in zones like hair, hands or feet in these cases by splitting the body in two square images with a small overlapping and processing them separately.
Requirements
-
Windows 10 x64 and NVIDIA graphics card.
-
Install NVIDIA CUDA 10.0 and NVIDIA CudNN.
-
Conda environment
- Install miniconda
- Go to powershell terminal and install environment
conda init exit conda env create -f .\environment.yaml -
OpenCV 4.3.0
- Download OpenCV 4.3.0
- Install on 3rdparty/opencv directory
- Add to Path
[ROOT]\3rdparty\opencv\build\x64\vc15\bin
-
FFMPEG 4.2.2
- Download ffmpeg 4.2.2
- Extract directory in 3rdparty/ffmpeg-4.2.2 directory
- Add to Path
[ROOT]\3rdparty\ffmpeg-4.2.2\bin
-
Visual C++ Redistributable
- Download and install
-
Inference models
- Download models
- Place Models\ folder inside root directory
-
Azure Kinect SDK 1.4.0
- Download and install
- Add to
PATHthe bin folderC:\Program Files\Azure Kinect SDK v1.4.0\sdk\windows-desktop\amd64\release\bin
-
Azure Kinect Body Tracking SDK 1.0.1
- Download and install
- Add to
PATHthe bin folderC:\Program Files\Azure Kinect Body Tracking SDK\sdk\windows-desktop\amd64\release\bin
Removing the background
Put the videos you want to process in a folder, and create an output folder in your system as well. Using fast storage disks will short the total processing time.
Edit run.ps1 accordingly to parameters below and run it on PowerShell.
Note: If you have more than one graphic card, set its device number at CUDA_VISIBLE_DEVICES
Parameters:
  -h, --help            show this help message and exit
  -n NAME, --name NAME  Name of processing.
  -i INPUT, --input INPUT
                        Path to videos folder.
  -o OUTPUT_DIR, --output_dir OUTPUT_DIR
                        Directory to save the output results.
Additional parameters:
  -s START, --start START
                        Start point to process (in seconds). Default 0.
  -d DURATION, --duration DURATION
                        Duration of the processed video (in seconds). Set to '-1'
                        to process till the end of the video. Default '-1'.
  -ft FIXED_THRESHOLD, --fixed_threshold FIXED_THRESHOLD
                        Comma separated list to set which videos must be split
                        in two according to a fixed threshold before processing.
                        For example, for two videos where we want to split the
                        first one (alphabetical order) by the line 640, set this
                        parameter to "640" or "640,".
  -shp SHARPEN, --sharpen SHARPEN
                        Enable sharpen original color image to help on noise
                        removal. Default to False.
  -mask_ops MASK_OPS, --mask_ops MASK_OPS
                        Morphological operations to apply to masks for each
                        inferred video. Format [erode|dilate],KernelSize,Iterations;...;
                        blur,KernelSize,SigmaX:[...].
                        Default "erode,3,10;dilate,5,5;blur,31,0" for each video.
                        Specify "-" to not use any morphological operation on
                        the mask.
  -o_types OUTPUT_TYPES, --output_types OUTPUT_TYPES
                        Output types generation separated by comma. Valid
                        values are out,matte,compose,fg. Default "out,matte".
  -bg BACKGROUND, --background BACKGROUND
                        Path to background video directory for compose output.
  --kinect_mask
                        Enable the use of azure kinect mask (Default).
  --no_kinect_mask
                        Disable the use of azure kinect mask.
  -i_ext INPUT_EXTENSION, --input_extension INPUT_EXTENSION
                        Input videos extension. Only if not using Azure Kinect
                        videos.
Example of run.ps1:
  conda activate bgmatting
  $Env:CUDA_VISIBLE_DEVICES=0
  python .\bg_matting.py `
    --name "Speaker" `
    --input D:\Speaker\ `
    --output_dir D:\Speaker\output\ `
    --fixed_threshold "640," `
    --start 34 `
    --duration 234
  conda deactivate
Kinect Mask Generator
To get the body segmentation from the Azure Kinect Video, the app uses a small CLI tool written in C++. Check it out!.


