* add project experimental note simplify namespace creation docs * add the 'a' to yaml for consistency * add comment on what the event hubs line is doing * fix the sample notebook * consistent install experience in doco * DOCS: download latest release |
||
|---|---|---|
| databricks-api | ||
| databricks-operator | ||
| docs/images | ||
| .gitignore | ||
| LICENSE | ||
| README.md | ||
README.md
Azure Databricks operator (for Kubernetes)
This project is experimental. Expect the API to change. It is not recommended for production environments.
Introduction
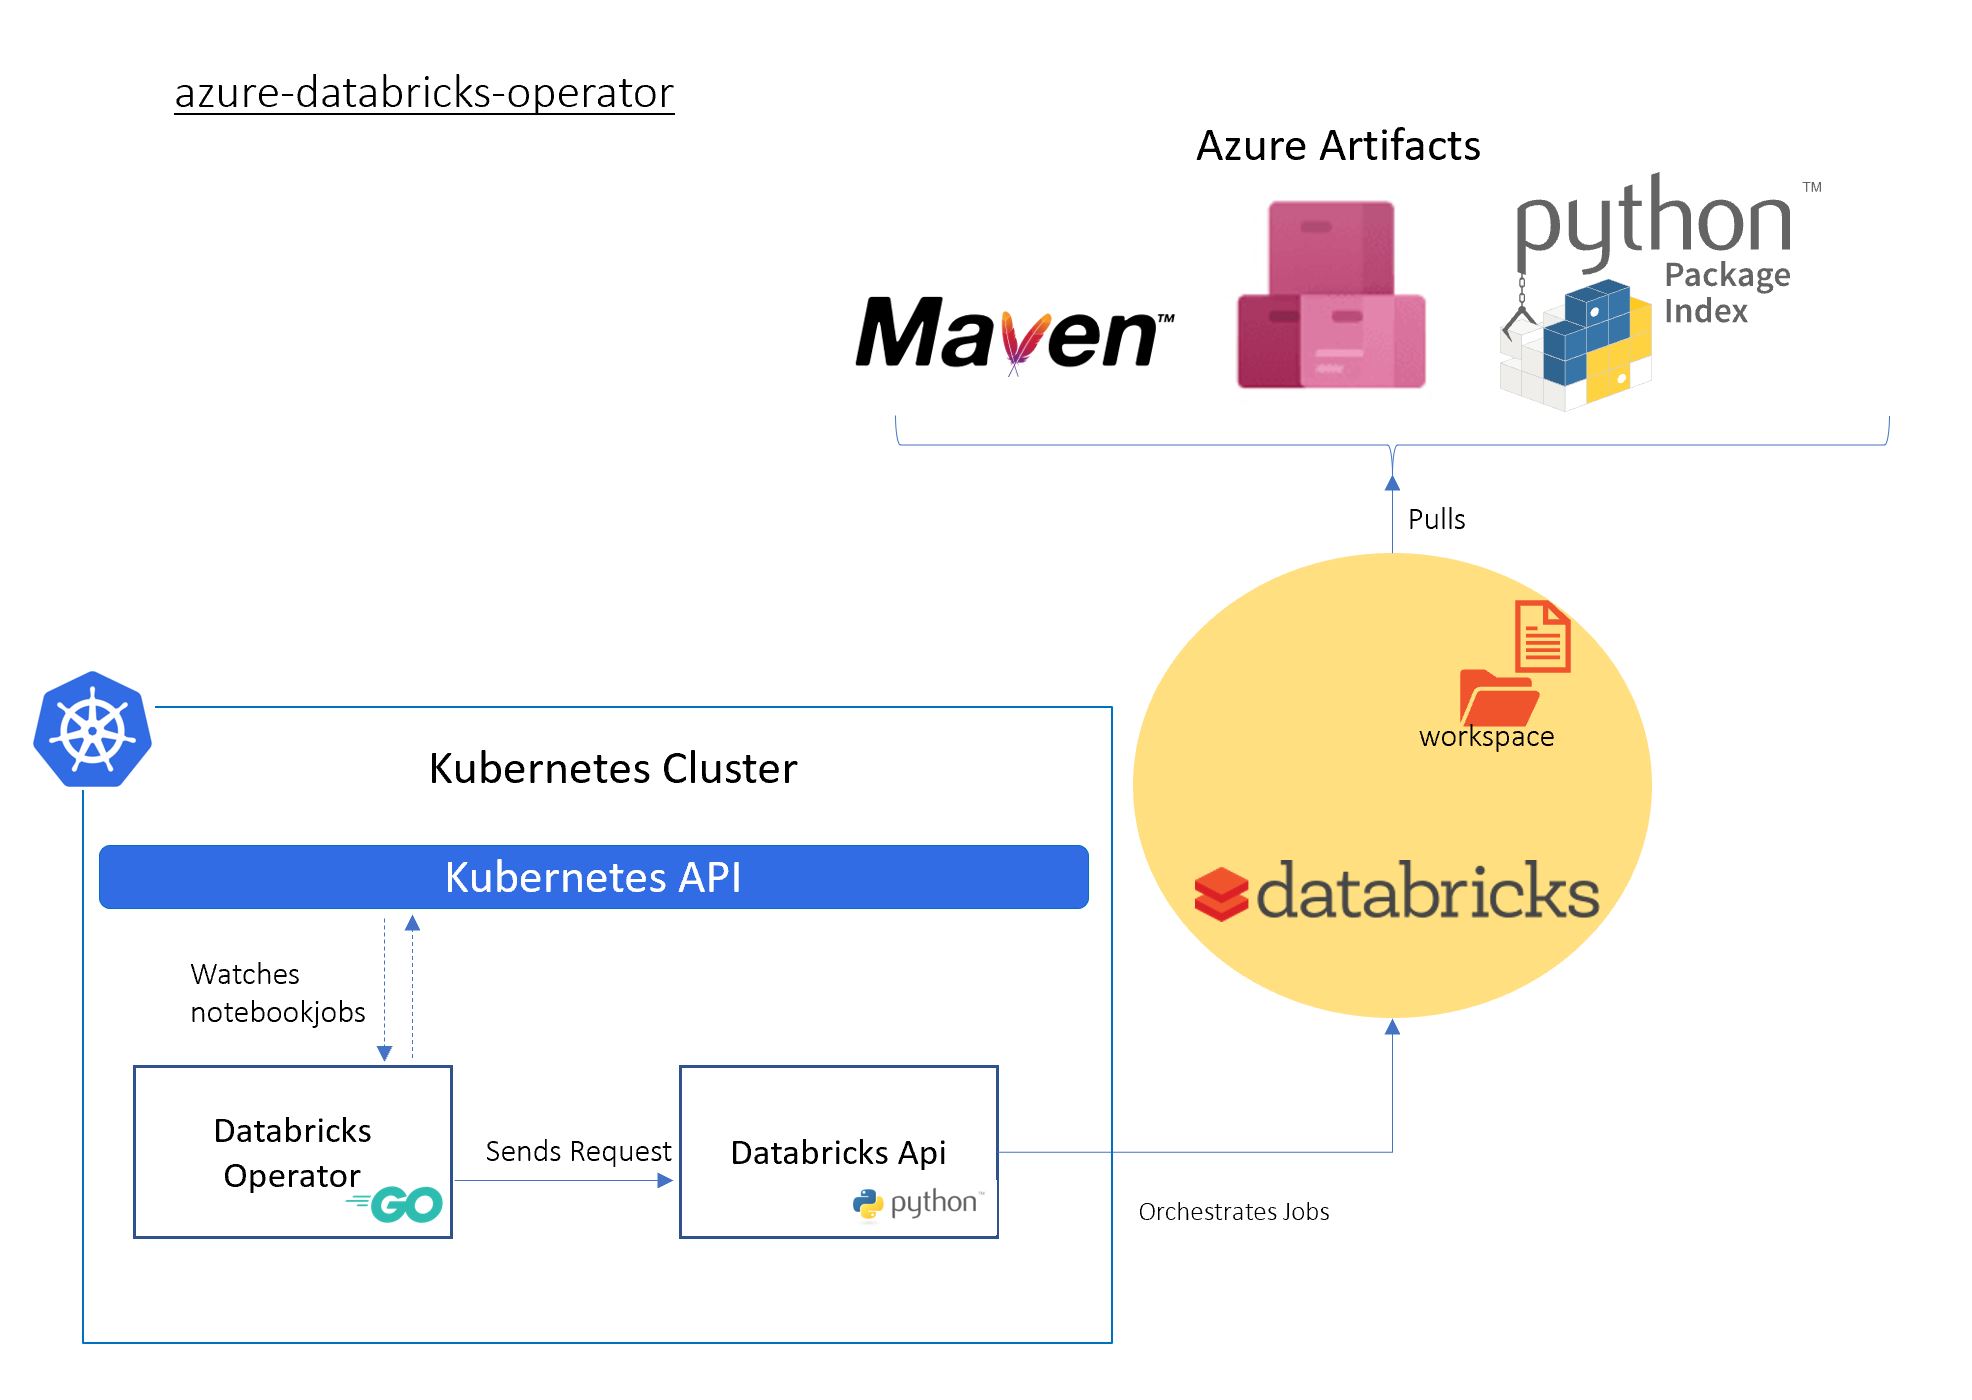
Kubernetes offers the facility of extending it's API through the concept of 'Operators' (Introducing Operators: Putting Operational Knowledge into Software). This repository contains the resources and code to deploy an Azure Databricks Operator for Kubernetes.
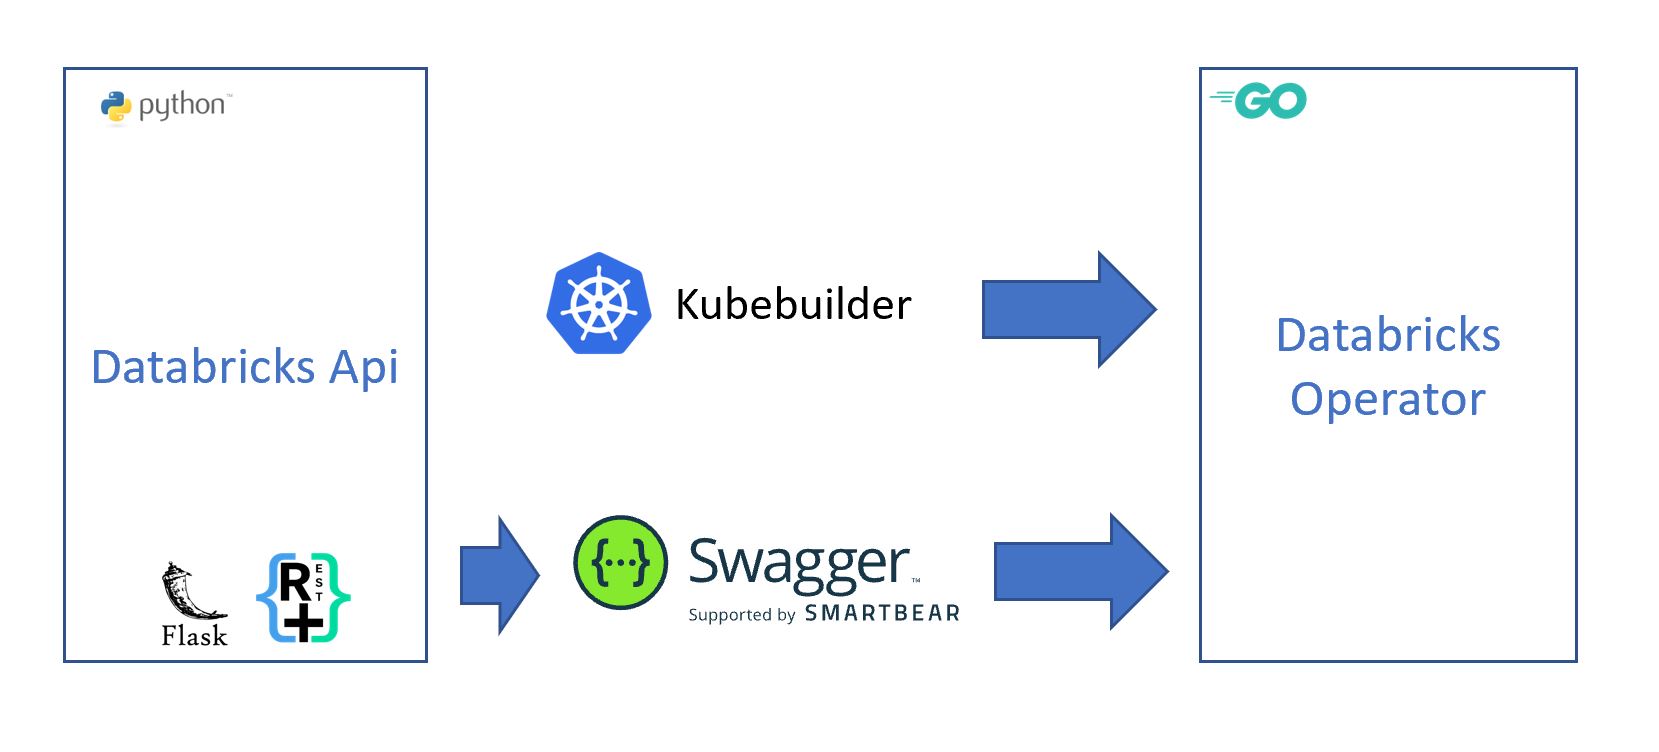
The Azure Databricks operator comprises two projects:
- The golang application is a Kubernetes controller that watches Customer Resource Definitions (CRDs) that define a Databricks job, and,
- A Python Flask App which sends commands to the Databricks clusters.
The Databricks operator is useful in situations where Kubernetes hosted applications wish to launch and use Databricks data engineering and machine learning tasks.
The project was built using
Prerequisites And Assumptions
-
You have the kubectl command line (kubectl CLI) installed.
-
You have acess to a Kubernetes cluster. It can be a local hosted Cluster like Minikube, Kind or, Docker for desktop installed localy with RBAC enabled. if you opt for Azure Kubernetes Service (AKS), you can use:
az aks get-credentials --resource-group $RG_NAME --name $Cluster_NAME
- To configure a local Kubernetes cluster on your machine
You need to make sure a kubeconfig file is configured.
- kustomize is also needed
Basic commands to check your cluster
    kubectl config get-contexts
    kubectl cluster-info
    kubectl version
    kubectl get pods -n kube-system
How to use the operator
Documentation is a work in progress
Quick start
- Download latest release.zip
wget https://github.com/microsoft/azure-databricks-operator/releases/latest/download/release.zip
unzip release.zip
- Create the
databricks-operator-systemnamespace
kubectl create namespace databricks-operator-system
- Generate a databricks token, and create Kubernetes secrets with values for
DATABRICKS_HOSTandDATABRICKS_TOKEN
kubectl --namespace databricks-operator-system create secret generic dbrickssettings --from-literal=DatabricksHost="https://xxxx.azuredatabricks.net" --from-literal=DatabricksToken="xxxxx"
- Apply the manifests for the CRD and Operator in
release/config:
kubectl apply -f release/config
-
Create a test secret, you can pass the value of Kubernetes secrets into your notebook as Databricks secrets
kubectl create secret generic test --from-literal=my_secret_key="my_secret_value" -
In Databricks, create a new Python Notebook called
testnotebookin the root of your Workspace. Put the following in the first cell of the notebook:
run_name = dbutils.widgets.get("run_name")
secret_scope = run_name + "_scope"

secret_value = dbutils.secrets.get(scope=secret_scope, key="dbricks_secret_key") # this will come from a kubernetes secret
print(secret_value) # will be redacted

value = dbutils.widgets.get("flag")
print(value) # 'true'
- Define your Notebook job and apply it
apiVersion: microsoft.k8s.io/v1beta1
kind: NotebookJob
metadata:
  annotations:
    microsoft.k8s.io/author: azkhojan@microsoft.com
  name: samplejob1
spec:
  notebookTask:
    notebookPath: "/testnotebook"
  timeoutSeconds: 500
  notebookSpec:
    "flag":  "true"
  notebookSpecSecrets:
  - secretName: "test"
    mapping:
    - "secretKey": "my_secret_key"
      "outputKey": "dbricks_secret_key"
  notebookAdditionalLibraries:
    - type: "maven"
      properties:
        coordinates: "com.microsoft.azure:azure-eventhubs-spark_2.11:2.3.9" # installs the azure event hubs library
  clusterSpec:
    sparkVersion: "5.2.x-scala2.11"
    nodeTypeId: "Standard_DS12_v2"
    numWorkers: 1
- Check the NotebookJob and Operator pod
# list all notebook jobs
kubectl get notebookjob
# describe a notebook job
kubectl describe notebookjob samplejob1
# describe the operator pod
kubectl -n databricks-operator-system describe pod databricks-operator-controller-manager-0
# get logs from the manager container
kubectl -n databricks-operator-system logs databricks-operator-controller-manager-0 -c dbricks
- Check the job ran with expected output in the Databricks UI.
Run Souce Code
-
Clone the repo
-
Install the NotebookJob CRD in the configured Kubernetes cluster folder ~/.kube/config, run
kubectl apply -f databricks-operator/config/crdsormake install -C databricks-operator -
Create secrets for
DATABRICKS_HOSTandDATABRICKS_TOKENkubectl --namespace databricks-operator-system create secret generic dbrickssettings --from-literal=DatabricksHost="https://xxxx.azuredatabricks.net" --from-literal=DatabricksToken="xxxxx"Make sure your secret name is set correctly in
databricks-operator/config/default/azure_databricks_api_image_patch.yaml -
Deploy the controller in the configured Kubernetes cluster folder ~/.kube/config, run
kustomize build databricks-operator/config | kubectl apply -f - -
Change the NotebookJob name from
sample1run1to your desired name, set the Databricks notebook path and update the values inmicrosoft_v1beta2_notebookjob.yamlto reflect your Databricks environmentkubectl apply -f databricks-operator/config/samples/microsoft_v1beta2_notebookjob.yaml
How to extend the operator and build your own images
Updating the Databricks operator:
This Repo is generated by Kubebuilder.
To Extend the operator databricks-operator:
-
Run
dep ensureto download dependencies. It doesn't show any progress bar and takes a while to download all of dependencies. -
Update
pkg\apis\microsoft\v1beta1\notebookjob_types.go. -
Regenerate CRD
make manifests. -
Install updated CRD
make install -
Generate code
make generate -
Update operator
pkg\controller\notebookjob\notebookjob_controller.go -
Update tests and run
make test -
Build
make build -
Deploy
make docker-build IMG=azadehkhojandi/databricks-operator
make docker-push IMG=azadehkhojandi/databricks-operator
make deploy
Main Contributors
- Jordan Knight Github, Linkedin
- Paul Bouwer Github, Linkedin
- Lace Lofranco Github, Linkedin
- Allan Targino Github, Linkedin
- Rian Finnegan Github, Linkedin
- Jason Goodselli Github, Linkedin
- Craig Rodger Github, Linkedin
- Justin Chizer Github, Linkedin
- Azadeh Khojandi Github, Linkedin
Resources
Kubernetes on WSL
On windows command line run kubectl config view to find the values of [windows-user-name],[minikubeip],[port]
mkdir ~/.kube \
&& cp /mnt/c/Users/[windows-user-name]/.kube/config ~/.kube

kubectl config set-cluster minikube --server=https://<minikubeip>:<port> --certificate-authority=/mnt/c/Users/<windows-user-name>/.minikube/ca.crt
kubectl config set-credentials minikube --client-certificate=/mnt/c/Users/<windows-user-name>/.minikube/client.crt --client-key=/mnt/c/Users/<windows-user-name>/.minikube/client.key
kubectl config set-context minikube --cluster=minikube --user=minikub
More info:
- https://devkimchi.com/2018/06/05/running-kubernetes-on-wsl/
- https://www.jamessturtevant.com/posts/Running-Kubernetes-Minikube-on-Windows-10-with-WSL/
Build pipelines
Contributing
This project welcomes contributions and suggestions. Most contributions require you to agree to a Contributor License Agreement (CLA) declaring that you have the right to, and actually do, grant us the rights to use your contribution. For details, visit https://cla.microsoft.com.
When you submit a pull request, a CLA-bot will automatically determine whether you need to provide a CLA and decorate the PR appropriately (e.g., label, comment). Simply follow the instructions provided by the bot. You will only need to do this once across all repos using our CLA.
This project has adopted the Microsoft Open Source Code of Conduct. For more information see the Code of Conduct FAQ or contact opencode@microsoft.com with any additional questions or comments.


