|
|
||
|---|---|---|
| .vscode | ||
| images | ||
| src | ||
| .gitignore | ||
| .space | ||
| .vscodeignore | ||
| CHANGELOG.md | ||
| LICENSE | ||
| README.md | ||
| package-lock.json | ||
| package.json | ||
| schema.json | ||
| tsconfig.json | ||
| tslint.json | ||
README.md
CodeTour 🗺️
CodeTour is a Visual Studio Code extension, which allows you to record and playback guided walkthroughs of your codebases. It's like a virtual brownbag, or table of contents, that can make it easier to onboard (or reboard!) to a new project/feature area, visualize bug reports, or understand the context of a code review/PR change. A "code tour" is simply a series of interactive steps, each of which are associated with a specific file/line, and include a description of the respective code. This allows developers to clone a repo, and then immediately start learning it, without needing to refer to a CONTRIBUTING.md file and/or rely on help from others. Tours can either be checked into a repo, to enable sharing with other contributors, or export to a "tour file", which allows anyone to replay the same tour, without having to clone any code to do it!
Starting a tour
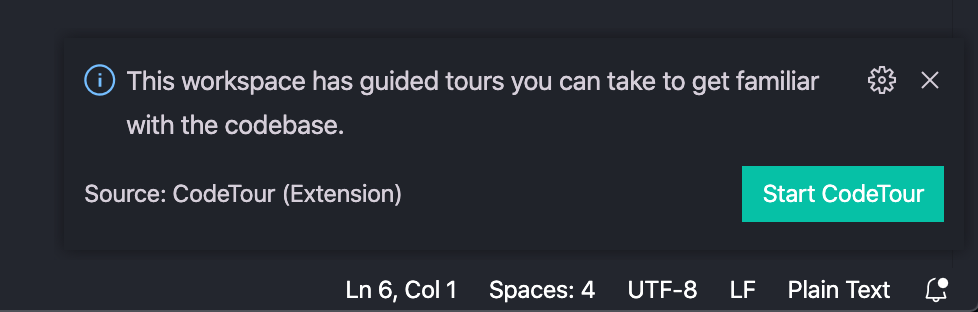
In order to start a tour, simply open up a codebase that has one or more tours. If this is the first time you've ever opened this codebase, you'll be presented with a toast notification asking if you'd like to take a tour of it.
Otherwise, you can manually start a tour via any of the following methods:
-
Clicking the
> Start CodeTourbutton in the status bar -
Selecting a tour (or specific step) in the
CodeTourview in theExploreractivity tab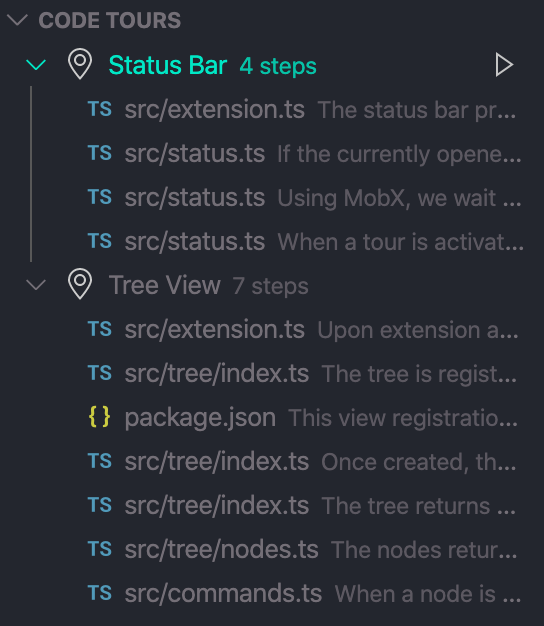
-
Running the
CodeTour: Start Tourcommand, and selecting the tour you'd like to take
If the current workspace only has a single code tour, then any of the above actions will automatically start that tour. Otherwise, you'll be presented with a list of tours to select from.
Opening a tour
In addition to taking tours that are part of the currently open workspace, you can also open a tour file that someone else sent you and/or you created yourself. Simply run the CodeTour: Open Tour File... command and/or click the folder icon in the title bar of the CodeTour tree view.
Navigating a tour
Once you've started a tour, the comment UI will guide you, and includes navigation actions that allow you to perform the following:
Move Previous- Navigate back to the previous step in the current tourMove Next- Navigate to the next step in the current tourEdit Tour- Begin editing the current tour (see authoring for details)End Tour- End the current tour and remove the comment UI
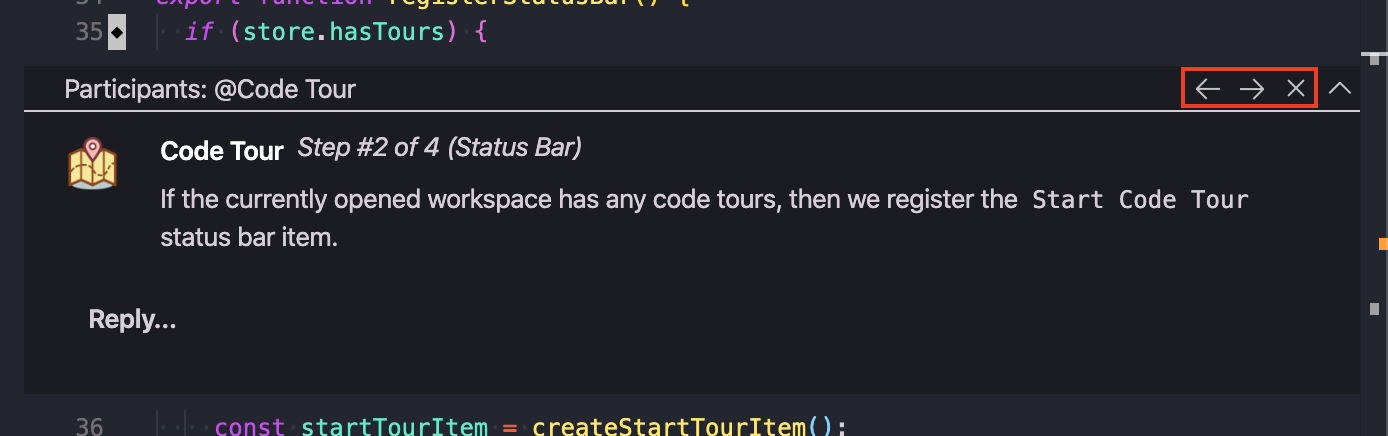
Additionally, you can use the ctrl+right / ctrl+left (Windows/Linux) and cmd+right / cmd+left (macOS) keyboard shortcuts to move forwards and backwards in the tour. The CodeTour tree view and status bar is also kept in sync with your current tour/step, to help the developer easily understand where they're at in the context of the broader tour.

If you navigate away from the current step and need to resume, you can do that via any of the following actions:
- Right-clicking the active tour in the
CodeTourstree and selectingResume Tour - Clicking the
CodeTourstatus bar item - Running the
CodeTour: Resume Tourcommand in the command palette
At any time, you can end the current code tour by means of one of the following actions:
- Click the stop button (the red square) in the current step comment
- Click the stop button next to the active tour in the
CodeTourtree - Running the
CodeTour: End Tourcommand in the command palette
Authoring tours
If you'd like to create a code tour for your codebase, you can simply click the + button in the CodeTours tree view and/or run the CodeTour: Record Tour command. This will start the "tour recorder", which allows you to begin opening files, clicking the "comment bar" for the line you want to annotate, and then adding the respective description (including markdown!). Add as many steps as you want, and then when done, click the save icon in the comment UI to write the tour to the currently opened workspace.
While you're recording, the CodeTour tree view will display the currently recorded tour, and it's current set of steps. You can tell which tour is being recorded because it will have a microphone icon to the left of its name.
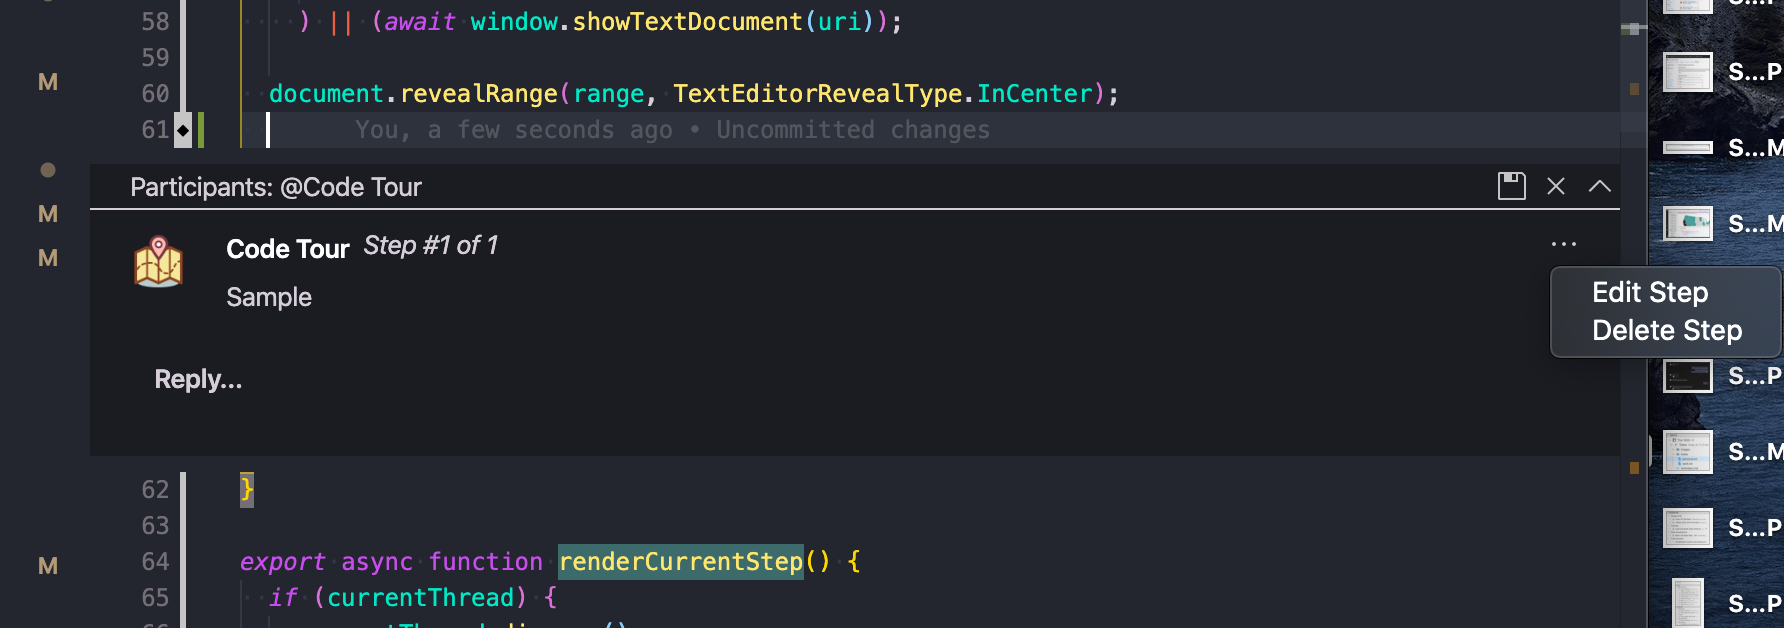
If you need to edit or delete a step while recording, click the ... menu next to the step's description, and select the appropriate action.
Step titles
By default, the CodeTour tree displays each tour step using the following display name format: #<stepNumber> - <filePath>. However, if you'd like to give the step a more friendly name, you can edit the step's description and add a markdown heading to the top of it, using whichever heading level you prefer (e.g. #, ##, etc.). For example, if you add a step whose description starts with `### Activation, the step and tree view would look like the following:
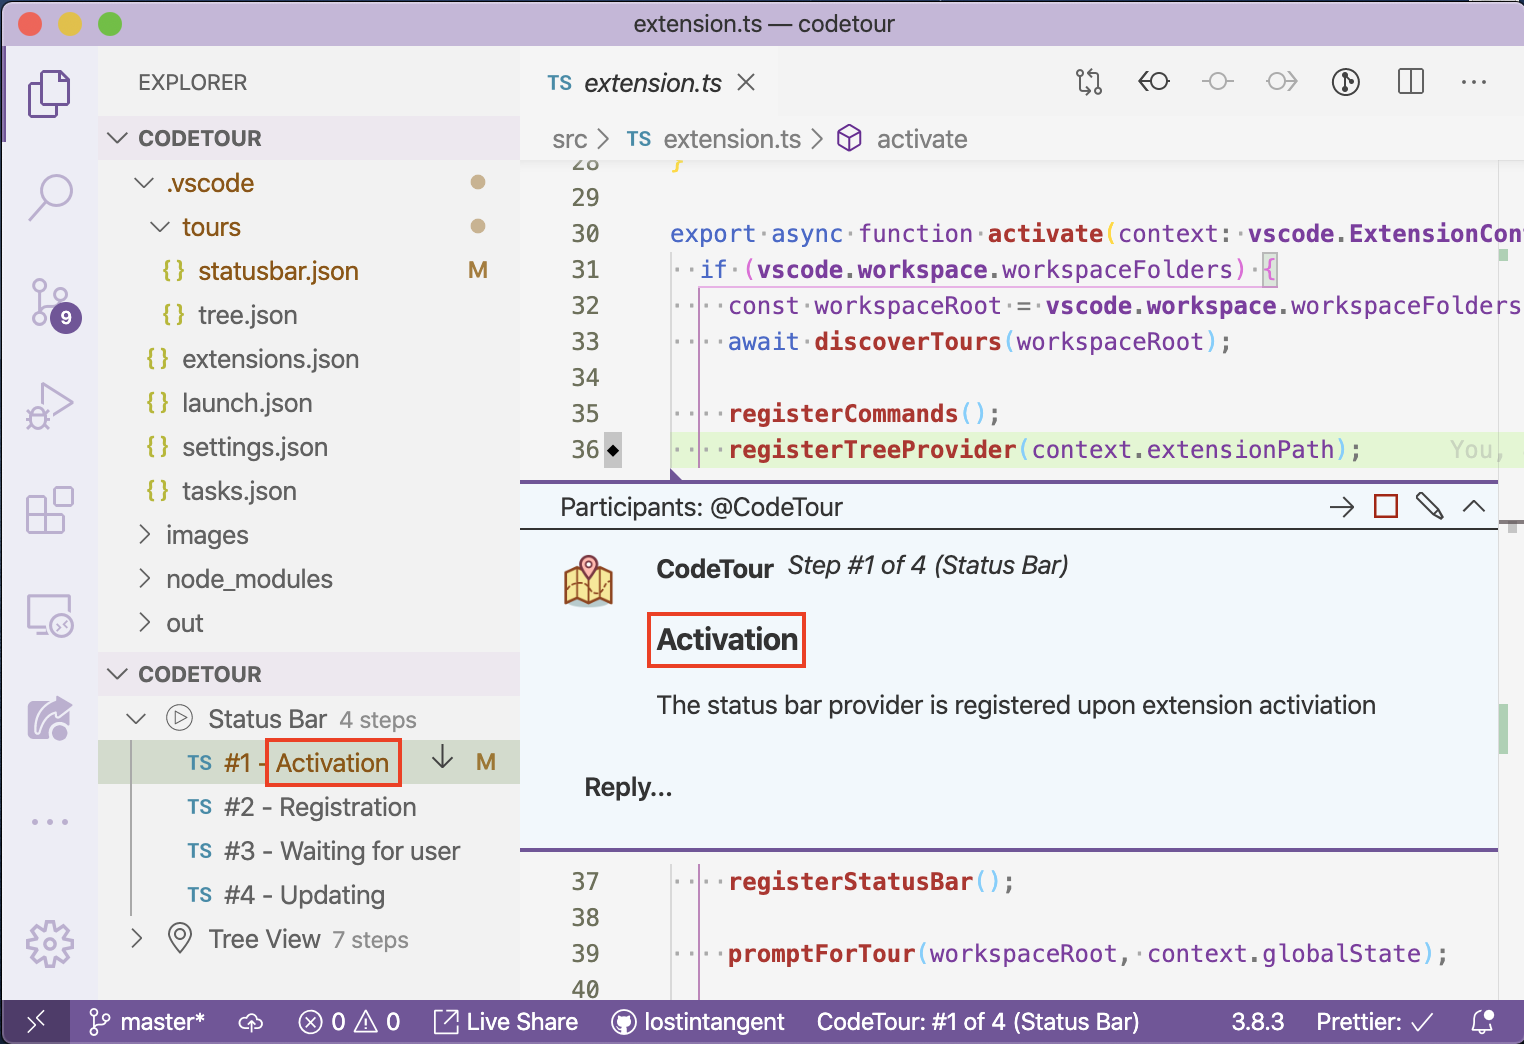
While you can any heading leve for the step title, we'd recommend using ### or "lower" (e.g. ####), since that provides a nice look within the step's comment UI.
If you'd like to add step titles to a tour, but don't want to add markdown headings to their descriptions, you can manually set the
titleproperty for each step in the tour's underlyingJSONfile (which can be found in the.vscode/toursdirectory). See tour schema for more detials.
Recording text selection
By default, each step is associated with the line of code you created the comment on (i.e. the line you clicked the + on the comment bar for). However, if you want to call out a specific span of code as part of the step, simply highlight the code before you add the step (clicking the Add Tour to Step button), and the selection will be captured as part of the step.
If you need to tweak the selection that's associated with a step, simply edit the step, reset the selection and then save it.
Re-arranging steps
While you're recording a tour, each new step that you add will be appended to the end of the tour. However, you can move existing steps up and down in the order by performing one of the following actions:
- Hover over the step in the
CodeTourtree and click the up/down arrow icon - Right-click the step in the
CodeTourtree and select theMove UporMove Downmenu items - Click the
...menu in the step comment UI and selectMove UporMove Down
Additionally, if you want to add a new step in the middle of a tour, simply navigate to the step that you want to insert a new step after, and then create the new step.
Deleting steps
If you no longer need a specific step in a tour, you can delete it by means of one of the following actions:
- Right-clicking the step in the
CodeTourtree and selectingDelete Step - Navigating to the step in the replay/comment UI, selecting the
...menu next to the comment description and selectingDelete Step
Editing a tour
If you want to edit an existing tour, simply right-click the tour in the CodeTour tree and select Edit Tour. Alternatively, you can edit a tour you're actively viewing by clicking the pencil icon in the current step's comment bar, or running the CodeTour: Edit Tour command.
At any time, you can right-click a tour in the CodeTour tree and change it's title, description or git ref, by selecting the Change Title, Change Description or Change Git Ref menu items. Additionally, you can delete a tour by right-clicking it in the CodeTour tree and seelcting Delete Tour.
Versioning tours
When you record a tour, you'll be asked which git "ref" to associate it with. This allows you to define how resilient you want the tour to be, as changes are made to the respective codebase.
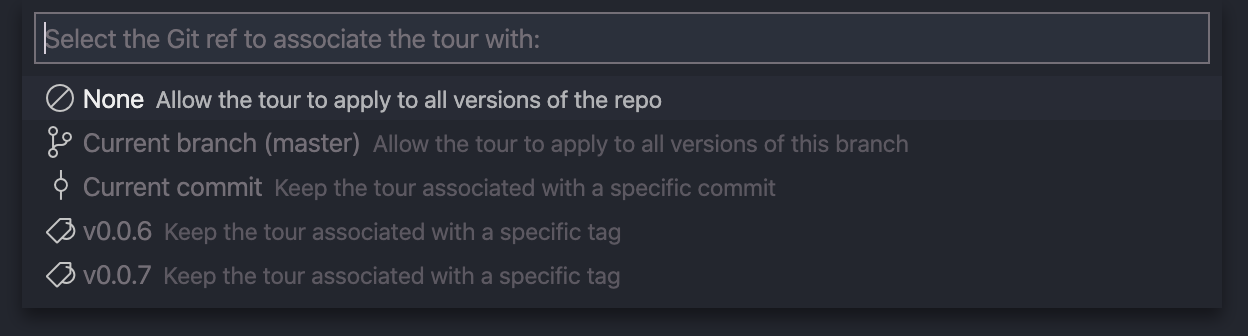
You can choose to associate with the tour with the following ref types:
None- The tour isn't associated with any ref, and therefore, the file/line numbers in the tour might get out of sync over time. The benefit of this option is that it enables the code to be edited as part of the tour, since the tour will walk the user through whichever branch/commit they have checked out.Current Branch- The tour is restricted to the current branch. This can have the same resiliency challenges asNone, but, it allows you to maintain a special branch for your tours that can be versioned seperately. If the end-user has the associated branch checked out, then the tour will enable them to make edits to files as its taken. Otherwise, the tour will replay with read-only files.Current Commit- The tour is restricted to the current commit, and therefore, will never get out of sync. If the end-user'sHEADpoints at the specified commit, then the tour will enable them to make edits to files as its taken. Otherwise, the tour will replay with read-only files.- Tags - The tour is restricted to the selected tag, and therefore, will never get out of sync. The repo's entire list of tags will be displayed, which allows you to easily select one.
At any time, you can edit the tour's ref by right-clicking it in the CodeTour tree and selecting Change Git Ref. This let's you "rebase" a tour to a tag/commit as you change/update your code and/or codebase.
Tour Files
Behind the scenes, the tour will be written as a JSON file to the .vscode/tours directory of the current workspace. This file is pretty simple and can be hand-edited if you'd like. Additionally, you can manually create tour files, by following the tour schema. You can then store these files to the .vscode/tours directory, or you can also create a tour at any of the following locations:
codetour.jsontour.json.vscode/codetour.json.vscode/tour.json
Exporting Tours
By default, when you record a tour, it is written to the currently open workspace. This makes it easy to check-in the tour and share it with the rest of the team. However, there may be times where you want to record a tour for yourself, or a tour to help explain a one-off to someone, and in those situations, you might not want to check the tour into the repo.
So support this, after you finish recording a tour, you can right-click it in the CodeTour tree and select Export Tour. This will allow you to save the tour to a new location, and then you can delete the tour file from your repo. Furthermore, when you export a tour, the tour file itself will embed the contents of all files needed by the tour, which ensures that someone can play it back, regardless if the have the respective code available locally. This enables a powerful form of collaboration.
Tour Schema
Within the tour file, you need to specify the following required properties:
title- The display name of the tour, which will be shown in theCodeTourtree view, quick pick, etc.description- An optional description for the tour, which will be shown as the tooltip for the tour in theCodeTourtree viewref- An optional "git ref" (branch/tag/commit) that this tour applies to. See versioning tours for more details.steps- An array of tour stepsfile- The file path (relative to the workspace root) that this step is associated withuri- An absolute URI that this step is associated with. Note thaturiandfileare mutually exclusive, so only set one per stepline- The 1-based line number that this step is associated withtitle- An optional title, which will be displayed as the step name in theCodeTourtree view.description- The text which explains the current file/line number, and can include plain text and markdown syntax
For an example, refer to the .vscode/tour.json file of this repository.
Tree View
If the currently opened workspace has any code tours, you'll see a new tree view called CodeTour, that's added to the Explorer tab. This view simply lists the set of available code tours, along with their title and number of steps. If you select a tour it will start it, and therefore, this is simply a more convenient alternative to running the CodeTour: Start Tour command. However, you can also expand a tour and start it at a specific step.
Additionally, the tree view will display the tour currently being recorded, which makes it easy to track your status while in the process of creating a new tour.
The tree view is automatically kept up to date, as you add/edit/delete tours within the current workspace. So feel free to record and/or edit tours, and then navigate them when done.
Status Bar
In addition to the CodeTour tree view, this extension also contributes a new status bar item called Start CodeTour to your status bar. It's only visible when the current workspace has one or more tours, and when clicked, it allows you to select a tour and then begin navigating it.
While you're within a tour, the status bar will update to show the title and step of the current tour. When clicked, it will open the file/line of the current tour step, which allows you to open other files while taking a tour, and then resumse the tour when ready. Once you end the current tour, the status bar will transition back to displaying the Start CodeTour button.
If you don't want this status bar item, simply right-click it and select
Hide CodeTour (Extension).
Contributed Commands
In addition to the CodeTour tree view and the status bar item, the Code Tour extension also contributes the following commands to the command palette:
-
CodeTour: Start Tour- Starts a tour for the currently opened workspace. This command is only visible if the current workspace actually has one or more code tours. -
CodeTour: Record Tour- Starts the tour recorder, which allows you to create a new tour by creating a sequence of steps. -
CodeTour: Refresh Tours- Refreshes theCode Toursview, which can be handy if you'd created/modified/deleted tour files on disk. -
CodeTour: Edit Tour- Puts the currently active tour into edit more. This command is only visible while you're actively playing a tour, that you're not already editing. -
CodeTour: End Tour- Ends the currently active tour. This command is only visible while you're actively recording/playing a tour. -
CodeTour: Resume Current Tour- Resumse the current tour by navigating to the file/line number that's associated with the current step. This command is only visible while you're actively recording/playing a tour.
Keybindings
In addition to the available commands, the Code Tour extension also contributes the following commands, which are active while you're currently taking a tour:
ctrl+right(Windows/Linux),cmd+right(macOS) - Move to the next step in the tourctrl+left(Windows/Linux)cmd+left(macOS) - Move to the previous step in the tour
Extension API (Experimental)
In order to enable other extensions to contribute/manage their own code tours, the CodeTour extension exposes an API with the following methods:
-
startTour(tour: CodeTour, stepNumber: number, workspaceRoot: Uri, startInEditMode: boolean = false, canEditTour: boolean): void- Starts the specified tour, at a specific step, and using a specific workspace root to resolve relative file paths. Additionally, you can specify whether the tour should be started in edit/record mode or not, as well as whether the tour should be editable. Once the tour has been started, the end-user can use the status bar, command palette, key bindings and comment UI to navigate and edit the tour, just like a "normal" tour. -
endCurrentTour(): void- Ends the currently running tour (if there is one). Note that this is simply a programatic way to end the tour, and the end-user can also choose to end the tour using either the command palette (running theCodeTour: End Tourcommand) or comment UI (clicking the red square, stop icon) as usual.