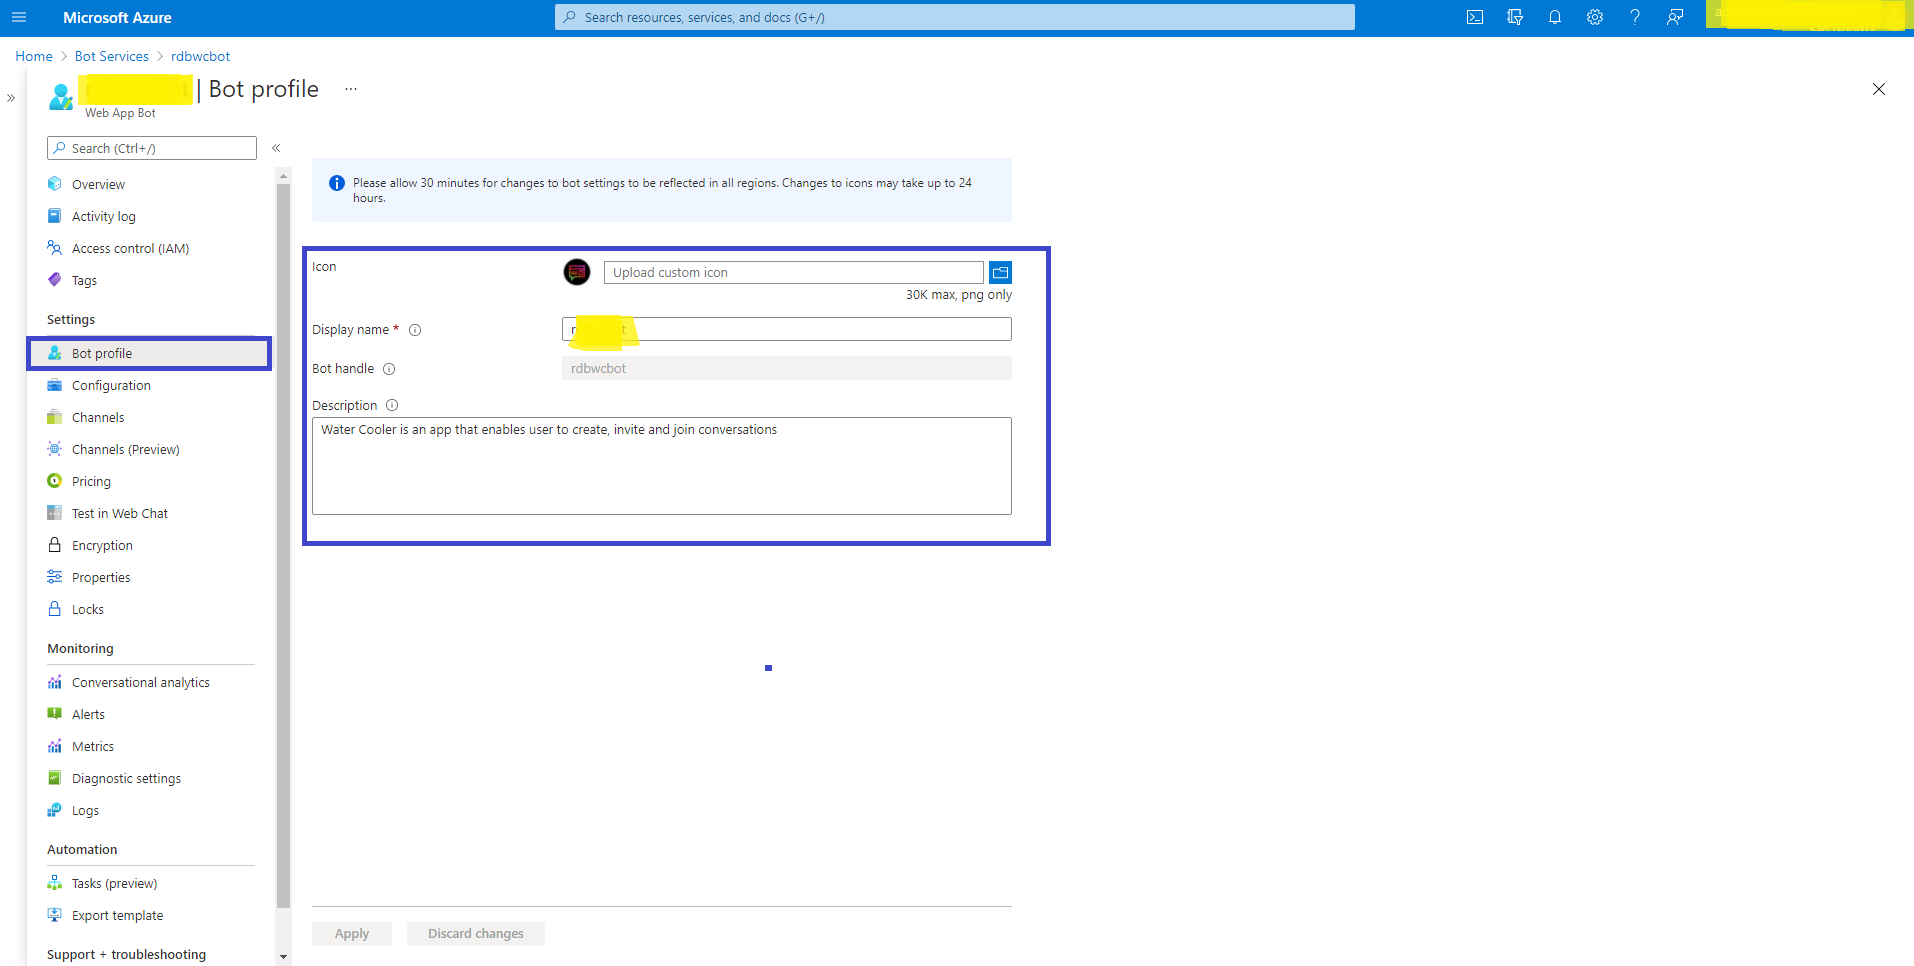
|
|
||
|---|---|---|
| Deployment | ||
| Manifest | ||
| WaterCoolerAPI | ||
| Wiki/Images | ||
| .gitignore | ||
| CODE_OF_CONDUCT.md | ||
| LICENSE | ||
| README.md | ||
| SECURITY.md | ||
| SUPPORT.md | ||
README.md
| page_type | languages | products | description |
|---|---|---|---|
| sample | csharp | office-teams | Water Cooler is a custom Teams app that enables corporate teams to create, invite, and join casual conversations among teammates, like those that take place by the Water Cooler or break room. |
Water Cooler App Template
Water Cooler is a custom Teams app that enables corporate teams to create, invite, and join casual conversations among teammates, like those that take place by the Water Cooler or break room. Use this template for multiple scenarios, such as new non-project related announcements, topics of interest, current events, or conversations about hobbies.
The app provides an easy interface for anyone to find an existing conversation or start a new one. It's a foundation for building custom targeted communication capabilities, promoting interaction amongst coworkers who may otherwise not get a chance to socialize during breaks.
Key features
-
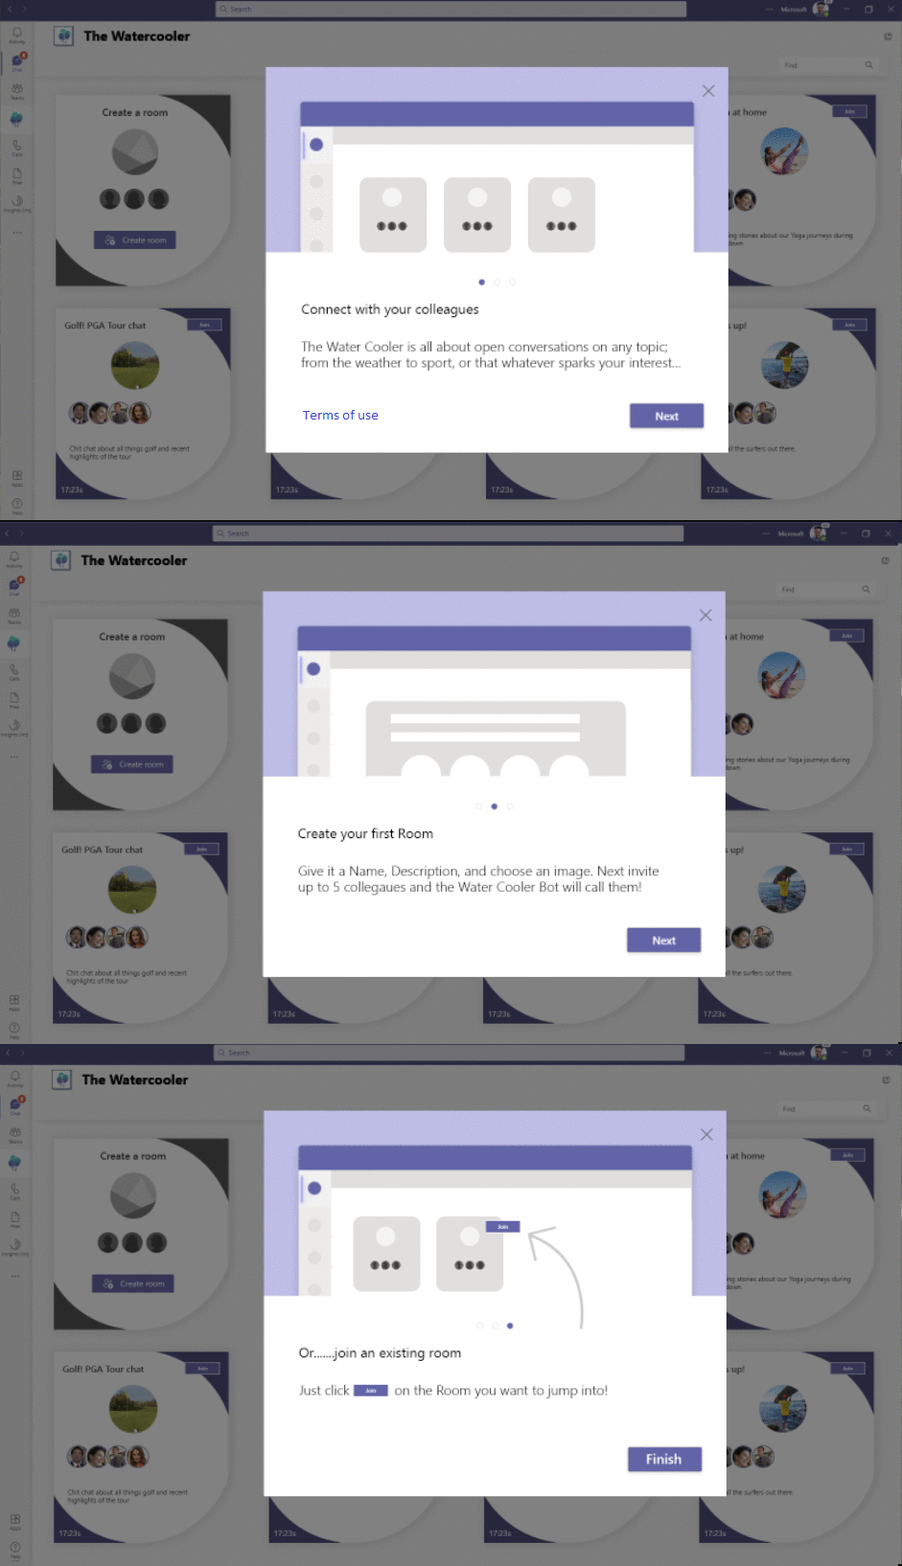
Water Cooler Welcome Tour: Welcome tour gives a brief introduction about the Water cooler app and helps the users on how to create the rooms or join existing rooms.
-
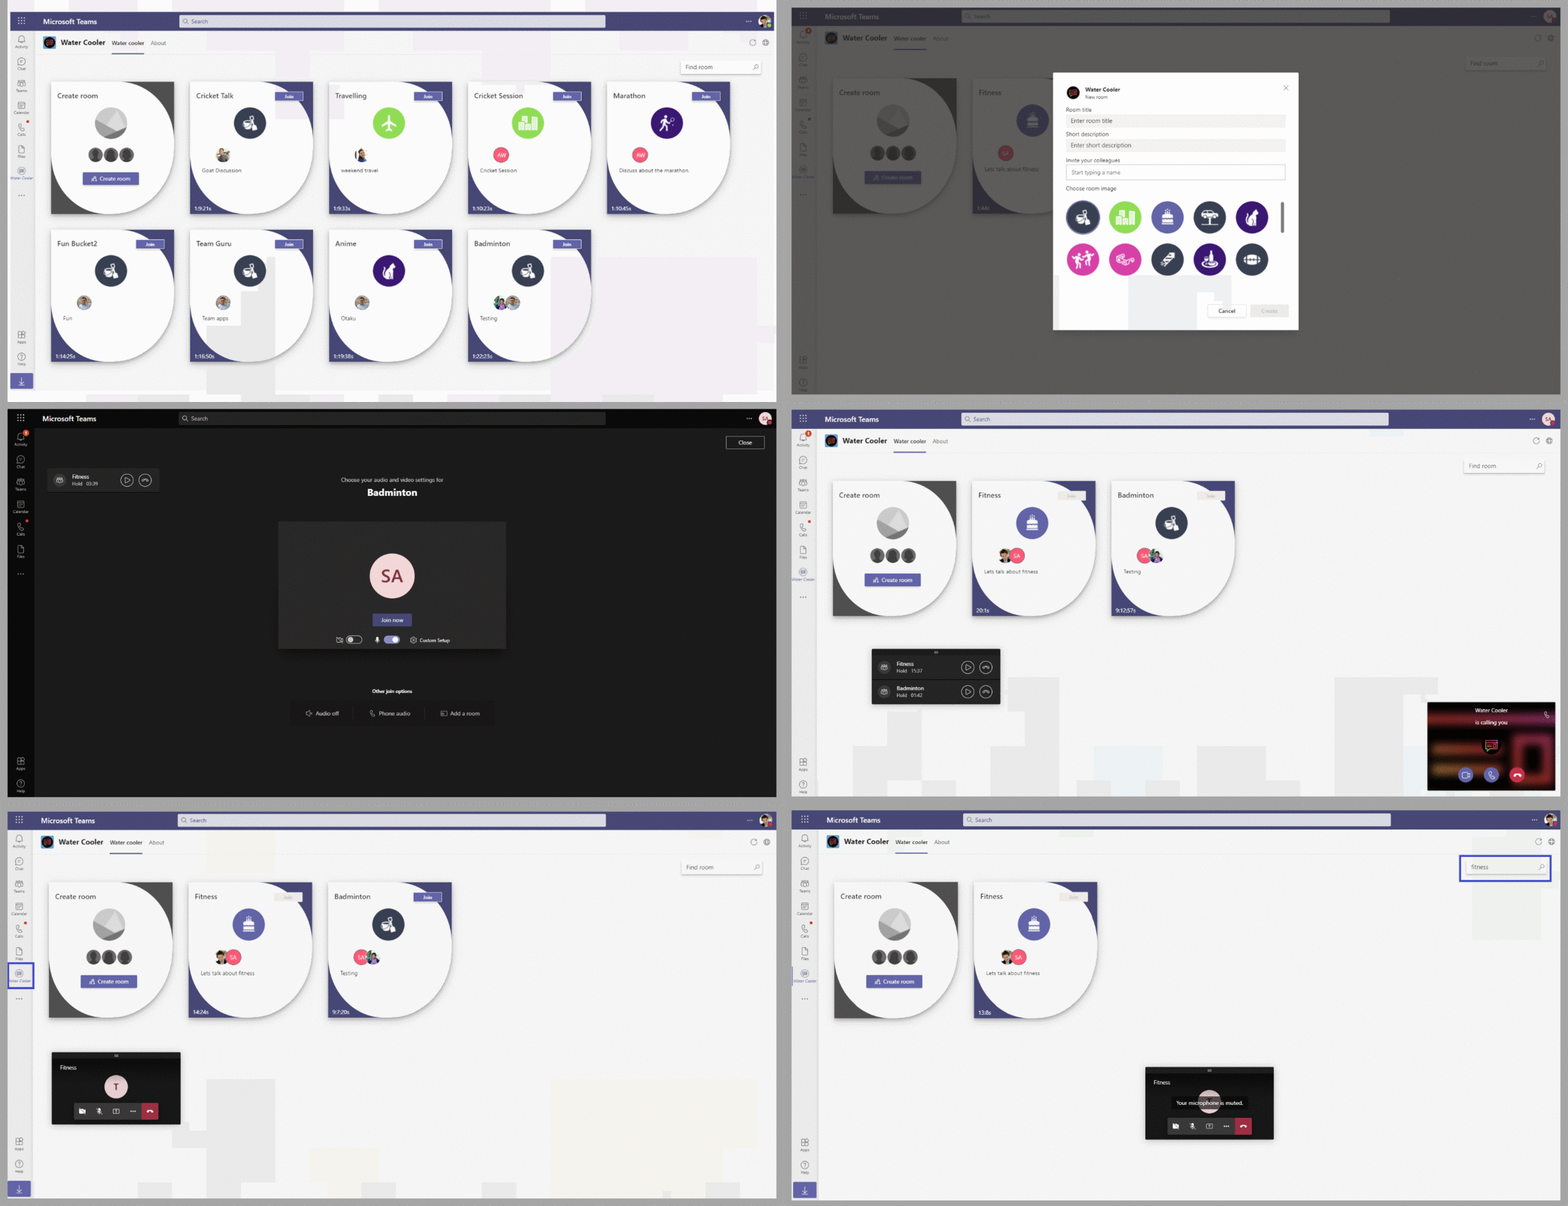
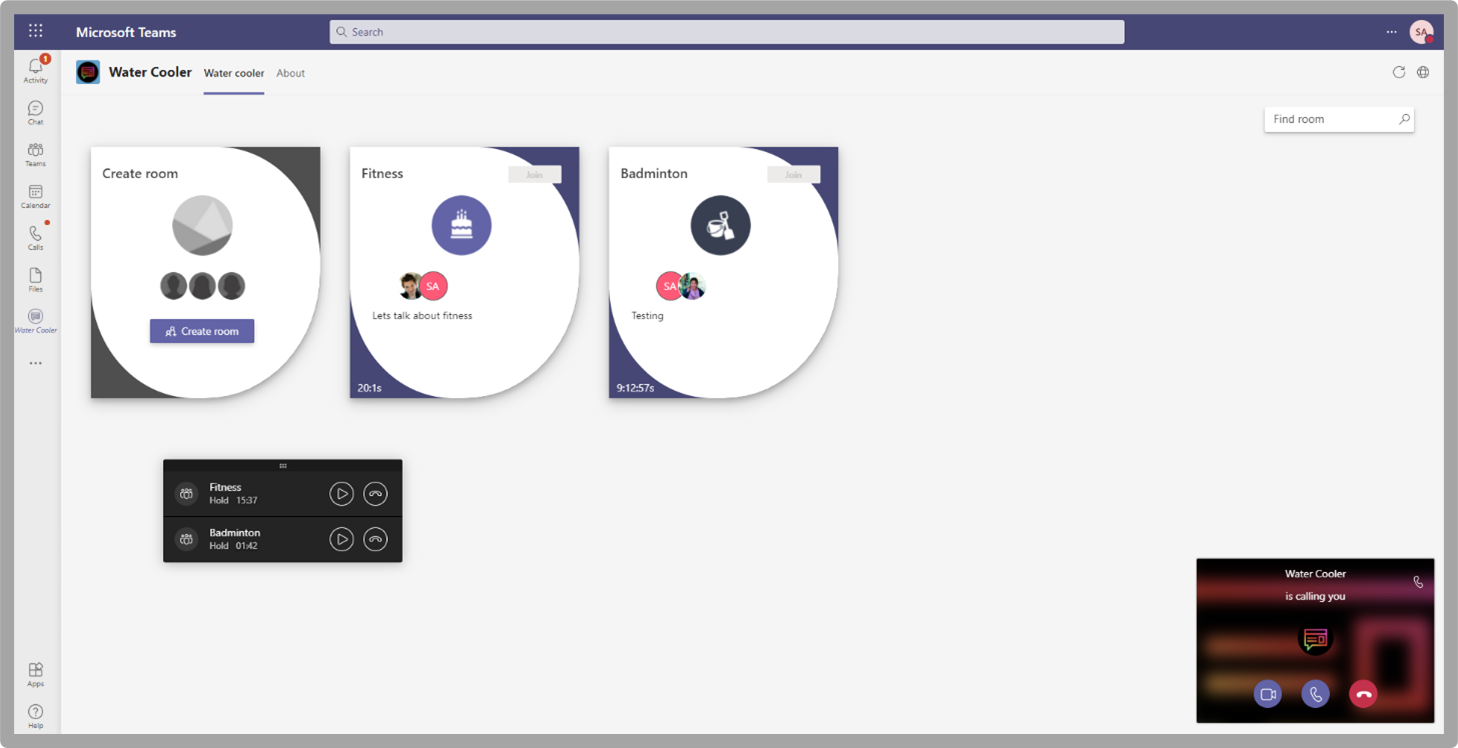
Water Cooler Home Page: Browse existing rooms where team members are interacting in existing conversations with certain people or topics of interest. Active conversations on the Home Page will show a room name, short description, call duration, and room image.
-
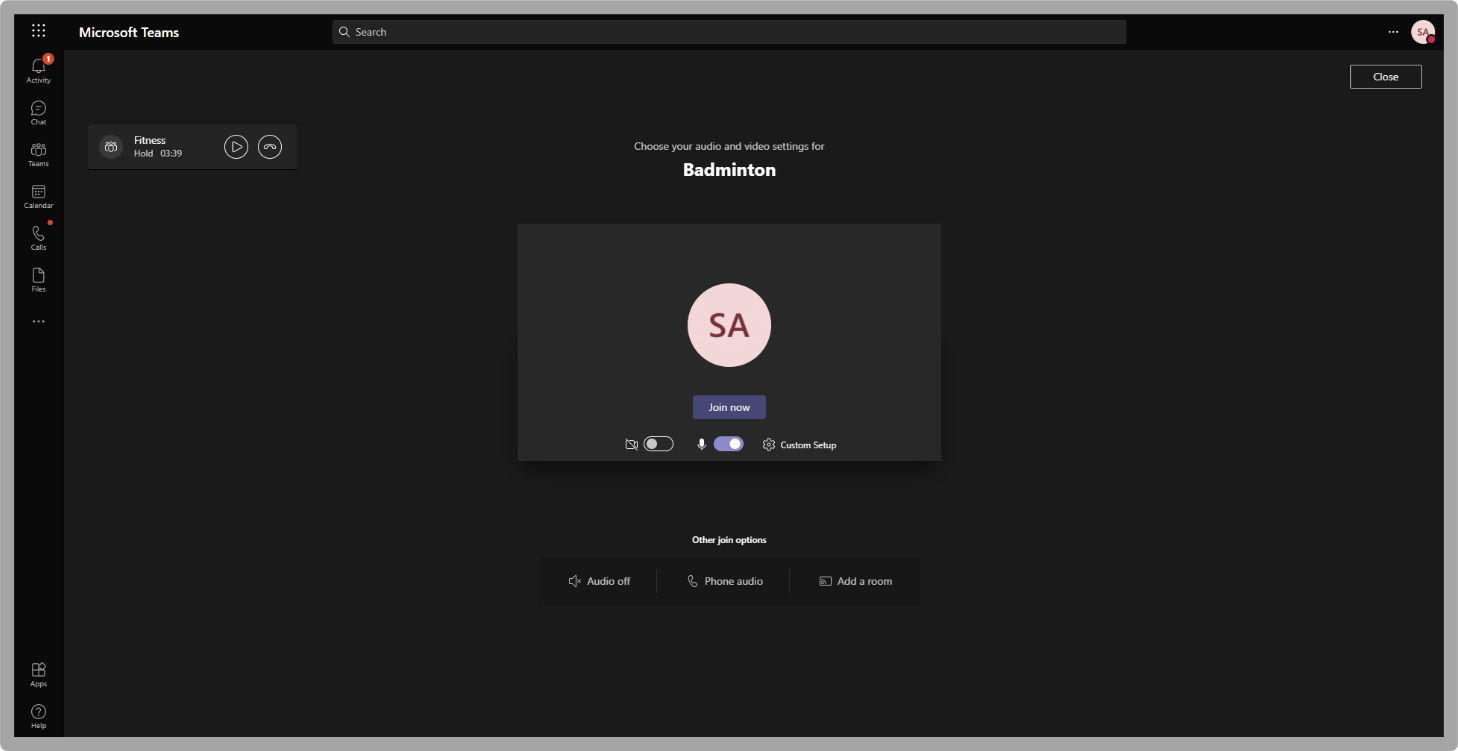
Join room: Active conversations will show a Join button to allow visitors to immediately enter an ongoing conversation.
-
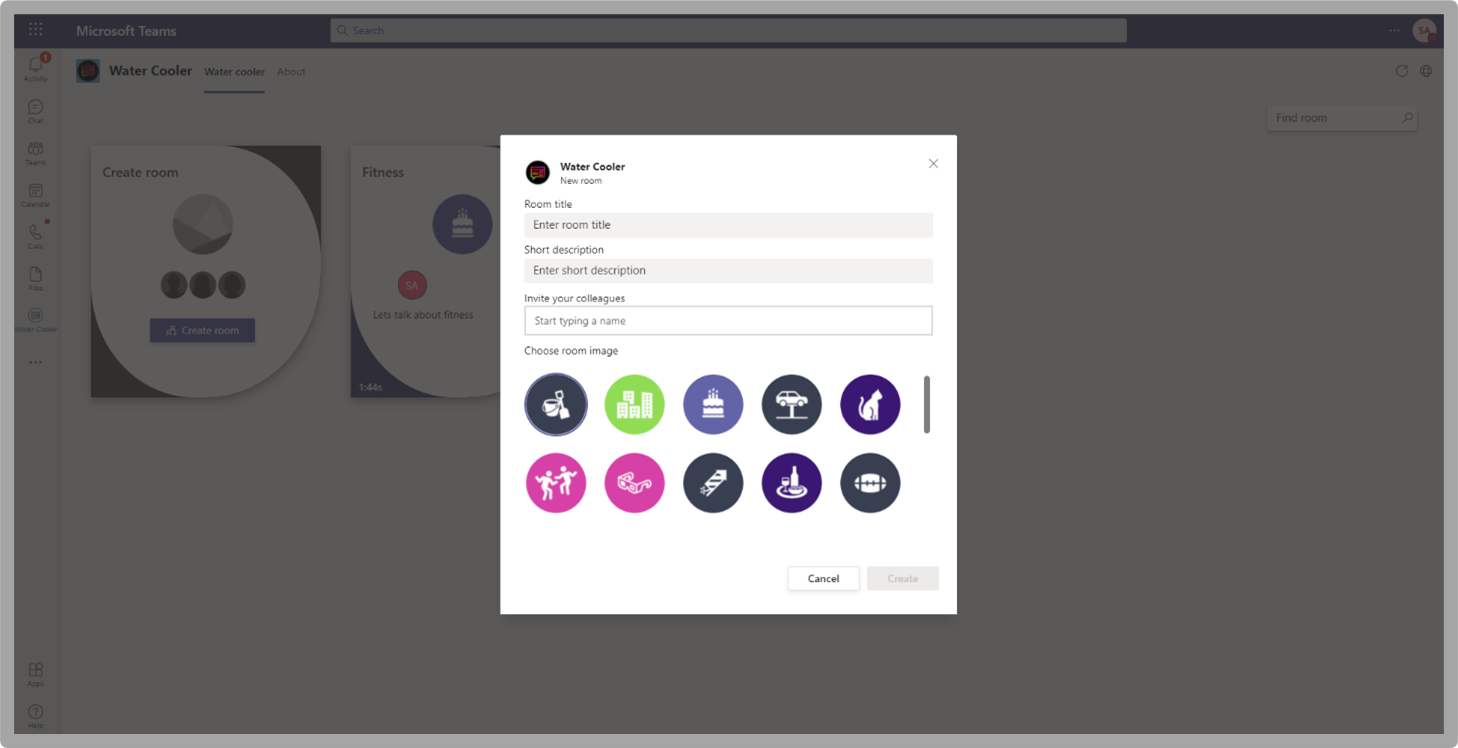
Room creation: Easily create rooms by specifying the room name, short description, up to 5 colleagues as an initial group and selecting from the provided set of room images. Room creation will create a Teams call/chat for all attendees to interact.
-
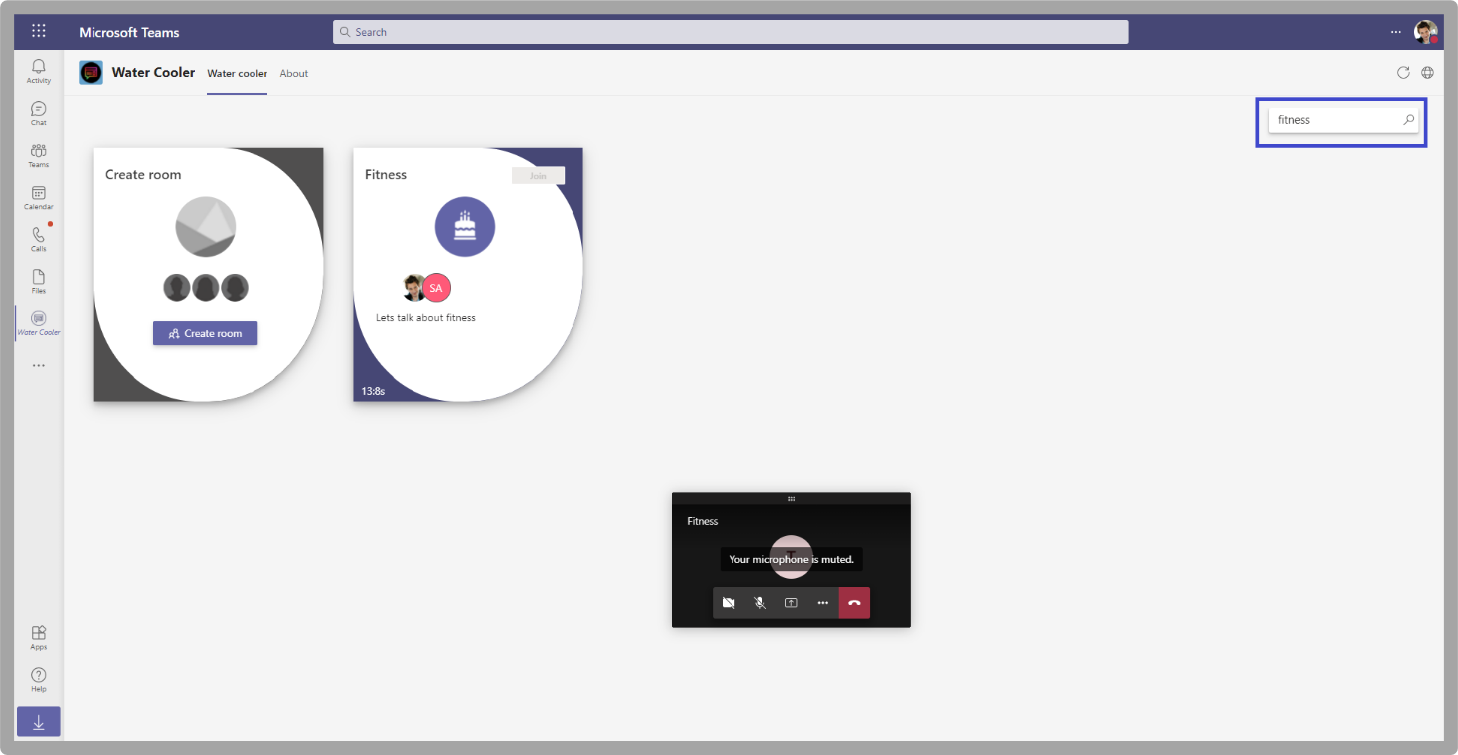
Find room: Use the find room feature to search keyword which will match the topic or short descriptions of ongoing conversations.
-
Attendee invitation: Just as with any Teams call, additional users can be invited after room creation.
-
App badge: Like other Teams apps, the Water Cooler icon on the left menu will show a badge with the number of active conversations visible from Teams while using any app.
Architecture
The Water Cooler app has the following main components:
- App Service (API): The API app service will provide the API endpoints to get the Rooms Data, its participants, and to Add a New Room.
- App Service (UI): The UI app service will display the Rooms and the participants in the room.
- Azure Storage: Azure Storage tables will store the Room Data and the participants information in the tables.
- Microsoft Graph API: The app leverages Microsoft graph APIs to List Participants, Get User Profile.
App Service
The app service implements two main concepts, Endpoints for displaying the calls and a scheduler job for updating the participant info.
API Endpoint
The end point will return all the active rooms by checking the azure storage tables. The azure storage tables will provide all active rooms. By utilizing the graph API, we will get the active participants in the call and return it data back to the UI. All these methods will be implemented using parallel async calls.
Scheduler
The scheduler will run for specified time and update database with the following things. It will loop through all the active calls and get the desired information from graph and based on the database records it will update or insert the records. E.g.: Currently there are 4 active users in the room. When the scheduler runs for the first time it will insert all 4 records. In next scheduler event we have a new participant in the call it will check for the change and as the new user is there it will insert the data. If any other user dropped off it will update the meeting end time for the user.
UI
The UI will fetch all the rooms and participants from the above-mentioned API and display the tiles information. The tile will have the Room name, description, participants list and a button to join the call. If the user is part of the call the join button will be displayed. Apart from that the first will be fixed and it will have the create new room button. Click on the button to open the dialog box with Room Name, Description and Participants list. After saving the Room a new call will be initiated. Bot will join the call and it will call other users who are invited initially. The UI application will continuously the poll the API to get the latest rooms information.
Microsoft Graph API
Delegated Permissions
App service requires the following Delegated Permission:
| Delegated Permission | Use Case |
|---|---|
| User.Read | In order to read the profile information of the logged in user. |
Application Permissions
App service requires the following Application Permissions:
| Application Permission | Use Case |
|---|---|
| Calls.AccessMedia.All | In order to access media streams in a call as an app. |
| Calls.Initaite.All | Initiate 1 to 1 outgoing call from app. |
| Calls.InitiaateGroupCall.All | Initiate outgoing group calls from the app. |
| Calls.JoinGroupCall.All | Join group calls and meetings as an app. |
| OnlineMeetings.Read.All | Read online meeting details. |
| OnlineMeetings.ReadWrite.All | Read and create online meetings. |
| People.Read.All | Read all users relevant peoples list. |
| User.Read.All | Read all users profile. |
Deployment Guide
Deployment of the Water Cooler app will take approx. 90 minutes, assuming all pre-requisites are in place.
Pre-requisites
Please make sure you are ready with the following list:
- Access to https://portal.azure.com
- You will need an active subscription with credit available
- Note: You will need to create a new Resource Group and be able to deploy Azure Services into it
- Access to run PowerShell on your local machine (as Administrator) connecting to a Microsoft Teams Tenant. This is needed to create the Policy allowing the Water Cooler app to make calls inside your tenant. Or you can use Azure cloud shell instead of PowerShell on local machine.
- When running the PowerShell your user account will need to have the Teams Administrator Role – or – be Global Administrator.
- Learn more: Use Microsoft Teams administrator roles to manage Teams
- Permissions to submit/approve a Teams App for use in your tenant via the Teams Admin Centre
- This allows users to find and access the app
Deployment steps
-
Register Azure AD application: Register an Azure AD application in your tenant's directory for Water Cooler app.
-
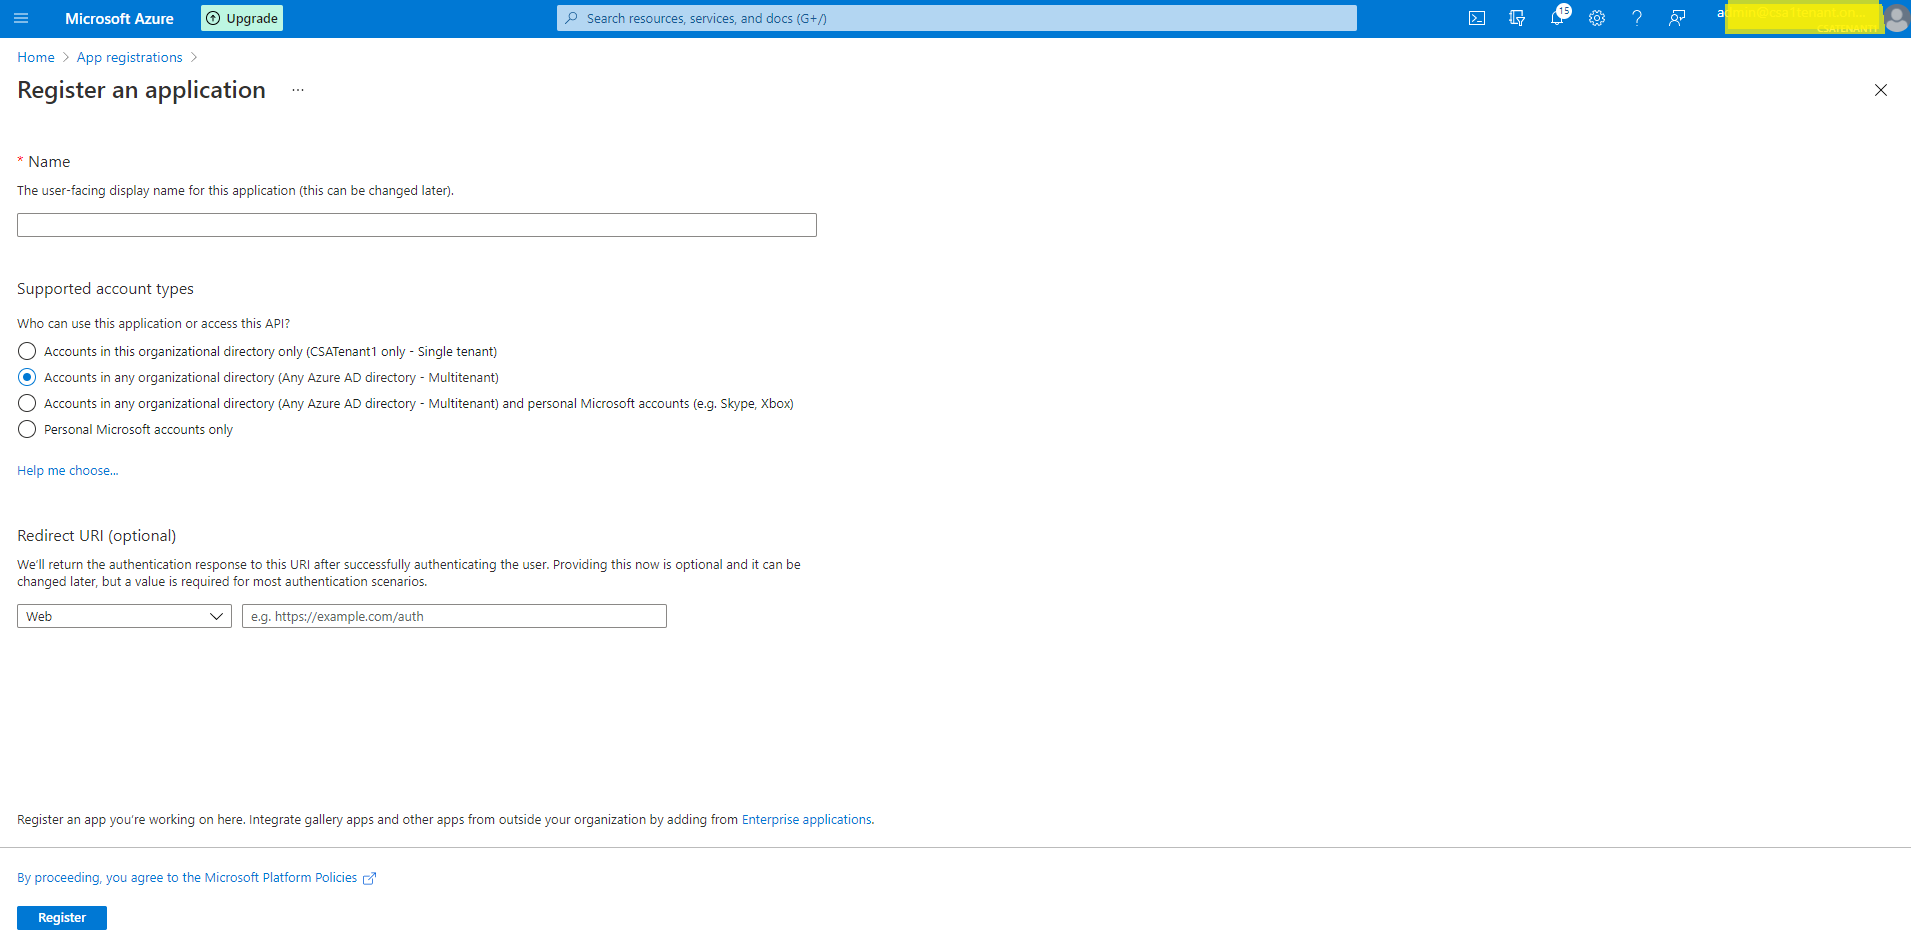
Log in to the Azure Portal for your subscription, and go to the App registrations blade.
-
Click New registration to create an Azure AD application.
-
Click Register to complete the registration.
-
When the app is registered, you'll be taken to the app's "Overview" page.
-
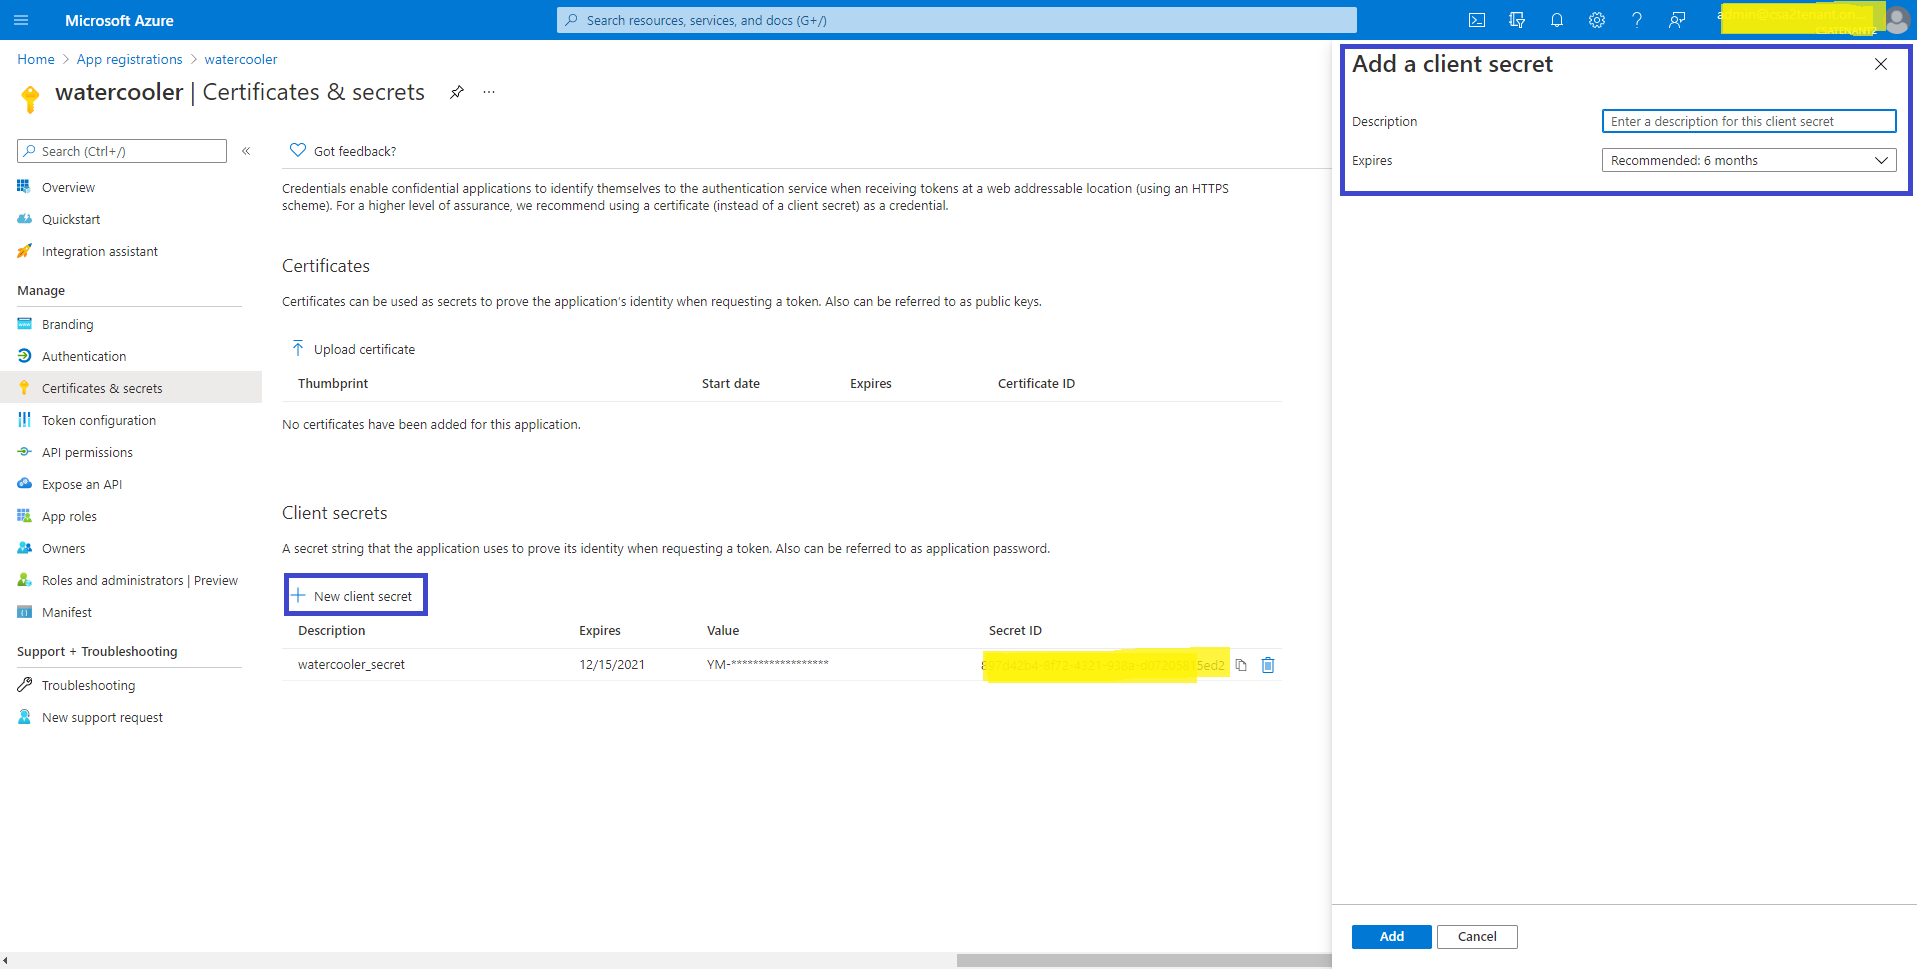
On the side rail in the Manage section, navigate to the "Certificates & secrets" section.
-
Once the client secret is created, copy its Value; we will need it later. At this point you should have the following 3 values.
- Application (client) ID for the Water Cooler app.
- Client secret for the Water Cooler app.
- Directory (tenant) ID. (Get from the app overview page or Azure AD)
We recommend that you copy the values, we will need them later.

-
-
Deploy your Azure subscription
-
Click on the Deploy to Azure button below.
-
When prompted, log in to your Azure subscription.
-
Azure will create a "Custom deployment" based on the Water Cooler ARM template and ask you to fill in the template parameters.
IMPORTANT NOTE: Please ensure that you don't use underscore (_) or space in any of the field values otherwise the deployment may fail.
-
Select a subscription and a resource group.
-
We recommend creating a new resource group.
-
The resource group location MUST be in a datacenter that supports all the following:
- Storage Accounts
- Application Insights
- App Service
- Azure Bot Services
For an up-to-date list of datacenters that support the above, click here
-
-
Update the following fields in the template:
- Client ID: The application (client) ID of the Microsoft Teams Water Cooler bot app. (from Step 1)
- Client Secret: The client secret of the Microsoft Teams Water Cooler bot app. (from Step 1)
- Bot Name: – Give the name to the Bot, as the calls will be initiated by bot in the Watercooler teams app. (Bot name must be available
not takenotherwise, the deployment will fail with a Conflict error) - User Id: This is the Azure AD GUID for the user account you want to run the application as. It just needs to be a regular AD account, no special licencing or permissions
- Storage Account Name: you need to think of a short name here for the storage table, keep it under 12 characters and all lower-case.(The storage name must be available
not takenotherwise, the deployment will fail with a Conflict error) - App Service Name: Think of a name for your app service (e.g. watercoolerappservice, must be available
not takenotherwise, the deployment will fail with a Conflict error) - write this down as you'll need it later. - Tenant Id: The tenant ID. (from Step 1). Basically, it will take it from the logged in tenant. You can also update manually.
- SKU: The app service plan. P1v2, P2v2, P3v2 (Premium V2 service plans), etc., You can check all the plans and its costs here. e.g. P3v2. (We recommend Premium plan P3v2).
- Terms Of Use Text: The text that should be shown in welcome card link.
- Terms Of Use Url: The link to be redirected when user click on the TermsOfUseText..
Note: Make sure that the values are copied as-is, with no extra spaces. The template checks that GUIDs are exactly 36 characters.
Note: If your Azure subscription is in a different tenant than the tenant where you want to install the Teams App, please update the Tenant Id field with the tenant where you want to install the Teams App.
-
If you wish to change the app name, description, and icon from the defaults, modify the corresponding template parameters.
-
Agree to the Azure terms and conditions by clicking on the check box "I agree to the terms and conditions stated above" located at the bottom of the page.
-
Click on "Agree & Create" to validate the template. It will validate the template and will provide create button if everything is good. Click on Create to start the deployment.
-
Wait for the deployment to finish. You can check the progress of the deployment from the "Notifications" pane of the Azure Portal. It may take up to an hour for the deployment to finish.
-
If deployment fails, Go to the deployed App sevice -> Deployment Center -> Logs. Then Sync to redeploy.
-
If Sync fails then We recommend to deploy on P1v2, P2v2, P3v2 (Premium V2 service plans) and after deploying successfully change the plan to S1.
-
Once successfully deployed, get the URL value from the Web API App Service that has been provisioned. Copy that value to clipboard for use next (and later).
-
-
Set-up Authentication
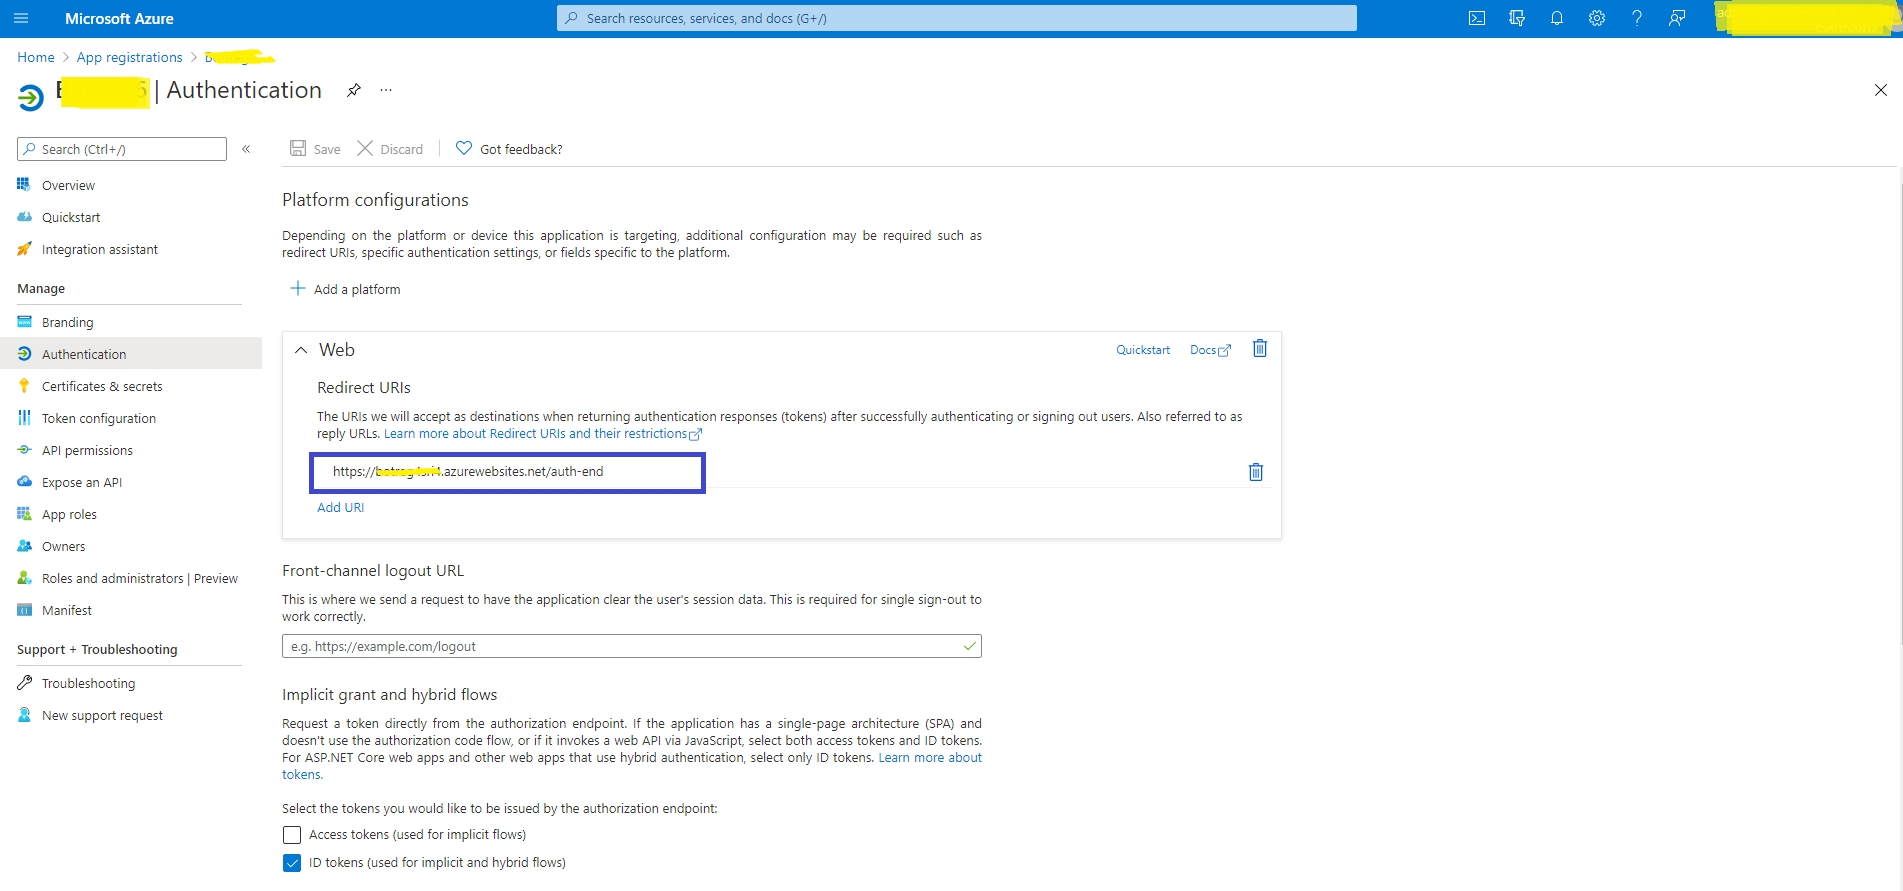
- Go to App Registrations page here and open the Water Cooler app you created (in Step 1) from the application list.
- Under Manage, click on Authentication to bring up authentication settings.
- Click on Add a Platform:
- Click
Web - Redirect URI: Enter
https://%AppServiceUrl%/auth-end for the URL e.g.https://yourappserviceurl/auth-end(app service) - You can find this URL by: Azure -> App Services -> your App Service -> copy URL
- Click
- Under Implicit grant, check ID tokens.
- Click Configure to commit your changes.
- Click on Add a Platform:
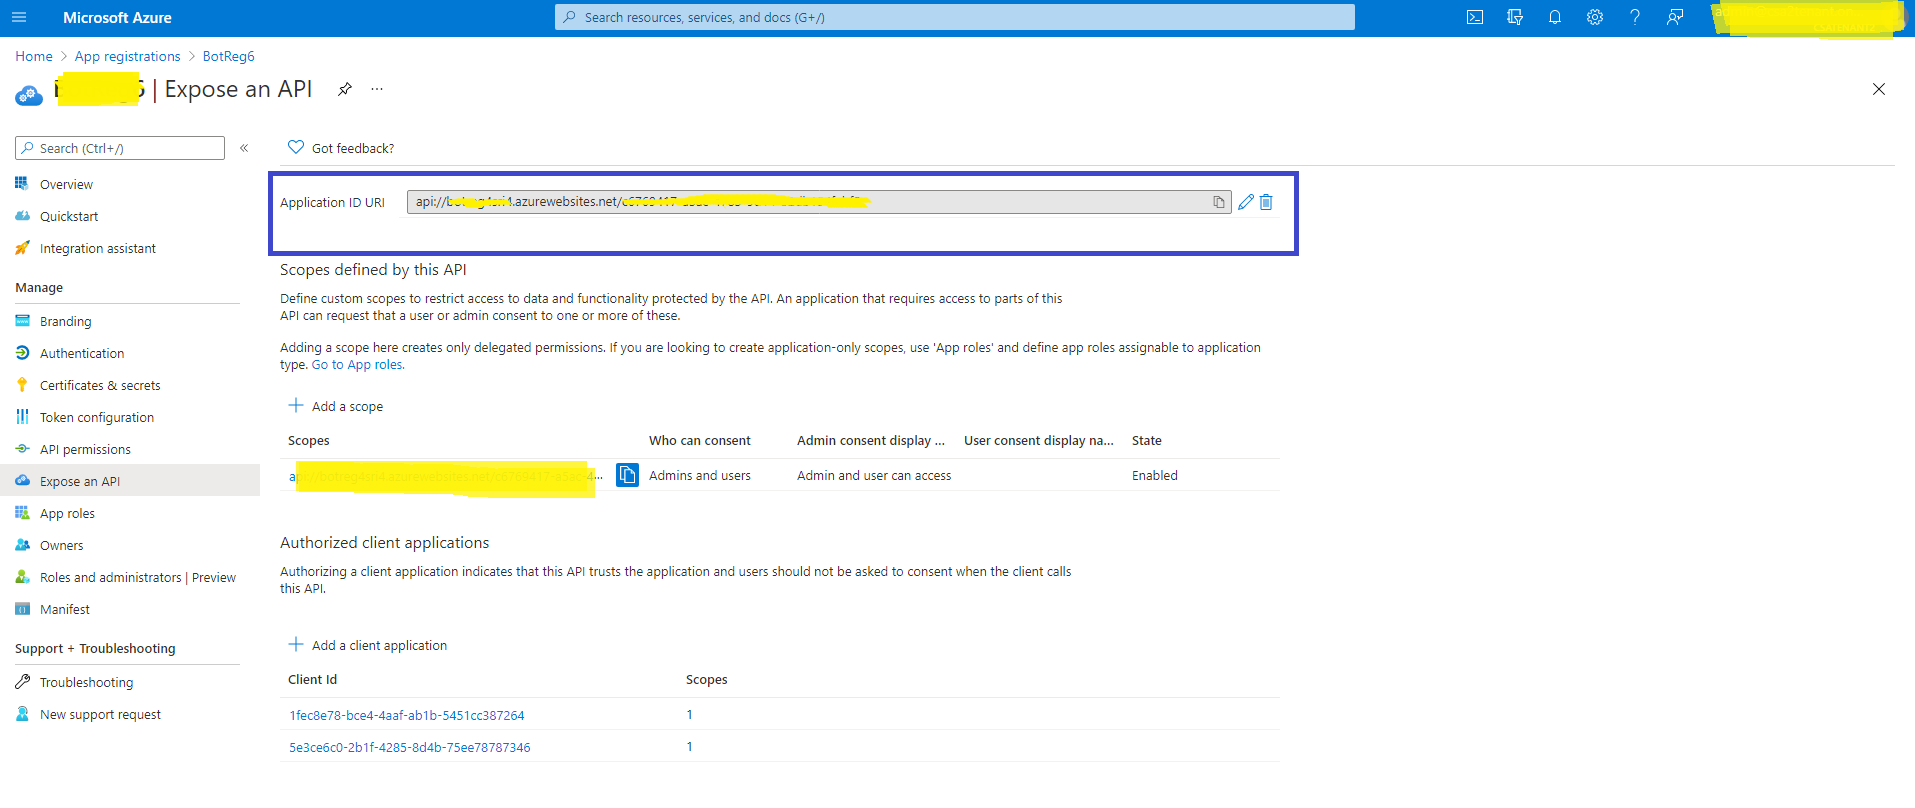
- Back under Manage, click on Expose an API.
-
Click on the Set link next to Application ID URI, and change the value to
api://%AppServiceURL%/clientId, this is the same URL you used in the previous step (but with api not https) see below: e.g.api://youappserviceurl.azurewebsites.net/clientId. -
Click Save to commit your changes.
-
Click on Add a scope, under Scopes defined by this API. In the flyout that appears, enter the following values:
- Scope name:
access_as_user - Who can consent?: Admins and users
- Admin and user consent display name: Access the API as the current logged-in user
- Admin and user consent description: Access the API as the current logged-in user
- Scope name:
-
Click Add scope to commit your changes.
-
Click Add a client application, under Authorized client applications. In the flyout that appears, enter the following values:
- Client ID:
5e3ce6c0-2b1f-4285-8d4b-75ee78787346(<- Has to be this) - Authorized scopes: Select the scope that ends with
access_as_user. (There should only be 1 scope in this list.)
- Client ID:
-
Click Add application to commit your changes.
-
Repeat the previous two steps, but with client ID =
1fec8e78-bce4-4aaf-ab1b-5451cc387264. After this step you should have two client applications (5e3ce6c0-2b1f-4285-8d4b-75ee78787346and1fec8e78-bce4-4aaf-ab1b-5451cc387264) listed under Authorized client applications.
-
-
Add Permissions to your App
Continuing from the Azure AD app registration page where we ended Step 3.
- Select API Permissions blade from the left-hand side.
- Click on Add a permission button to add permission to your app.
- In Microsoft APIs under Select an API label, select the service and give the following permissions,
-
Under Commonly used Microsoft APIs
-
Select “Microsoft Graph”, then select Application permissions and check the following permissions,
- Calls.AccessMedia.All
- Calls.Initiate.All
- Calls.InitiateGroupCall.All
- Calls.JoinGroupCall.All
- Calls.JoinGroupCallAsGuestAll
- OnlineMeetings.ReadWrite.All
- People.Read.All
- User.Read.All
-
then select Delegated permissions and check the following permissions
- Offline_access
- OnlineMeetings.ReadWrite
- Openid
- Profile
- User.Read
-
Click on Add Permissions to commit your changes.
-
- You should have 14 Configured Permissions in total. If not, you’ve missed some!
- If you are logged in as the Global Administrator, click on the “Grant admin consent for %tenant-name%” button to grant admin consent, else inform your Admin to do the same through the portal.
Alternatively you may follow the steps below:
- Prepare link -
https://login.microsoftonline.com/common/adminconsent?client_id=%appId%. Replace the%appId%with the Application (client) ID of Microsoft Teams Water Cooler bot app (from above). - Global Administrator can grant consent using the link above.
- Prepare link -
-
Give policy access to admin user
-
Click on command shell icon on header
-
Run
Update-Module MicrosoftTeams(To use updated module) -
Write below commands to run and provide appropriate details
-
Import-Module MicrosoftTeams
-
$userCredential= Get-Credential -
Connect-MicrosoftTeams -Credential
$userCredential -
New-CsApplicationAccessPolicy -Identity OnlineMeeting-WaterCooler -AppIds
%clientId%-Description "Water cooler app - Online meeting policy for admin -Tenant" -
Grant-CsApplicationAccessPolicy -PolicyName OnlineMeeting-WaterCooler -Identity
%adminUserId%
-
-
-
Create the Teams app package
Now everything is deployed in Azure, we need to package up the Teams App and add it into Teams!
- Make sure you have cloned the app repository locally.
- Open the Manifest\manifest.json file in a text editor.
- Change the placeholder fields in the manifest to values appropriate for your organization in developer property.
MenifestVersion = 1.5Version = 1.0.0id=Client IDdeveloper.name= Microsoft (What's this?)developer.websiteUrldeveloper.privacyUrldeveloper.termsOfUseUrl(This should be the same Terms of use URL used in step 4 ->15-> 2) [Note: These 3 URLs should be different]
- Change the placeholder fields in the manifest to values appropriate to app name property
- short: “
Water Cooler”, - Full: “
Water Cooler” - Description.short = Must be less than 80 characters in length
- short: “
- Change the placeholder fields in the manifest as an example below:
- "entityId": "
waterCooler", - "name": "
Water Cooler", - "contentUrl":
https://yourappserviceurl.azurewebsites.net/, - "websiteUrl":
"https://yourappserviceurl.azurewebsites.net/",
- "entityId": "
- Change the
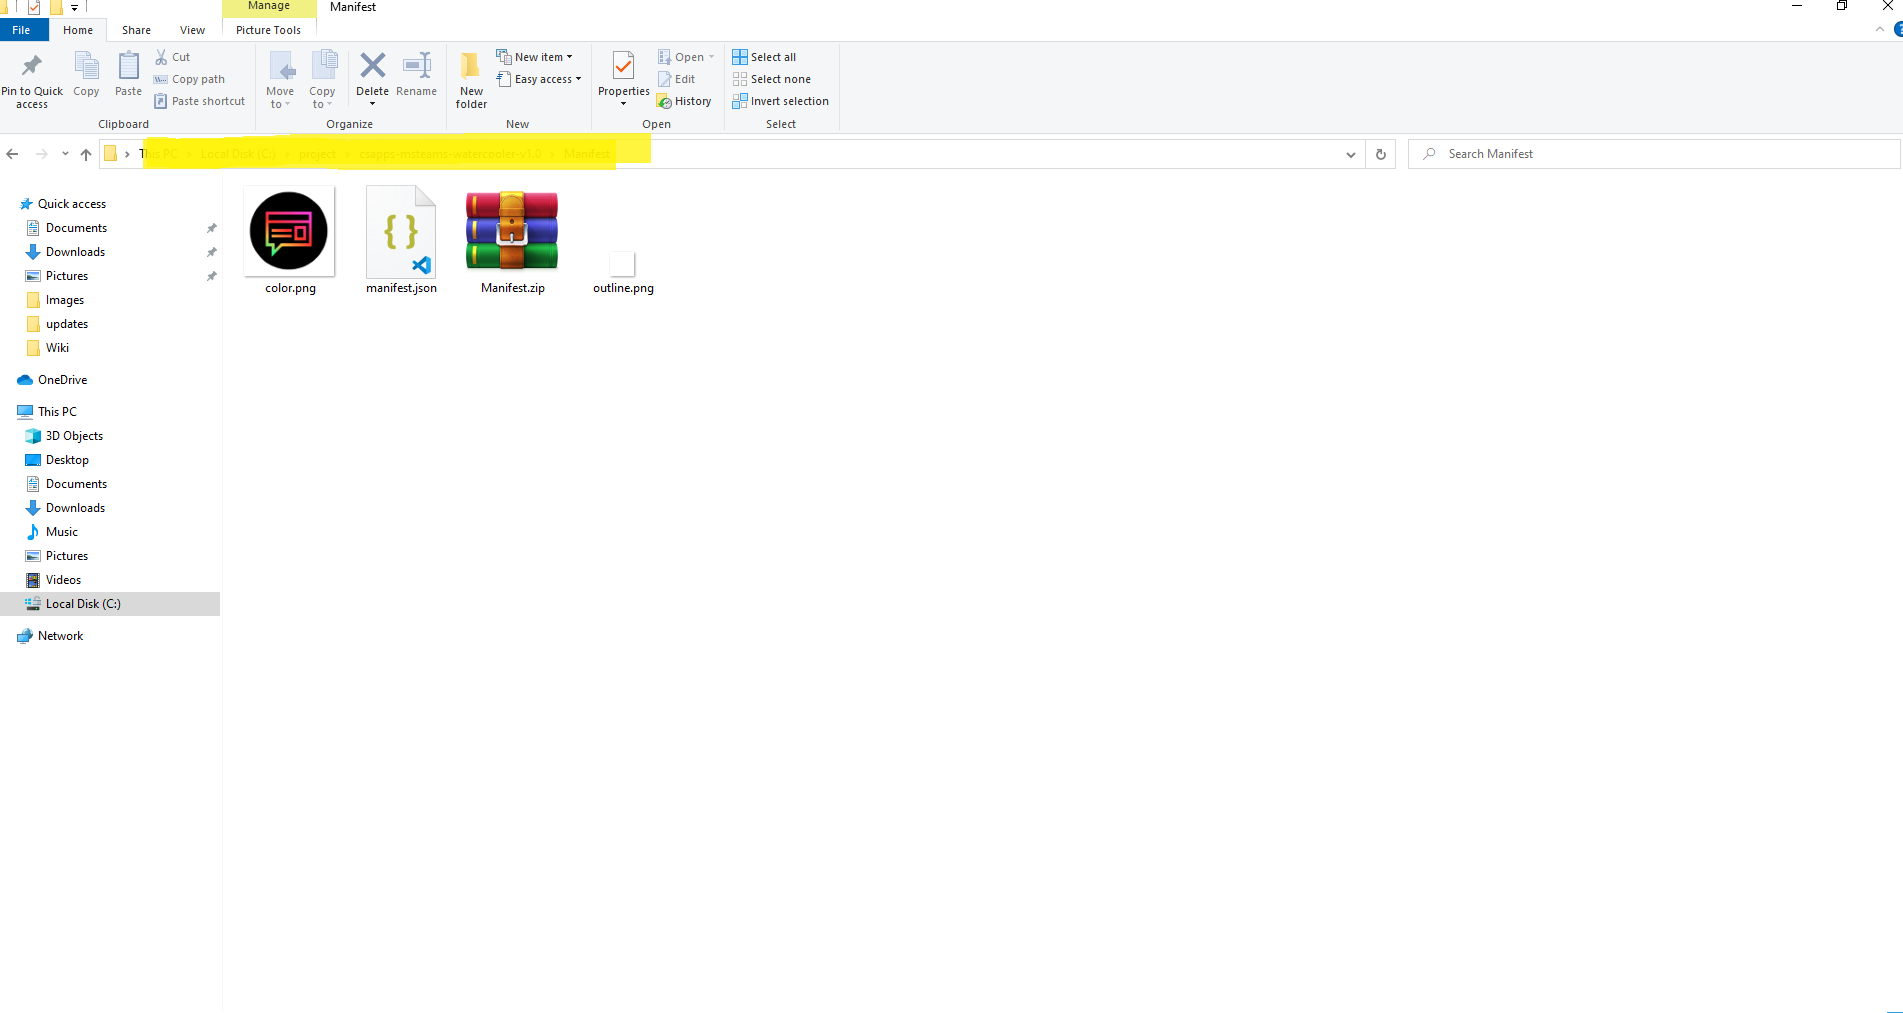
<<clientId>>placeholder in the id setting of the webApplicationInfo section to be the%clientId%value. Change the<<appDomain>>placeholder in the resource setting of the webApplicationInfo section to be the%appDomain%value e.g.api://appname.azurewebsites.net/clientId. - Create a ZIP package with the manifest.json, color.png, and outline.png. The two image files are the icons for your app in Teams.
-
Install app in Microsoft Teams
- Install the Water Cooler app (the manifest.zip package)
- You can do this through the Teams Admin Centre -> Teams Apps -> Manage Apps -> Upload -> Select a File -> Choose Manifest.zip you just created
- If your tenant has sideloading apps enabled, you can install your app by following the instructions here.
- Install the Water Cooler app (the manifest.zip package)
-
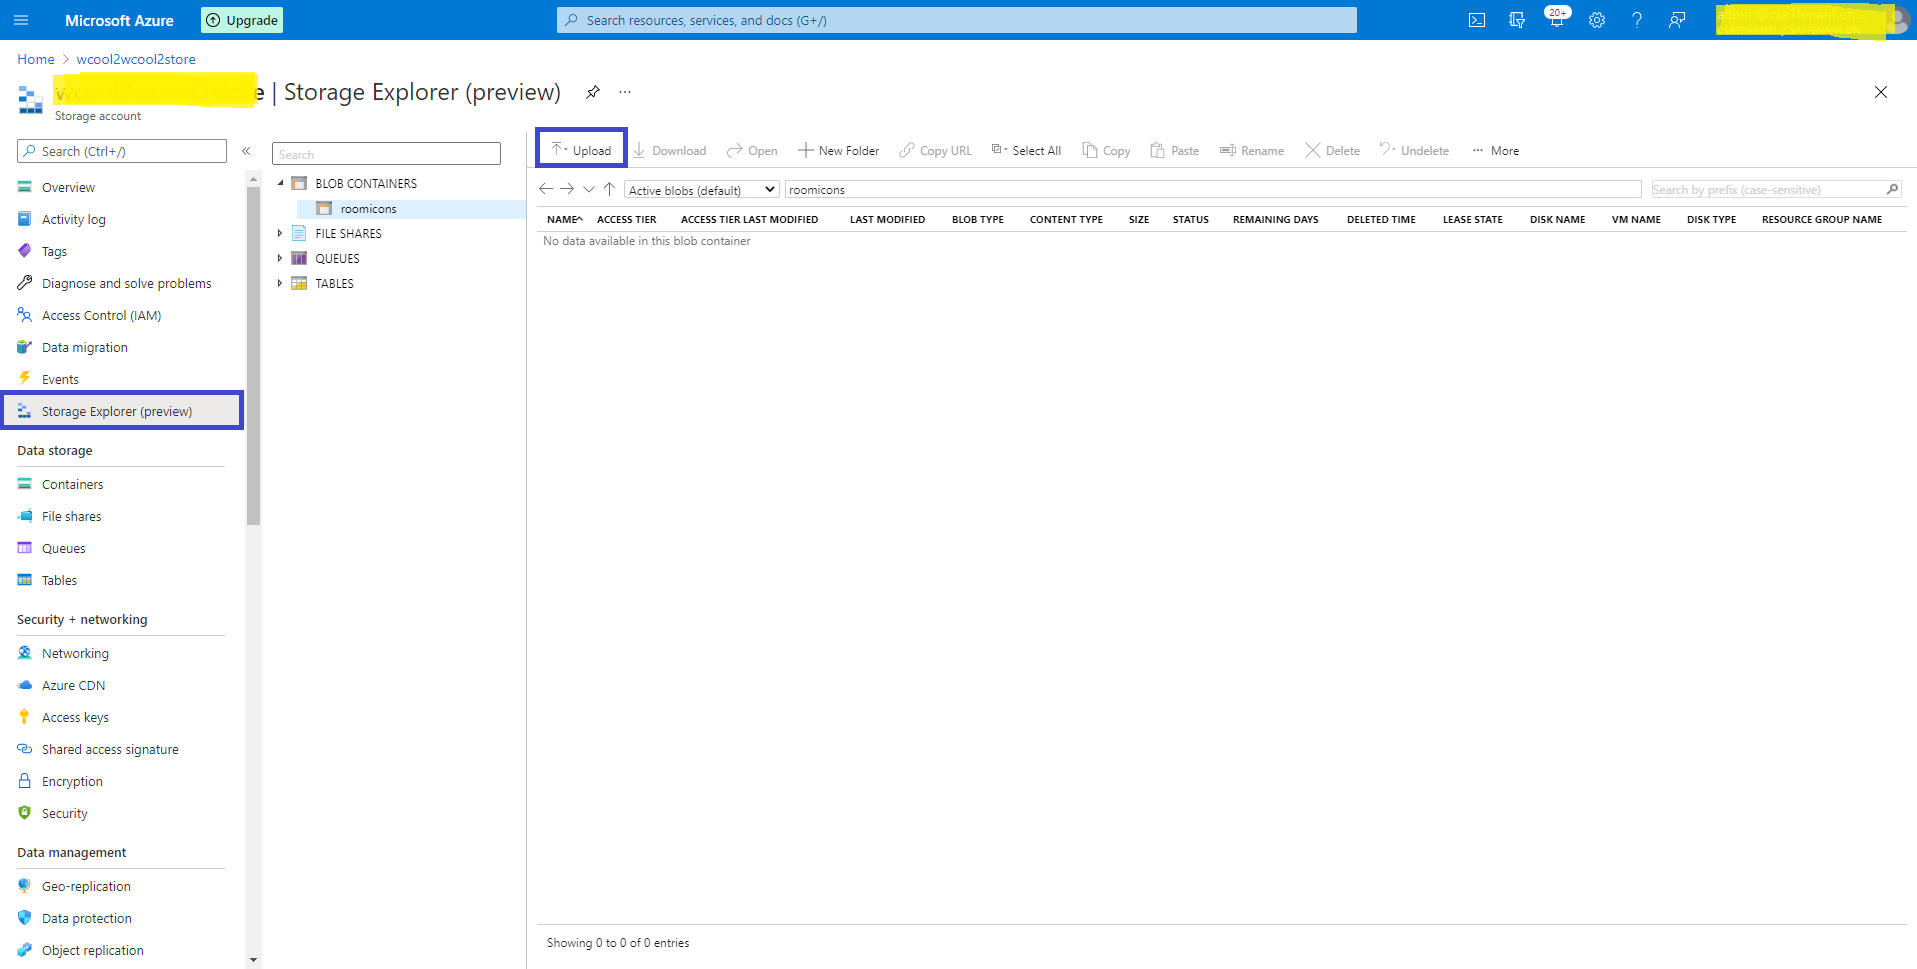
Upload room icons to blob storage
IMPORTANT
Proactive app installation will work only if you upload the app to your tenant's app catalog. Install the app (the manifest.zip package) to the users and teams that will be the target audience.
For Existing Customers
-
Update app service application settings.
-
Go to resource group provided for deployment.
-
Open deployed API app service.
-
Go to Configuration from left tray.
-
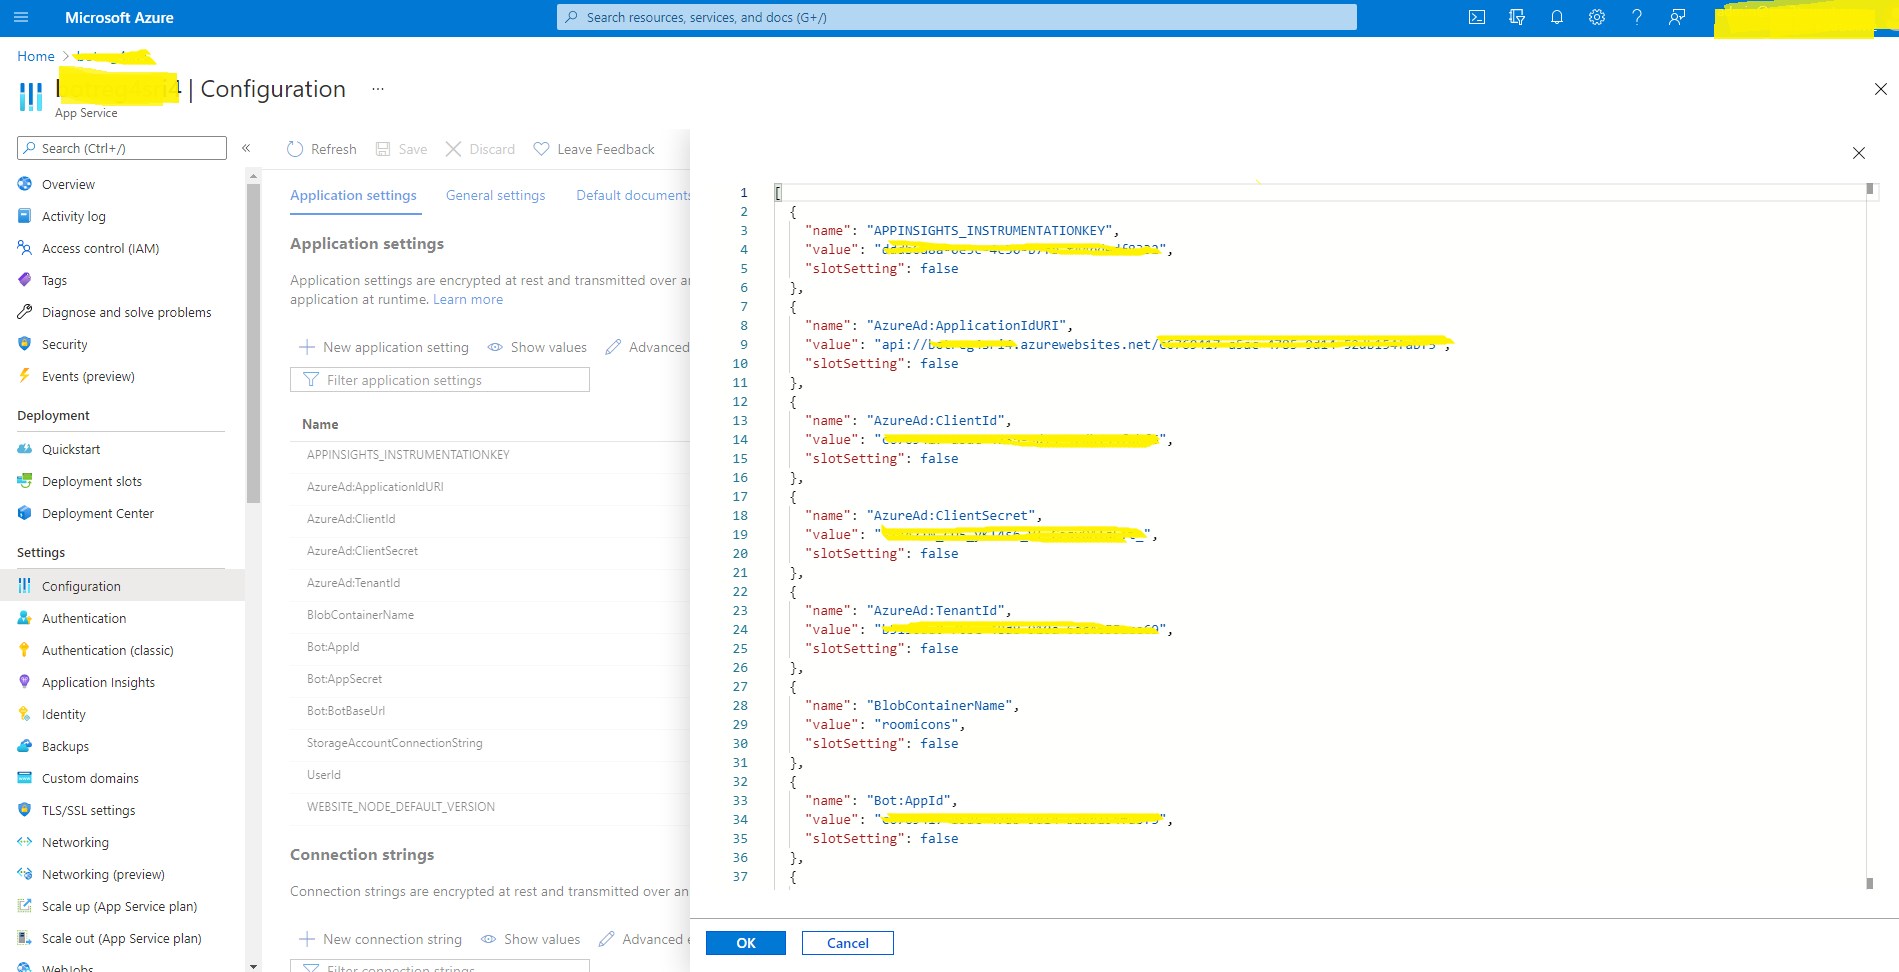
Click on Advance edit.
-
Update following property values.
-
AzureAd:ApplicationIdURI :
api://yourapiappservice.azurewebsites.net/<<clientId>> -
Add properties mentioned below.
TermsOfUseText(Terms of use Text to be shown in welcome card)TermsOfUseUrl(Link to be redirected when clicked on terms of use text)
-
WEBSITE_NODE_DEFAULT_VERSION should be
14.16.0 -
Save the configuration settings.
-
-
Sync the deployment.
-
Update app services link in registered App.
-
Go to Authentication.
-
Delete your UI App service. We don’t need it anymore.
-
Create the Teams app package (Follow Deployment process step 6 above)
Troubleshooting Guidelines
-
If deployment fails, Go to the deployed App service -> Deployment centre -> Logs. Then Sync to redeploy.
-
If Sync fails then We recommend to deploy on P1v2, P2v2, P3v2 (Premium V2 service plans) and after deploying successfully change the plan to S1.
Feedback
Thoughts? Questions? Ideas? Share them with us on Teams UserVoice!
Please report bugs and other code issues here.
Legal notice
This app template is provided under the MIT License terms. In addition to these terms, by using this app template you agree to the following:
- You, not Microsoft, will license the use of your app to users or organization.
- This app template is not intended to substitute your own regulatory due diligence or make you or your app compliant with respect to any applicable regulations, including but not limited to privacy, healthcare, employment, or financial regulations.
- You are responsible for complying with all applicable privacy and security regulations including those related to use, collection, and handling of any personal data by your app. This includes complying with all internal privacy and security policies of your organization if your app is developed to be sideloaded internally within your organization. Where applicable, you may be responsible for data related incidents or data subject requests for data collected through your app.
- Any trademarks or registered trademarks of Microsoft in the United States and/or other countries and logos included in this repository are the property of Microsoft, and the license for this project does not grant you rights to use any Microsoft names, logos or trademarks outside of this repository. Microsoft’s general trademark guidelines can be found here.
- If the app template enables access to any Microsoft Internet-based services (e.g., Office365), use of those services will be subject to the separately provided terms of use. In such cases, Microsoft may collect telemetry data related to app template usage and operation. Use and handling of telemetry data will be performed in accordance with such terms of use.
- Use of this template does not guarantee acceptance of your app to the Teams app store. To make this app available in the Teams app store, you will have to comply with the submission and validation process, and all associated requirements such as including your own privacy statement and terms of use for your app.
Contributing
This project welcomes contributions and suggestions. Most contributions require you to agree to a Contributor License Agreement (CLA) declaring that you have the right to, and actually do, grant us the rights to use your contribution. For details, visit https://cla.microsoft.com.
When you submit a pull request, a CLA-bot will automatically determine whether you need to provide a CLA and decorate the PR appropriately (e.g., label, comment). Simply follow the instructions provided by the bot. You will only need to do this once across all repos using our CLA.
This project has adopted the Microsoft Open Source Code of Conduct. For more information see the Code of Conduct FAQ or contact opencode@microsoft.com with any additional questions or comments.
