* Used shared webpack dev code * fix * remove ts-loader dep * PR fixes * dev 0.1.7 * fixes * fixes * package lock |
||
|---|---|---|
| .azure-pipelines | ||
| .github | ||
| .vscode | ||
| build | ||
| commands | ||
| configureWorkspace | ||
| debugging/coreclr | ||
| dockerCompose | ||
| dockerfile | ||
| docs | ||
| documentContentProviders | ||
| explorer | ||
| helpers | ||
| images | ||
| style/acr-logs | ||
| test | ||
| typings | ||
| utils | ||
| .gitignore | ||
| .vscodeignore | ||
| CHANGELOG.md | ||
| LICENSE.md | ||
| README.md | ||
| ThirdPartyNotice.html | ||
| constants.ts | ||
| dockerHubSearch.ts | ||
| extension.bundle.ts | ||
| extension.ts | ||
| extensionVariables.ts | ||
| gulpfile.ts | ||
| main.js | ||
| package-lock.json | ||
| package.json | ||
| parser.ts | ||
| tsconfig.json | ||
| tslint.json | ||
| webpack.config.js | ||
README.md
Docker Support for Visual Studio Code
The Docker extension makes it easy to build, manage and deploy containerized applications from Visual Studio Code, for example:
- Automatic
Dockerfile,docker-compose.yml, and.dockerignorefile generation (PressF1and search forDocker: Add Docker files to Workspace) - Syntax highlighting, hover tips, IntelliSense (completions) for
docker-compose.ymlandDockerfilefiles - Linting (errors and warnings) for
Dockerfilefiles - Command Palette (
F1) integration for the most common Docker commands (for exampledocker build,docker push, etc.) - Explorer integration for managing Images, running Containers, and Docker Hub registries
- Deploy images from Docker Hub and Azure Container Registries directly to Azure App Service
- Debug .NET Core applications running in Linux Docker containers
- Working with docker will walk you through many of the features of this extension
Prerequisites
To use much of the Docker extension functionality, you will need to install Docker on your machine and set up on the system path.
Linux
Since VS Code runs as a non-root user, you will also need to follow the steps in “Manage Docker as a non-root user” from Post-installation steps for Linux for the extension to be able to access docker.
Generating Docker Files
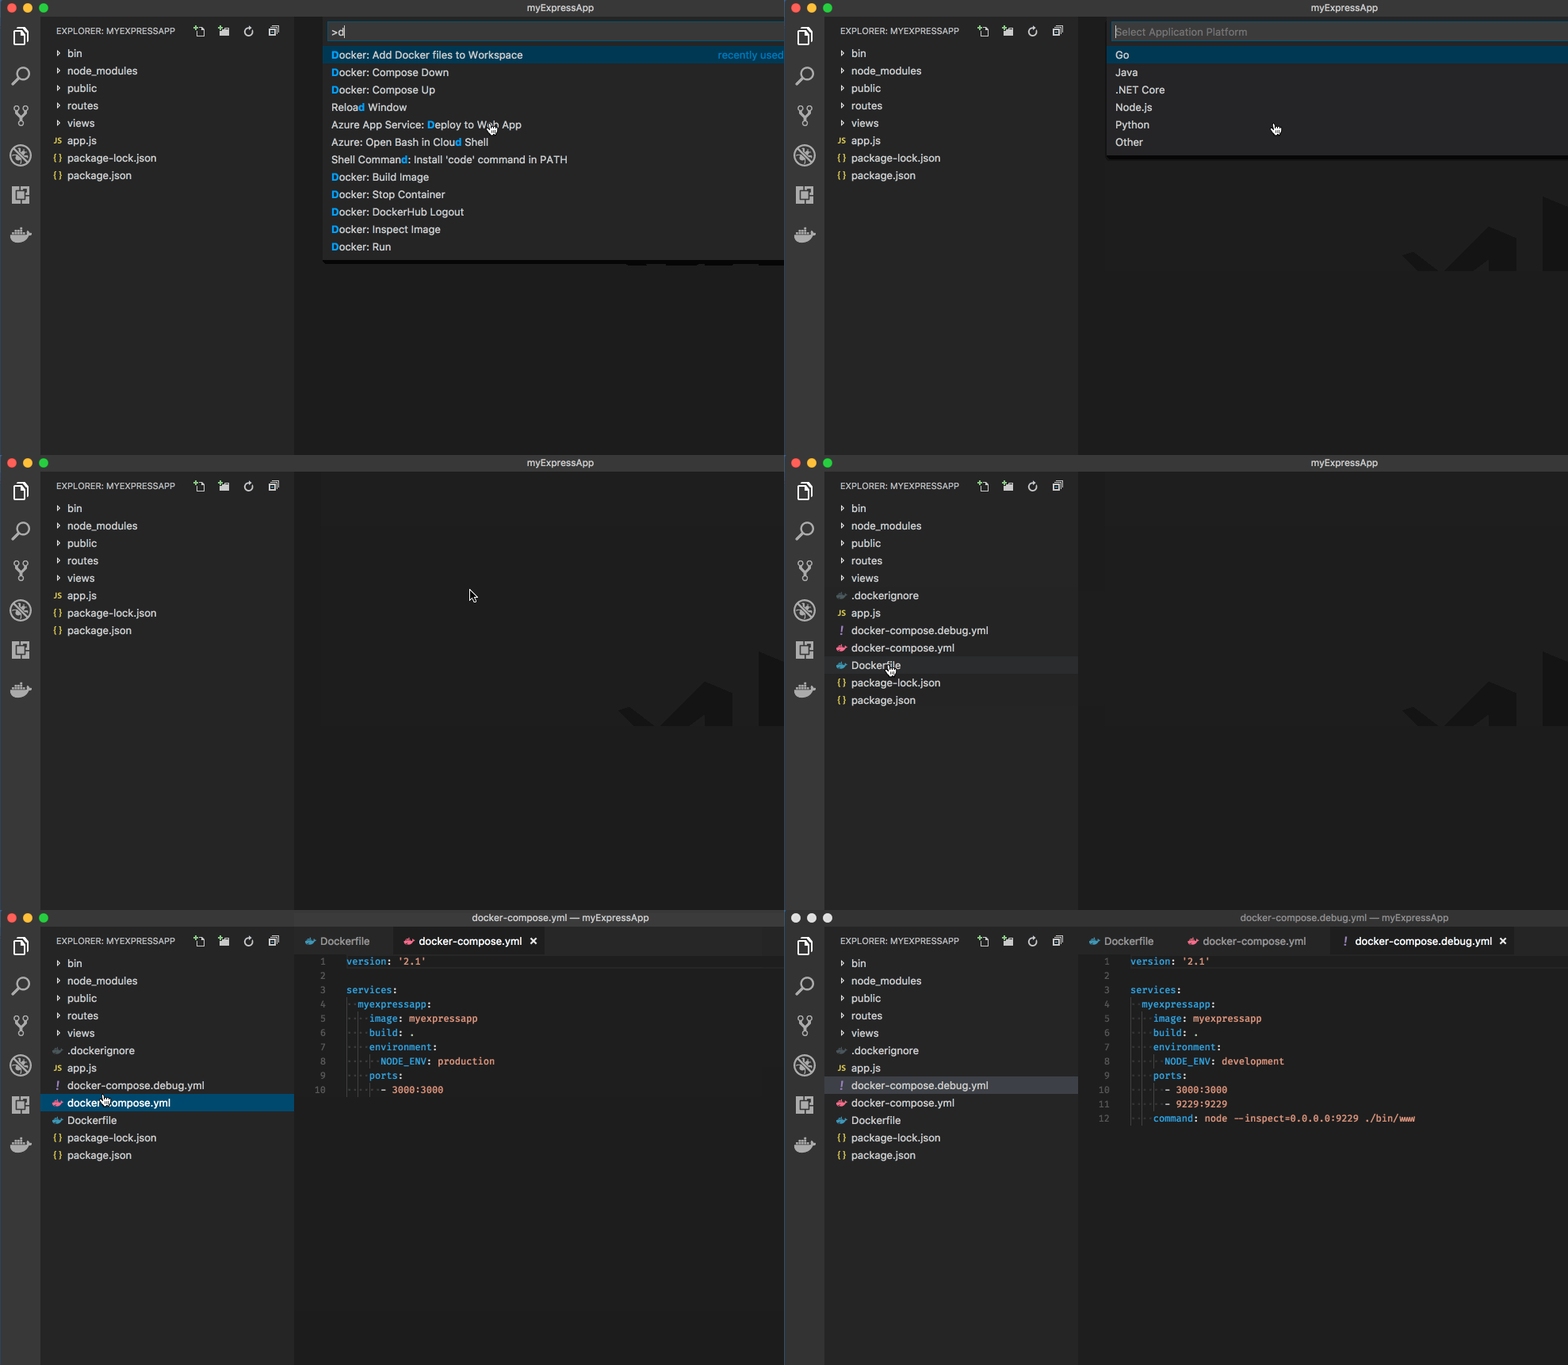
Press F1 and search for Docker: Add Docker Files to Workspace to generate Dockerfile, docker-compose.yml, docker-compose.debug.yml, and .dockerignore files for your workspace type:
Note: The
docker-compose.ymlanddocker-compose.debug.ymlfiles are not generated for .NET Core applications.
Editing
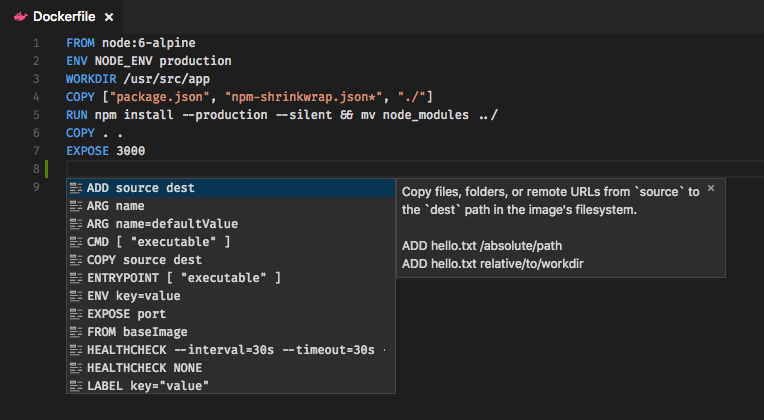
Rich IntelliSense (completions) for Dockerfile and docker-compose.yml files:
Docker commands
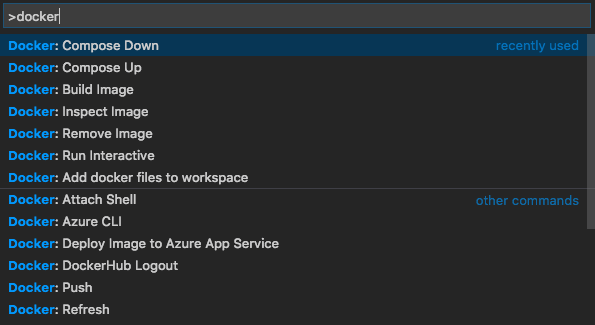
Many of the most common Docker and docker compose commands are built right into the Command Palette (F1).
Docker View
The Docker extension contributes a new Docker View to VS Code. Within the View, the Explorer lets you view and manage your Images, Containers, and browse your Docker Hub registry. If the Azure Account extension is installed, you can browse your Azure Container Registries as well.
The right click context menu provides quick access to the same rich set of commands found in the Command Palette (F1).
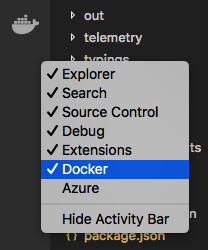
You can move the View up or down by dragging the Docker icon and you can hide the View by right clicking on the icon and choosing Hide. To bring it back, right click on the Activity Bar area and check the Docker item.
The showExplorer configuration setting controls the visibility of the Docker View.
"docker.showExplorer": false
Docker Hub Login
The first time you expand the Docker Hub node you'll be prompted to log in to your Docker Hub account.
Your user name and password are stored in your operating system credentials vault (for example macOS keychain, Windows Credential Store) so that you don't need to log in every time. You can log out of Docker Hub by right clicking on the Docker Hub label and choosing log out. This will delete the credentials from the OS store.
Deploying images to Azure App Service
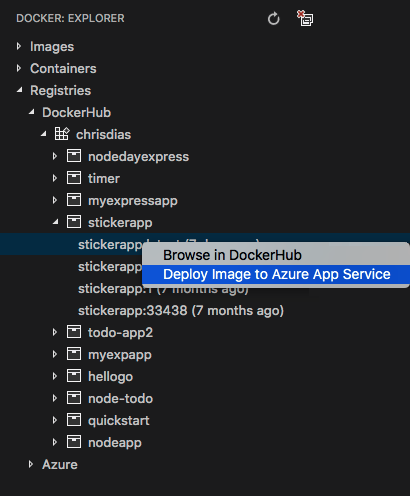
With the Docker Explorer you can deploy images from Docker Hub Registries or Azure Container Registries directly to an Azure App Service instance, as detailed in this getting started guide. This functionality requires installing the Azure Account extension and an Azure Subscription. If you do not have an Azure subscription, sign up today for a free 30 day account and get $200 in Azure Credits to try out any combination of Azure services.
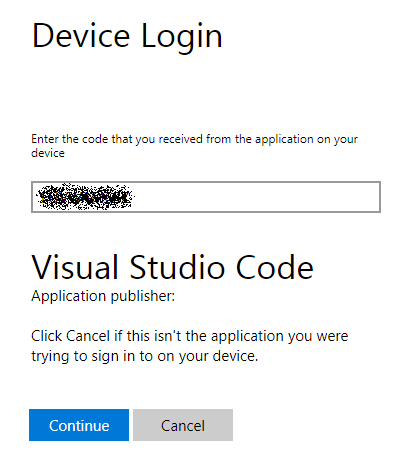
To log into Azure, press F1 and search for Azure Sign In. You will then sign into your account using the Device Login flow. Click on "Copy & Open" to open your default browser.
Paste in the access code and continue the sign in process.
You can now right click on an image in Docker Hub or an Azure Container Registry and choose "Deploy Image to Azure App Service".
From here you will be prompted for a Resource Group, location, an App Service Plan, and a globally unique website name.
Azure CLI
Microsoft ships the latest Azure CLI as a Docker image. You can easily launch a container running the CLI from the Command Palette (press F1 and search for Docker: Azure CLI). The extension will then run an interactive terminal attached to the container.
After the container is started, you will be prompted to login to your Azure account. From there, set the subscription you want to work with using az account set (you can see all of your subscriptions with az account list). You do not need to login in every time you run the container because the extension volume mounts the local $HOME/.azure folder to the container's $HOME/.azure folder.
Private registries (Preview)
This build includes preview support for connecting to private registries (such as those described in Docker Hub documentation). At the moment, OAuth is not supported, only basic authentication. We hope to extend this support in the future.
Self-signed and corporate certificates
If you are using a self-signed or corporate CA certificate (e.g. for a private Docker registry) and have the certificate authority's certificate registered in the Windows or Mac certificate store, you will want to use the following setting:
"docker.importCertificates": true
This causes the extension automatically pick up system-wide certificates. Leaving it at the default false means the default Node.js list of trusted certificates will be used. You can fine-tune the values this way:
    "docker.importCertificates":{
        "useCertificateStore": true,
        "certificatePaths": [
            "/etc/ssl/certs/ca-certificates",
            "/etc/openssl/certs",
            "/etc/pki/tls/certs",
            "/usr/local/share/certs"
        ]
    }
The exact folder to use for certificatePaths on Linux will depend on the distribution.
Debugging .NET Core (Preview)
Note that Windows containers are not currently supported, only Linux containers.
Prerequisites
-
(All users) Install the .NET Core SDK which includes support for attaching to the .NET Core debugger.
-
(All users) Install the C# VS Code extension which includes support for attaching to the .NET Core debugger in VS Code.
-
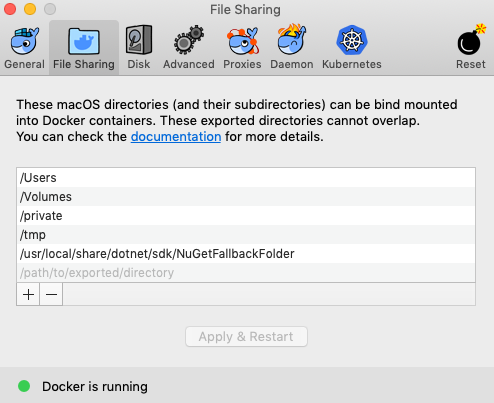
(Mac users) add
/usr/local/share/dotnet/sdk/NuGetFallbackFolderas a shared folder in your Docker preferences.
Starting the Debugger
To debug a .NET Core application running in a Linux Docker container, add a Docker .NET Core launch configuration:
- Switch to the debugging tab.
- Select
Add configuration... - Select
Docker: Launch .NET Core (Preview) - Set a breakpoint.
- Start debugging.
Upon debugging, a Docker image will be built and a container will be run based on that image. The container will have volumes mapped to the locally-built application and the .NET Core debugger. If the Docker container exposes port 80, after the debugger is attached the browser will be launched and navigate to the application's initial page.
NOTE: you may see errors in the debug console when debugging ends (e.g. "
Error from pipe program 'docker': ..."). This appears due to debugger issue #2439 and should not impact debugging.
Most properties of the configuration are optional and will be inferred from the project. If not, or if there are additional customizations to be made to the Docker image build or container run process, those can be added under the dockerBuild and dockerRun properties of the configuration, respectively.
{
    "configurations": [
        {
            "name": "Docker: Launch .NET Core (Preview)",
            "type": "docker-coreclr",
            "request": "launch",
            "preLaunchTask": "build",
            "dockerBuild": {
                // Image customizations
            },
            "dockerRun": {
                // Container customizations
            }
        }
    ]
}
Application Customizations
When possible, the location and output of the application will be inferred from the workspace folder opened in VS Code. When they cannot be inferred, these properties can be used to make them explicit:
| Property | Description | Default |
|---|---|---|
appFolder |
The root folder of the application | The workspace folder |
appProject |
The path to the project file | The first .csproj found in the application folder |
appOutput |
The application folder relative path to the output assembly | The TargetPath MS Build property |
You can specify either
appFolderorappProjectbut should not specify both.
Docker Build Customizations
Customize the Docker image build process by adding properties under the dockerBuild configuration property.
| Property | Description | Default |
|---|---|---|
args |
Build arguments applied to the image. | None |
context |
The Docker context used during the build process. | The workspace folder, if the same as the application folder; otherwise, the application's parent (i.e. solution) folder |
dockerfile |
The path to the Dockerfile used to build the image. | The file Dockerfile in the application folder |
labels |
The set of labels added to the image. | com.microsoft.created-by = visual-studio-code |
tag |
The tag added to the image. | <Application Name>:dev |
target |
The target (stage) of the Dockerfile from which to build the image. | base |
Example build customizations:
{
    "configurations": [
        {
            "name": "Launch .NET Core in Docker",
            "type": "docker-coreclr",
            "request": "launch",
            "preLaunchTask": "build",
            "dockerBuild": {
                "args": {
                    "arg1": "value1",
                    "arg2": "value2"
                },
                "context": "${workspaceFolder}/src",
                "dockerfile": "${workspaceFolder}/src/Dockerfile",
                "labels": {
                    "label1": "value1",
                    "label2": "value2"
                },
                "tag": "mytag",
                "target": "publish"
            }
        }
    ]
}
Docker Run Customization
Customize the Docker container run process by adding properties under the dockerRun configuration property.
| Property | Description | Default |
|---|---|---|
containerName |
The name of the container. | <Application Name>-dev |
env |
Environment variables applied to the container. | None |
envFiles |
Files of environment variables read in and applied to the container. Environment variables are specified one per line, in <name>=<value> format. |
None |
extraHosts |
Hosts to be added to the container's hosts file for DNS resolution. |
None |
labels |
The set of labels added to the container. | com.microsoft.created-by = visual-studio-code |
network |
The network to which the container will be connected. Use values as described in the Docker run documentation. | bridge |
ports |
Ports that are going to be mapped on the host. | All ports exposed by the Dockerfile will be bound to a random port on the host machine |
volumes |
Volumes that are going to be mapped to the container. | None |
ports
| Property | Description | Required | Default |
|---|---|---|---|
hostPort |
Port number to be bound on the host. | No | None |
containerPort |
Port number of the container to be bound. | Yes | None |
protocol |
Specific protocol for the binding (`tcp | udp`). If no protocol is specified it will bind both. | No |
volumes
| Property | Description | Required | Default |
|---|---|---|---|
localPath |
Path on local machine that will be mapped. The folder will be created if it does not exist. Path may use the ${workspaceFolder} variable when needed. |
Yes | None |
containerPath |
Path where the volume will be mapped within the container. The folder will be created if it does not exist. | Yes | None |
permissions |
Permissions for the container for the mapped volume, rw for read-write or ro for read-only. |
Yes | rw |
Example run customization:
{
    "configurations": [
        {
            "name": "Launch .NET Core in Docker",
            "type": "docker-coreclr",
            "request": "launch",
            "preLaunchTask": "build",
            "dockerRun": {
                "containerName": "my-container",
                "env": {
                    "var1": "value1",
                    "var2": "value2"
                },
                "envFiles": [
                    "${workspaceFolder}/staging.env"
                ],
                "labels": {
                    "label1": "value1",
                    "label2": "value2"
                },
                "network": "host",
                "ports": [
                    {
                        "hostPort": 80,
                        "containerPort": 80
                    },
                    {
                        "containerPort": 443
                    },
                    {
                        "containerPort": 6029,
                        "protocol": "udp"
                    },
                    {
                        "containerPort": 6029,
                        "protocol": "tcp"
                    },
                    {
                        "hostPort": 4562,
                        "containerPort": 5837,
                        "protocol": "tcp"
                    }
                ],
                "extraHosts": [
                    {
                        "hostname": "some-hostname",
                        "ip": "some-ip"
                    },
                    {
                        "hostname": "some-other-hostname",
                        "ip": "some-other-ip"
                    }
                ],
                "volumes": [
                    {
                        "localPath": "path-on-host-machine",
                        "containerPath": "path-inside-container",
                        "permissions": "ro|rw"
                    }
                ]
            }
        }
    ]
}
Configuration Settings
The Docker extension comes with a number of useful configuration settings allowing you to customize your workflow.
| Setting | Description | Default Value |
|---|---|---|
docker.attachShellCommand.linuxContainer |
Attach command to use for Linux containers | /bin/sh |
docker.attachShellCommand.windowsContainer |
Attach command to use for Windows containers | powershell |
docker.dockerComposeBuild |
Run docker-compose with the --build argument, defaults to true | true |
docker.dockerComposeDetached |
Run docker-compose with the --d (detached) argument, defaults to true | true |
docker.defaultRegistryPath |
Default registry and path when tagging an image | "" |
docker.explorerRefreshInterval |
Explorer refresh interval, default is 1000ms | 1000 |
docker.host |
Host to connect to (same as setting the DOCKER_HOST environment variable) | "" |
docker.imageBuildContextPath |
Build context PATH to pass to Docker build command | "" |
docker.languageserver.diagnostics.deprecatedMaintainer |
Controls the diagnostic severity for the deprecated MAINTAINER instruction | warning |
docker.languageserver.diagnostics.directiveCasing |
Controls the diagnostic severity for parser directives that are not written in lowercase | warning |
docker.languageserver.diagnostics.emptyContinuationLine |
Controls the diagnostic severity for flagging empty continuation lines found in instructions that span multiple lines | warning |
docker.languageserver.diagnostics.instructionCasing |
Controls the diagnostic severity for instructions that are not written in uppercase | warning |
docker.languageserver.diagnostics.instructionCmdMultiple |
Controls the diagnostic severity for flagging a Dockerfile with multiple CMD instructions | warning |
docker.languageserver.diagnostics.instructionEntrypointMultiple |
Controls the diagnostic severity for flagging a Dockerfile with multiple ENTRYPOINT instructions | warning |
docker.languageserver.diagnostics.instructionHealthcheckMultiple |
Controls the diagnostic severity for flagging a Dockerfile with multiple HEALTHCHECK instructions | warning |
docker.languageserver.diagnostics.instructionJSONInSingleQuotes |
Controls the diagnostic severity for JSON instructions that are written incorrectly with single quotes | warning |
docker.languageserver.diagnostics.instructionWorkdirRelative |
Controls the diagnostic severity for WORKDIR instructions that do not point to an absolute path | warning |
docker.promptOnSystemPrune |
Prompt for confirmation when running System Prune command | true |
docker.showExplorer |
Show or hide the Explorer | true |
docker.truncateLongRegistryPaths |
Truncate long Image and Container registry paths in the Explorer | false |
docker.truncateMaxLength |
Maximum number of characters for long registry paths in the Explorer, including ellipsis | 10 |
Installation
In VS Code, open the Extension Viewlet, type in Docker, locate the extension and click on Install. Once the extension is installed you will be prompted to restart Visual Studio Code which will only take (literally) a couple of seconds.
Of course, you will need to have Docker installed on your computer in order to run commands from the Command Palette (F1, type in Docker).
Running commands on Linux
By default, Docker runs as the root user, requiring other users to access it with sudo. This extension does not assume root access, so you will need to create a Unix group called docker and add users to it. Instructions can be found here: Create a Docker group
Connecting to docker-machine
The default connection of the extension is to connect to the local docker daemon. You can connect to a docker-machine instance if you launch Visual Studio Code and have the DOCKER_HOST environment variable set to a valid host or if you set the docker.host configuration setting.
If the docker daemon is using TLS, the DOCKER_CERT_PATH environment variable must also be set (e.g. $HOME\.docker\machine\machines\default). See docker documentation for more information.
Contributing
There are a couple of ways you can contribute to this repository:
- Ideas, feature requests and bugs: We are open to all ideas and we want to get rid of bugs! Use the Issues section to either report a new issue, provide your ideas or contribute to existing threads
- Documentation: Found a typo or strangely worded sentences? Submit a PR!
- Code: Contribute bug fixes, features or design changes.
Legal
Before we can accept your pull request you will need to sign a Contribution License Agreement. All you need to do is to submit a pull request, then the PR will get appropriately labelled (for example cla-required, cla-norequired, cla-signed, cla-already-signed). If you already signed the agreement we will continue with reviewing the PR, otherwise system will tell you how you can sign the CLA. Once you sign the CLA all future PR's will be labeled as cla-signed.
Troubleshooting
I get "unauthorized: authentication required" in the terminal when executing some commands, such as "Docker: push".
Make sure you are signed in to the Docker Hub or Azure container registry from the docker CLI via docker login (using your username, not your e-mail address).
If you are using an Azure container registry, you will need to get the username and password from Azure by right-clicking on the Azure container registry in the extension and selecting "Browse in the Azure Portal", then selecting the "Access Keys" tab.
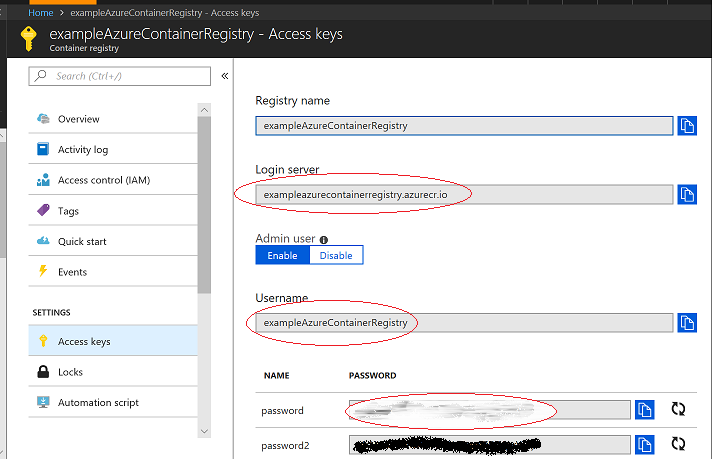
Finally, execute docker login, for example:
docker login exampleazurecontainerregistry.azurecr.io
and respond with the username and password specified by Azure.
I'm on Linux and get the error "Unable to connect to Docker, is the Docker daemon running?"
Please see Prerequisites and the specific section on Linux.
Telemetry
This extension collects telemetry data to help us build a better experience for building micro-service applications with Docker and VS Code. We only collect data on which commands are executed. We do not collect any information about image names, paths, etc. The extension respects the telemetry.enableTelemetry setting which you can learn more about in our FAQ.
