* Updating ReadMe to reflect new functionality * Adding error logic handling and simplifying the job json for notebok * Updated notebook release image * Adding Notebook Job Deployment and Error Handling (#5) (#6) * Adding notebook job functionality ``` python deployment.py notebook \ na \ na \ local/path/to/job.json \ --notebook-path "/Databricks/Path/" ``` * Adding error logic handling and simplifying the job json for notebok * Updated notebook release image |
||
|---|---|---|
| Notebook | ||
| Python/SparkSimpleApp | ||
| Scala/SparkSimpleApp | ||
| docs/img | ||
| .gitignore | ||
| CODE_OF_CONDUCT.md | ||
| LICENSE | ||
| README.md | ||
| SECURITY.md | ||
| deployment.py | ||
README.md
DevOps for a Spark Jar, Egg Jobs
Assumptions:
- You have created one or more (Dev/QA and Prod) Databricks Workspaces.
- You have generated a Personal Access Token (PAT).
- You have created at least one mount point called
/mnt/jarsto house the jars or egg packages.- In this demo case, it's expecting two other mount points
/mnt/inputwith a file called/mnt/input/bank/bank.csvpulled from UCI Machine Learning Repo/mnt/output
- You are familiar with either Scala or Python.
Table of Contents
- Scala Jar App Build Pipeline
- Python Egg App Build Pipeline
- Scala Jar App Release Pipeline
- Python Egg App Release Pipeline
- Python Notebook Release Pipeline
Useful DevOps concepts
- Release and Approval Gates to control when a code release hits your environment and ask for approval from leadership before deployment.
Build Pipeline
ScalaSpark_App_Build
In the build pipeline, you are going to create the Jar as an artifact produced by the build.
- Create a new Build Pipeline and name it ScalaSpark_App_Build
- Choose "Use the classic editor" for a visual development experience.
- Select a source
- Azure Repos Git
- Repository: D_AI_CE_DatabricksSparkDevOps
- Default Branch: master
- Search for a "Maven" template and apply.
- In the Maven task, unlink the default Maven POM file and re-link it with
Scala/SparkSimpleApp/pom.xml - All other default options are okay.
- Save & queue. You should now have a running pipeline.
Pyspark_App_Build
- Create a new Build Pipeline and name it Pyspark_App_Build
- Choose "Use the classic editor" for a visual development experience.
- Select a source
- Azure Repos Git
- Repository: D_AI_CE_DatabricksSparkDevOps
- Default Branch: master
- Search for a "Python" template and apply.
- Delete the disabled Flake8 task.
- For each task, if the "Advanced > Working Directory" option is present, set it as
Python/SparkSimpleApp.
- Select the versions of Python you will test against by changing the Variable
python.versionto3.6, 3.7, 3.8. - Change the
pytest command linetask topip install .\ && pip install pytest && pytest tests --doctest-modules --junitxml=junit/test-results.xml- This will install the current working directory's package (
pip install .\with the working directory set toPython/SparkSimpleApp).
- This will install the current working directory's package (
- Set the
Use Pythontask under Publish to3.7. - Change
Build sdist's script to bepython setup.py bdist_eggand change its Display name toBuild egg - Change
Publish Artifact: disttasks' Path to Publish toPython/SparkSimpleApp/dist - All other default options are okay.
- Save & queue. You should now have a running pipeline.
Release Pipelines
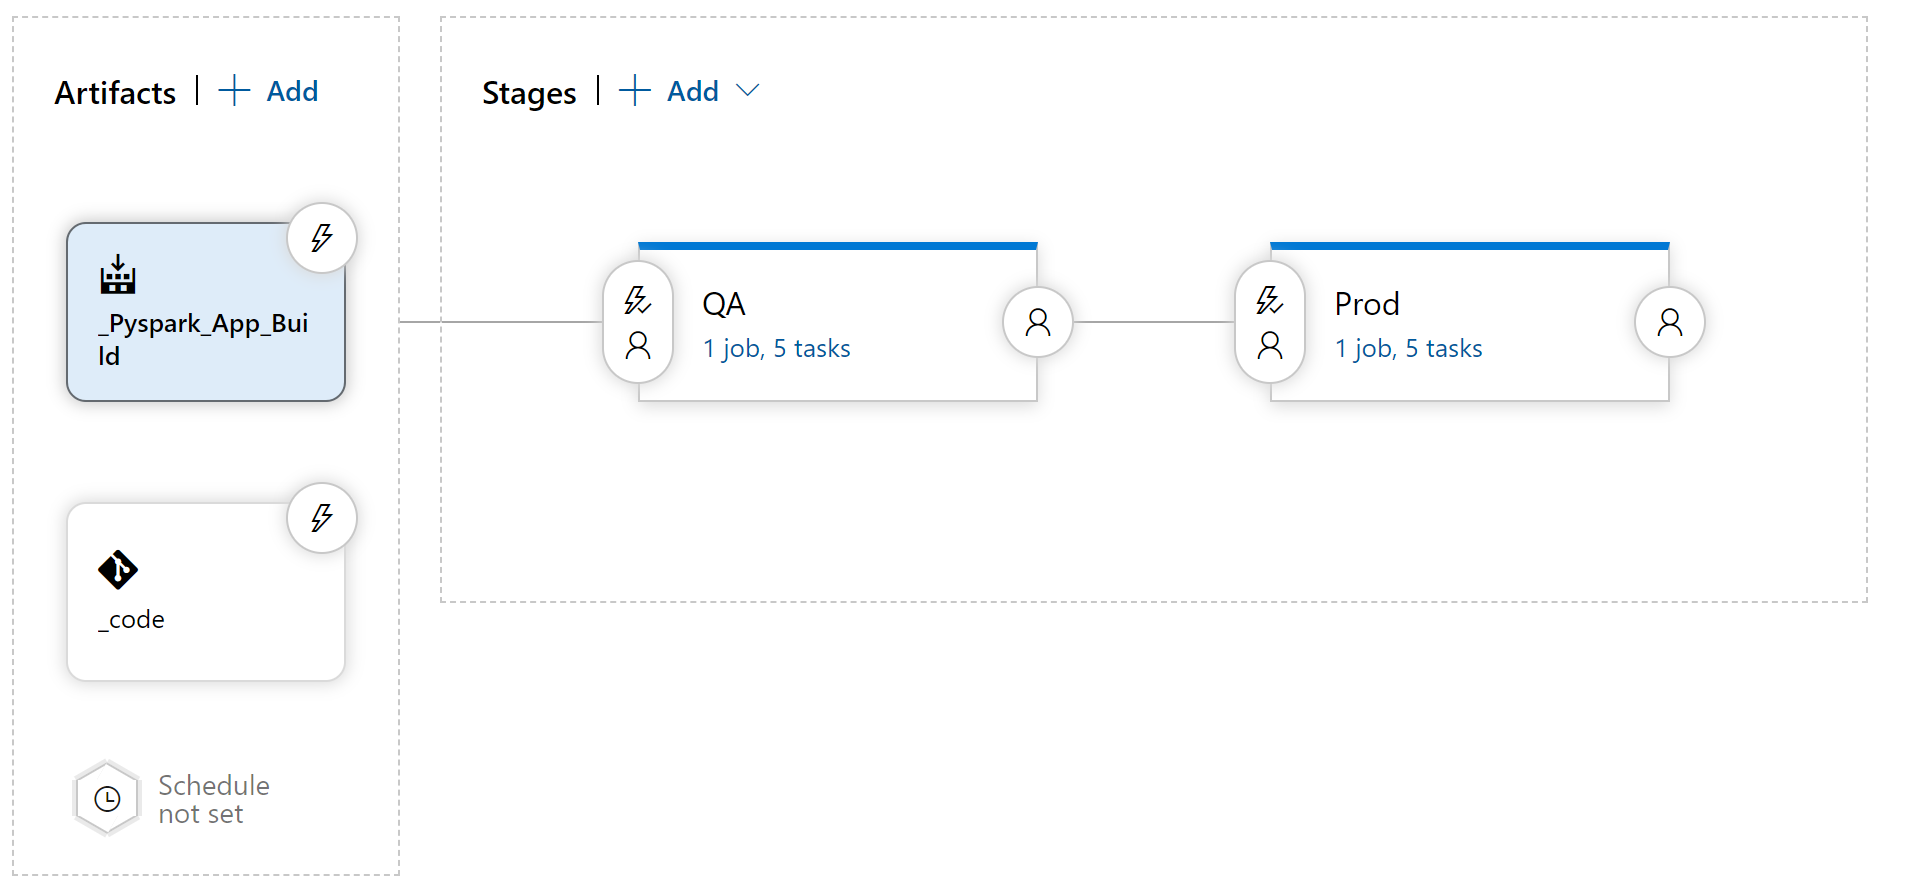
The release pipeline allows you to deploy your jar or egg job to your target compute: Databricks Spark. Create your Release pipeline by going to Pipelines > Releases > + New Release Pipeline. Start with an Empty Job.

-
Add two artifacts:
- Build: Choose the source build pipeline, default verison of Latest and default Source Alias (
_ScalaSpark_App_Buildor_Pypark_App_Build). - Azure Repo Git: Choose the repository that your code exists in. Name it _code.
- Build: Choose the source build pipeline, default verison of Latest and default Source Alias (
-
Add two stages:
- QA
- Prod
-
Add two variable groups:
- DevDatabricksVariables: Region and Token for Dev / QA environment
- Add
DATABRICKS_REGION(e.g. centralus or eastus2) - Add
DATABRICKS_TOKENand add your Personal Access Token. Apply the Lock to make it a hidden variable. - Choose the Scope as Stage > QA
- Add
- ProdDatabricksVariables: Region and Token for production environment
- Add
DATABRICKS_REGION(e.g. centralus or eastus2) - Add
DATABRICKS_TOKENand add your Personal Access Token. Apply the Lock to make it a hidden variable. - Choose the Scope as Stage > Prod
- Add
- DevDatabricksVariables: Region and Token for Dev / QA environment
-
Add the Microsoft DevLabs' DevOps for Azure Databricks extension. This will give us some handy tasks that sit on top of the Databricks CLI. This will, however, force us to use a Windows Agent in the Release pipelines.
- There's another extension by Data Thirst: Databrick Script Deployment Task.
- Feel free to explore this extension as it has additional UI driven tasks for the Databricks CLI.
Release Scala Databricks

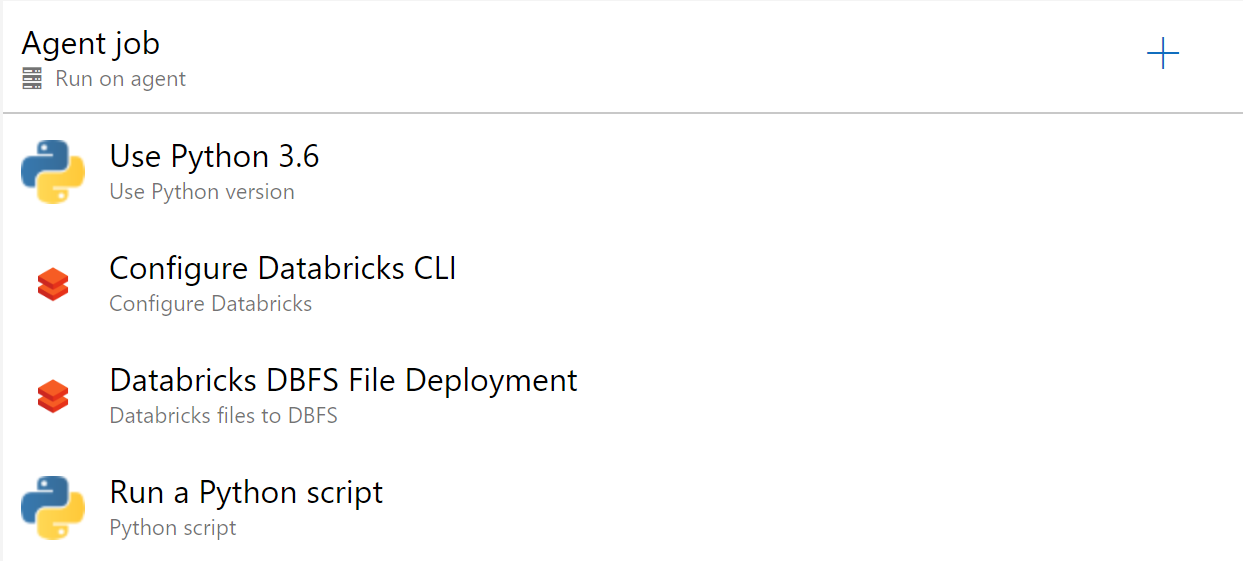
Add the following tasks to both the QA and Prod stages (Pro Tip: You can do this once in QA and then Clone the stage and rename).
- Use Python Version
- Set Version Spec to 3.6
- Configure Databricks (from Microsoft DevLabs)
- Set Workspace URL to
https://$(DATABRICKS_REGION).azuredatabricks.net - Set Access Token to
$(DATABRICKS_TOKEN) - This creates a Databricks configuration profile of
AZDO. We pass this to the deployment.py file.
- Set Workspace URL to
- Databricks file to DBFS
- Set Azure Region to
$(DATABRICKS_REGION) - Set Local Root Folder to
$(System.DefaultWorkingDirectory)/_ScalaSpark_App_Build/drop/Scala/SparkSimpleApp/target - Set File Pattern to
*.jar - Set Target folder in DBFS to
/mnt/jars/ - Set Security
- Authentication Method: Bearer Token
- Databricks Bearer token:
$(DATABRICKS_TOKEN)
- Set Azure Region to
- Python Script
- Script Source: File Path
- Script Path:
$(System.DefaultWorkingDirectory)/_code/deployment.py - Arguments:
jar $(System.DefaultWorkingDirectory)/_ScalaSpark_App_Build/drop/Scala/SparkSimpleApp/target dbfs:/mnt/jars $(System.DefaultWorkingDirectory)/_code/Scala/SparkSimpleApp/job.json --main-class com.microsoft.spark.example.SparkSimpleApp --profile AZDO --parameters "/mnt/input/bank/bank.csv" "/mnt/output/SparkSimpleAppPY/test.csv"
You now have a working release pipeline! Save and execute the Release!
Release Egg Databricks

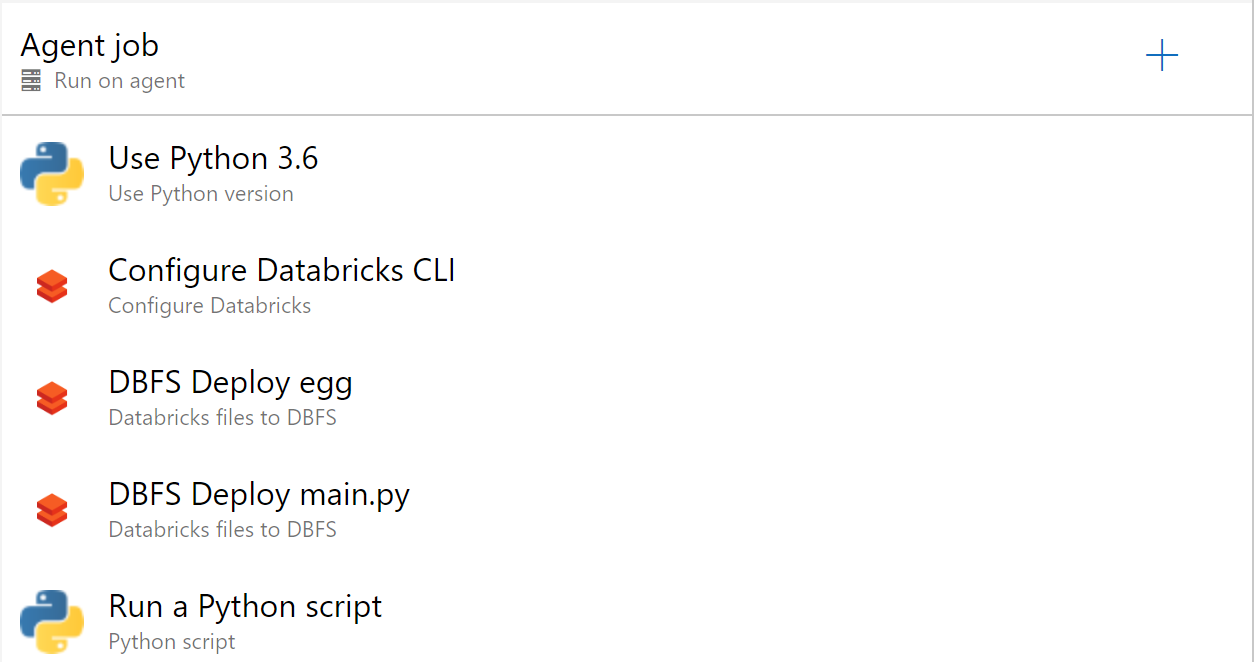
Add the following tasks to both the QA and Prod stages (Pro Tip: You can do this once in QA and then Clone the stage and rename).
- Use Python Version
- Set Version Spec to 3.6
- Configure Databricks (from Microsoft DevLabs)
- Set Workspace URL to
https://$(DATABRICKS_REGION).azuredatabricks.net - Set Access Token to
$(DATABRICKS_TOKEN) - This creates a Databricks configuration profile of
AZDO. We pass this to the deployment.py file.
- Set Workspace URL to
- Databricks file to DBFS
- Set Azure Region to
$(DATABRICKS_REGION) - Set Local Root Folder to
$(System.DefaultWorkingDirectory)/_Pyspark_App_Build/dist - Set File Pattern to
*.jar - Set Target folder in DBFS to
/mnt/jars/ - Set Security
- Authentication Method: Bearer Token
- Databricks Bearer token:
$(DATABRICKS_TOKEN)
- Set Azure Region to
- Databricks file to DBFS
- Set the settings the same as above with the following exceptions.
- Set Local Root Folder to
$(System.DefaultWorkingDirectory)/_code/Python/SparkSimpleApp - Set File Pattern to
main.py
- Python Script
- Script Source: File Path
- Script Path:
$(System.DefaultWorkingDirectory)/_code/deployment.py - Arguments:
egg $(System.DefaultWorkingDirectory)/_Pyspark_App_Build/dist/ dbfs:/mnt/jars $(System.DefaultWorkingDirectory)/_code/Python/SparkSimpleApp/job.json --python-file "dbfs:/mnt/jars/main.py" --profile AZDO --parameters "/mnt/input/bank/bank.csv" "/mnt/output/SparkSimpleAppPY/test.csv"
You now have a working release pipeline! Save and execute the Release!
Release Python Notebook

For a Python notebook, we do not have a build process since no egg package is being created. We can release the notebook immediately, however that leaves you open to logic errors. Consider following the guidance from Alexandre Gattiker. In this example, we assume the notebook is valid and can be pushed to QA and manually reviewed in that workspace.
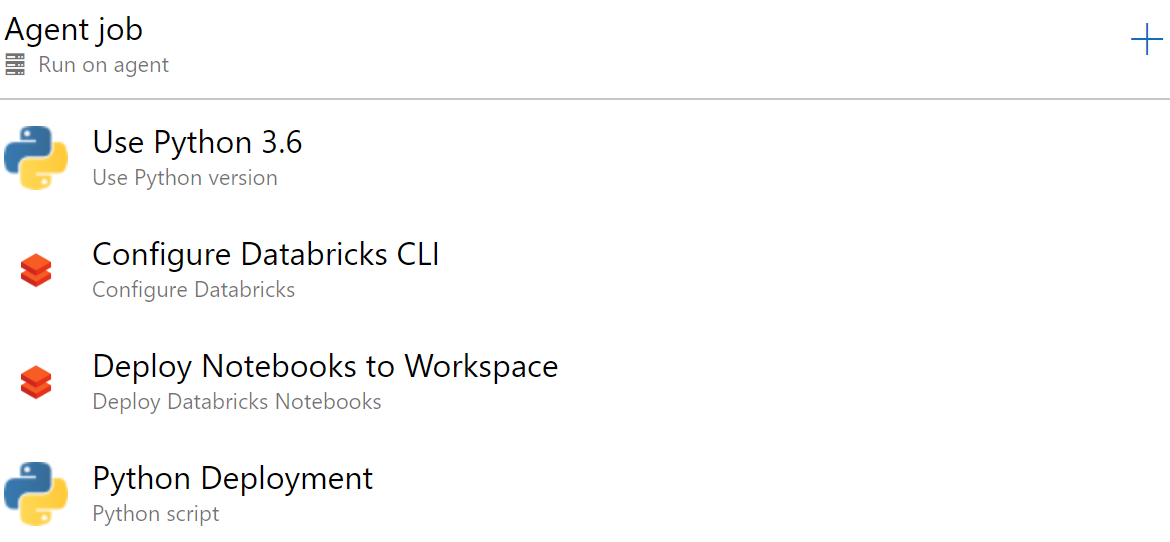
Add the following tasks to both the QA and Prod stages (Pro Tip: You can do this once in QA and then Clone the stage and rename).
- Use Python Version
- Set Version Spec to 3.6
- Configure Databricks (from Microsoft DevLabs)
- Set Workspace URL to
https://$(DATABRICKS_REGION).azuredatabricks.net - Set Access Token to
$(DATABRICKS_TOKEN) - This creates a Databricks configuration profile of
AZDO. We pass this to the deployment.py file.
- Set Workspace URL to
- Deploy Databricks Notebook
- Set Notebooks Folder to
$(System.DefaultWorkingDirectory)/_code/Notebook - Set Workspace Folder to
/Shared - This will recreate the entire
_code/Notebookstructure (notebooks and folders) in the/Shared/folder in Databricks.
- Set Notebooks Folder to
- Python Script
- Script Source: File Path
- Script Path:
$(System.DefaultWorkingDirectory)/_code/deployment.py - Arguments:
notebook na na $(System.DefaultWorkingDirectory)/_code/Notebook/job.json --notebook-path "/SparkSimpleNotebook" --profile AZDO --parameters "input" "/mnt/input/bank/bank.csv" "output" "/mnt/output/SparkSimpleAppNotebook/test"
To add further to this example, you might:
- Deploy your notebook to a versioned folder number based on the Pre-defined release variable of
Release.DeploymentID. - Update an existing job and point to the new versioned folder.
- Execute the notebook with the Microsoft DevLabs extension task.
You now have a working pipeline to deploy Azure Databricks Notebooks! Save and execute the Release!
Additional Functionality
Update an Existing Job by Name or Job_ID
This deployment script does NOT help with identifying existing jobs and shutting them down.
Instead, you can specify the --update-if-exists flag to change an existing job if it is found.
You can either pass --update-if-exists job_id XXX with XXX being a known job-id and it will update the job found when looking up job-id XXX.
Alternatively, you can pass in the name of the job like --update-if-exists name my_job_name. This will look up the job-id for the first match it finds (ordering not guaranteed) based on the name of the job. The downsides are:
- Databricks allows for multiple jobs to share the same name (why?!?)
- The output of
databricks jobs listseems to be smaller job-id first. - You could miss existing active jobs with schedules if they have later job-id's and the same name.
deployment.py
The deployment.py file helps abstract the calls to the Databricks CLI and enables you to replace text in the job's json definition.
The help file below describes the usage.
usage: deployment.py [-h] [--python-file PYTHON_FILE]
                     [--main-class MAIN_CLASS] [--notebook-path NOTEBOOK_PATH]
                     [--profile PROFILE]
                     [--update-if-exists UPDATE_IF_EXISTS UPDATE_IF_EXISTS]
                     [--parameters ...]
                     {jar,egg,notebook} library_path cloud_path job_json

Deploy a set of jar or egg files as a Spark application

positional arguments:
  {jar,egg,notebook}    Valid options are jar, egg, or notebook
  library_path          The library or folder containing libraries to include.
                        Use na for no libraries.
  cloud_path            The path in the cloud (e.g. DBFS, WASB) that the
                        library is located. Use na for no libraries.
  job_json              The path to the job definition (only applicable to
                        Databricks)

optional arguments:
  -h, --help            show this help message and exit
  --python-file PYTHON_FILE
                        (egg option) The python file that runs the python
                        application
  --main-class MAIN_CLASS
                        (jar option) The main class of your scala jar
                        application
  --notebook-path NOTEBOOK_PATH
                        (notebook option)The path to your notebook in your
                        databricks workspace
  --profile PROFILE     Profile name to be passed to the databricks CLI
  --update-if-exists UPDATE_IF_EXISTS UPDATE_IF_EXISTS
                        Looks for a job_id or name (useful only for Databricks
                        deployments)
  --parameters ...      List of parameters that get passed directly to the
                        spark jar / python task. This must be the last
                        parameter.