15 KiB
DevOps for Artificial Intelligence (AI) applications: Creating continous integration pipeline using Docker and Kubernetes.
This tutorial demonstrates how to implement a Continous Integration (CI)/Continous Delivery (CD) pipeline for an AI application. AI application is a combination of application code embedded with a pretrained machine learning (ML) model. For this tutorial we are fetching a pretrained model from a private Azure blob storage account, it could be a AWS S3 account as well.
We will use a simple python flask web application for the tutorial, you can download the source code from GitHub.
For an in-depth underastanding of how DevOps integrates with different stages of an AI Data Science project, checkout this training from our team. In addition, do checkout this great series of blog posts on DevOps in Data Science from Microsoft.
We also recommend taking a look at our newly launched Azure Machine Learning services (Azure ML). Azure ML is an integrated, end-to-end data science and advanced analytics solution for professional data scientists to prepare data, develop experiments, and deploy models at cloud scale.
- If you are already using Azure ML, you can easily consume your models by exporting the model file to a storage container.
- You can also seamlessly integrate with Azure ML Model Management service via the REST APIs to fetch specific version of a model for your application.
- To download a model stored in model management service, you can use the Get Model Details endpoint that returns the URL of the blob container that stores the model. Lastly, if you don't want to pre-package the model with your application, you can deploy your model, at scale from within the Azure ML workbench and consume it as a REST endpoint in your application.
In this tutorial we demonstrate how you can build a continous integration pipeline for an AI application. The application securely pulls the latest model from an Azure Storage account and packages that as part of the application. The deployed application has the app code and ML model packaged as single container. This decouples the app developers and data scientists, to make sure that their production app is always running the latest code with latest ML model. Variation to this tutorial could be consuming the ML application as an endpoint instead of packaging it in the app. The goal of the tutorial is to show how easy it is do devops for an AI application.
Introduction
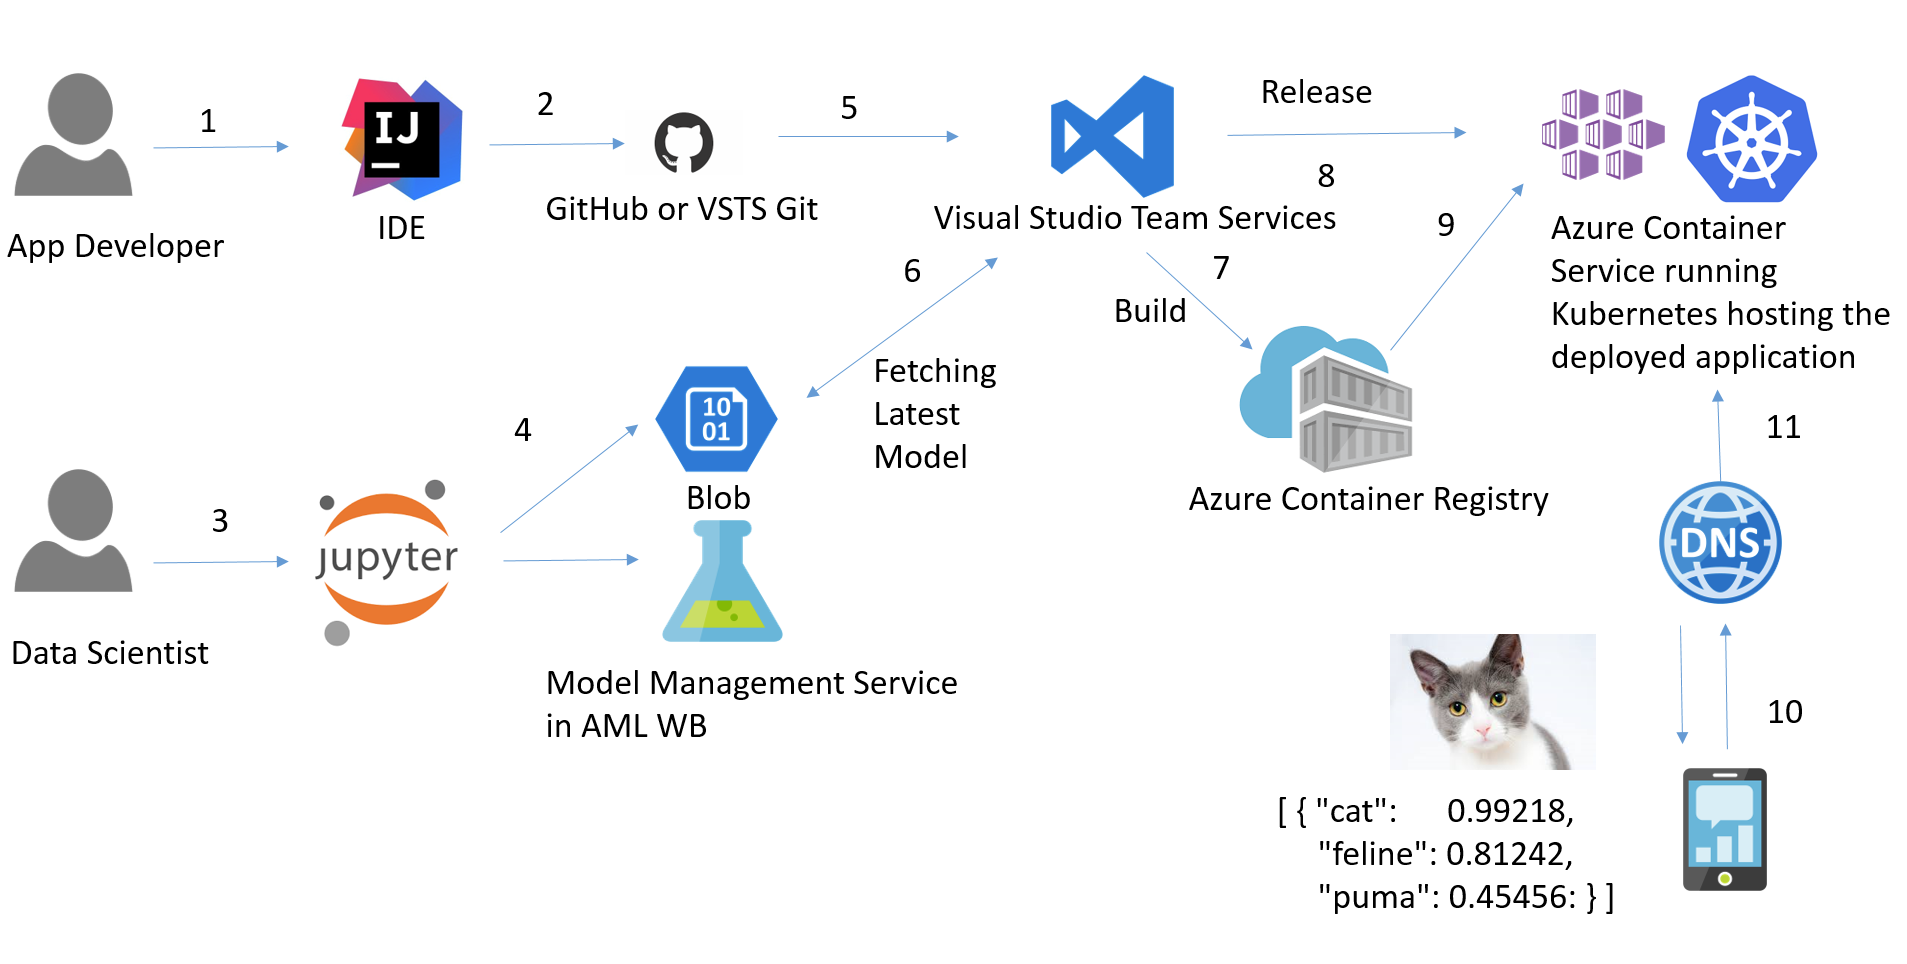
At the end of this tutorial, you will have a pipeline for our AI application that picks the latest commit from GitHub repository and the latest pretrained machine learning model from the Azure Storage container, stores the image in a private image repository on Azure Container Registry (ACR) and deploys it on a Kubernetes cluster running on Azure Container Service (AKS).
- Developer work on the IDE of their choice on the application code.
- They commit the code to source control of their choice (VSTS has good support for various source controls)
- Separately, the data scientist work on developing their model.
- Once happy, they publish the model to a model repository, in this case we are using a blob storage account. This could be easily replaced with Azure ML Workbench's Model management service through their REST APIs.
- A build is kicked off in VSTS based on the commit in GitHub.
- VSTS Build pipeline pulls the latest model from Blob container and creates a container.
- VSTS pushes the image to private image repository in Azure Container Registry
- On a set schedule (nightly), release pipeline is kicked off.
- Latest image from ACR is pulled and deployed across Kubernetes cluster on ACS.
- Users request for the app goes through DNS server.
- DNS server passes the request to load balancer and sends the response back to user.
Note: If you are using Azure ML workbench already, you probably realize that you can get all the way to step 9 i.e. model operationalized and deployed on a AKS cluster. The tutorial aims to provide ways for you to customize the container that gets deployed on AKS cluster. Alternatively, if you want to package your ML model and application code in a single container for low latency edge scenario instead of having two containers, this tutorial is for you.
Prerequisites
- Visual Studio Team Services Account
- Azure CLI
- Azure Container Service (AKS) cluster running Kubernetes
- Azure Container Registy (ACR) account
- Install Kubectl to run commands against Kubernetes cluster. We will need this to fetch configuration from ACS cluster.
- Fork the repository to your GitHub account.
Creating VSTS Build Definition
Go to the VSTS account that you created as part of the prereqs. You can find the URL for the VSTS account from Azure Portal under overview of your team account.
On the landing page, click on the new project icon to create a project for your work.
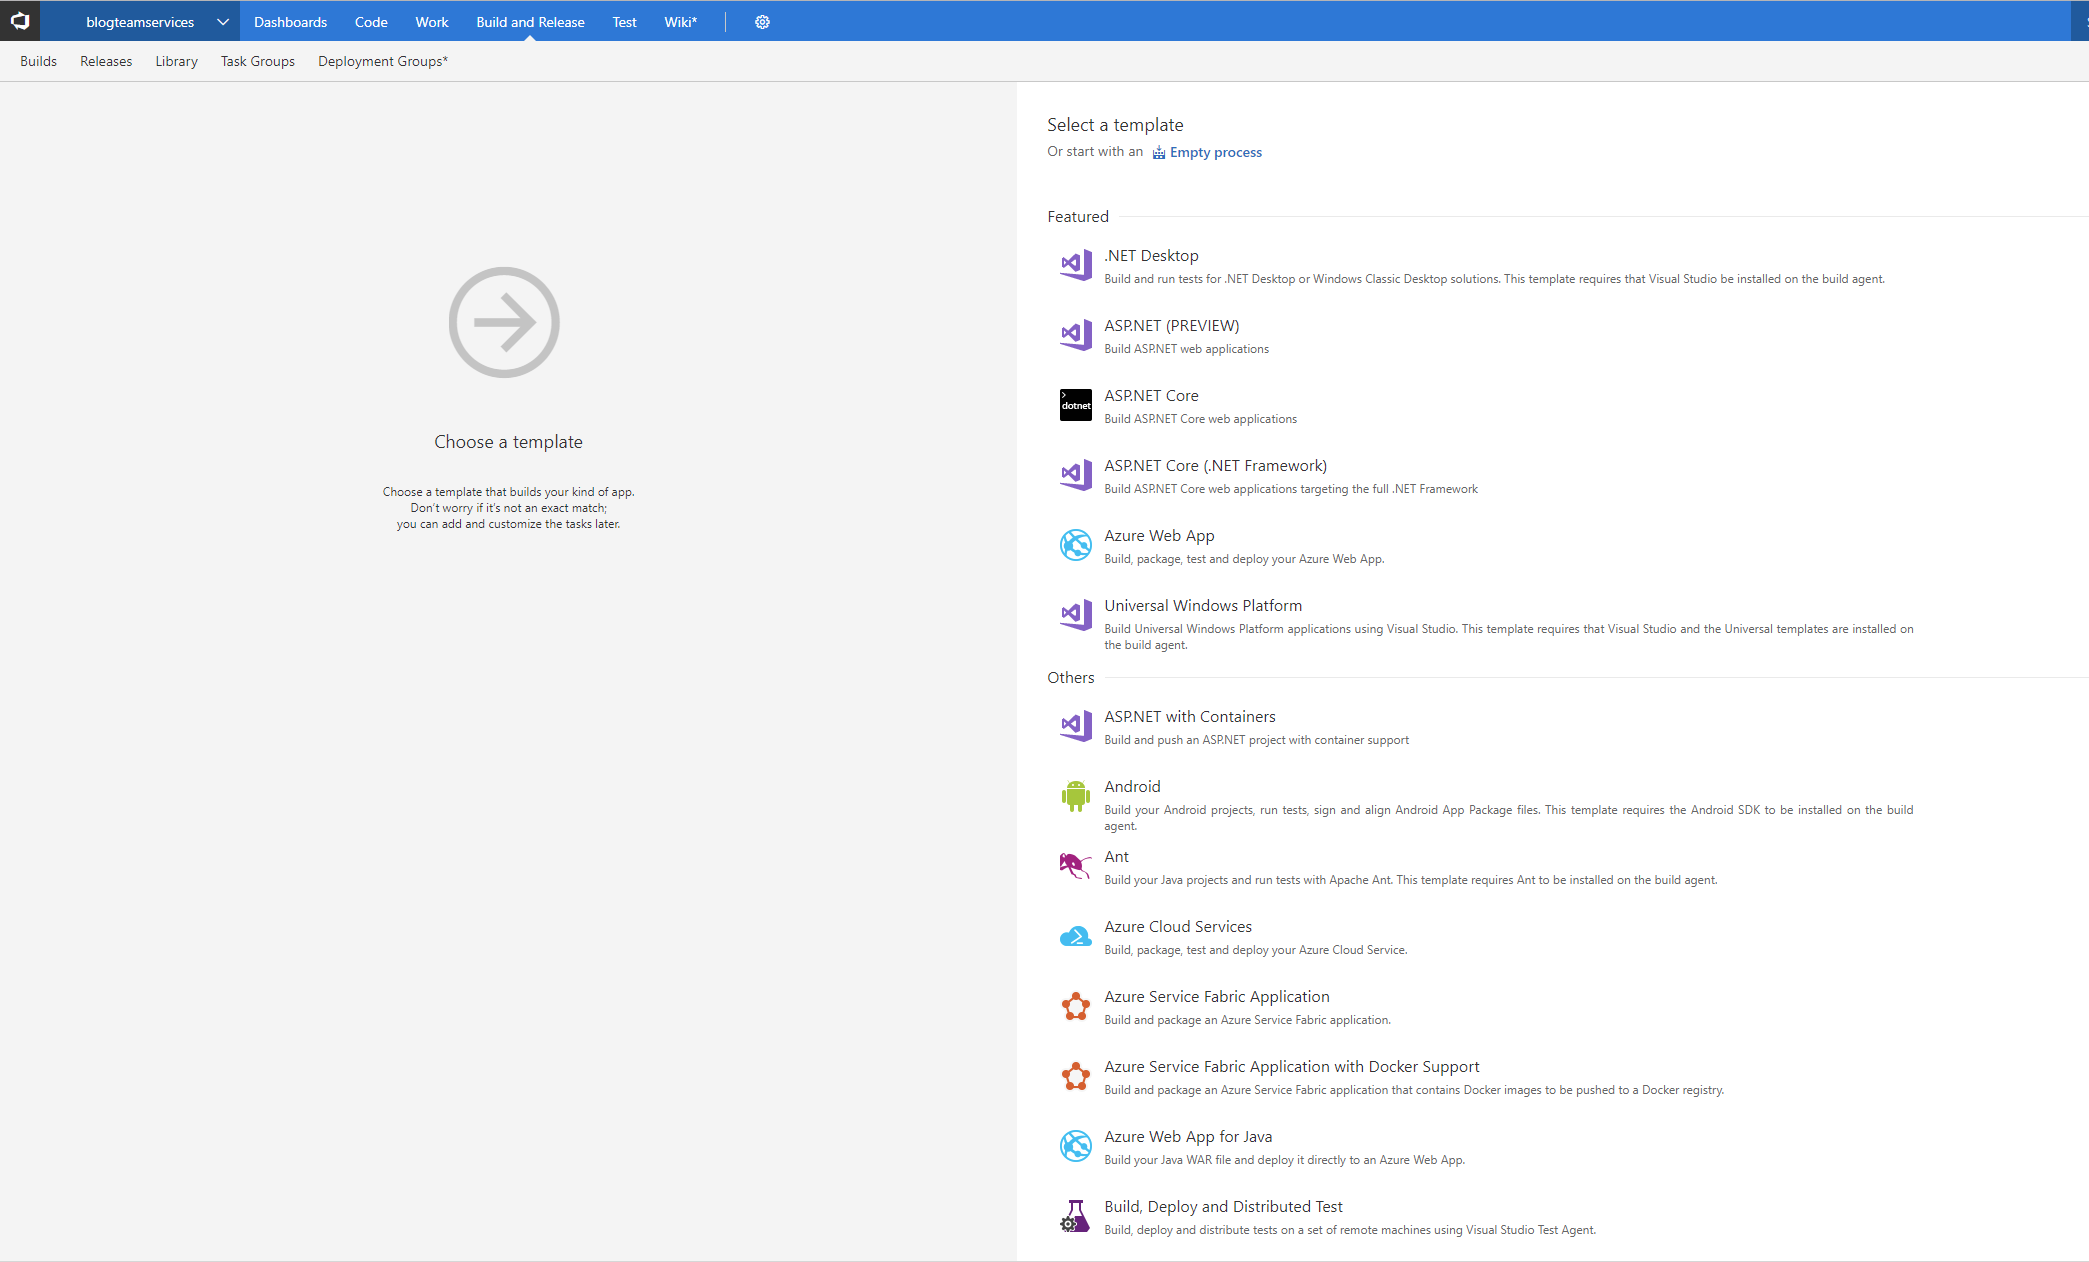
Go to your project homepage and click on "Build and Releases tab" from the menu. To create a new Build Definition click on the "+ New" icon on top right. We will start from an empty process and add tasks for our build process. Notice here that VSTS provides some well definied build definition process for commonly used stack like ASP .Net
Name your build definition and select a agent from the agent queue, we select Hosted Linux queue since our app is Linix based and we want to run some Linux specific command in further steps. When you queue a build, VSTS provides you an agent to run your build definition on.
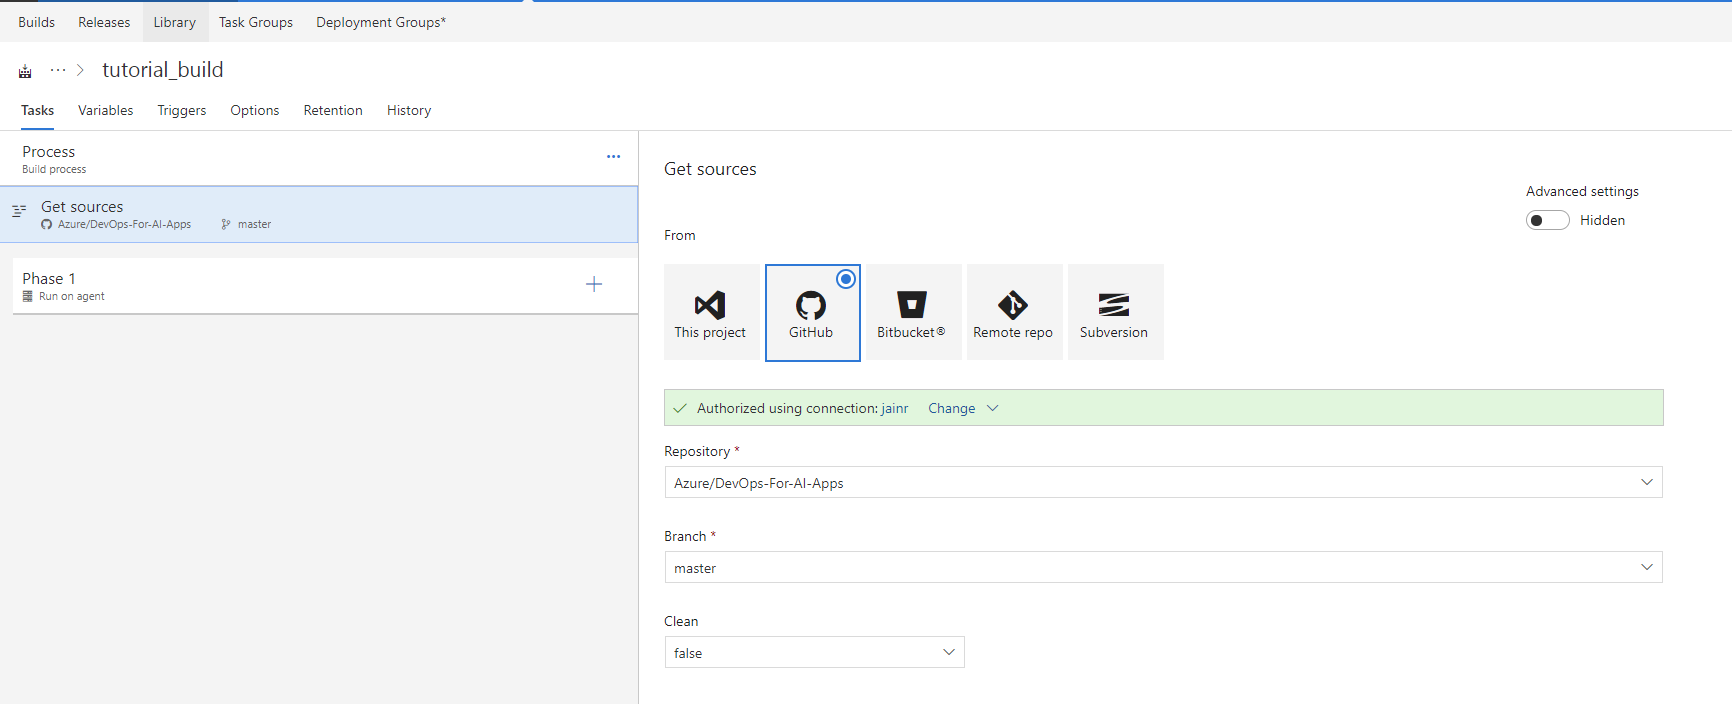
Under Get-Sources option, you can link the VSTS Build to source control of your choice. In this tutorial we are using GitHub, you can authorize VSTS to access your repository and then select it from the drop down. You can also select the branch that you want to build your app from, we select master.
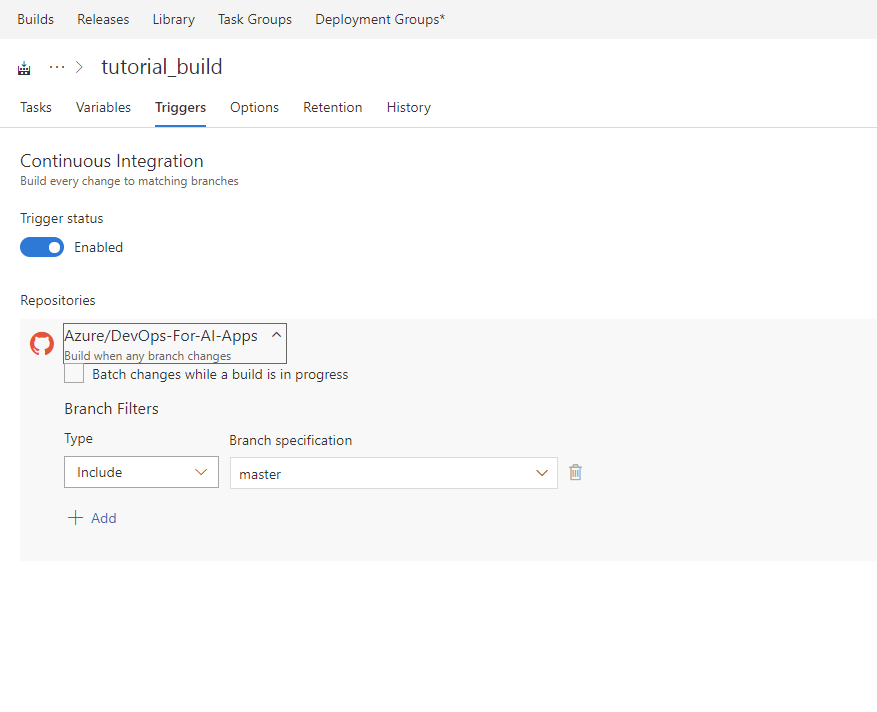
You want to kick off a new build each time there ia new checkin to the repository, to do so you can go to the trigger tab and enable continous integration. You can again select which branch you want to build off from.
At this point we have the build definition to triggered to run on a linux agent for each commit to the repository. Let's start with adding tasks to build container for our app.
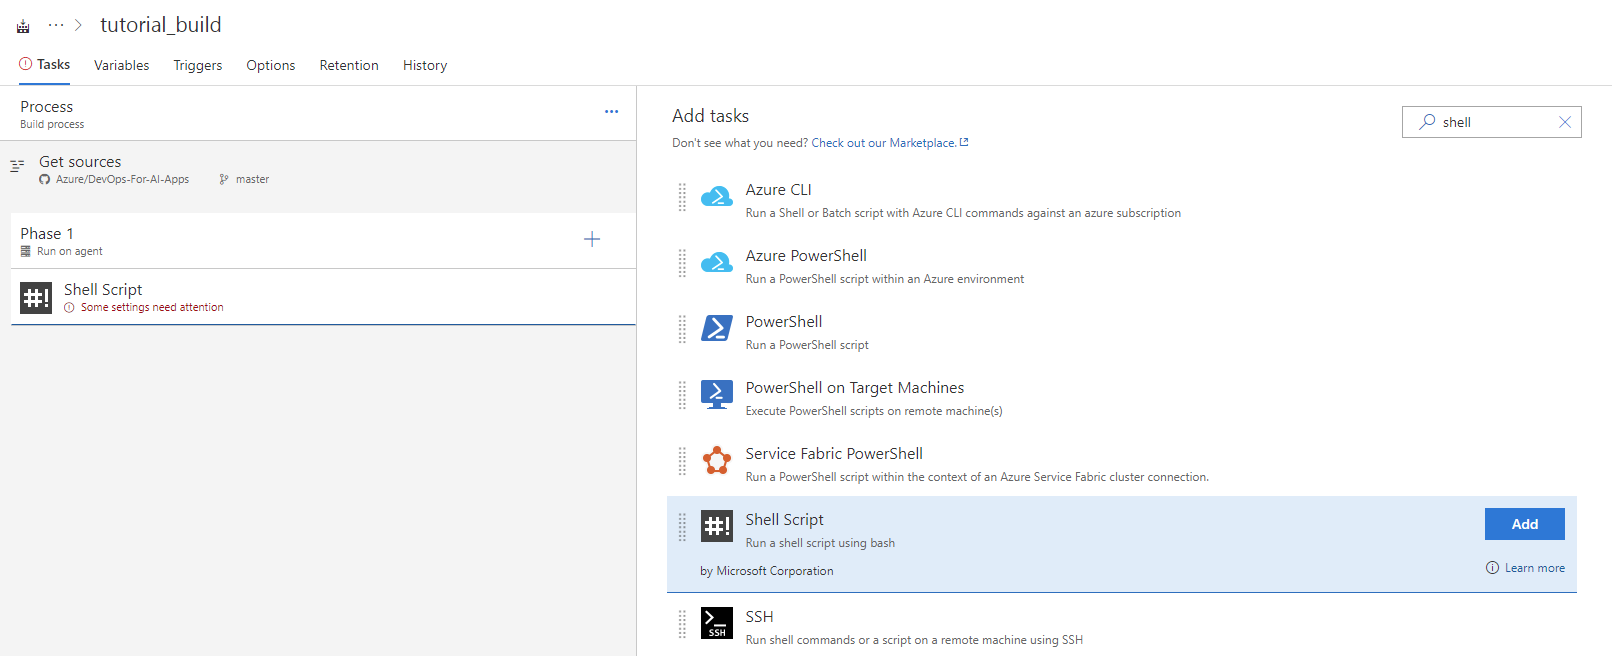
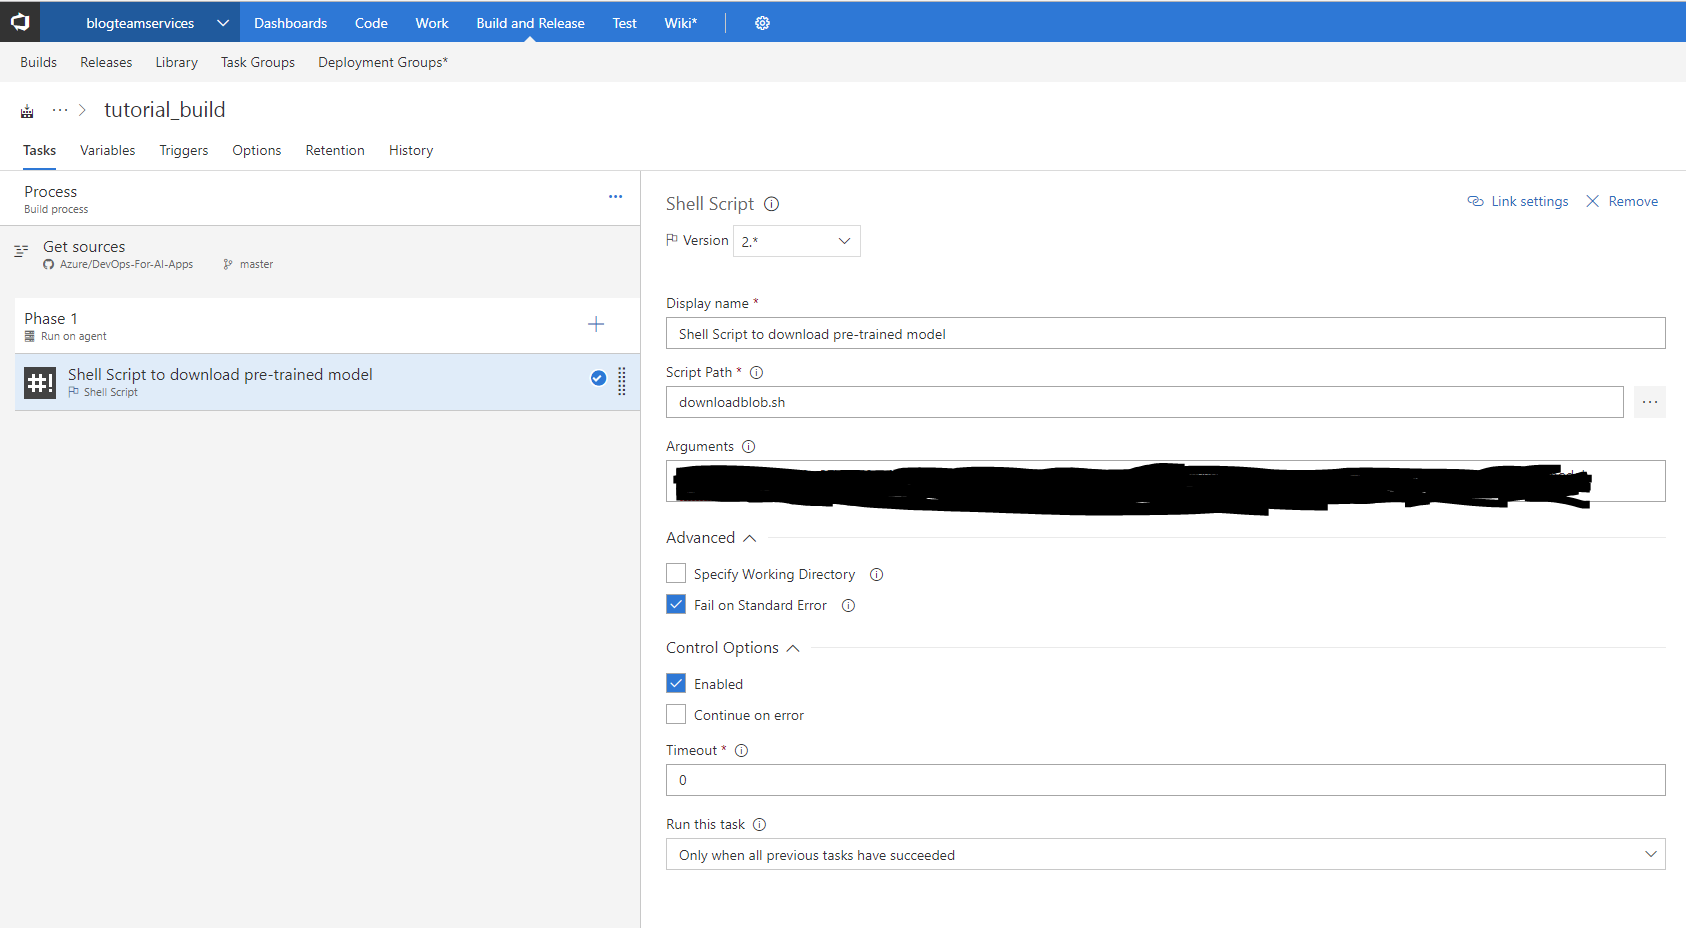
As first task we want to download the pre-trained model to the VSTS agent that we are building on, we are using a simple shell script to download the blob. Add Shell Script vsts task to execute the script.
Add the path to the script, in the arguments section pass in the value for your storage account name, access key, container name and blob names (model name and sysnet file).
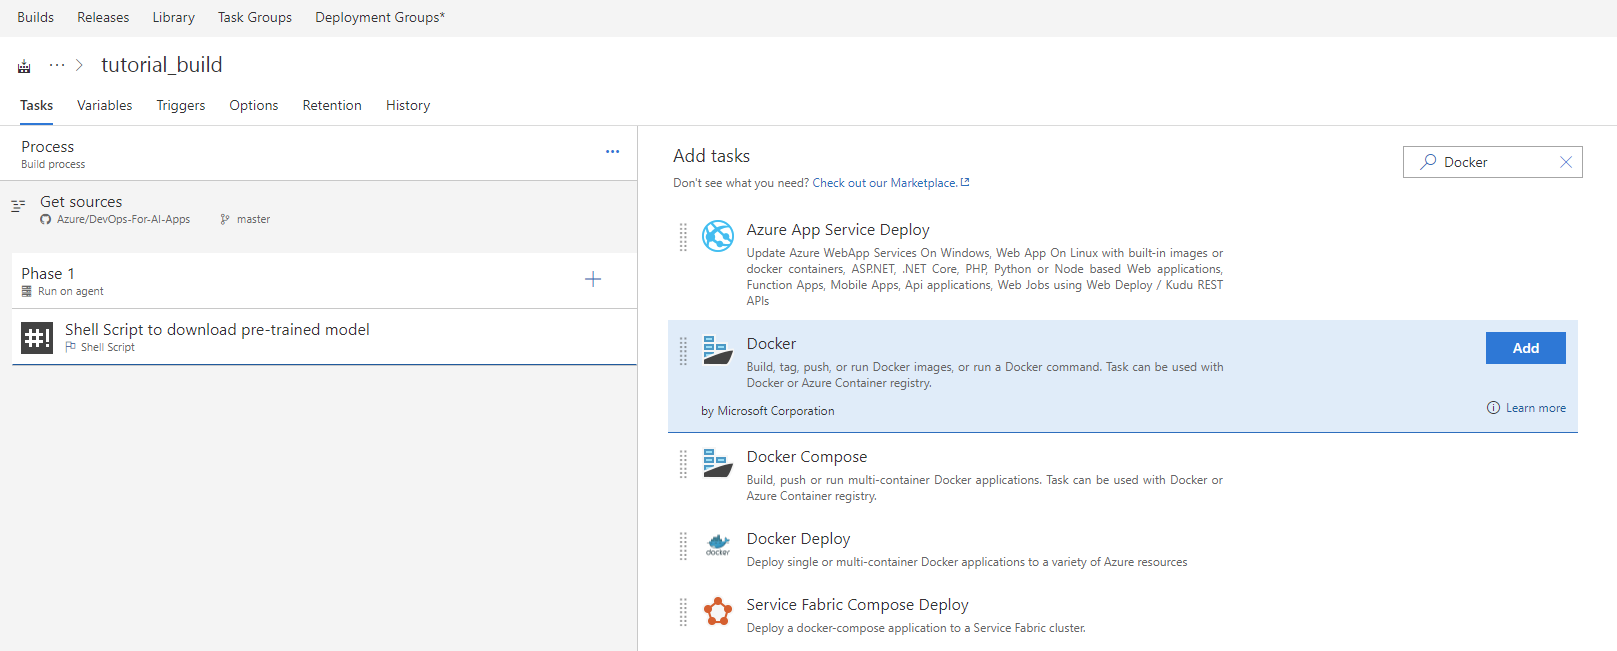
Add a Docker task to run docker commands. We will use this task to build container for our AI application. We are using Dockerfile that contains all the commands to assemble an image.
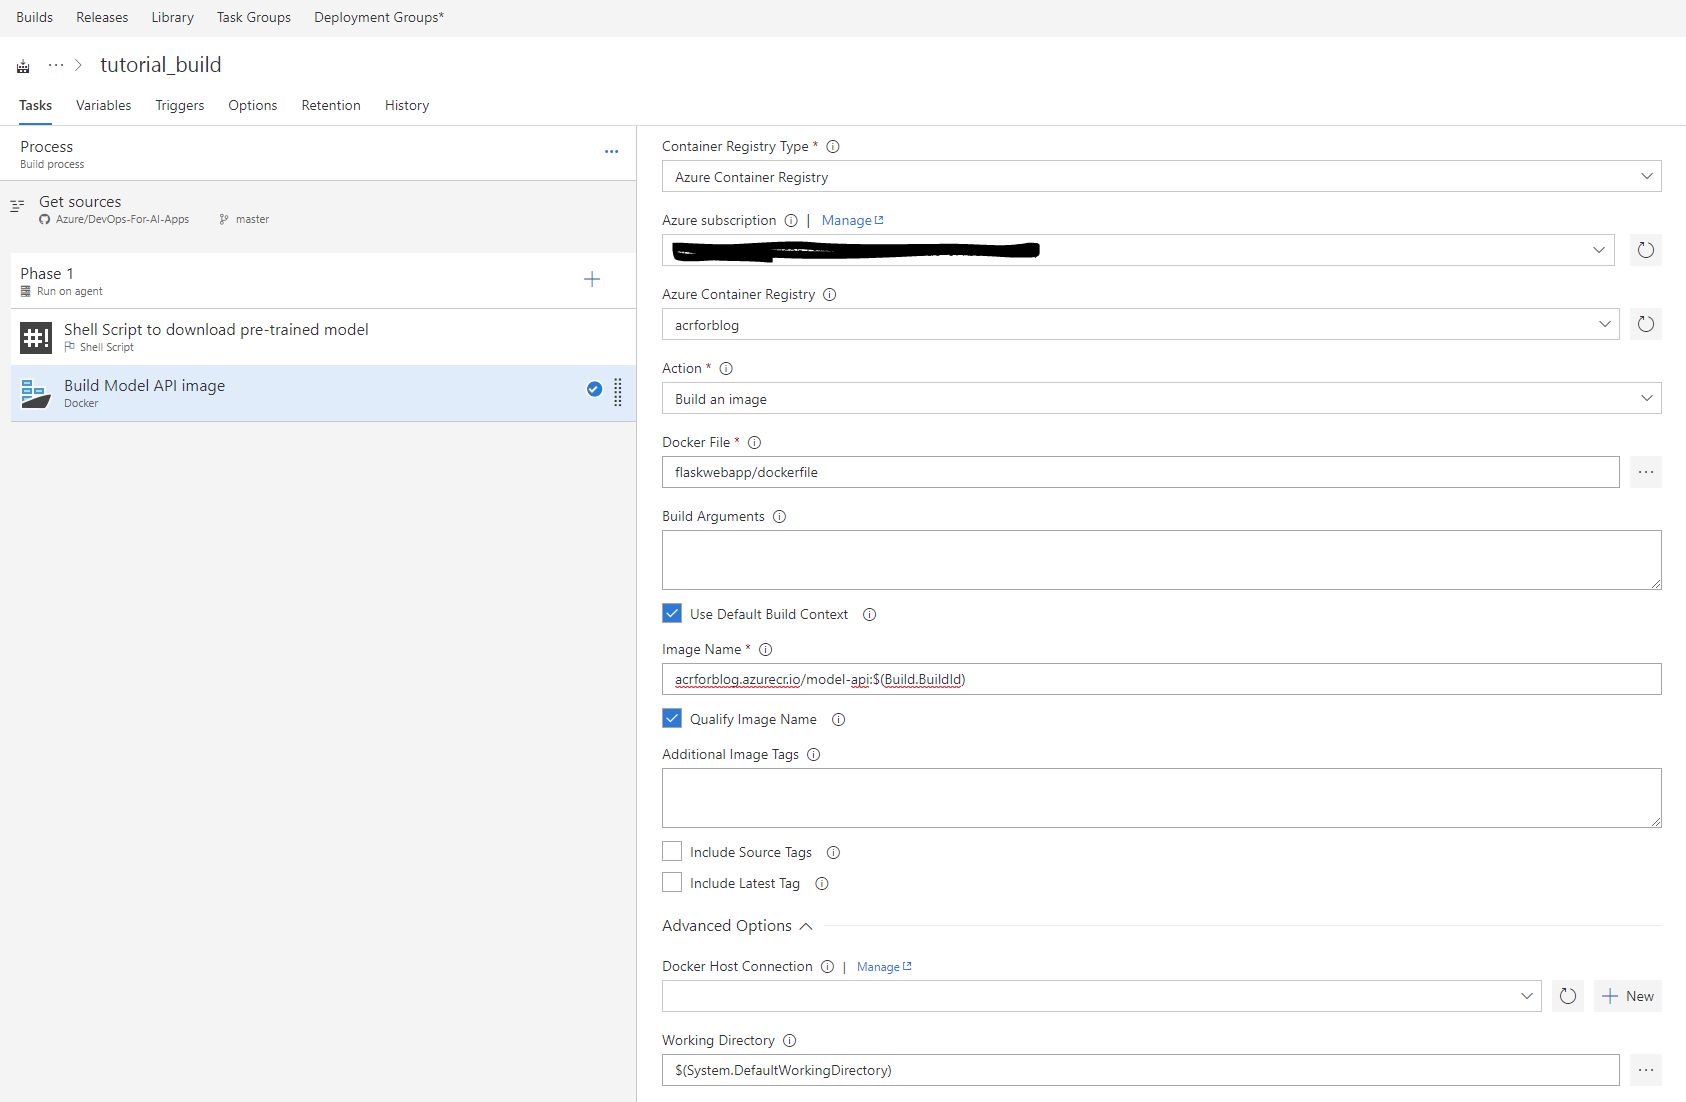
Within the Docker task, give it a name, select subscription and ACR from dropdown. For action select "Build an image" and then give it the path to dockerfile. For Image name, select the following format <YOUR_ACR_URL>/<CONTAINER_NAME>:$Build.BuildId. BuildId is a VSTS agent parameter and gets updated for each build.
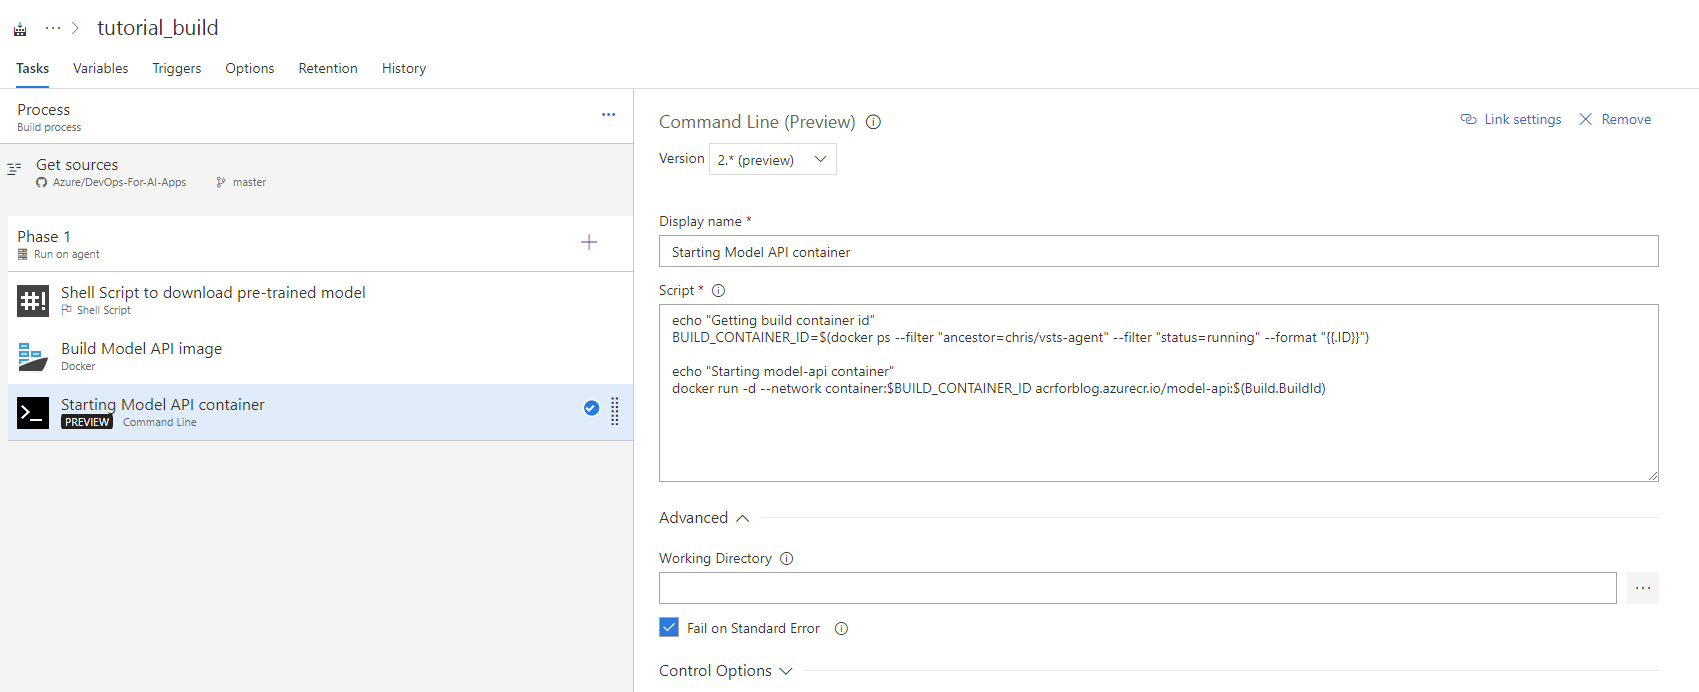
After building the container for our application, we want to test the container. To do so, we will first start the container using the command line task. Note that we are using version 2.* of this task that gives us the option to pass inlien script. We are doing something tricky here, VSTS agent that builds our code is a docker container itself. So basically we are trying to start a container within a container. This is not hard but we need to make sure that both the containers are running on same network so we can access the ports correctly. To do so we first get the container id of the vsts build agent, by running following command. BUILD_CONTAINER_ID=$(docker ps --filter "ancestor=chris/vsts-agent" --filter "status=running" --format "{{.ID}}")
Please Note that the image name of the VSTS agent (chris/vsts-agent) might change in future, which will break this command but you can run other docker specific commands to find the image name of the VSTS agent.
Next we start our model-api image that we created in previous step and passing the network parameter to run it on same network as build VSTS agent container.
docker run -d --network container:BUILD_CONTAINER_ID acrforblog.azurecr.io/model-api:(Build.BuildId)
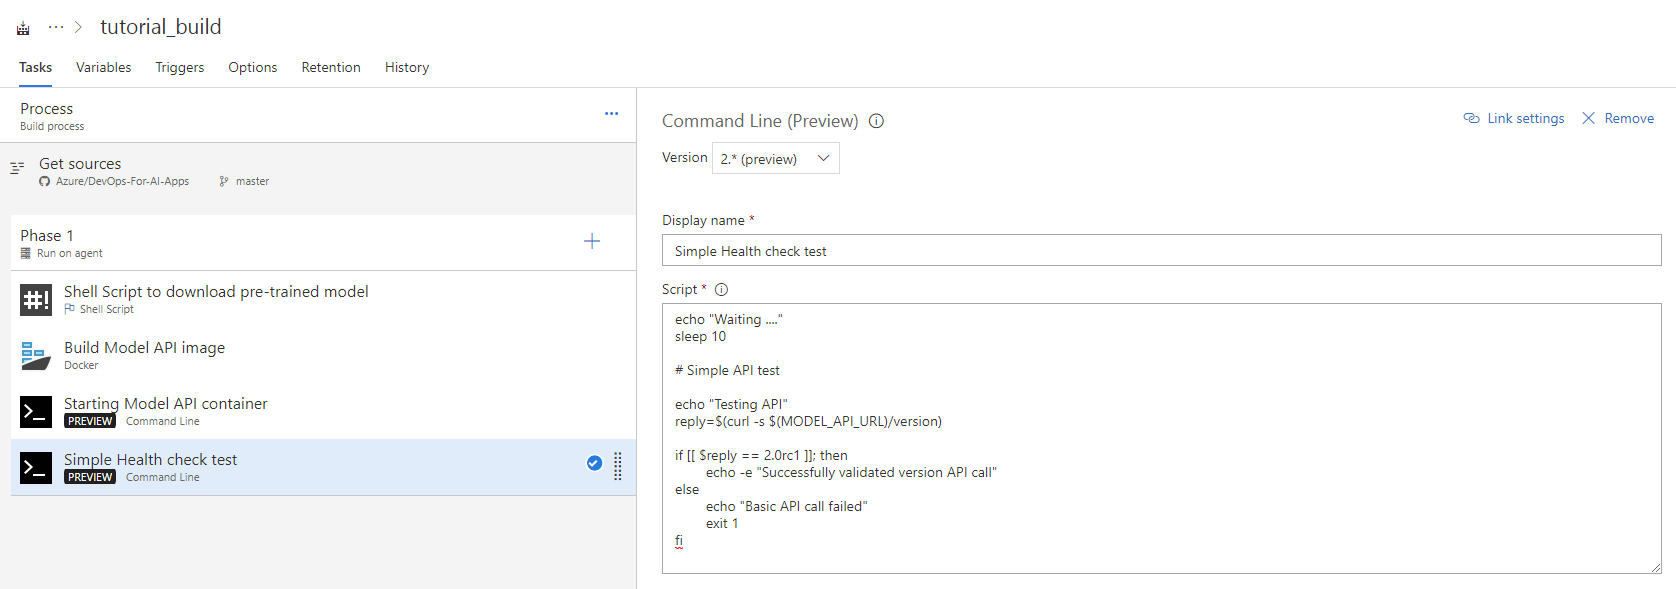
Once we have the container running, we are doing a simple API test to the version endpoint, to make sure the container started ok. We are sleeping for 10 seconds to wait for the container to come up.
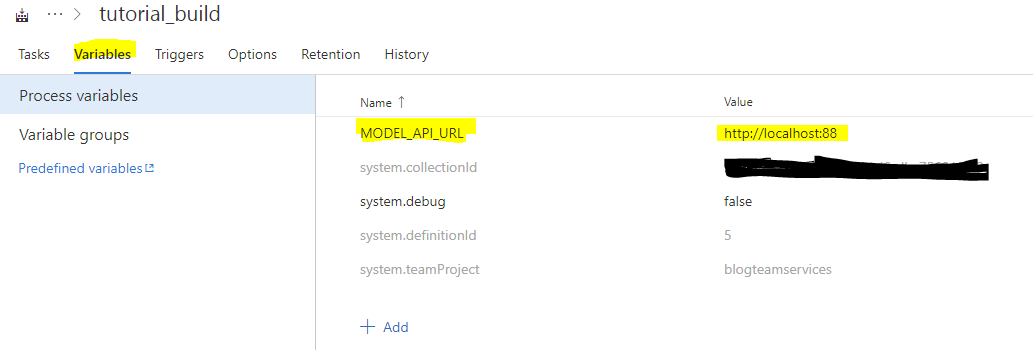
Notice that we are making use of a variable here (MODEL_API_URL), you can define custom process variable for your builds. To see a list of pre-defined variables and add your own, click on the variables tab.
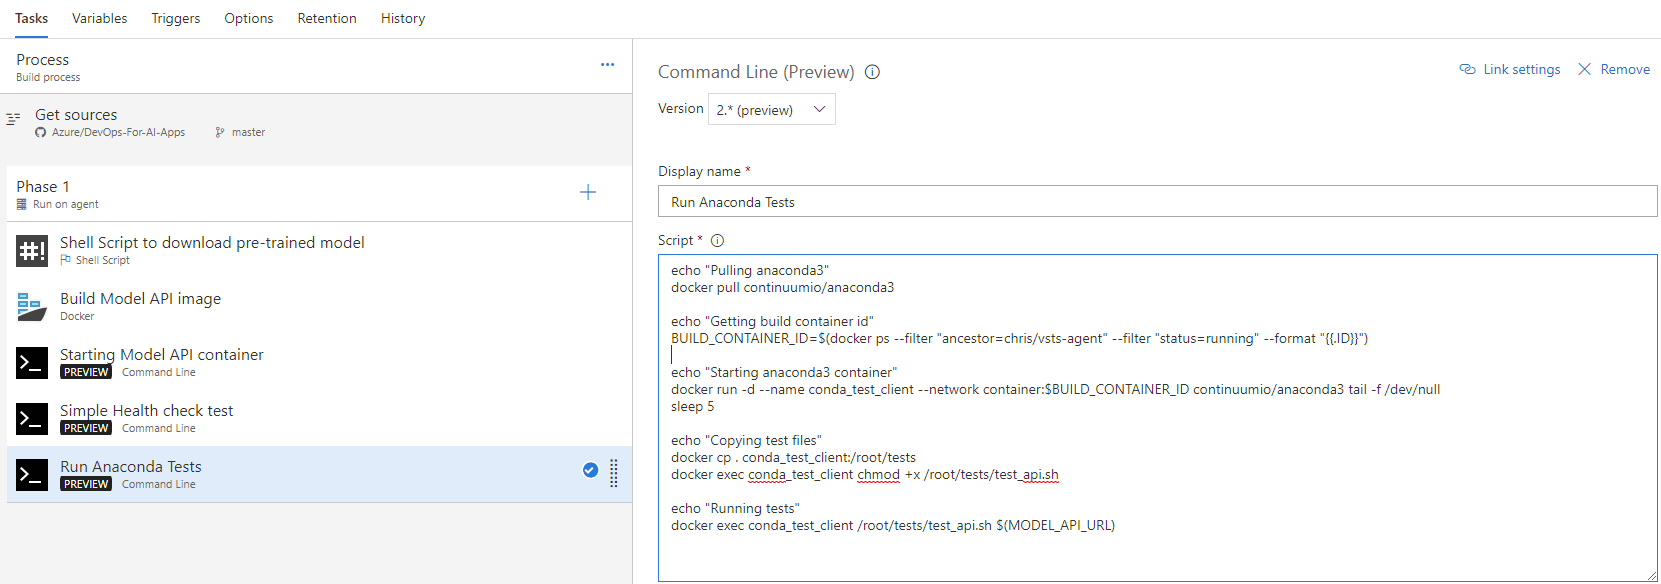
Next, we pass an image to the API and get the score back from it. Our test script is in the test/integration folder. We are only doing simple tests here but you can add more sophisticated tests to your workflow.
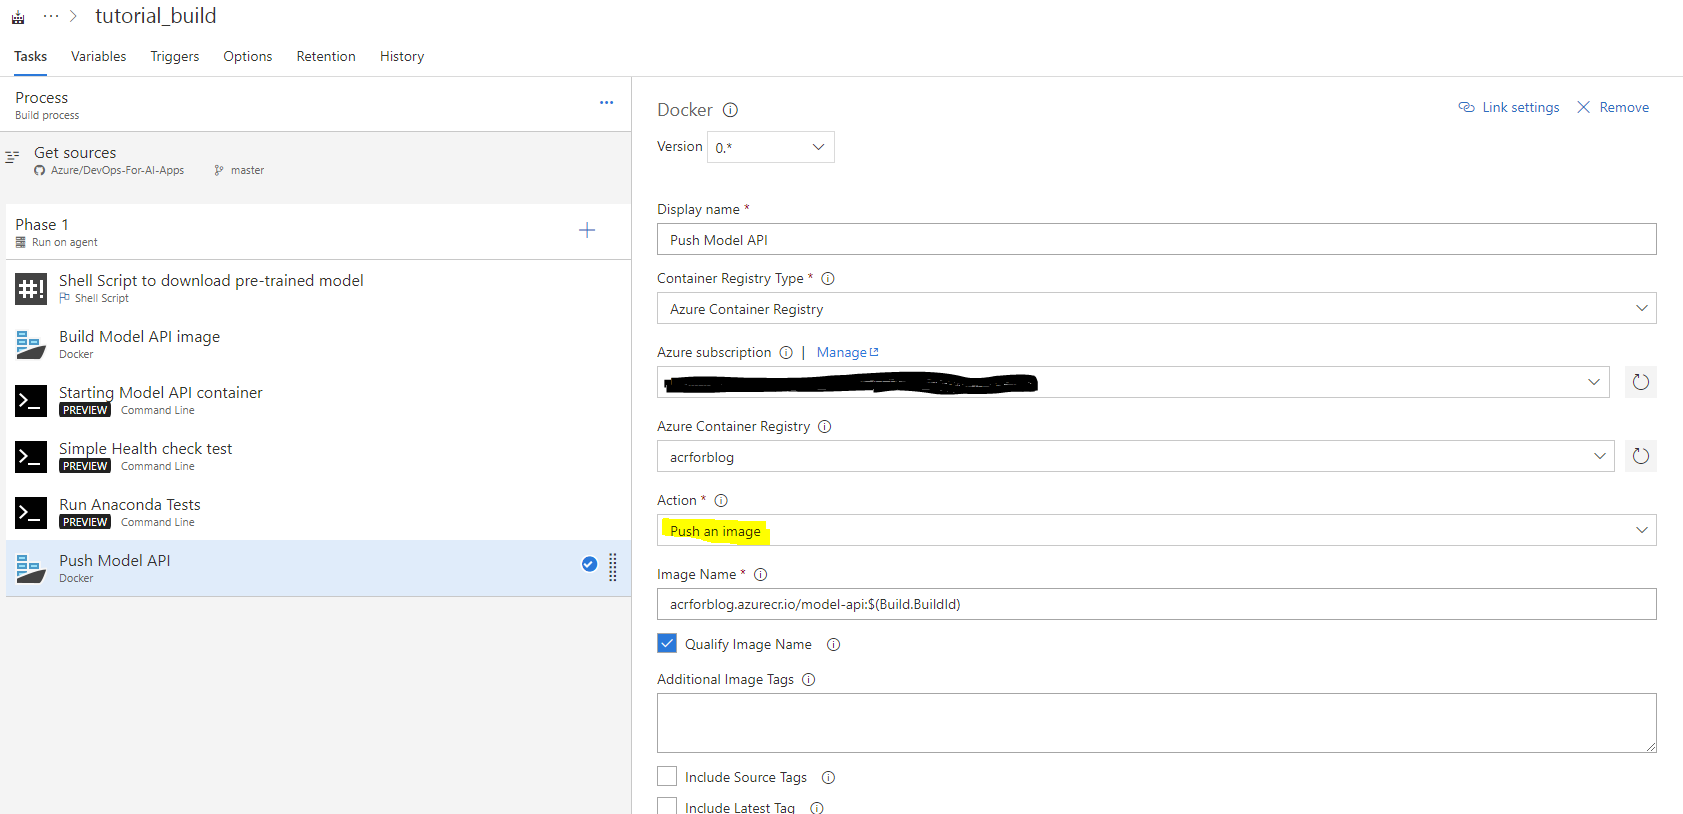
Finally, we push the image that we have built to a private repository in Azure container registry.
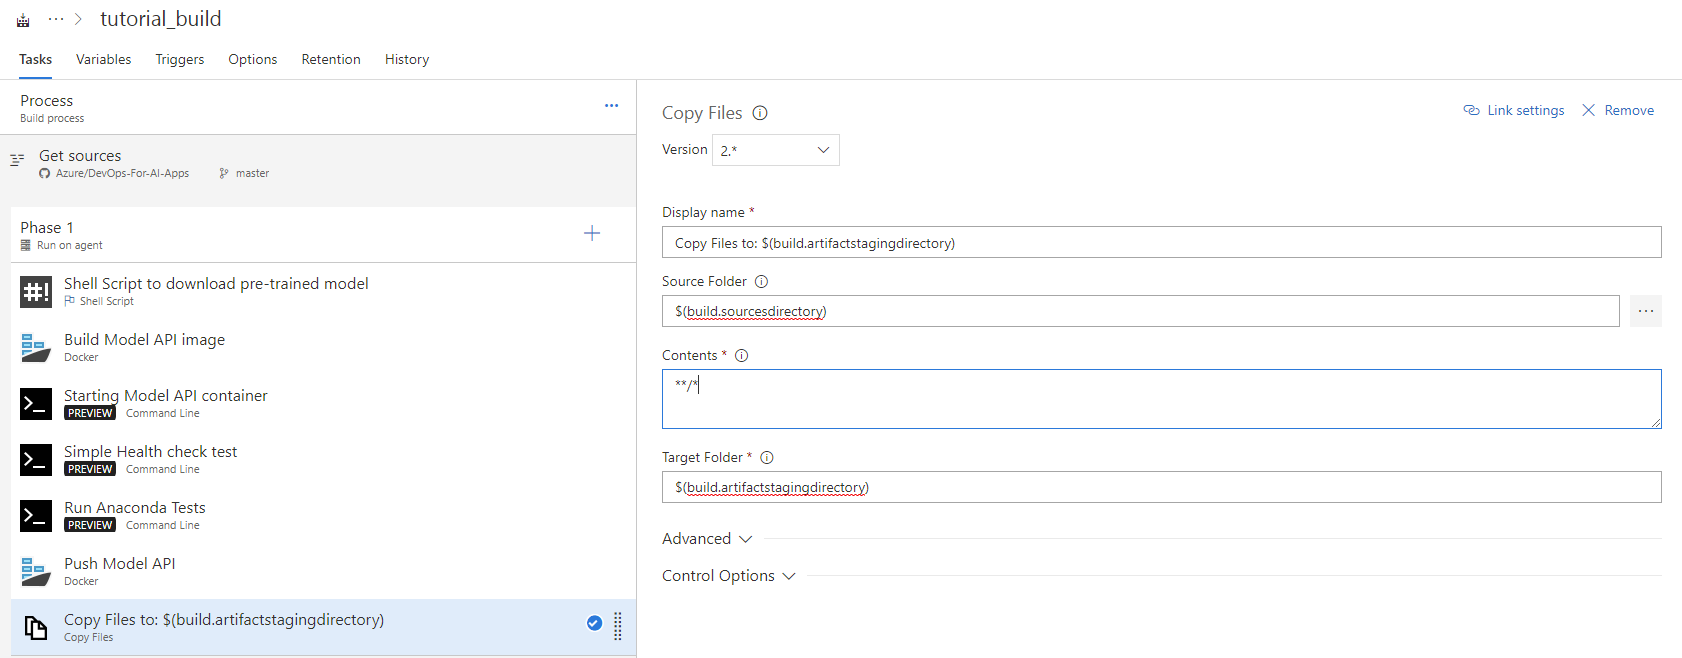
In the next two steps, we copy over files from the sources directory over to target directory so we can prepare the artifact for release phase. This step is required so you can trigger the release pipelines. You can choose what files make it to the artifact, by using regex pattern.
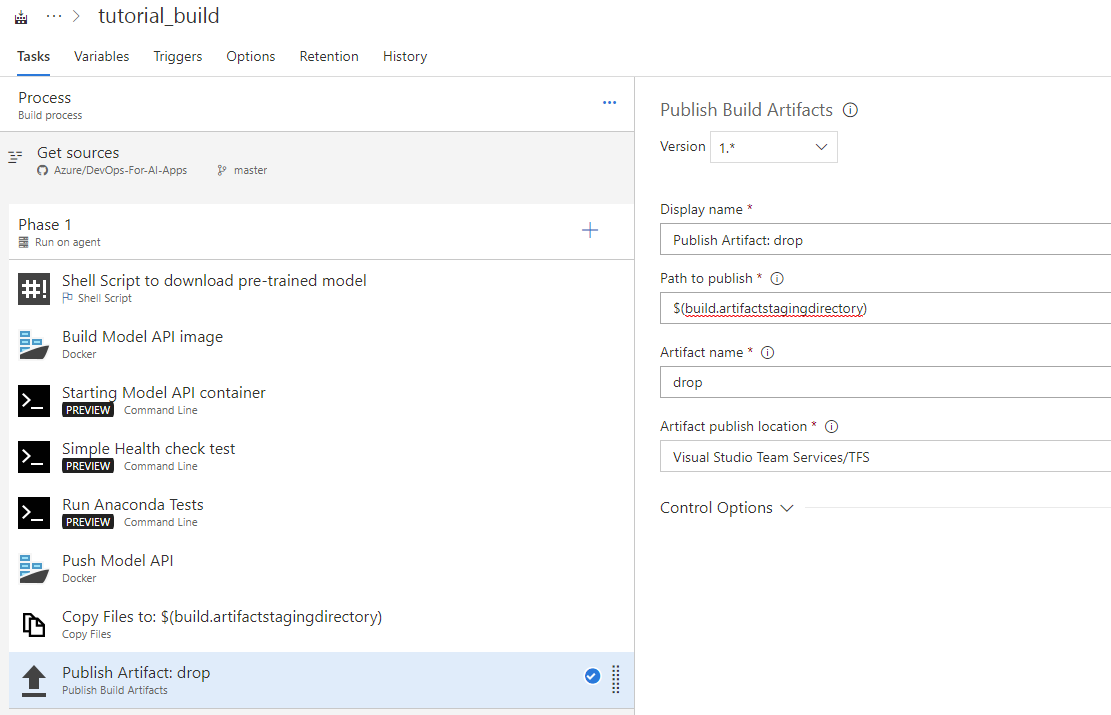
Once you have the artifact created, you have to publish it using the Publish Build Artifact task. For publish location, leave it default (VSTS/TFS), other option is using Fileshare.
Save (not save and queue) your build definition. Congratulations, you have successfully created a build defintion for your AI application by fetching a pre-trained model from a storage container, building the container image, doing basic integration test, pushing the container to your private container registry and publishing the artifact for downstream release process. Note that we are doing basic testing here but you can add more comprehensive tests based on your application.
Creating Release Definition
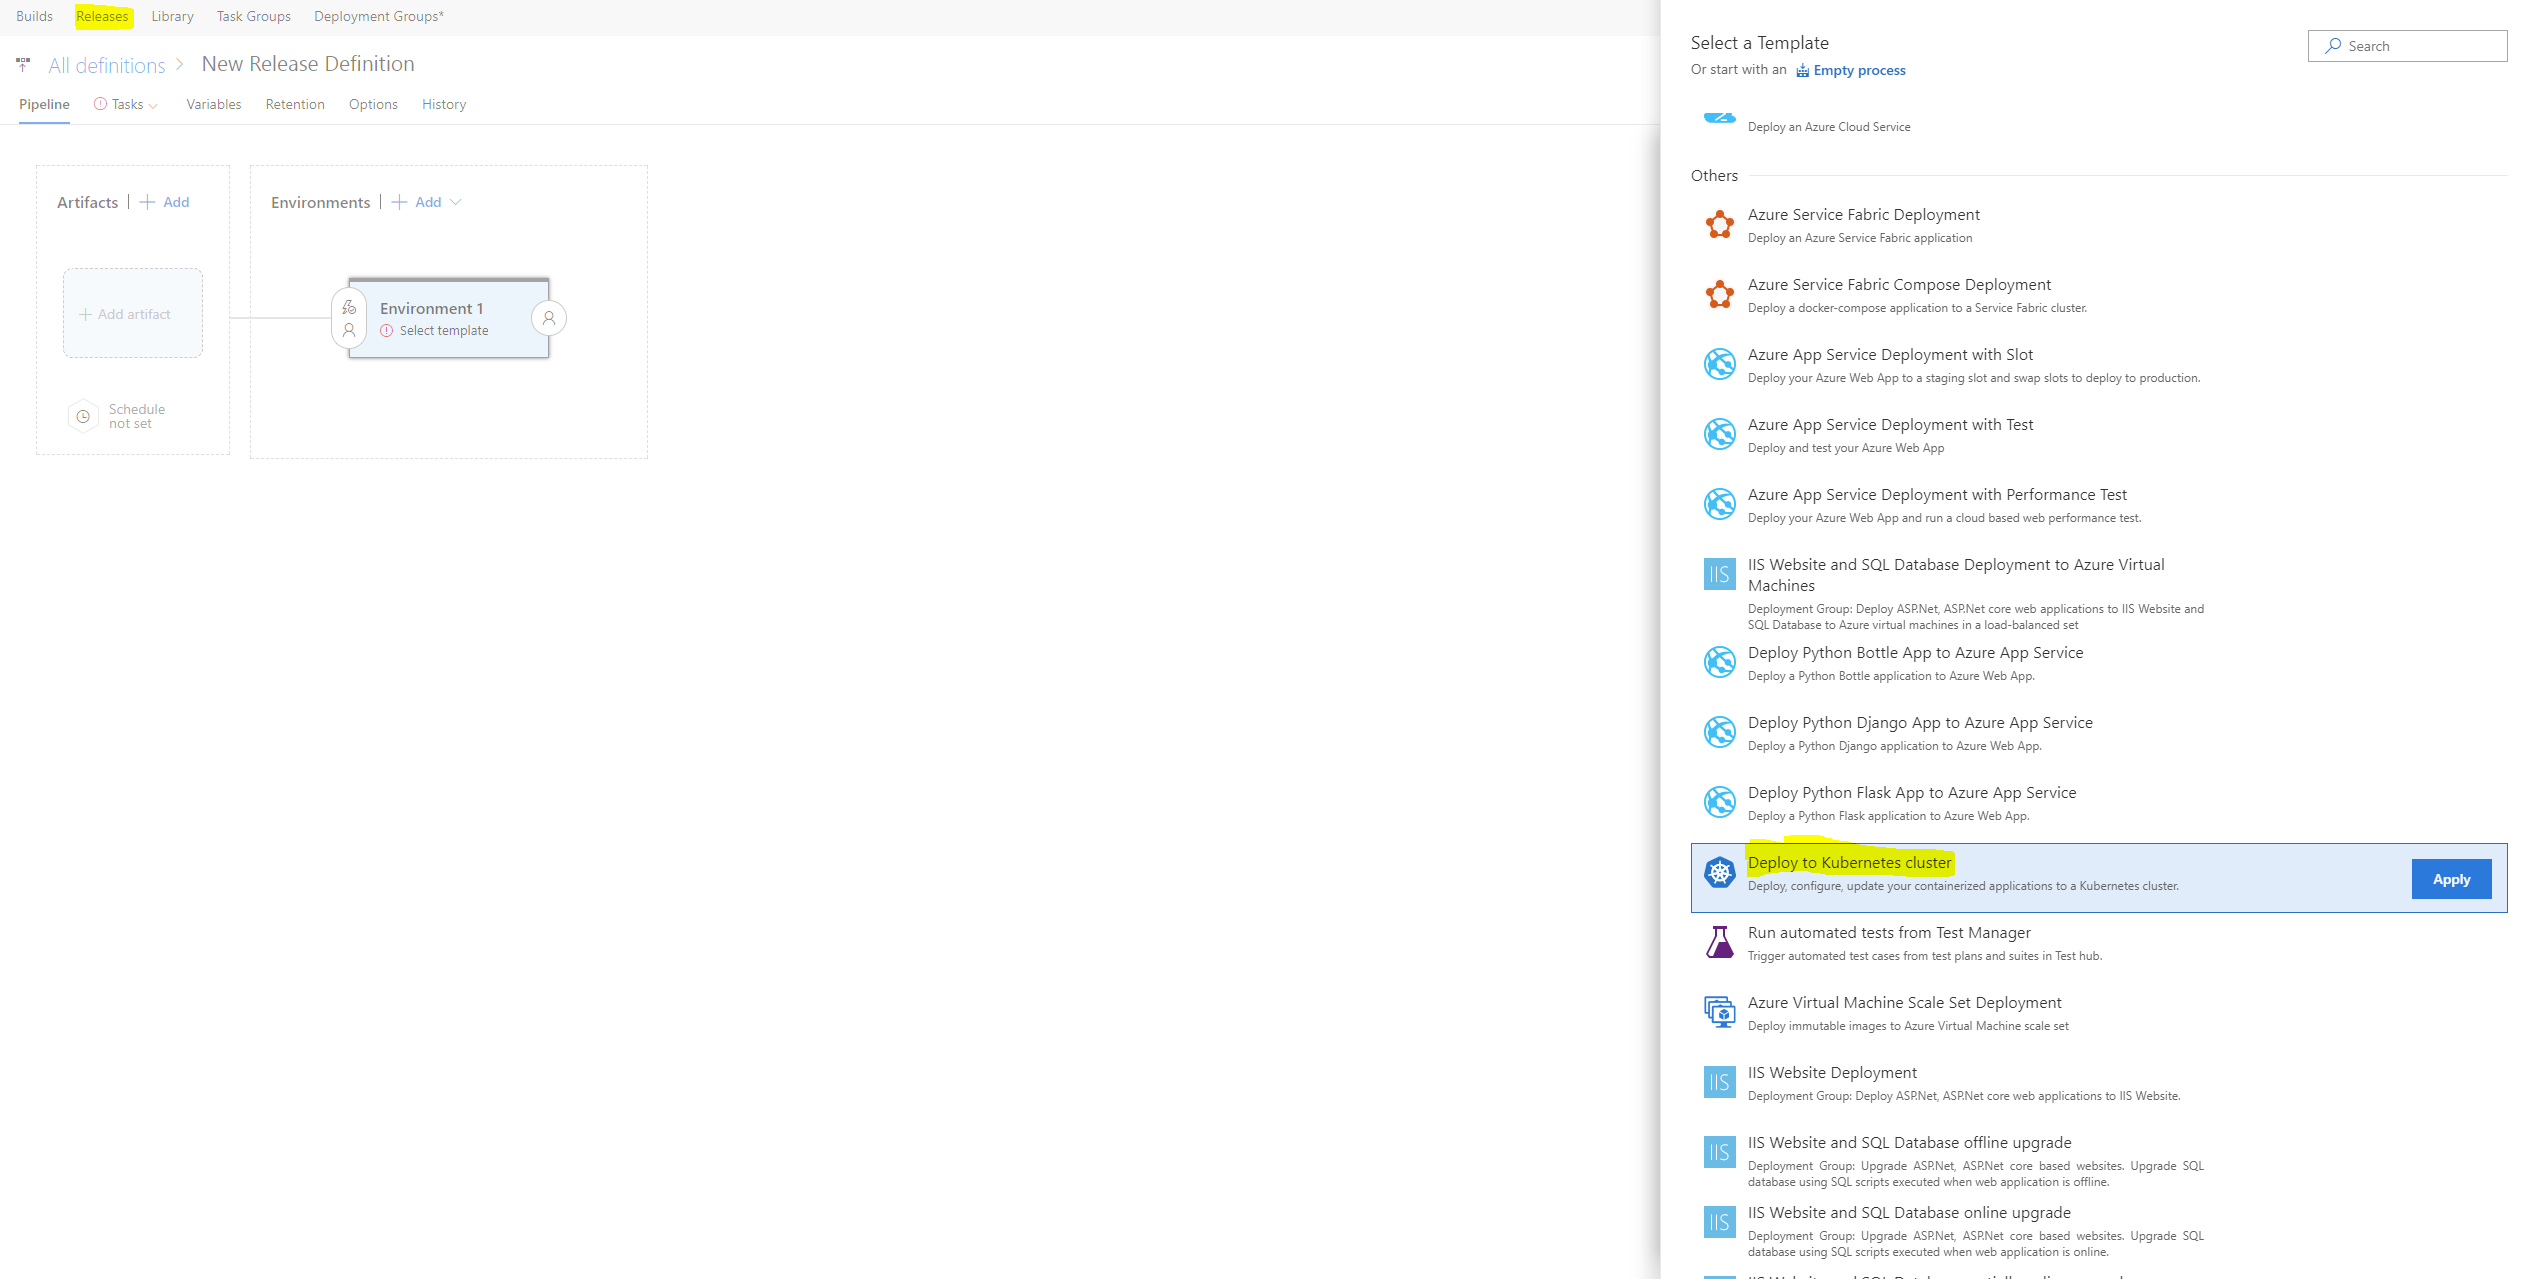
Hover over the the Build and Releases tab on the top and select Releases. Click the "+" and select Create New definition option to create a new release definition. You can add multiple environments like Integration, Staging and Prod depending on your devOps needs but to keep it simple we will just create one environment and call it production. While creating a new environment VSTS gives you an option for selecting a template, select Deploy to Kubernetes cluster and hit apply.
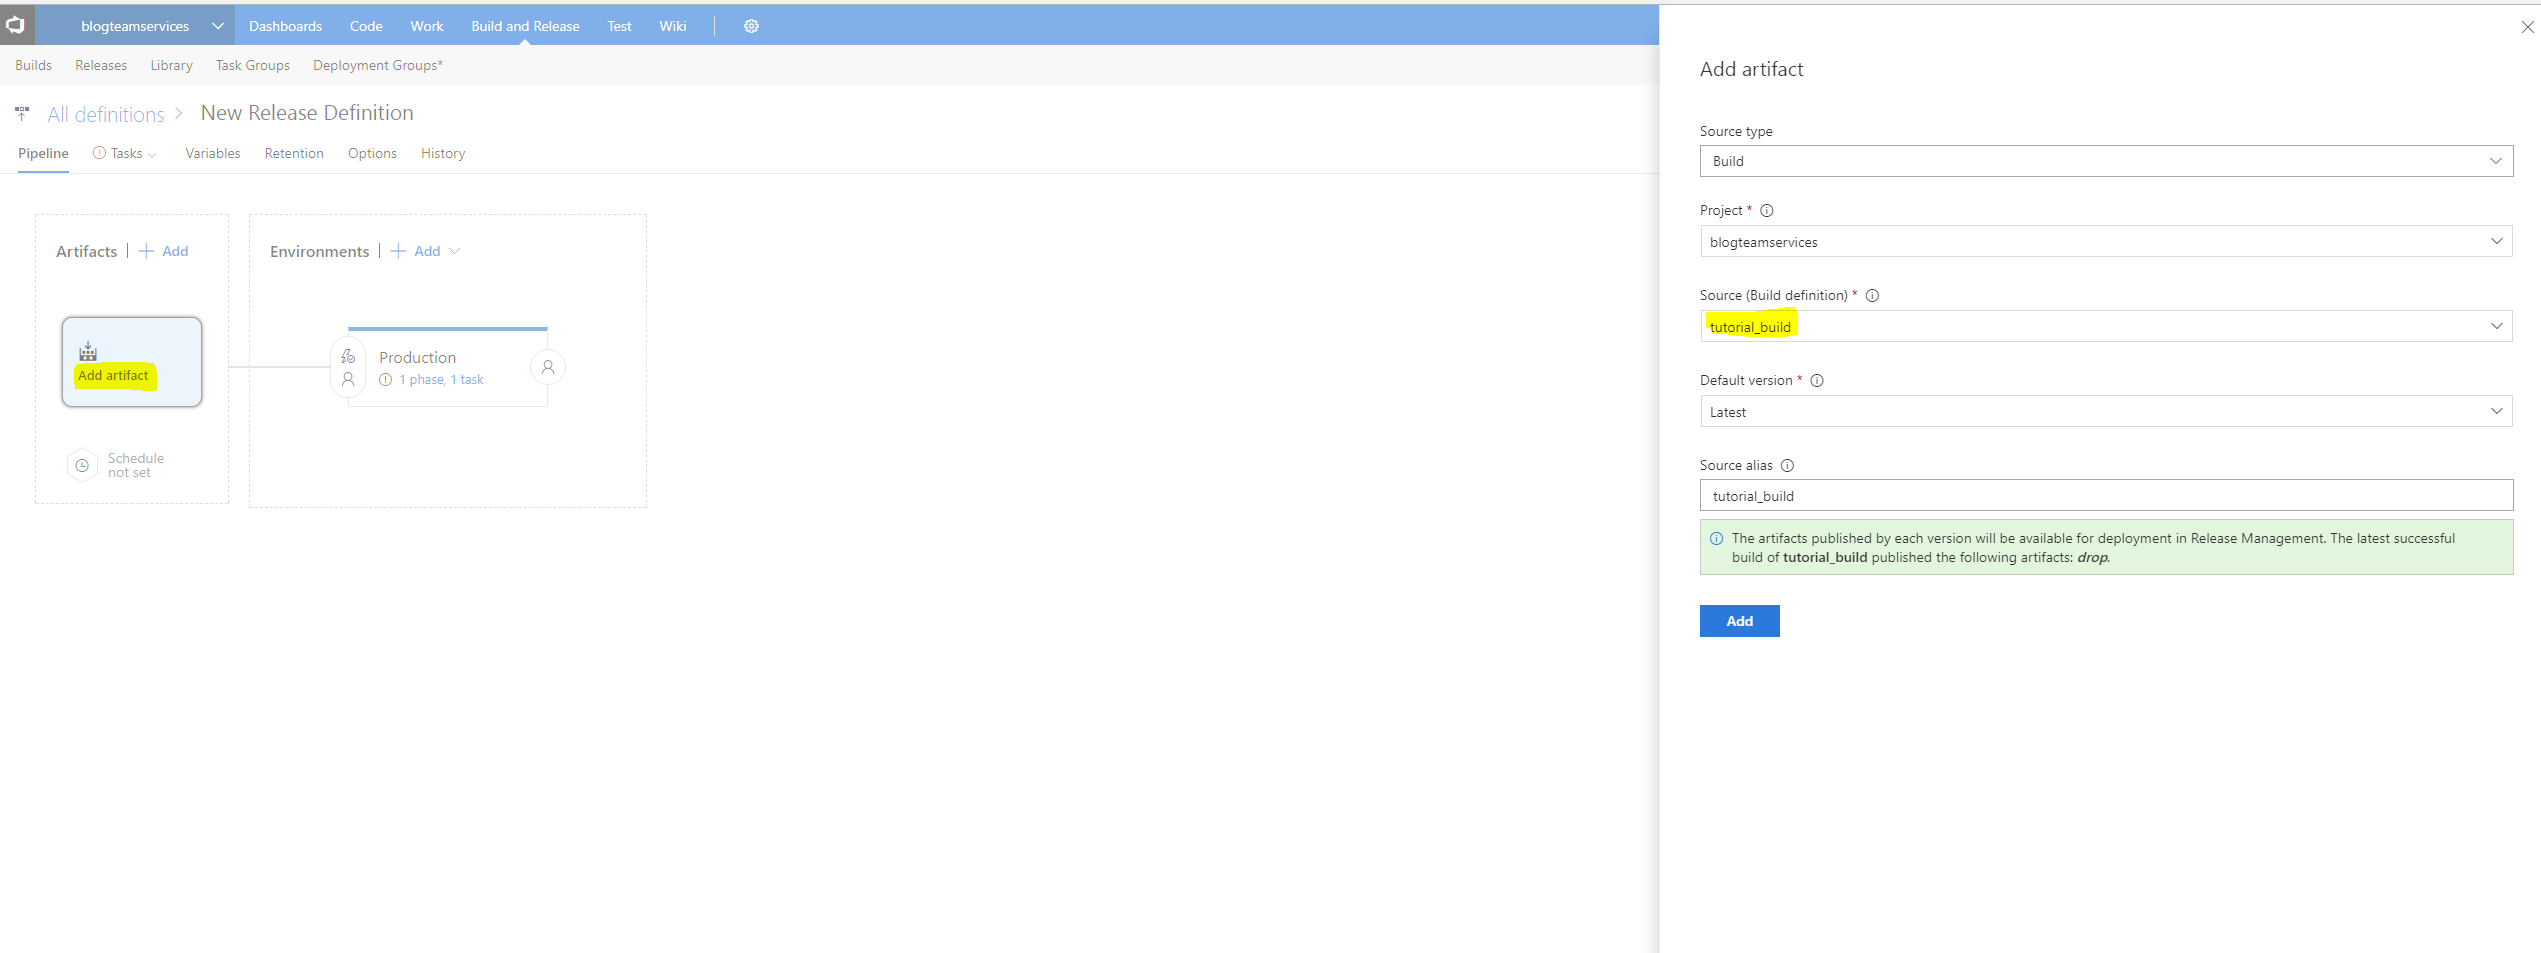
Before you fill in the details for the Deploy to Kubernetes task in the Production environment, lets also add the artifact that we published as part of the build phase.
You can also select how often do you want your release pipeline to run. You can set a schedule (nightly, weekly etc.) or have continuos deployment where each build gets released in production. To enable continous deployment, select the lighting sign in the artifacts and enable CD.
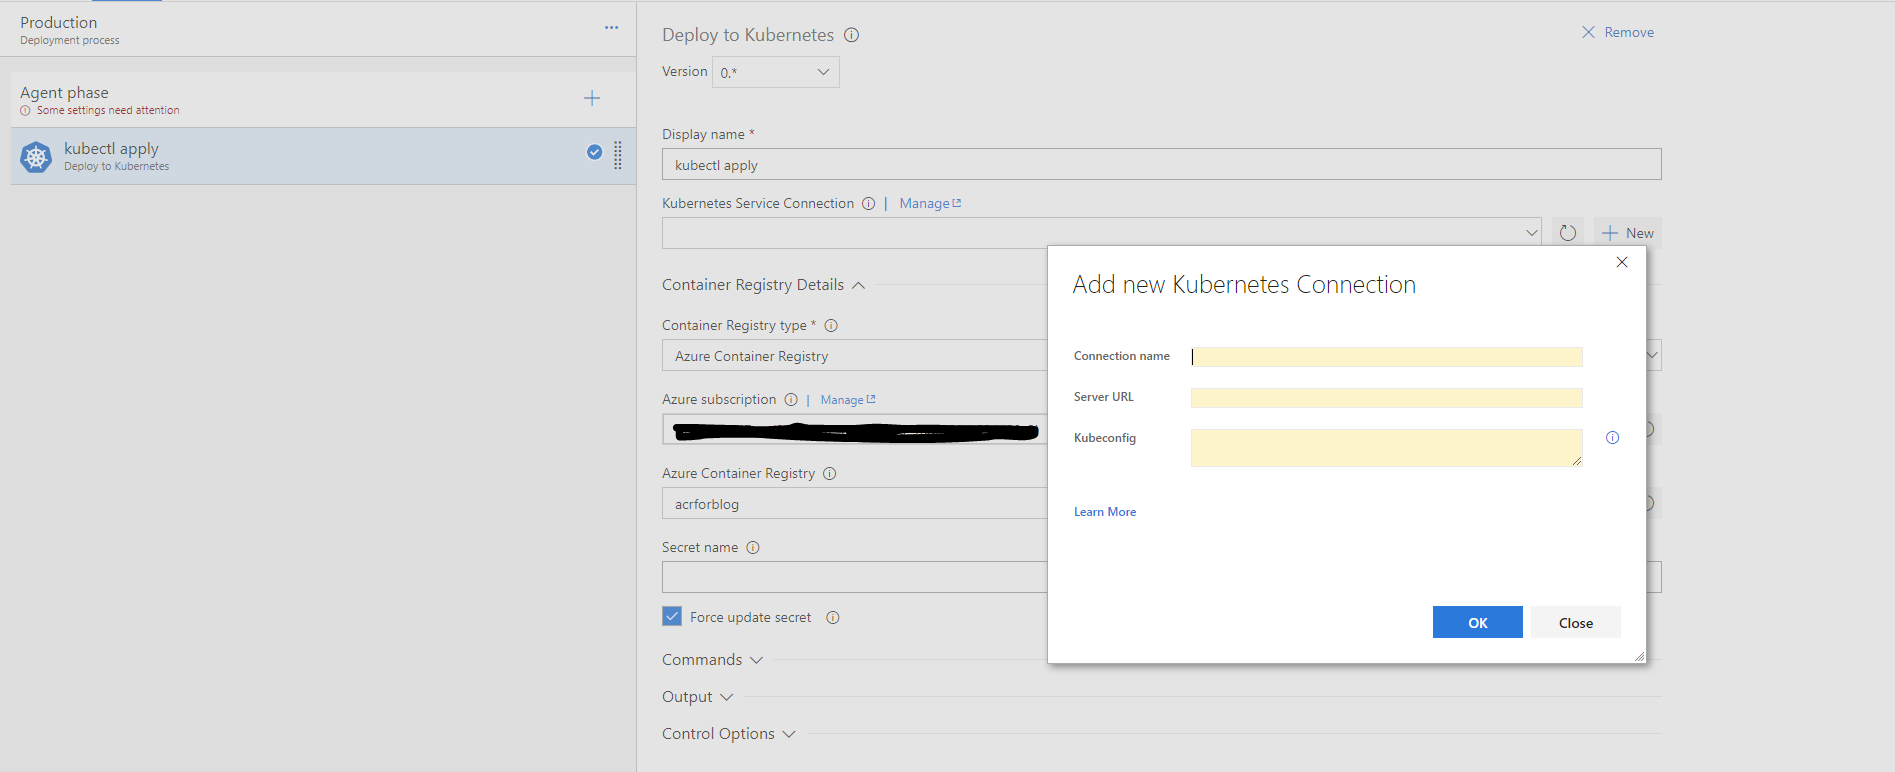
In the environments box, click on task and it will open a new screen. For Kubernetes service connection, click on New and it will open a new dialog. Add the necessary information in order to connect to the Kubernetes cluster. First, give a connection name. Then, you need to get the Server URL. You can get it either from the Azure Portal under overview as Master FQDN or try running “kubectl cluster-info” at your command prompt and get the URL of Kubernetes master. Finally, paste the entire content of your Kubernetes configuration file in the “Kubeconfig” field. Config file can be found under the .kube folder inside your home directory. For more details on how to get credentials for your ACS cluster, you can refer to the documentation from ACS team. Click OK to save the connection.
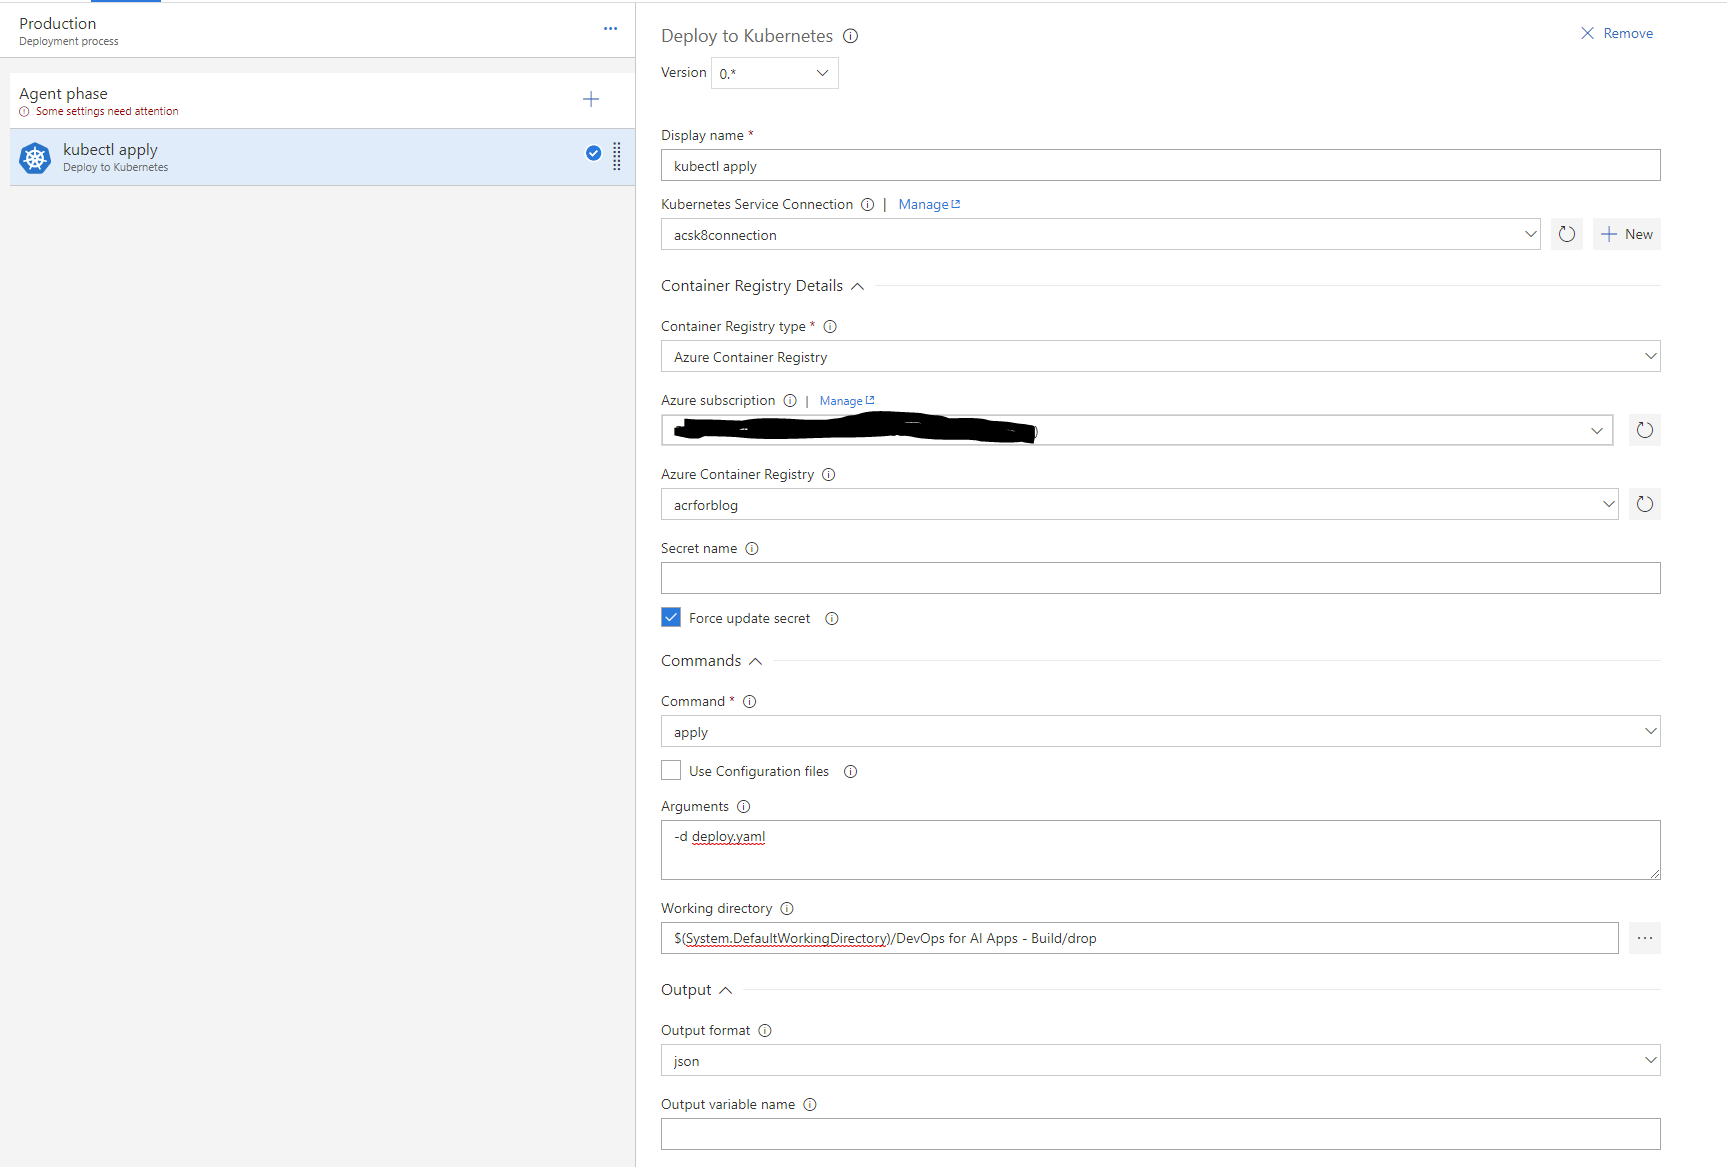
In the Arguments section use the deploy flag and give it the deploy file name. In the Working directory, select your working directory from the linked artifacts that you created in previous step.
Hit save, you now have an end to end pipeline for Continous Integration and Continous Delivery.
Testing your CI/CD Pipeline
To test your CI/CD pipeline, make some changes in your repository and push them to GitHub. If all works well, you will see a new Build being triggered which, in turn, will trigger a new Release.
