|
|
||
|---|---|---|
| Images | ||
| example | ||
| .gitignore | ||
| CODE_OF_CONDUCT.md | ||
| KNOWN_ISSUES.md | ||
| LICENSE | ||
| README.md | ||
| SECURITY.md | ||
| SUPPORT.md | ||
| automl_codegen_preview.yml | ||
README.md
AutoML Code Generation - Preview
What is this new feature?
‘AutoML Code Generation’ makes AutoML a ‘White Box’ AutoML solution by allowing the user to select any AutoML trained model (winner or child model) and generate the Python training code that created that specific model. Then, explore, customize, and retrain the model using Python before deploying to Azure ML Endpoints or your selected inference execution environment.
Basically, with this feature AutoML generates Python code showing you how data was preprocessed and how algorithms were used exactly, so not only you can understand what AutoML did, you can also reuse and customize that code for further manual tweaking and tuning.
So, for instance, the generated Python code for a selected model would be provided in a Jupyter notebook and .py files that will have Python code using OSS libraries under the covers such as Scikit-Learn, LightGBM, Auto-Arima, Prophet, Pandas DataFrame, etc. implementing the following actions:
- Featurization and data transformation
- Scaling
- Training
Simplified code example:
At this point, the generated model training code is not really AutoML anymore but it’s just about Python libraries using OSS libraries such as Scikit-Learn algorithms, LightGBM, Auto-Arima, etc. which allows you to customize/tune that code, re-train and deploy.
What can you do with this generated model training code?
There are multiple actions you might want to do with this generated model training code:
- LEARN: Learn what featurization process and hyperparameters is the model’s algorithm using.
- TRACK/VERSION/AUDIT: Train the model with the generated code and store versioned code to track what specific training code is used by the model to be deployed to production (Usually required by certain auditability regulations and organization’s policies).
- CUSTOMIZE: Customize the training code (i.e. changing hyperparameters applying your ML and algorithms skills/experience) and re-train a new model with your customized/extended code.
Supported features
The current supported scenarios by AutoML Code Generation are:
- Model data pre-process (Featurization and Scaling)
- Classification models
- Regression models
- Time Series Forecasting models
Setup
To start using the AutoML Code Gen Preview, the feature must be enabled when submitting the experiment.
Please note that these instructions may be updated as needed during the preview.
Install Azure ML SDK private preview version
When using AutoML via the SDK, you will need to ensure that you call experiment.submit() from a Conda environment that contains the private preview SDK. In addition, this feature is only enabled for experiments running on a remote compute target.
To create a new Conda environment with the private preview SDK, make sure you have Anaconda or Miniconda installed, then run these commands:
conda env create -f automl_codegen_preview.yml
conda activate automl_codegen_preview
To update the private preview SDK when a new version is released, run these commands:
conda activate automl_codegen_preview
pip install --upgrade --extra-index-url https://azuremlsdktestpypi.azureedge.net/codegen "azureml-train-automl<0.1.50"
You will know if you are using a private preview version by running the following code snippet:
from azureml.core.conda_dependencies import CondaDependencies
print(CondaDependencies.sdk_origin_url())
The return value should be https://azuremlsdktestpypi.azureedge.net/codegen.
In addition, before submitting your experiment, you will need to set the following flag in AutoMLConfig:
enable_code_generation=True
Thus, your AutoMLConfig will look something like this:
config = AutoMLConfig(
    task="classification",
    training_data=data,
    label_column_name="label",
    compute_target=compute_target,
    enable_code_generation=True
)
IMPORTANT NOTE: Due to temporal dependency to indexed packages needed to make code-gen work, before training with "enable_code_generation=True" the process will need to create a specific Docker image for it, which causes significant delay on the start of the featurization and training (around 15 min). This issue is temporal and will be eliminated when moving to PUBLIC PREVIEWS and more mature PRIVATE PREVIEWS.
You can retrieve the code gen artifacts via the UI (see Viewing Code Generation from the UI), or by running the following code:
remote_run.download_file("outputs/generated_code/script.py", "script.py")
remote_run.download_file("outputs/generated_code/script_run_notebook.ipynb", "script_run_notebook.ipynb")
UI
Enabling Code Generation from the UI: NOTE: Currently, when code gen is enabled via the UI, the public version of the SDK (from PyPi) will be used. Thus, you may be missing bugfixes or additions not available in the public version. This will be addressed in the future.
Trigger an Automated ML run using the following url:
Make sure to fill in the fields in the { }
Viewing Code Generation from the UI
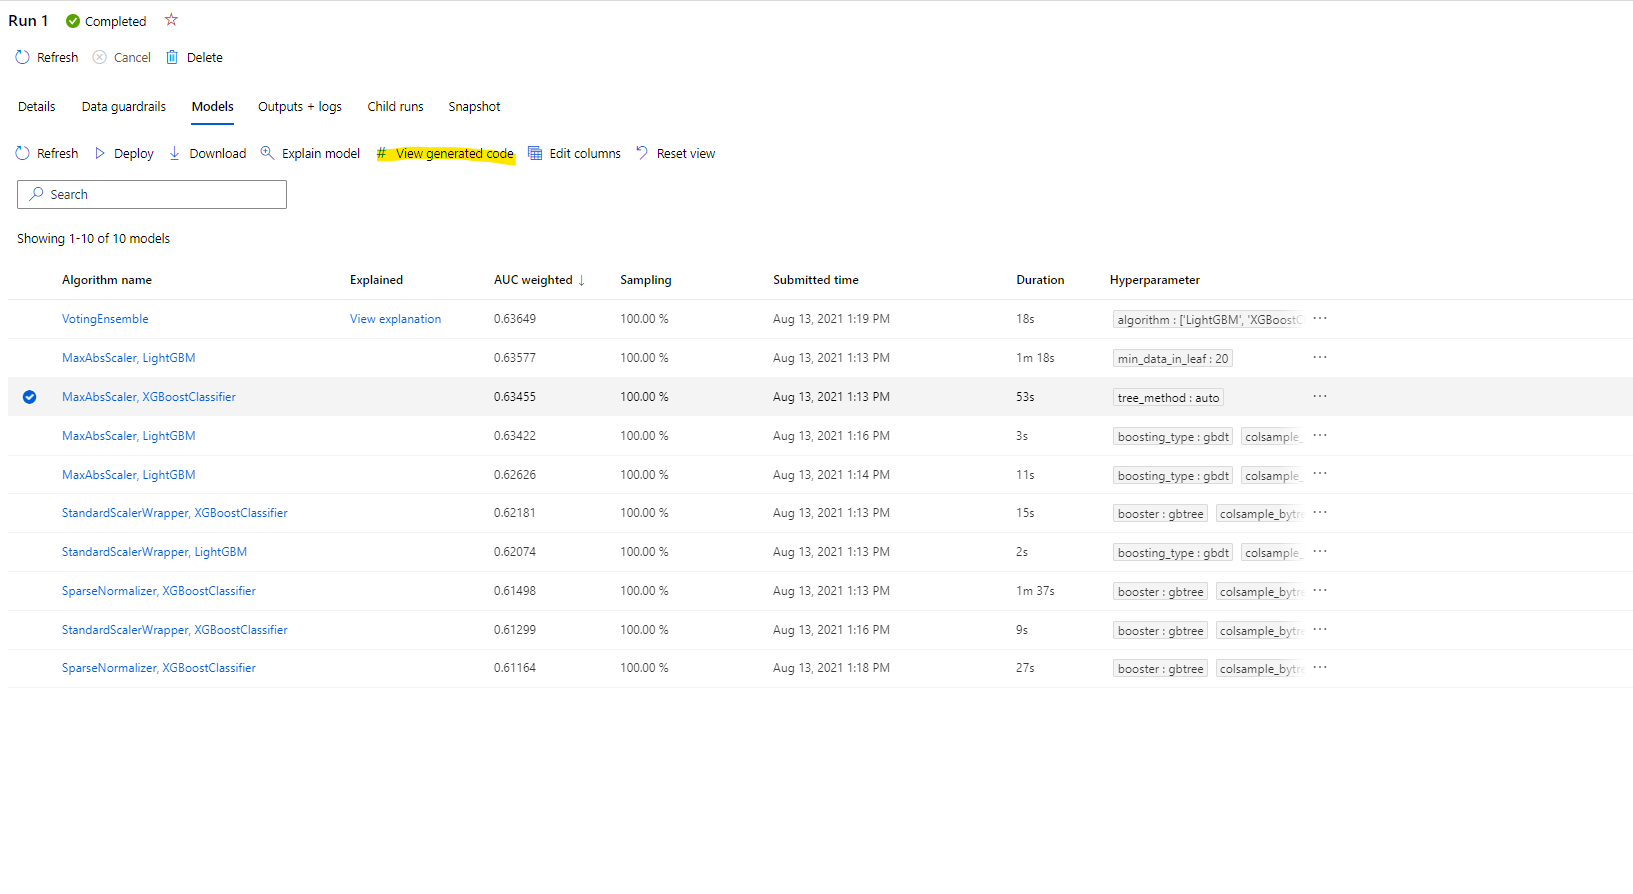
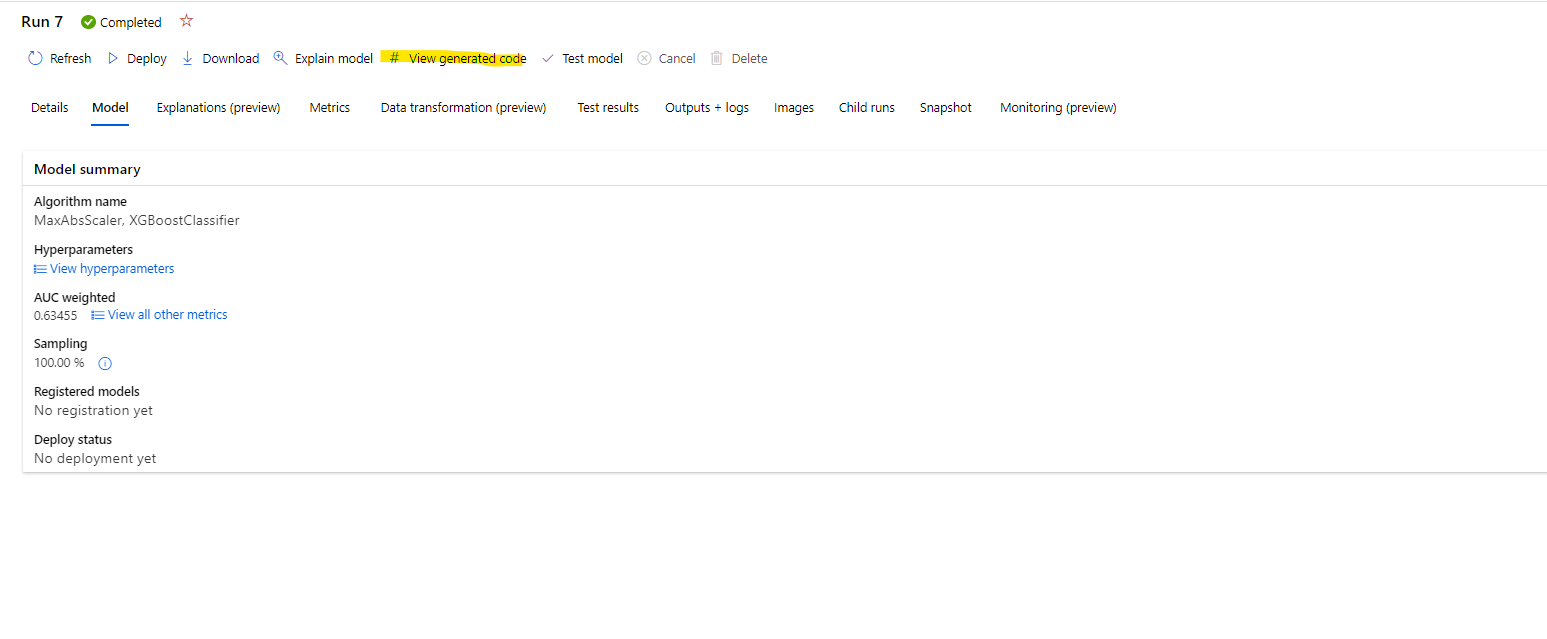
Once a child run is completed, you will be able to view the generated code through the UI by clicking the “View generated code” button which can be viewed in either the Models tab in the parent run page (see first image) or on the top of the child run page (see second image).
After clicking this button, you will be redirected to the Notebooks portal extension where you can run the generated code.
Generated Code Walkthrough: Notebook and .py file code
Please, review this additional walkthrough example in order to understand the generated code:
Generated Code Walkthrough: Notebook and .py file code
Sign up for this Private Preview
How do I sign up for this Private Preview of AutoML ‘CodeGen’?
• Reach out to - cesardl@microsoft.com to enable your Azure subscription for this Private Preview feature.
• In addition, fill out this form - Private Preview sign up for 'AutoML CodeGen'
Contributing
This project welcomes contributions and suggestions. Most contributions require you to agree to a Contributor License Agreement (CLA) declaring that you have the right to, and actually do, grant us the rights to use your contribution. For details, visit https://cla.opensource.microsoft.com.
When you submit a pull request, a CLA bot will automatically determine whether you need to provide a CLA and decorate the PR appropriately (e.g., status check, comment). Simply follow the instructions provided by the bot. You will only need to do this once across all repos using our CLA.
This project has adopted the Microsoft Open Source Code of Conduct. For more information see the Code of Conduct FAQ or contact opencode@microsoft.com with any additional questions or comments.
Trademarks
This project may contain trademarks or logos for projects, products, or services. Authorized use of Microsoft trademarks or logos is subject to and must follow Microsoft's Trademark & Brand Guidelines. Use of Microsoft trademarks or logos in modified versions of this project must not cause confusion or imply Microsoft sponsorship. Any use of third-party trademarks or logos are subject to those third-party's policies.


