5.6 KiB
Submitting render jobs using the Azure Batch plug-in
Job configuration
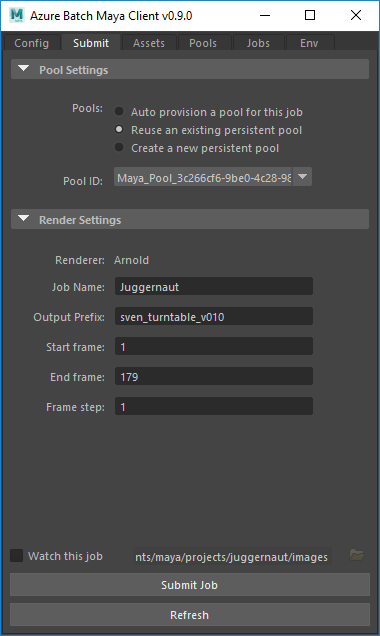
The Submit tab of the plug-in is where you will configure the basic parameters for the job.
The plug-in will detect which rendering engine you're currently using and display the applicabale settings.
The plug-in will also warn you if your selected render engine is not supported.
If you load a new scene while the plug-in is open, click the Refresh button to make sure the settings are updated.
Scene parameters
The basic parameters for your job (start frame, end frame, output prefix etc) will be automatically set based on the render settings of the current scene. You can override these using the submission UI - any changes you make here will not be persisted back to the scene file render settings, so you can make changes on a job-by-job basis without needing to re-upload the scene file.
Pool options
You have the option to determine which VM pool the render will run on. You can pick an existing VM pool, or create a new pool.
When creating a new pool, you can choose to make an auto pool, which will run exclusively for this job, and will automatically shut down
on completion of the render. Alternatively you can create a new persistent pool, that will remain available after the render has completed and can
be used for any number of jobs. For more information on managing persistent pools see managing pools.
Managing assets
When you load the plug-in it will scan the scene file for any external file references. These references are then display in the Assets tab.
If a referenced path cannot be resolved, the plug-in will attempt to locate the file in a few default locations (for example the scene file location, current
project sourceimages directory and the current working directory).
If the asset still cannot be located, it will be listed with a warning icon.

If you know the location of any unresolved file references, you can click the warning icon and you will be prompted to add a search path. The plug-in will then use this search path to attempt to resolve any missing assets. You can add any number of additional search paths.
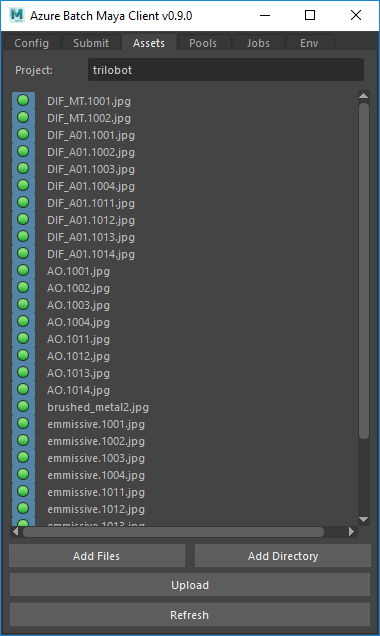
If you are aware of asset references that the plug-in has not detected, additional files, or directories of files can be added using the Add Files and
Add Directory buttons.
If you load a new scene while the plug-in is open, be sure to click Refresh to make sure the scene is re-parsed for references.
Uploading assets to a project
When you submit a render, all referenced files (as displayed in the Assets tab) will be automatically uploaded. You also have the option to upload the asset
files independently of a job submission, using the Upload button on the Assets tab.
Assets will be uploaded to a project container in Azure storage, where their file structure will be maintained. This project will be named after the current
Maya project by default. An asset project can be referenced by any number of render jobs, and all assets that have been uploaded to a project will be available to a job that
references that project (regardless of whether a particular asset was explicitly referenced by that scene).
To change the asset project referenced by your next job, simply change the name in the Project field in the Assets tab.
If there are referenced files that you wish to exclude from uploading, simply unselect it using the green button beside the listing.
Environment configuration
The Env tab will allow you to configure the VMs to be deployed when you create a pool. You can select the image to be run (Windows or CentOS) and the VM type. You can see a list
of VM types and their descriptions in this article.
You can also select whether you wish to have the pool licensed for Maya and Arnold. Maya licensing will be enabled by default, whereas Arnold licensing will be enabled if Arnold
is detected as the active render engine (you may need to click Refresh to get the latest scene settings).
If you wish to render using your own license server, you can deselet the license options and configure your license end point be adding the applicable environment variables in the table.
Note that you will be billed for the licensing of applications for the entire up-time of VMs running in the pool, regardless of whether they are being used for rendering.

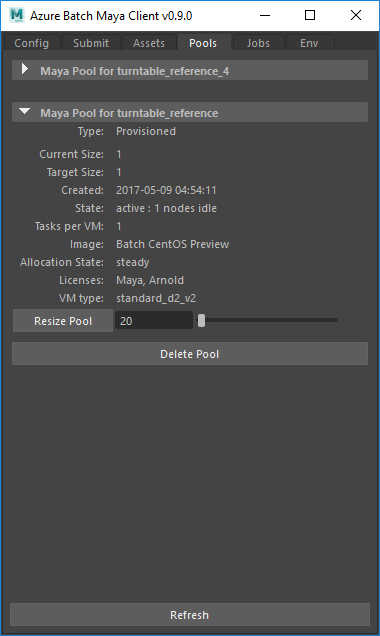
Managing Pools
Any persistent pools that have been deployed previously for render jobs from the plug-in can be managed in the Pools tab.
Selecting a listed pool will display the current state of the pool, including how many nodes are running, the selected VM image, the VM type and
the licenses that are deployed to that pool.
You can also delete the pool and resize the number of VMs in the pool. A pool can be left at 0 nodes to avoid incurring costs inbetween workloads.
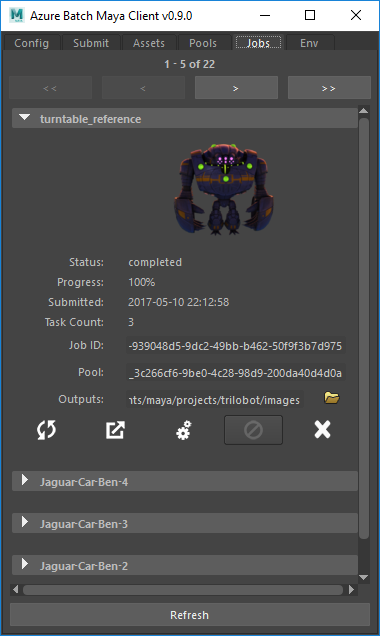
Monitoring jobs
Once you have submitted a job, you can monitor it both via the Azure Management Portal and the Jobs tab of the plug-in.
Selecting a listed job will display the current state of the job. You can also use this tab to cancel and delete jobs, as well as download the outputs and rendering logs.
To download outputs, use the Outputs field to set the desired destination directory, and click the center button (with the gear icon) to start a background process that will
watch the job and download outputs as it progresses. You can close Maya without disrupting the download.