21 KiB
Enterprise Scale Analytics - Data Management
General disclaimer: Please be aware that this template is in private preview. Therefore, expect smaller bugs and issues when working with the solution. Please submit an Issue in GitHub if you come across any issues that you would like us to fix.
DO NOT COPY - UNDER DEVELOPMENT - MS INTERNAL ONLY - Please be aware that this template is in private preview without any SLA.
Description
The Data Management template is, as the name suggests, classified as a management function and is at the heart of the Enterprise Scale Analytics and AI solution pattern. It is responsible for the governance of the platform and enables communication to ingest data sources from Azure, third-party clouds and on-premises data sources.
What will be deployed?
By default, all the services which come under Data Management Zone are enabled, and you must explicitly disable services that you don't want to be deployed.
Note: Before deploying the resources, we recommend to check registration status of the required resource providers in your subscription. For more information, see Resource providers for Azure services.
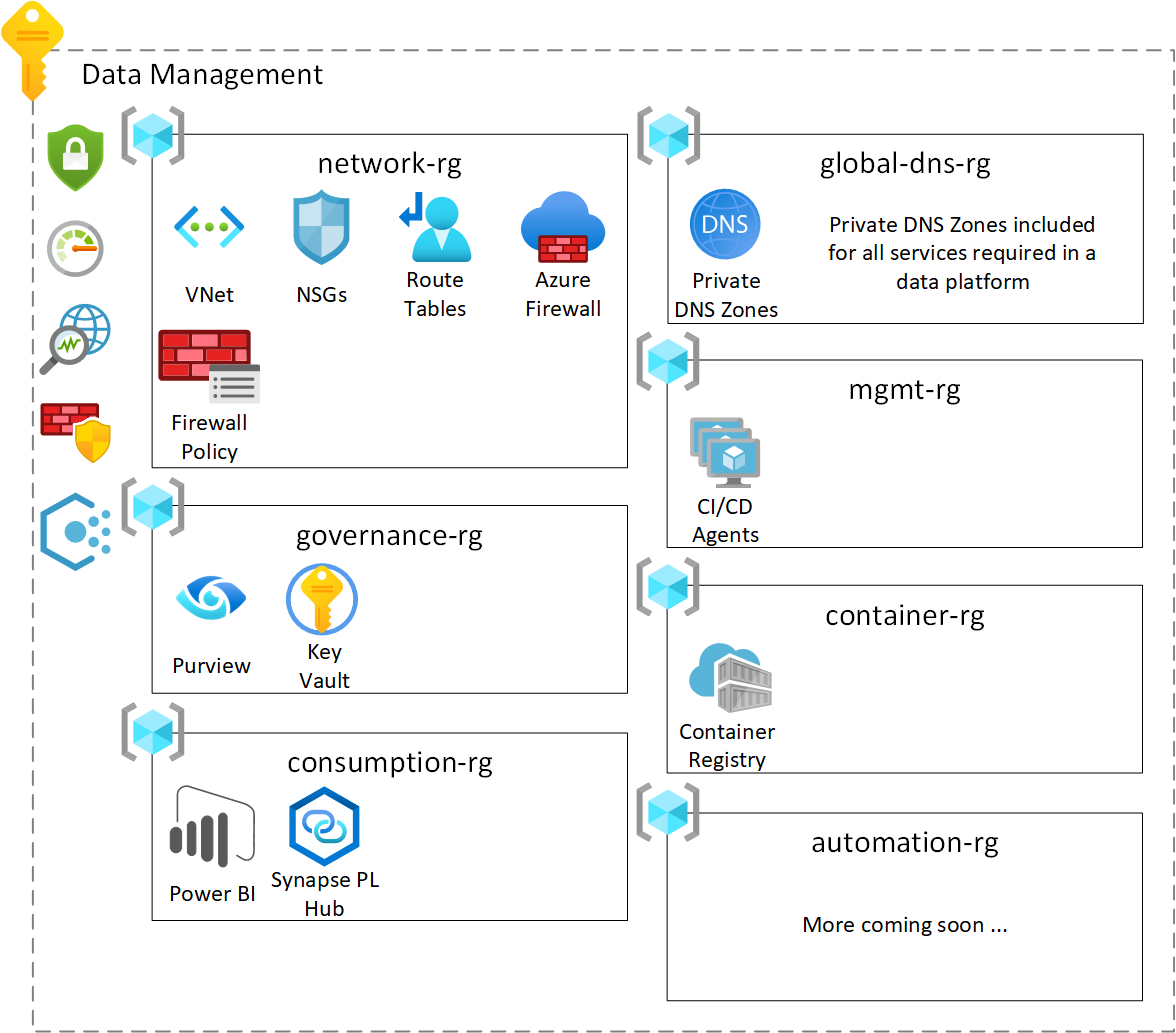
- Virtual Network
- Network Security Groups
- Route Tables
- Azure Firewall
- Firewall Policy
- Private DNS Zones
- Container Registry
- Purview
- Key Vault
- Storage Account
- Synapse Private Link Hub
- PowerBI
- Policies
For more details regarding the services that will be deployed, please read the Data Management guide in the Enterprise Scale Analytics documentation.
You have two options for deploying this reference architecture:
- Use the
Deploy to Azurebutton for an immediate deployment - Use GitHub Actions or Azure DevOps Pipelines for an automated, repeatable deployment
Prerequisites
The following prerequisites are required to make this repository work:
- an Azure subscription
- User Access Administrator or Owner access to the subscription to be able to create a service principal and role assignments for it.
If you don’t have an Azure subscription, create your Azure free account today.
Option 1: Deploy to Azure - Quickstart (Coming soon ...)
| Data Management Zone |
|---|
Option 2: GitHub Actions or Azure DevOps Pipelines
1. Create repository from a template
-
On GitHub, navigate to the main page of this repository.
-
Above the file list, click Use this template

-
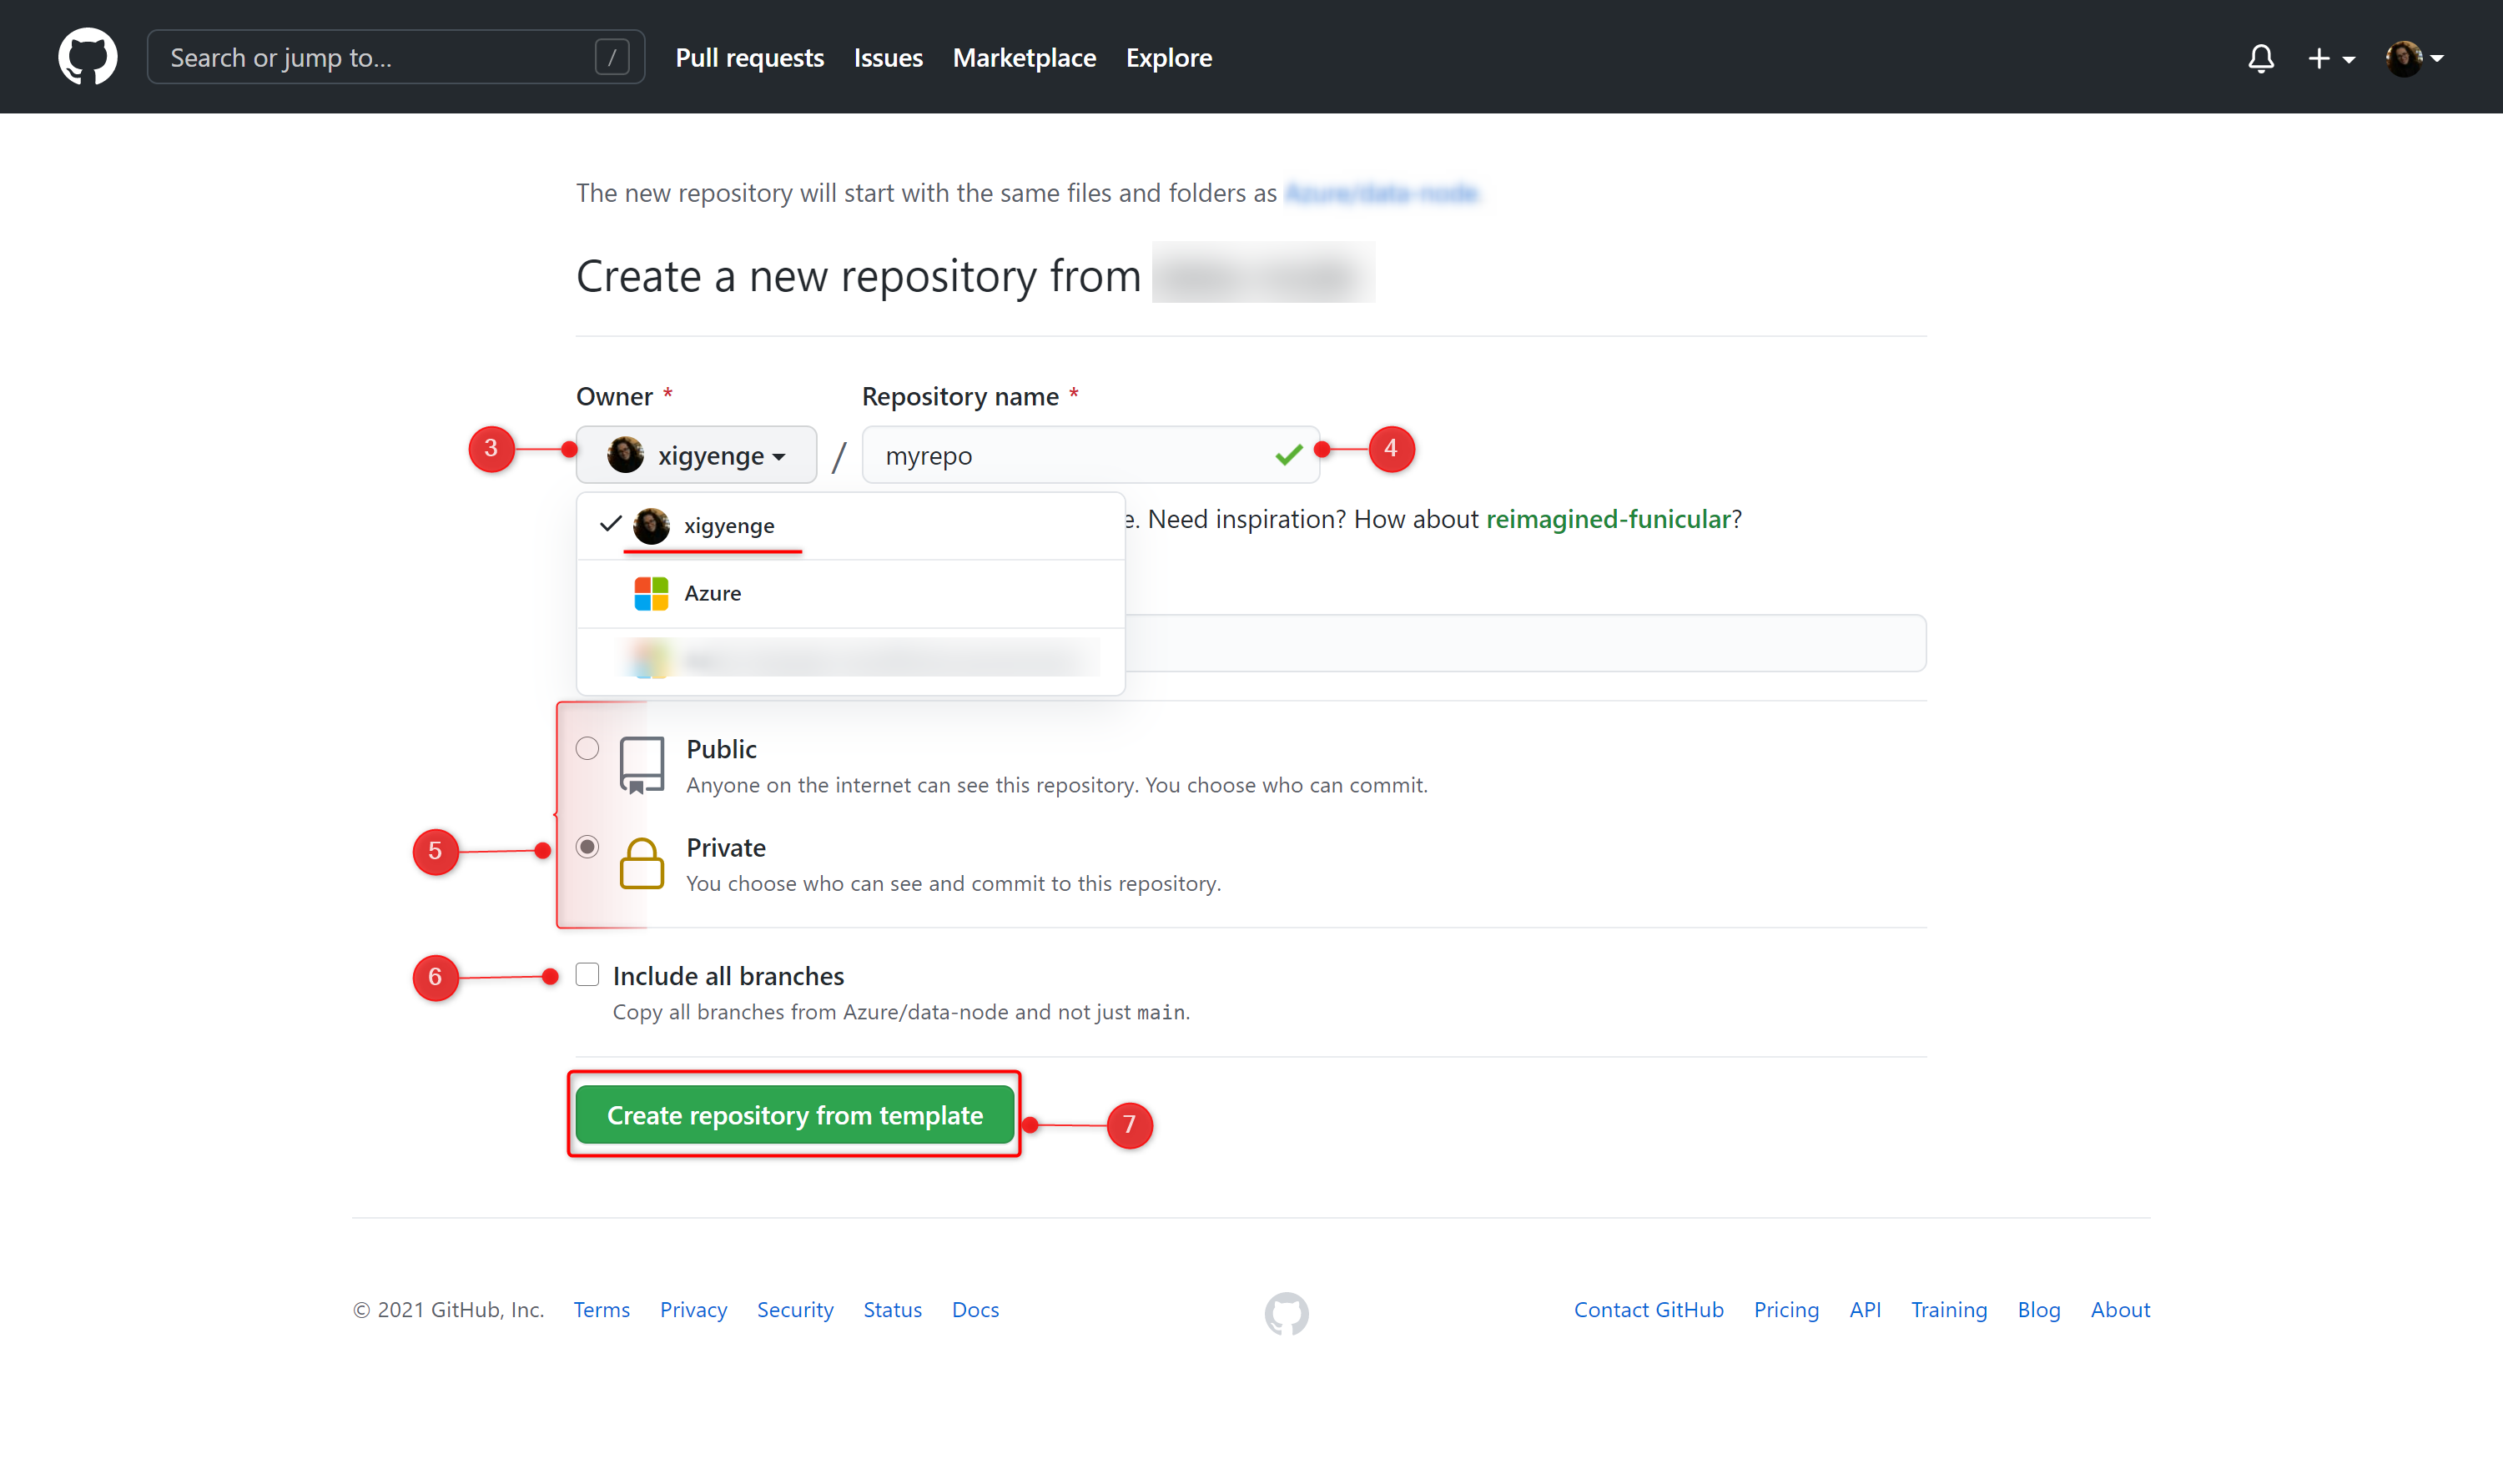
Use the Owner drop-down menu and select the account you want to own the repository.
-
Type a name for your repository and an optional description.
-
Choose a repository visibility. For more information, see "About repository visibility."
-
Optionally, to include the directory structure and files from all branches in the template and not just the default branch, select Include all branches.
-
Click Create repository from template.
2. Setting up the required Service Principal and access
A service principal needs to be generated for authentication and authorization from GitHub or Azure DevOps to your Azure subscription. This is required to deploy resources to your environment. Just go to the Azure Portal to find the ID of your subscription. Then start the Cloud Shell or Azure CLI, login to Azure, set the Azure context and execute the following commands to generate the required credentials:
Azure CLI
# Replace {service-principal-name} and {subscription-id} with your
# Azure subscription id and any name for your service principal.
az ad sp create-for-rbac \
  --name "{service-principal-name}" \
  --role "Contributor" \
  --scopes "/subscriptions/{subscription-id}" \
  --sdk-auth
This will generate the following JSON output:
{
  "clientId": "<GUID>",
  "clientSecret": "<GUID>",
  "subscriptionId": "<GUID>",
  "tenantId": "<GUID>",
  (...)
}
Note: Take note of the output. It will be required for the next steps.
3. Resource Deployment
Now that you have set up the Service Principal, you need to choose how would you like to deploy the resources. Deployment options:
GitHub Actions
If you want to use GitHub Actions for deploying the resources, add the previous JSON output as a repository secret with the name AZURE_CREDENTIALS in your GitHub repository:
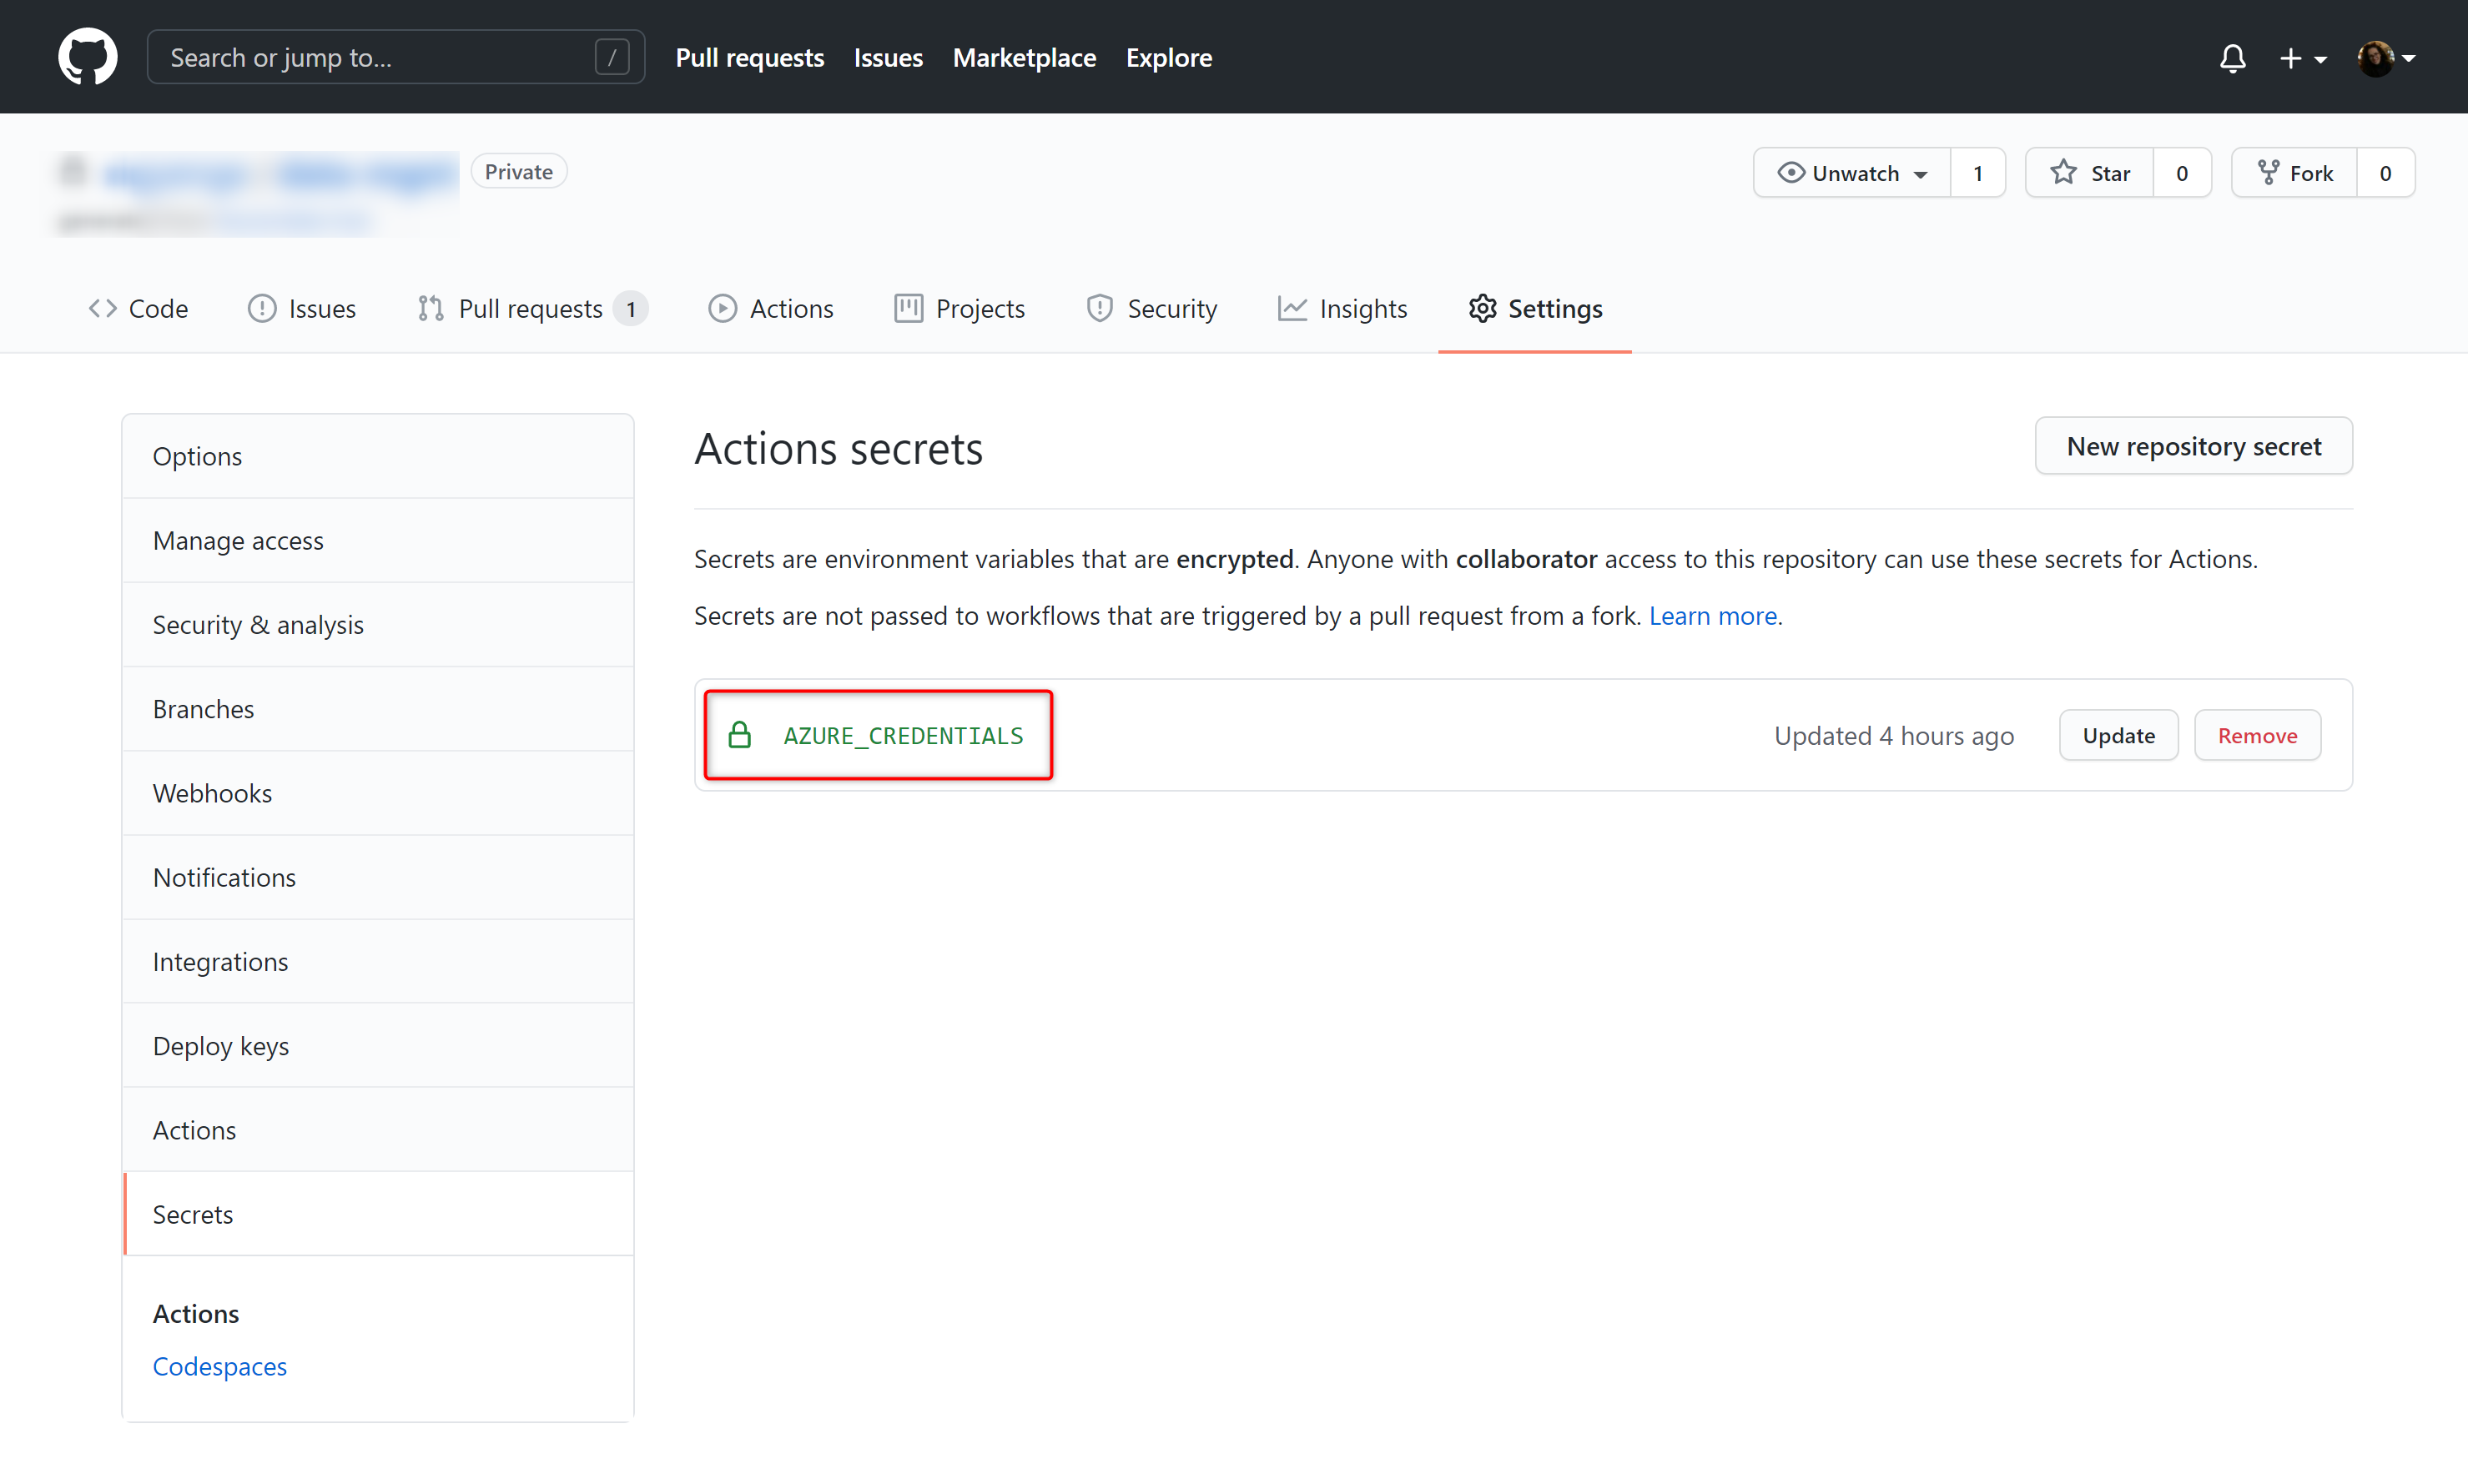
To do so, execute the following steps:
- On GitHub, navigate to the main page of the repository.
- Under your repository name, click on the Settings tab.
- In the left sidebar, click Secrets.
- Click New repository secret.
- Type the name
AZURE_CREDENTIALSfor your secret in the Name input box. - Enter the JSON output from above as value for your secret.
- Click Add secret.
Azure DevOps
If you want to use Azure DevOps Pipelines for deploying the resources, you need to create an Azure Resource Manager service connection. To do so, execute the following steps:
-
First, you need to create an Azure DevOps Project. Instructions can be found here.
-
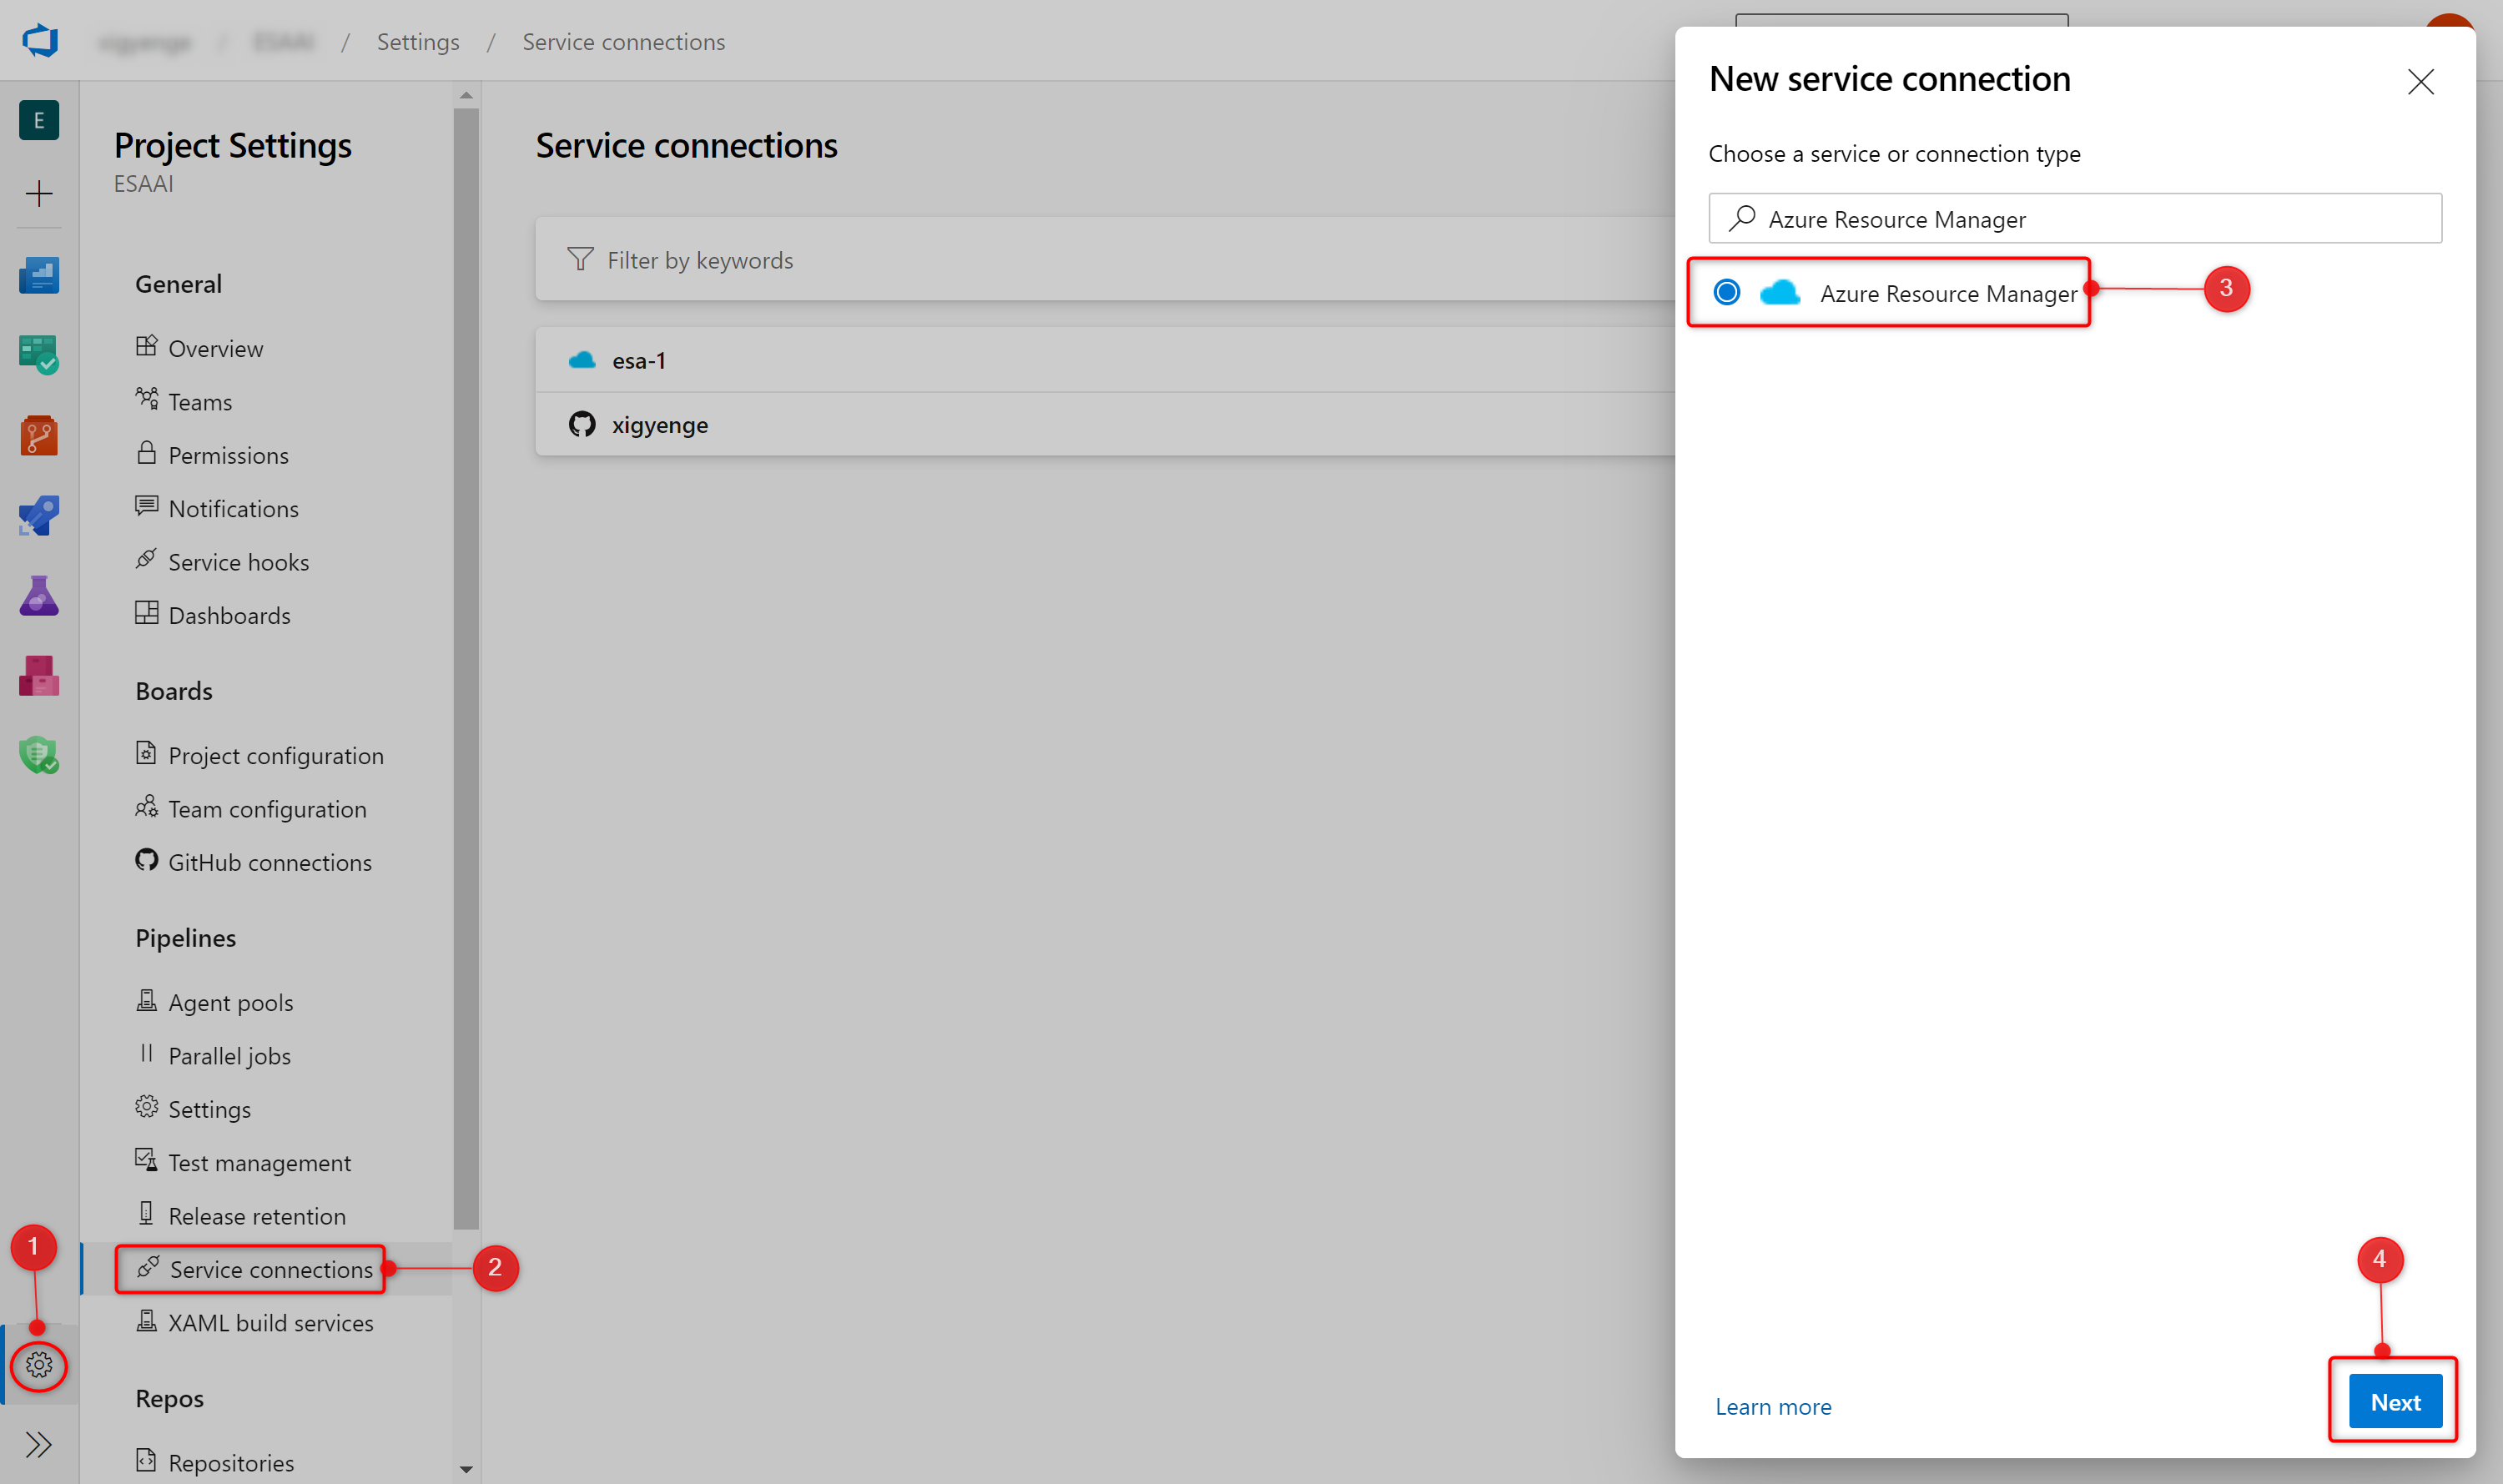
In Azure DevOps, open the Project settings.
-
Now, select the Service connections page from the project settings page.
-
Choose New service connection and select Azure Resource Manager.
-
On the next page select Service principal (manual).
-
Select the appropriate environment to which you would like to deploy the templates. Only the default option Azure Cloud is currently supported.
-
For the Scope Level, select Subscription and enter your
subscription Idandname. -
Enter the details of the service principal that we have generated in step 3. (Service Principal Id = clientId, Service Principal Key = clientSecret, Tenant ID = tenantId) and click on Verify to make sure that the connection works.
-
Enter a user-friendly Connection name to use when referring to this service connection. Take note of the name because this will be required in the parameter update process.
-
Optionally, enter a Description.
-
Click on Verify and save.
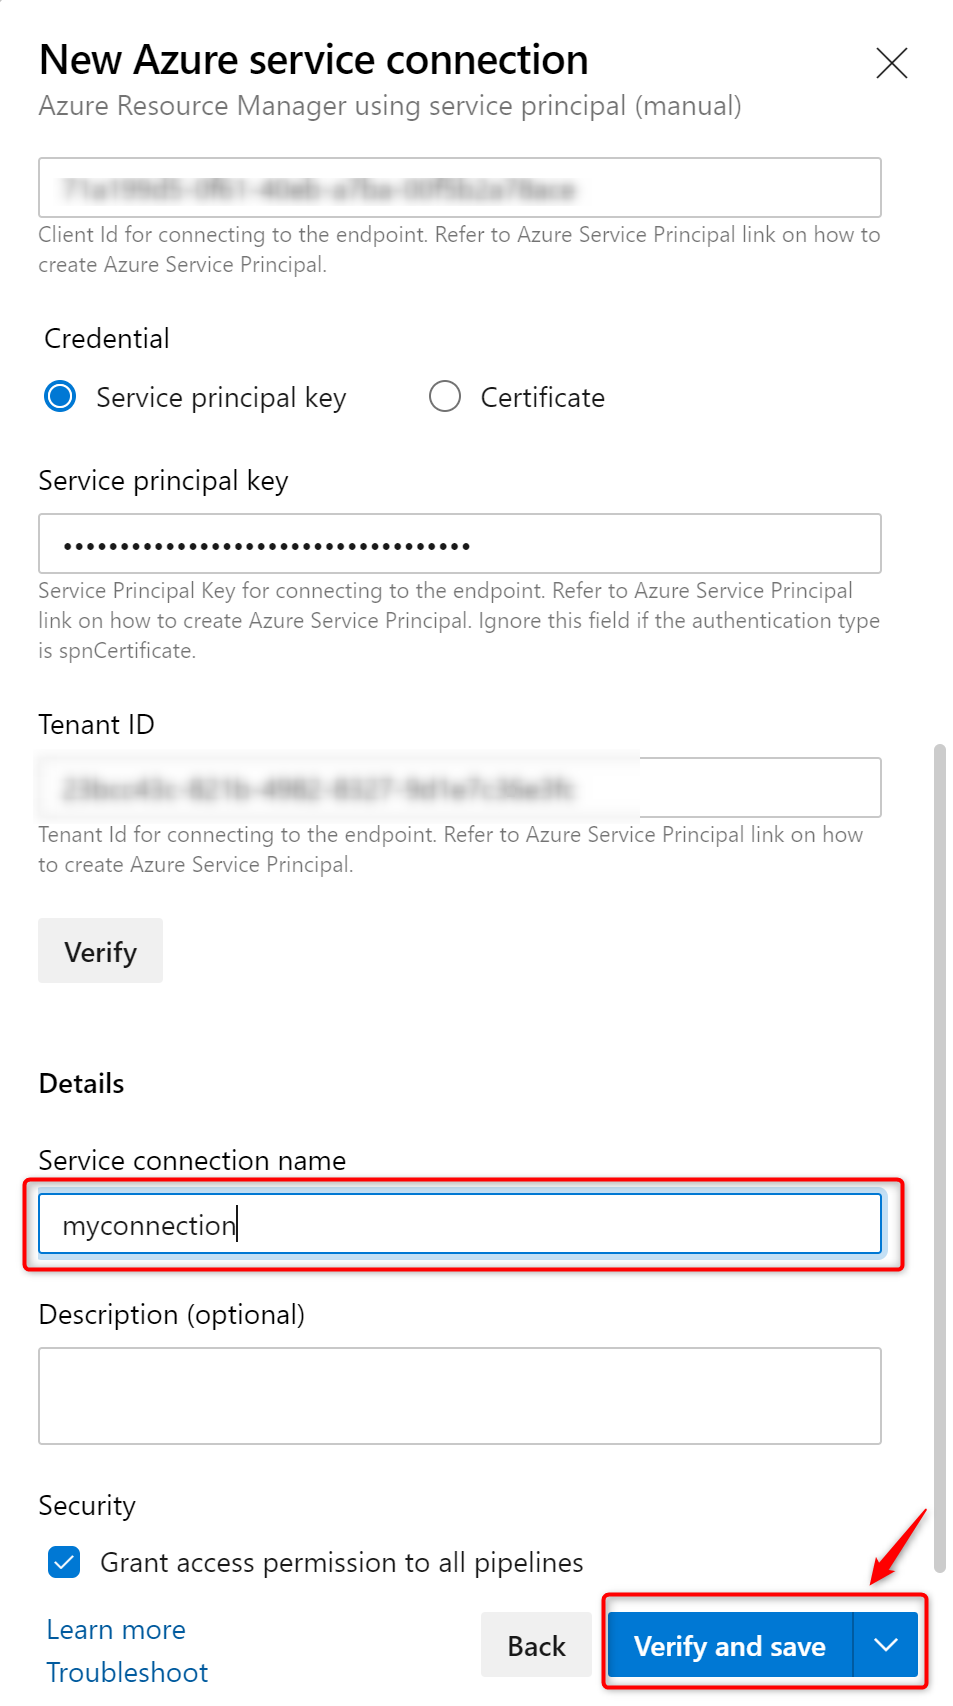
More information can be found here.
4. Parameter Update Process
In order to deploy the ARM templates in this repository to the desired Azure subscription, you will need to modify some parameters in the forked repository. As updating each parameter file manually is a time-consuming and potentially error-prone process, we have simplified the task with a GitHub Action workflow. After successfully executing the previous steps, please open the .github/workflows/updateParameters.yml. In this file you need to update the environment variables. Just click on .github/workflows/updateParameters.yml and edit the following section:
env:
  DATA_HUB_SUBSCRIPTION_ID: '{dataHubSubscriptionId}'
  DATA_HUB_NAME: '{dataHubName}' # Choose max. 11 characters. They will be used as a prefix for all services. If not unique, deployment can fail for some services.
  LOCATION: '{regionName}'       # Specifies the region for all services (e.g. 'northeurope', 'eastus', etc.)
  AZURE_RESOURCE_MANAGER_CONNECTION_NAME: '{resourceManagerConnectionName}'
The following table explains each of the parameters:
| Parameter | Description | Sample value |
|---|---|---|
| DATA_HUB_SUBSCRIPTION_ID | Specifies the subscription ID of the Data Management Zone where all the resources will be deployed | xxxxxxxx-xxxx-xxxx-xxxx-xxxxxxxxxxxx |
| DATA_HUB_NAME | Specifies the name of your Data Management Zone. The value should consist of alphanumeric characters (A-Z, a-z, 0-9) and should not contain any special characters like -, _, ., etc. Special characters will be removed in the renaming process. |
myhub01 |
| LOCATION | Specifies the region where you want the resources to be deployed. | northeurope |
| AZURE_RESOURCE_MANAGER _CONNECTION_NAME | Specifies the resource manager connection name in Azure DevOps. You can leave the default value if you want to use GitHub Actions for your deployment. More details on how to create the resource manager connection in Azure DevOps can be found in step 4. b) or here. | my-connection-name |
After updating the values, please commit the updated version to the main branch of your repository. This will kick off a GitHub Action workflow, which will appear under the Actions tab of the main page of the repository. The Update Parameter Files workflow will update all parameters in your repository according to a pre-defined naming convention. Once the process has finished, it will open a new pull request in your repository, where you can review the changes made by the workflow. Please follow the instructions in the pull request to complete the parameter update process. It will guide you to change the environment variables in the deployment workflow file as well.
Note: We are not renaming the environment variables in the workflow files because this could lead to an infinite loop of workflow runs being started.
After following the instructions in the pull request, you can merge the pull request back into the main branch of your repository by clicking on Merge pull request. Finally, you can click on Delete branch to clean up your repository.
5. Reference pipeline from GitHub repository in Azure DevOps Pipelines
Note: This is not applicable for GH Actions.
Install Azure DevOps Pipelines GitHub Application
First you need to add and install the Azure Pipelines GitHub App to your GitHub account. To do so, execute the following steps:
-
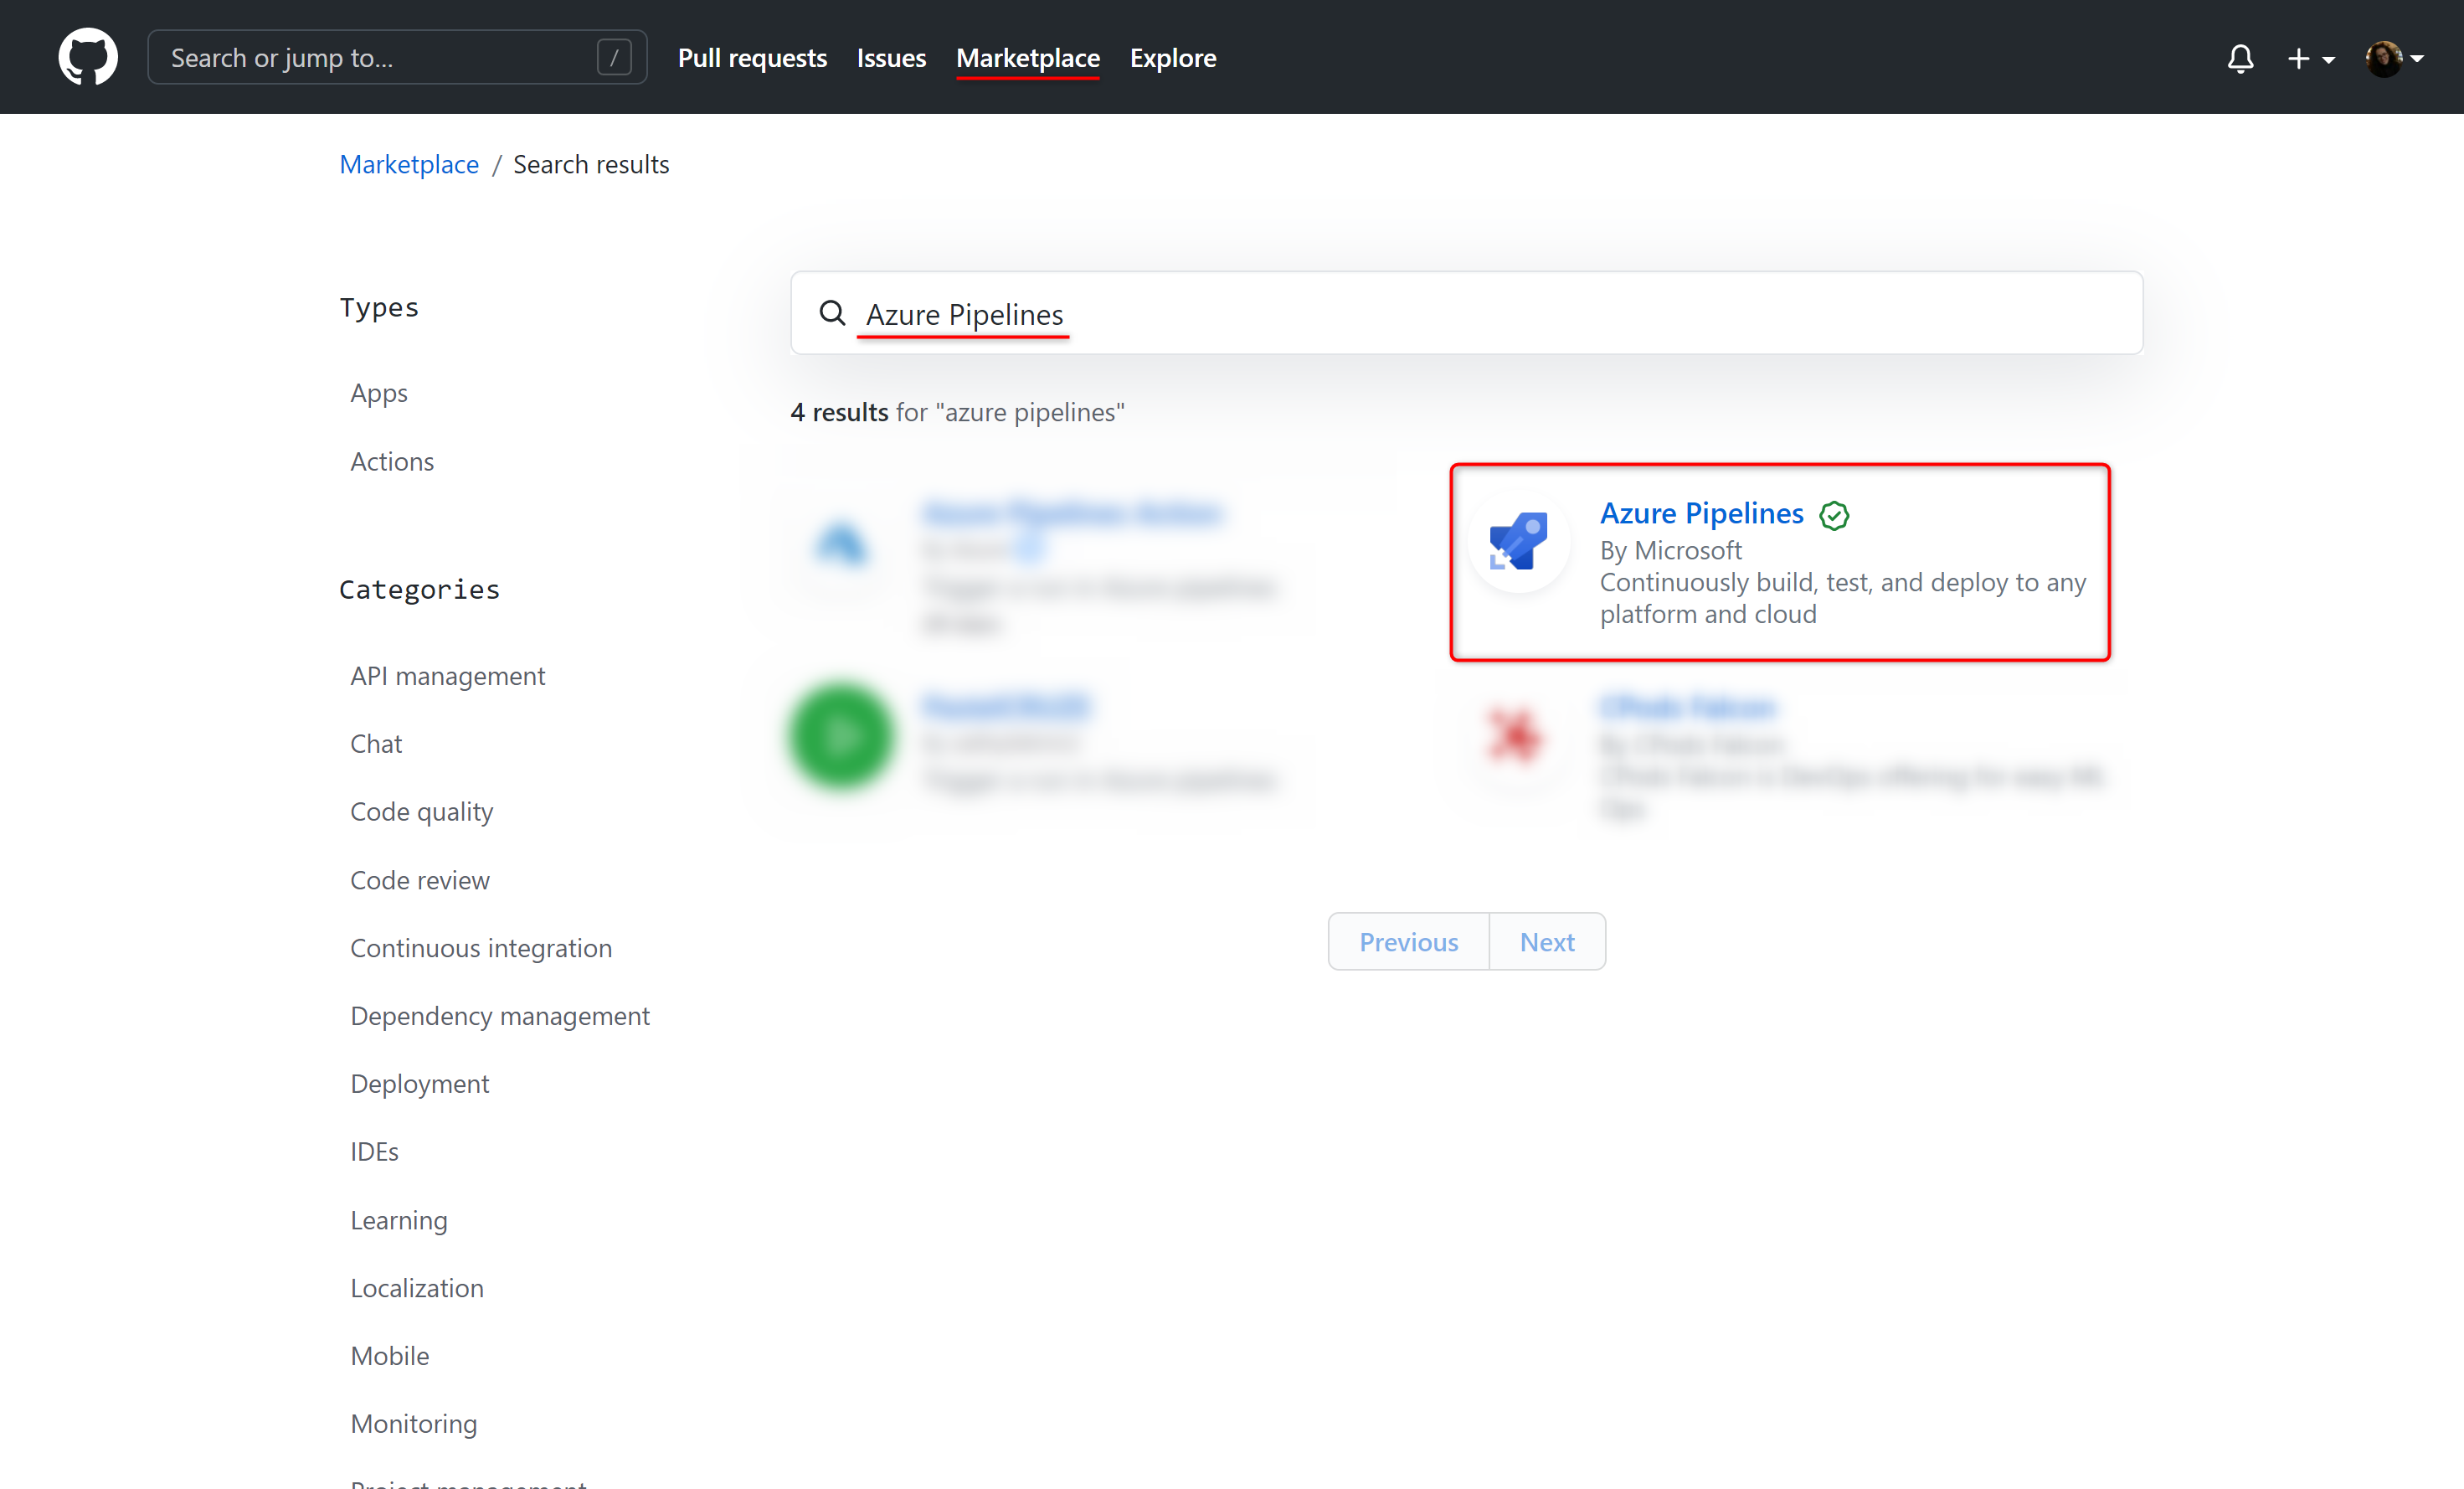
Click on Marketplace in the top navigation bar on GitHub.
-
In the Marketplace, search for Azure Pipelines. The Azure Pipelines offering is free for anyone to use for public repositories and free for a single build queue if you’re using a private repository.
-
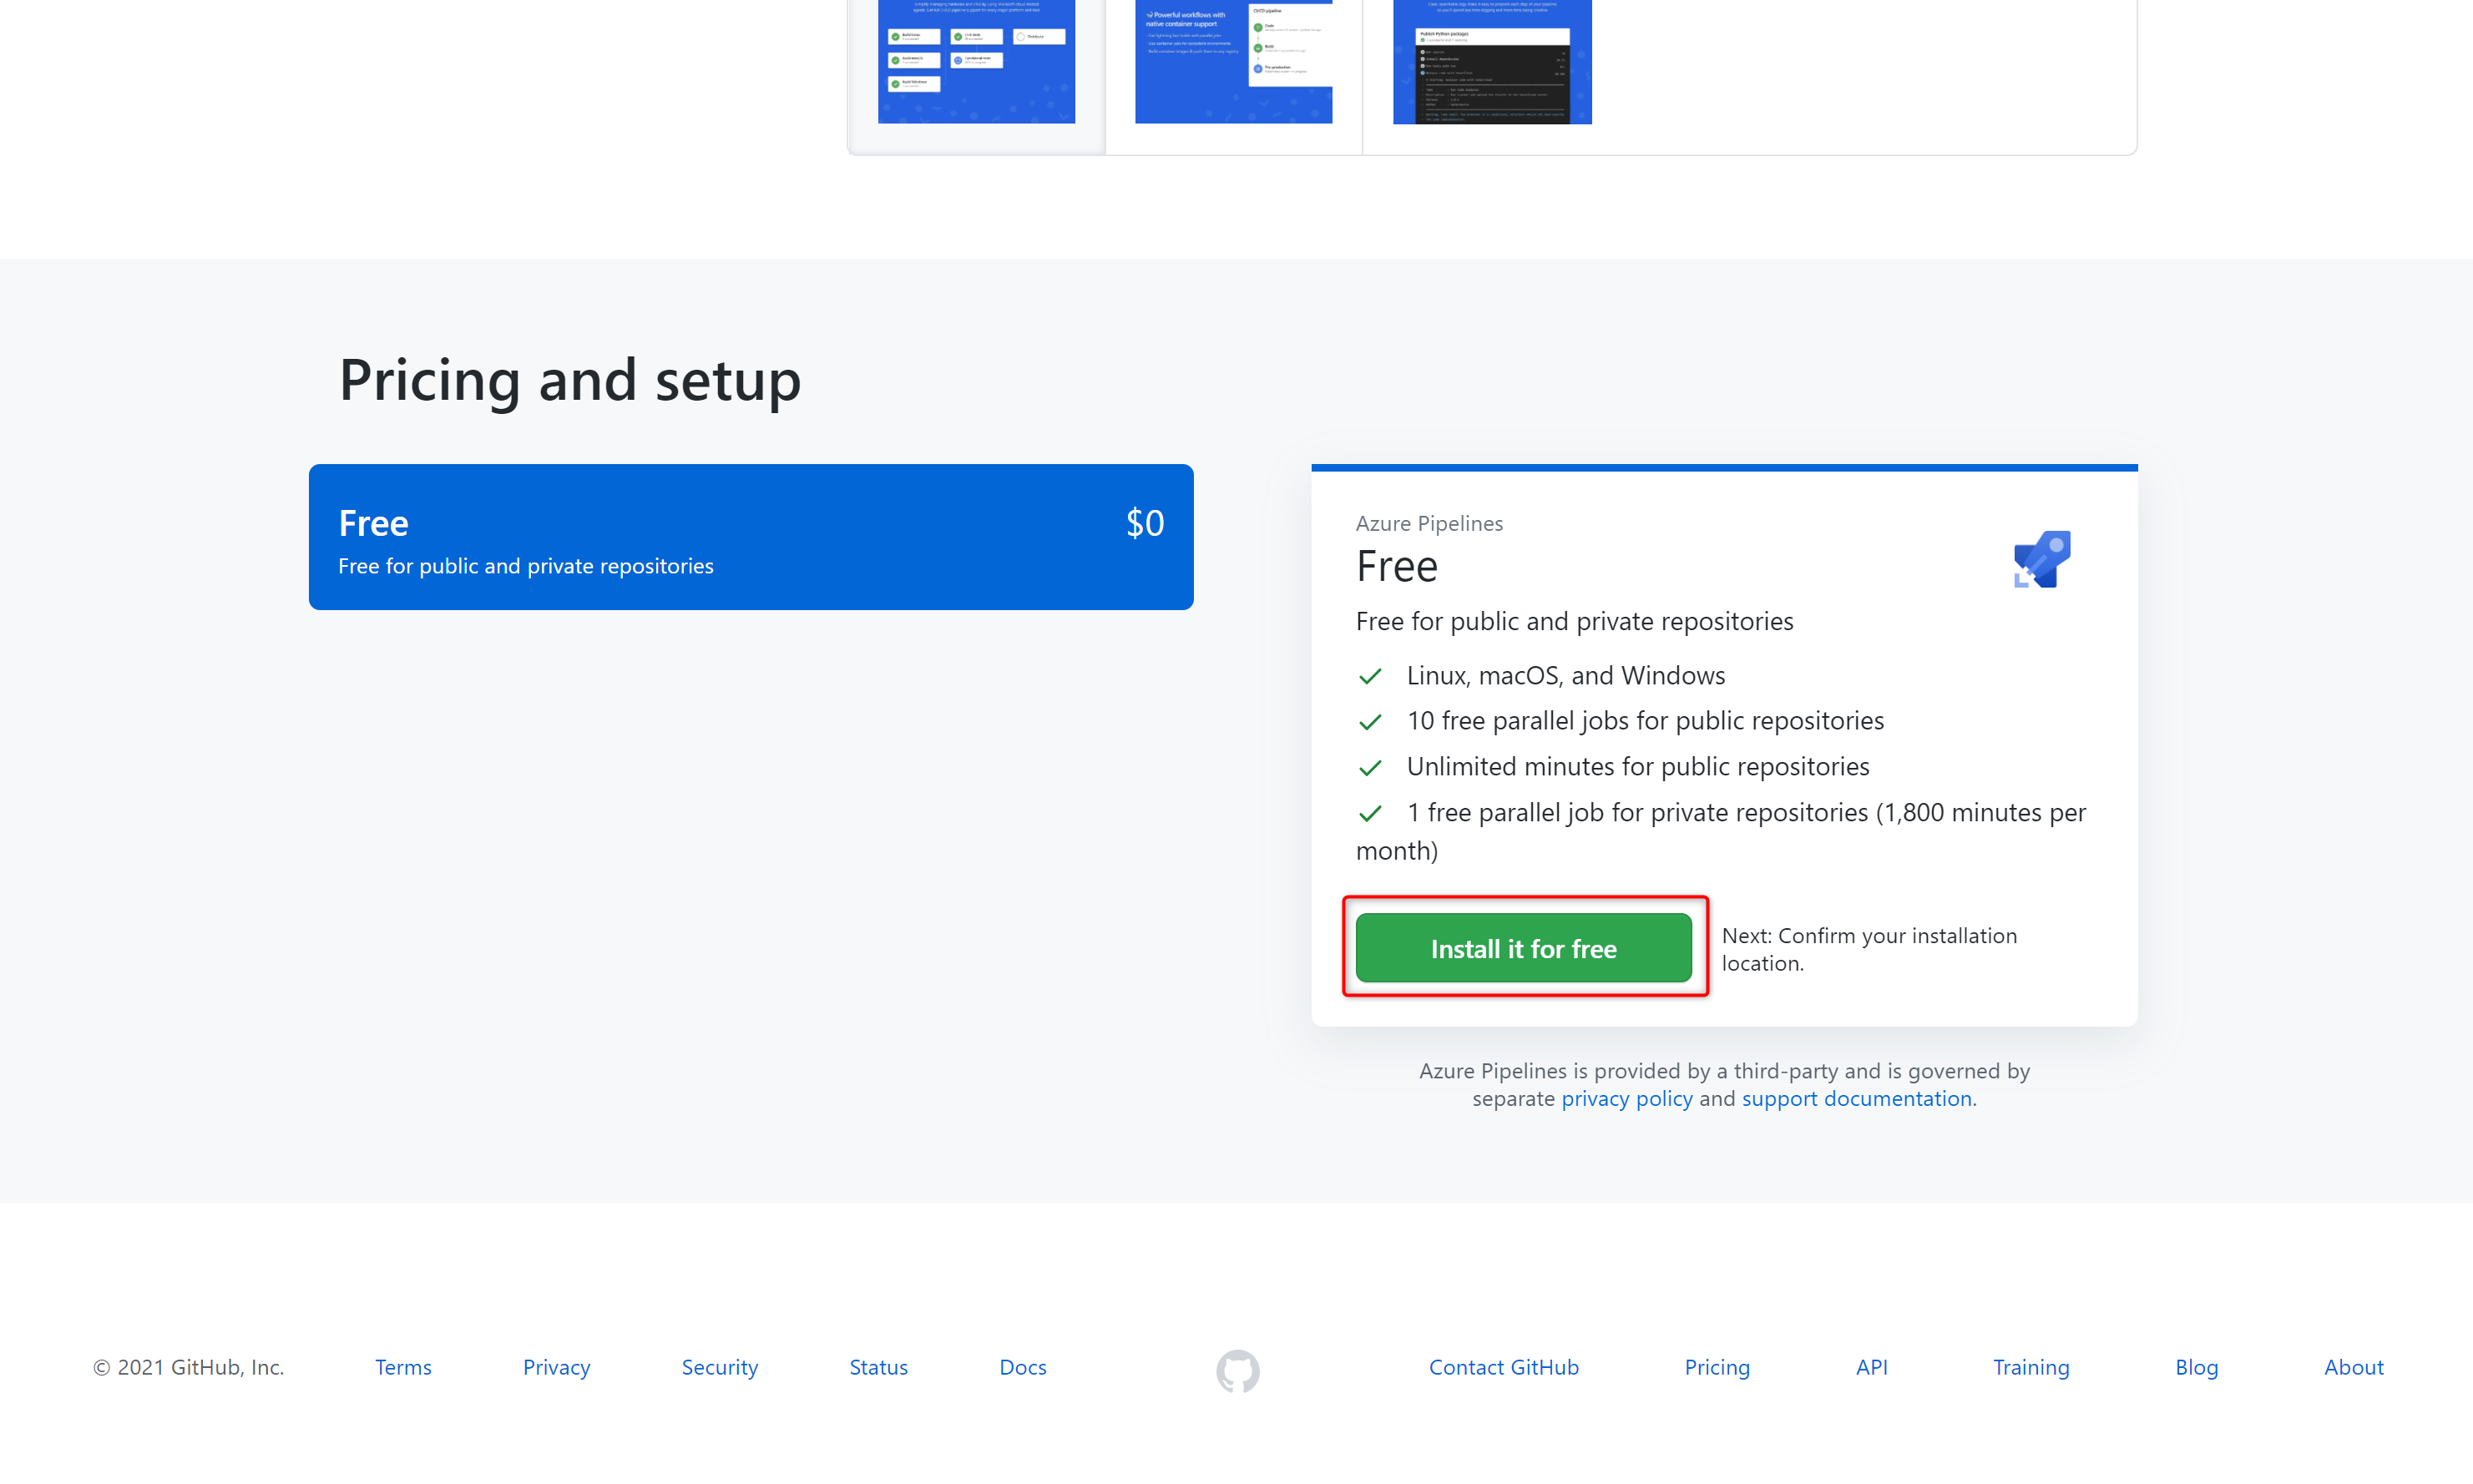
Select it and click on Install it for free.
-
If you are part of multiple GitHub organizations, you may need to use the Switch billing account dropdown to select the one into which you forked this repository.
-
You may be prompted to confirm your GitHub password to continue.
-
You may be prompted to log in to your Microsoft account. Make sure you log in with the one that is associated with your Azure DevOps account.
Configuring the Azure Pipelines project
As a last step, you need to create an Azure DevOps pipeline in your project based on the pipeline definition YAML file that is stored in your GitHub repository. To do so, execute the following steps:
-
Select the Azure DevOps project where you have setup your
Resource Manager Connection. -
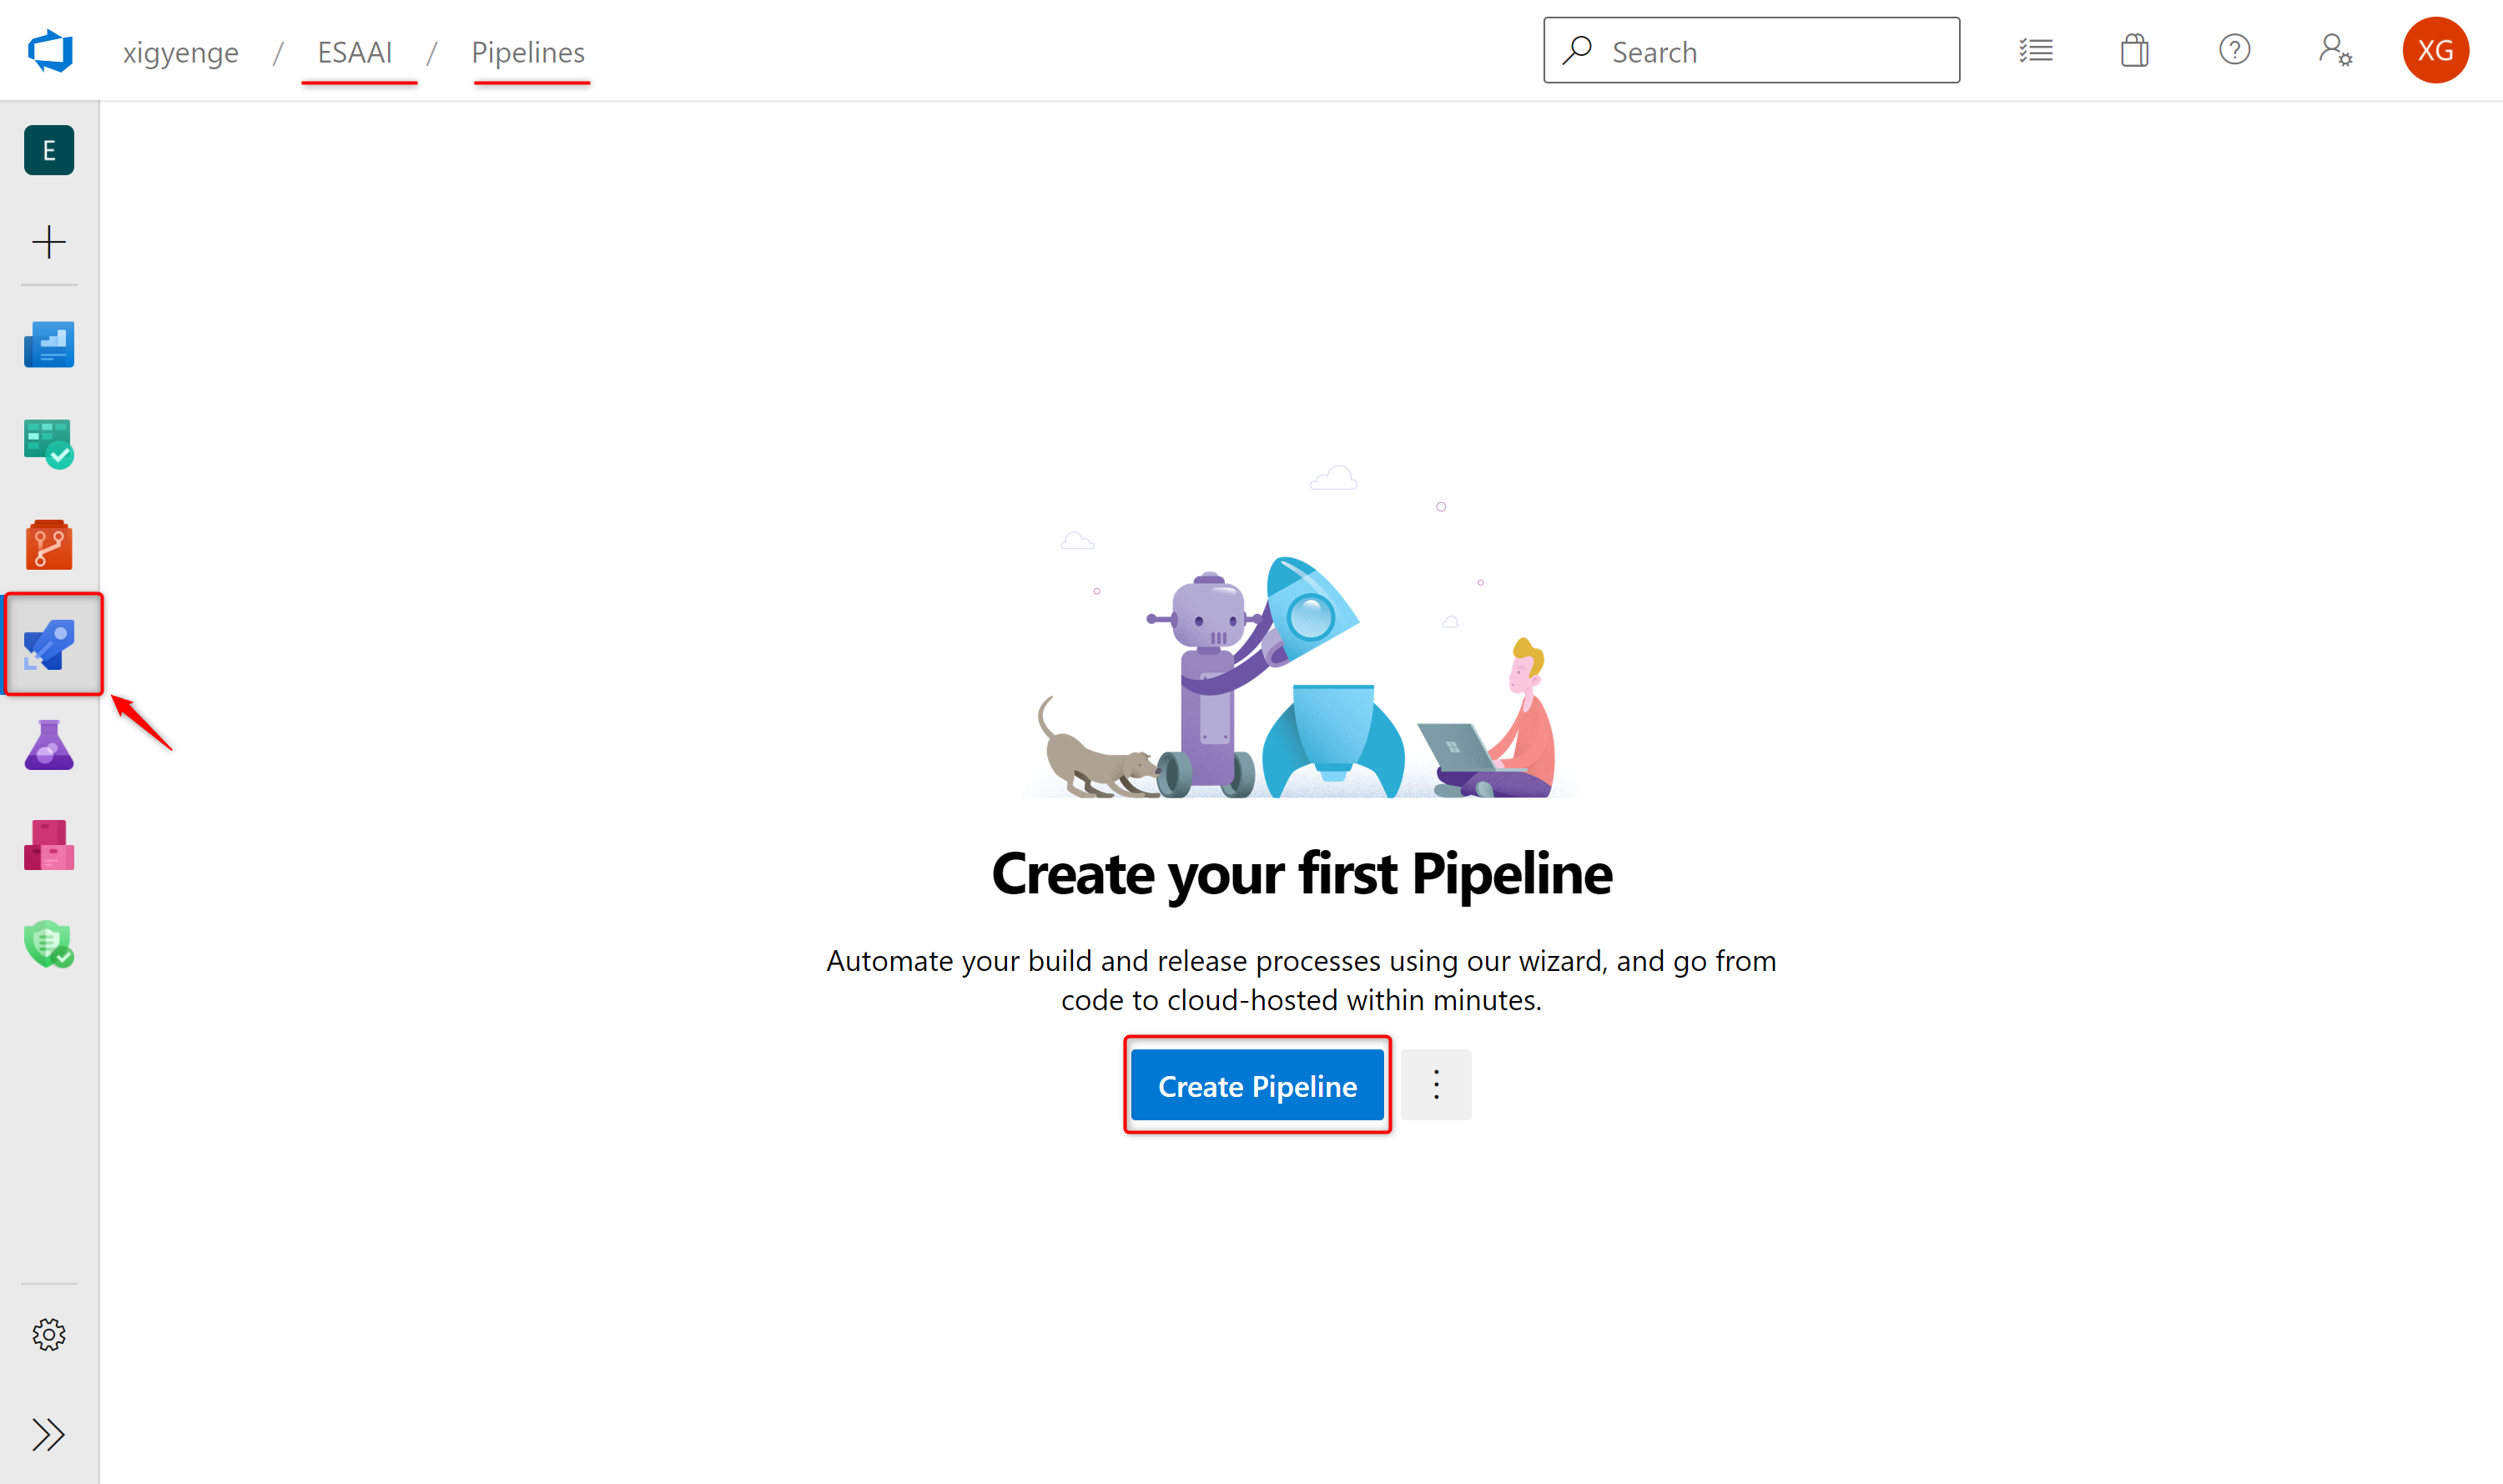
Select Pipelines and then New Pipeline in order to create a new pipeline.
-
Choose GitHub YAML and search for your repository (e.g. "
GitHubUserName/RepositoryName").
-
Select your repository.
-
Click on Existing Azure Pipelines in YAML file
-
Select
mainas branch and/.ado/workflows/dataNodeDeployment.ymlas path.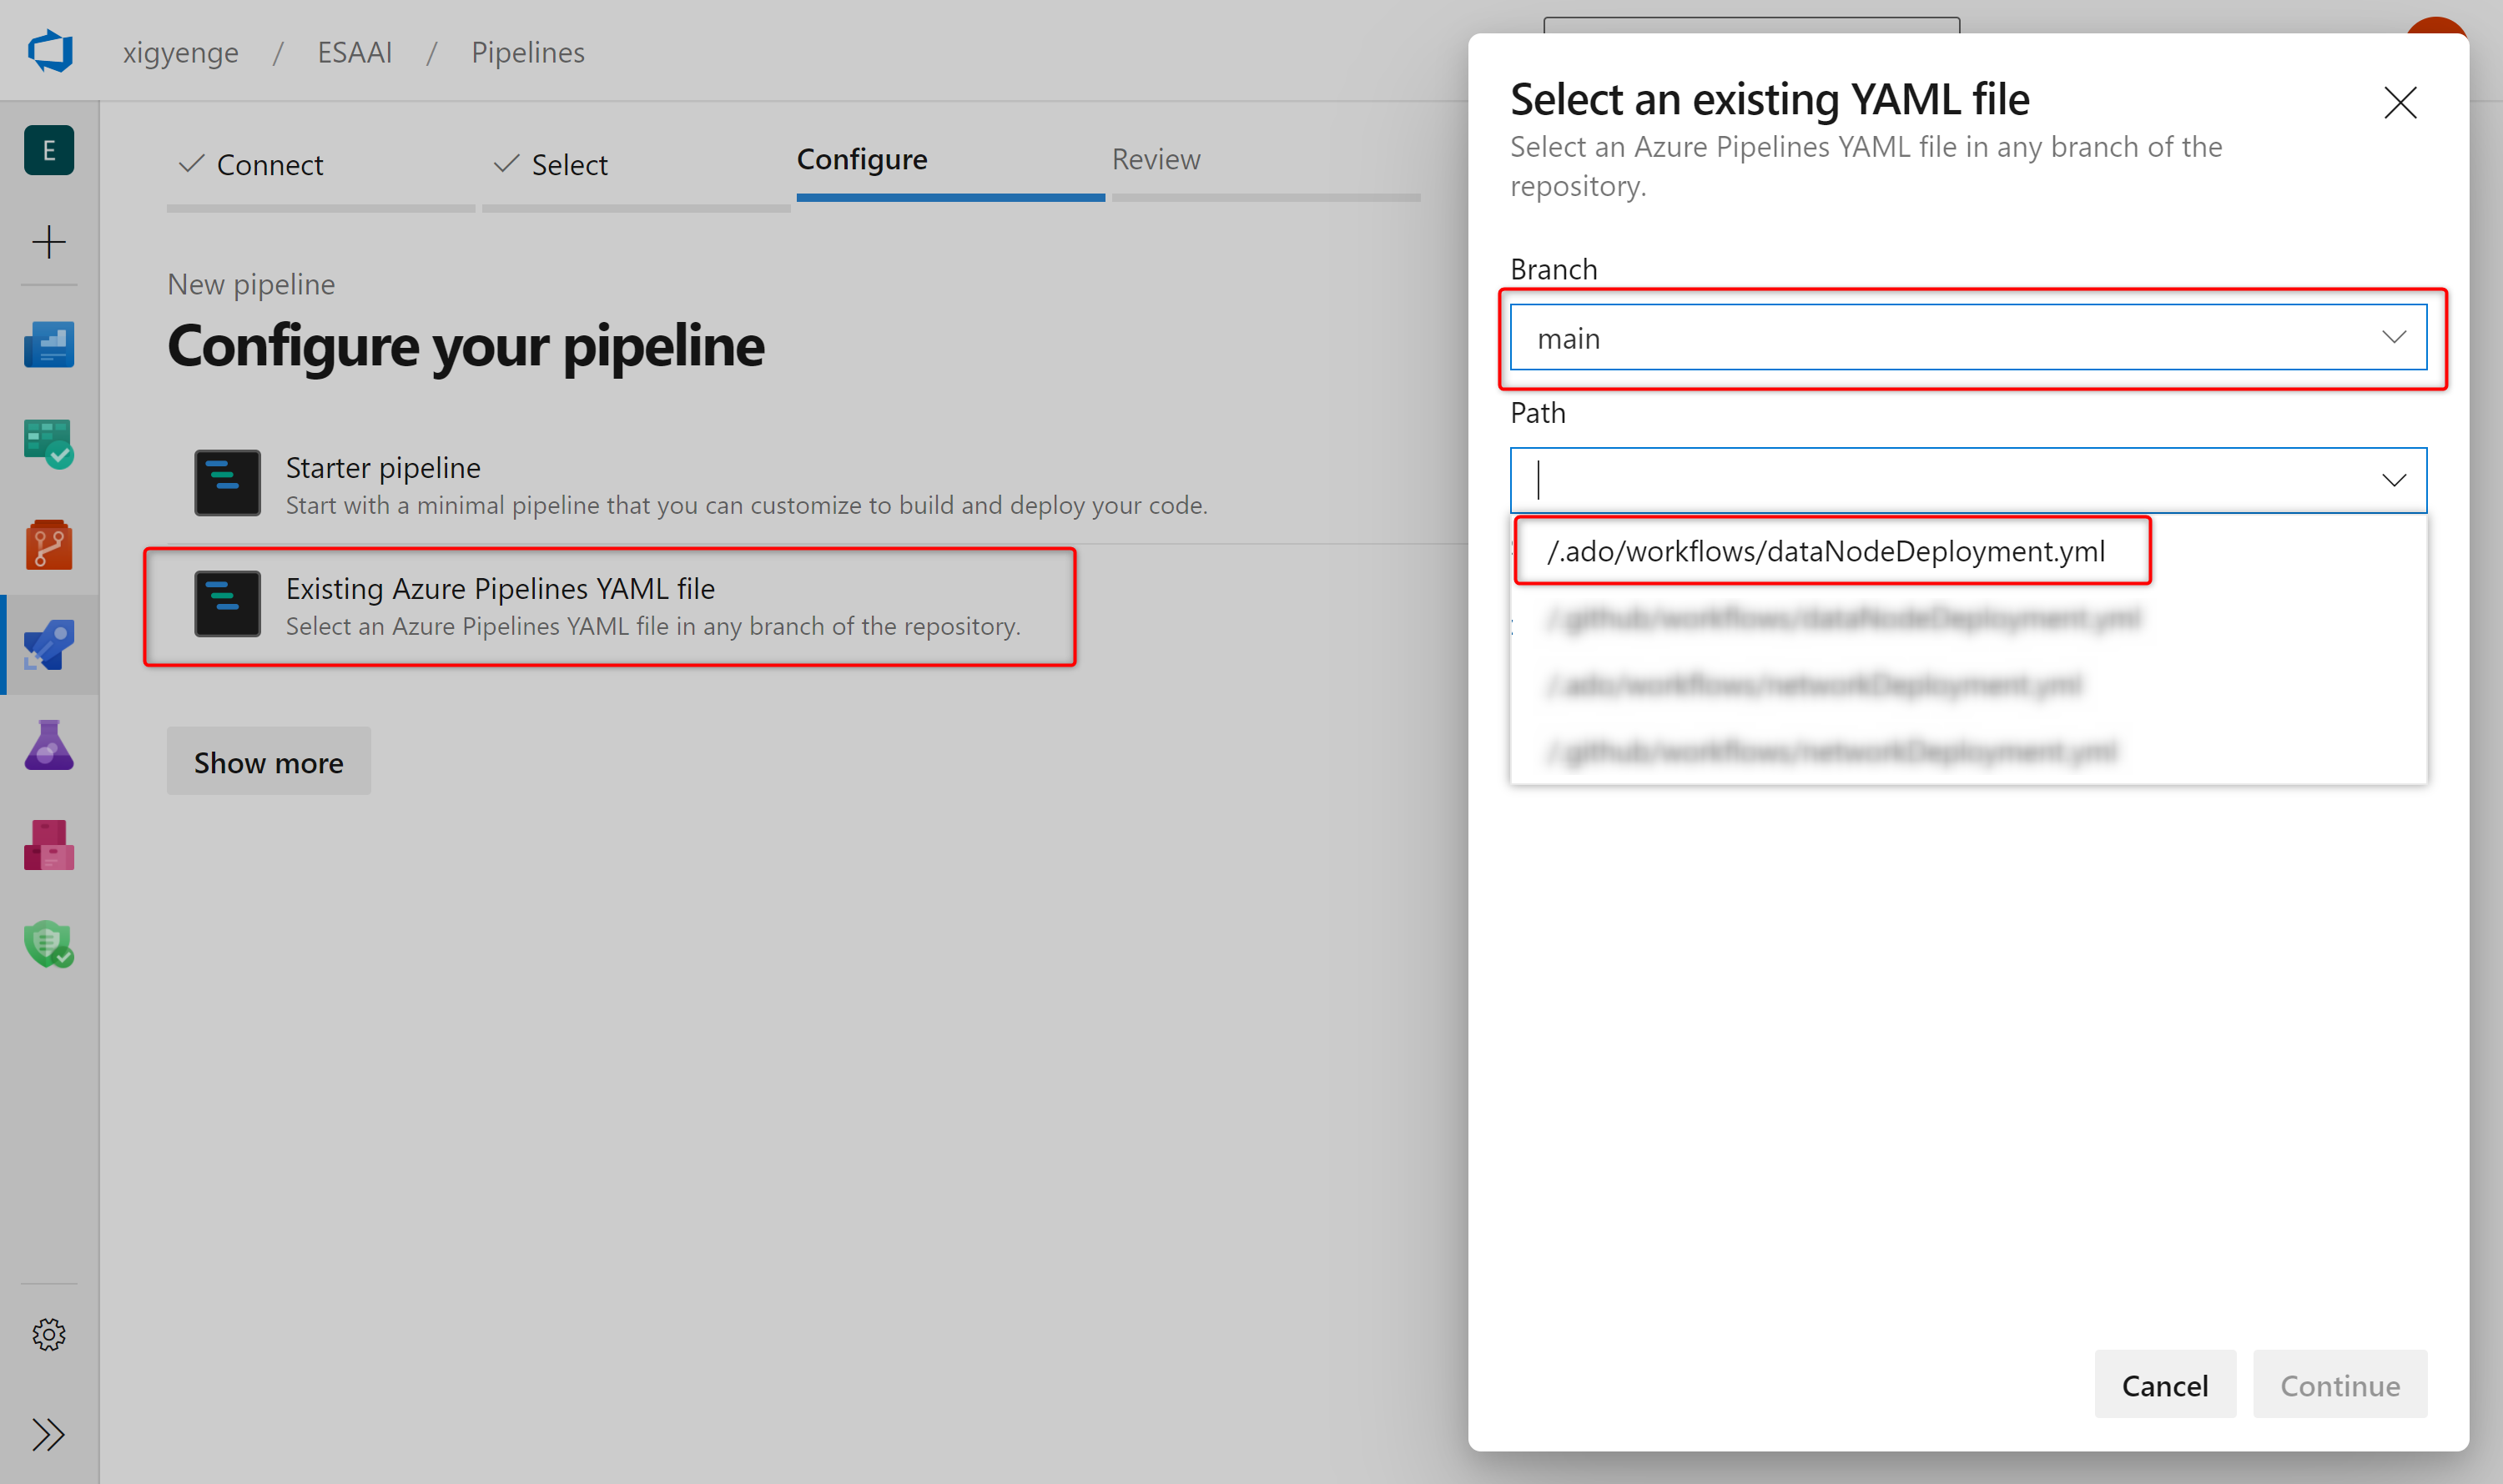
-
Click on Continue and then on Run.
6. Follow the workflow deployment
Congratulations! You have successfully executed all steps to deploy the template into your environment through GitHub Actions or Azure DevOps.
If you are using GitHub Actions, you can navigate to the Actions tab of the main page of the repository, where you will see a workflow with the name Data Management Deployment running. Click on it to see how it deploys one service after another. If you run into any issues, please open an issue here.
If you are using Azure DevOps Pipelines, you can navigate to the pipeline that you have created as part of step 6 and monitor it as each service is deployed. If you run into any issues, please open an issue here.
Documentation
Code Structure
| File/folder | Description |
|---|---|
.ado/workflows |
Folder for ADO workflows. The dataDomainDeployment.yml workflow shows the steps for an end-to-end deployment of the architecture. |
.github/workflows |
Folder for GitHub workflows. The updateParameters.yml workflow is used for the parameter update process, while the dataDomainDeployment.yml workflow shows the steps for an end-to-end deployment of the architecture. |
code |
Sample password generation script that will be run in the deployment workflow for resources that require a password during the deployment. |
configs |
Folder containing a script and configuration file that is used for the parameter update process. |
docs |
Resources for this README. |
infra |
Folder containing all the ARM templates for each of the resources that will be deployed (deploy.{resource}.json) together with their parameter files (params.{resource}.json). |
CODE_OF_CONDUCT.md |
Microsoft Open Source Code of Conduct. |
LICENSE |
The license for the sample. |
README.md |
This README file. |
SECURITY.md |
Microsoft Security README. |
Enterprise Scale Analytics Documentation and Implementation
- Documentation
- Implementation - Data Management
- Implementation - Data Landing Zone
- Implementation - Data Domain - Batch
- Implementation - Data Domain - Streaming
- Implementation - Data Product - Reporting
- Implementation - Data Product - Analytics & Data Science
Known issues
Error: MissingSubscriptionRegistration
Error Message:
ERROR: Deployment failed. Correlation ID: ***
  "error": ***
    "code": "MissingSubscriptionRegistration",
    "message": "The subscription is not registered to use namespace 'Microsoft.DocumentDB'. See https://aka.ms/rps-not-found for how to register subscriptions.",
    "details": [
      ***
        "code": "MissingSubscriptionRegistration",
        "target": "Microsoft.DocumentDB",
        "message": "The subscription is not registered to use namespace 'Microsoft.DocumentDB'. See https://aka.ms/rps-not-found for how to register subscriptions."
Solution:
This error message appears, in case during the deployment it tries to create a type of resource which has never been deployed before inside the subscription. We recommend to check prior the deployment whether the required resource providers are registered for your subscription and if needed, register them through the Azure Portal, Azure Powershell or Azure CLI as mentioned here.
Contributing
This project welcomes contributions and suggestions. Most contributions require you to agree to a Contributor License Agreement (CLA) declaring that you have the right to, and actually do, grant us the rights to use your contribution. For details, visit https://cla.opensource.microsoft.com.
When you submit a pull request, a CLA bot will automatically determine whether you need to provide a CLA and decorate the PR appropriately (e.g., status check, comment). Simply follow the instructions provided by the bot. You will only need to do this once across all repositories using our CLA.
This project has adopted the Microsoft Open Source Code of Conduct. For more information see the Code of Conduct FAQ or contact opencode@microsoft.com with any additional questions or comments.
