|
|
||
|---|---|---|
| img | ||
| manifest | ||
| scripts | ||
| .DS_Store | ||
| .gitignore | ||
| README.md | ||
| SECURITY.md | ||
| notes.txr | ||
README.md
Managing Azure Kubernetes Service: What you need to know about day two operations.
This is the repository for Ignite Session - Managing Azure Kubernetes Service: What you need to know about day two operations.
In this workshop you'll walk through the following task:
- Deploy application to AKS
- Use Container Insights to troubleshoot application issues
- Scale application to meet request demand
- View and fix security recommendations from Azure Security Center
- Apply Policy to govern your AKS resources
Connect to AKS cluster
-
Login to Azure Portal at http://portal.azure.com
-
Open the Azure Cloud Shell and choose Bash Shell (do not choose Powershell)
-
The first time Cloud Shell is started will require you to create a storage account. Make sure you click on"Show Advanced Settings" Use the existing resource group and create a new storage account and file share. You will need to use a unique name with no dashes or special characters.
-
Once your cloud shell is started, clone the workshop repo into the cloud shell environment
git clone https://github.com/Azure/ignite-day2-aks -
Now you'll need to get your credentials for your Kubernetes cluster. Run the below command to pull down the credentials.
Make sure you use your id for the resource group name and cluster name
Example of where to find your id
RGNAME=ODL-aks-<id>
CLUSTERNAME=ignite-<id>
az aks get-credentials -n $CLUSTERNAME -g $RGNAME
**Tip: You can get your cluster name and resource group with the following command:
az aks list
Deploy Application
You'll be deploying the following application to your AKS Cluster
The application consists of 3 components:
- A public facing Order Capture swagger enabled API
- A public facing frontend
- A MongoDB database
You'll first need to setup Helm, as we'll use it to deploy the MongoDB database.
Apply the following manifest to setup RBAC for helm:
kubectl apply -f ignite-day2-aks/manifest/helm-rbac.yaml
Now we will initialize Helm and it will be deployed to the cluster
helm init --service-account tiller
wait approximately 20 seconds before running the next command
Now that we have Helm setup we'll now deploy are MongoDB database
helm install stable/mongodb --name orders-mongo --set mongodbUsername=orders-user,mongodbPassword=orders-password,mongodbDatabase=akschallenge
We'll now create the secrets the application will use to connect to the MongoDB Database
kubectl create secret generic mongodb --from-literal=mongoHost="orders-mongo-mongodb.default.svc.cluster.local" --from-literal=mongoUser="orders-user" --from-literal=mongoPassword="wrong-password"
To deploy the application we will need to deploy a set of pre-created set of Kubernetes manifest files. Perform the following command in the cloud shell to deploy the manifest:
kubectl apply -f ignite-day2-aks/manifest/app
Now that your app is deployed you can check the status of it with the following command:
kubectl get pods
You should see the following output:
odl_user@Azure:~$ kubectl get pods
NAME                                   READY   STATUS             RESTARTS   AGE
azure-vote-back-5966fd4fd4-w7tnn       1/1     Running            0          14m
azure-vote-front-67fc95647d-kgls8      1/1     Running            0          14m
captureorder-894bbf6d7-crdbd           0/1     Error              1          62s
captureorder-894bbf6d7-sgvgf           0/1     CrashLoopBackOff   2          62s
frontend-794fbc469-7rk7z               1/1     Running            0          62s
orders-mongo-mongodb-9d7ccf7f5-wm995   1/1     Running            0          2m7s
You'll notice that the "captureorder" service is in a CrashLoopBack/error state, so in the next section we will troubleshoot the issue with Azure Container Insights
Troubleshoot Application with Azure Container Insights
In the Azure portal navigate to your AKS cluster, which is listed under "Kubernetes Service. Once you have selected your cluster, select "Monitor Containers" in the center screen navigation.
Now select "Controllers" from the top navigation and scroll to you find the "captureorder" controller. Now select "live logs" on the right panel to see the logs for the captureorder service.
You'll see that the "connection is refused" and if we look at the Environmental Variable on the right side we can see we have "wrong-password" for the MongoDB server. Since we have the wrong password our app is unable to make a connection to the MongoDB database that it's dependant on.
Environmental Variables
Let's update the password to be correct for the the MondoDB database connection
kubectl create secret generic mongodb --from-literal=mongoHost="orders-mongo-mongodb.default.svc.cluster.local" \
--from-literal=mongoUser="orders-user" \
--from-literal=mongoPassword="orders-password" --dry-run -o yaml | kubectl apply -f -
Now restart the containers to pickup their new environmental variables.
kubectl delete pods -l app=captureorder
Now when you look at the pods they should all be in a "running" state.
kubectl get pods
NAME                                   READY   STATUS    RESTARTS   AGEazure-vote-back-5966fd4fd4-96kbx       1/1     Running   0          84m
azure-vote-front-67fc95647d-wxdqf      1/1     Running   0          84m
captureorder-894bbf6d7-fkhsb           1/1     Running   0          19s
captureorder-894bbf6d7-h95tp           1/1     Running   0          19s
frontend-794fbc469-2km8p               1/1     Running   0          39m
orders-mongo-mongodb-9d7ccf7f5-hzpg8   1/1     Running   0          42m
You can also test the application by running a curl command
Note You need to find the external ip by running the following command
kubectl get service captureorder
Now in the following command put your service public IP in the POST section
curl -d '{"EmailAddress": "email@domain.com", "Product": "prod-1", "Total": 100}' -H "Content-Type: application/json" -X POST http://[Your Service Public LoadBalancer IP]/v1/order
You should see that it posted an order.
Assign policies for AKS
Now we will setup pre-created policies for AKS using Azure Policy. We will setup a policy to only allow for images to be pulled from a specific container registry and also a policy to limit the use of privileged containers.
You first need to enable the Policy addon for your AKS Cluster
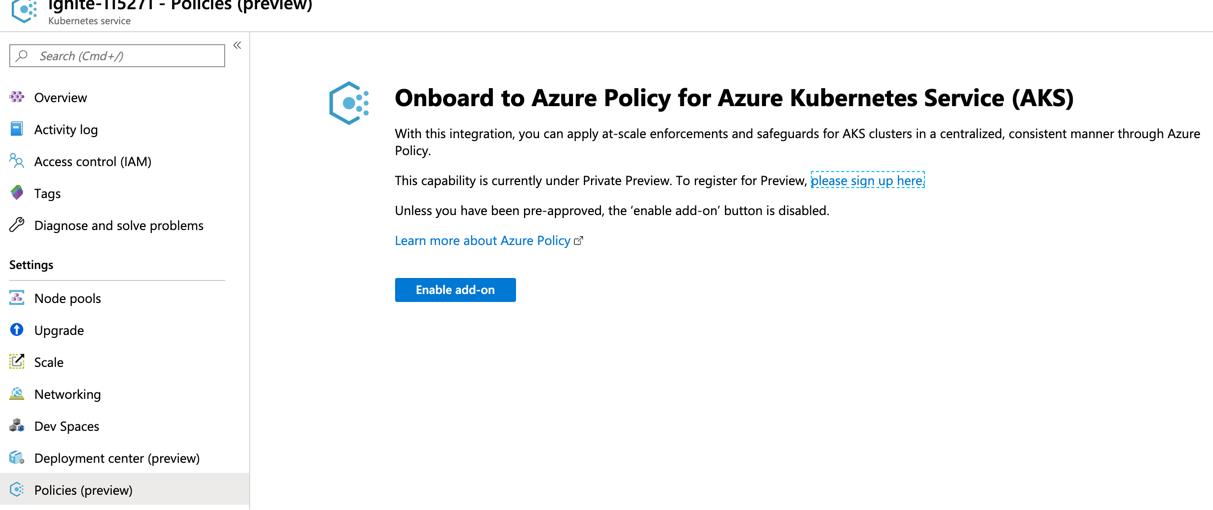
Find your AKS cluster under Kubernetes Service in the portal. Then select Policy on the left side and then click enable addon
Now let's go ahead and assign some policies. In the Azure portal type "policy" in the search bar and select "Policy".
Now in the "Policy" blade select the following.
- Assignments
- Assign Policy
Now set the following parameters
- Scope - Choose your subscription and AKS resource group
- Policy Definition - Search for AKS and choose [Limited Preview]: Ensure only allowed container images in AKS
- Enforcement - Disabled
- Select Next
- Allowed Container Images Regex - ^.+azurecr.io/.+$
- Select Review + Create
Also add the following policy
- Scope - Choose your subscription and AKS resource group
- Policy Definition - Search for AKS and choose [Limited Preview]: Do not allow privileged containers in AKS
- Enforcement - Disabled
- Select Review + Create
We will come back to look at how policies work in a later section, as it takes a few minutes for them to initialize and take effect.
Scale Application
Now that are awesome app has become hugely popular we need to ensure that it will scale to meet demand.
Let's first run a load test on the app. We will use Azure Container Instances to run a load test against the capture-order API.
Run the following command to spin up a container instance. Make sure you put in the correct IP parameter for your capture order service.
You can get the external IP with the following command:
kubectl get svc

captureorder           LoadBalancer   10.0.127.97   52.228.224.149   80:31195/TCP   36m
Now run the following command in substitute your external service IP:
az container create -g $RGNAME -n loadtest --image azch/loadtest --restart-policy Never -e SERVICE_ENDPOINT=https://<hostname order capture service>
Once the container is running you can view the logs and review the results. It will run a series of load test, which will increase latency over 2 minutes.
az container logs -g $RGNAME -n loadtest
To help automatically scale we will use a Kubernetes Horizontal Autoscale Policy:
kubectl apply -f ignite-day2-aks/manifest/app/hpa.yaml
After this is applied we will run the load test again and we'll see how are application automatically scales.
az container create -g $RGNAME -n loadtest2 --image azch/loadtest --restart-policy Never -e SERVICE_ENDPOINT=https://<hostname order capture service>
After running the load test you can run the following command to see that new pods are automatically being created to handle the increased load
kubectl get pods -w
Now let's go back and check our Azure policies to see the audit information
View Policy Compliance with Azure Policy For AKS to govern resources
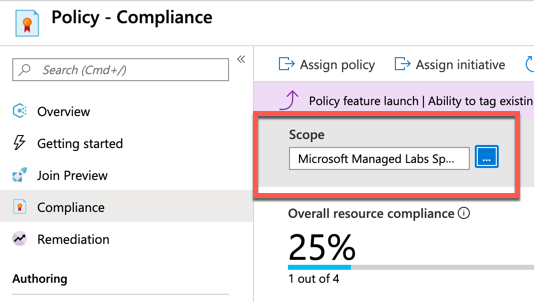
In the portal search for Policy. Ensure that you change the scope to only include your resource group.
In the policy section view select Compliance. Now you will see, which resources are in or out of compliance.
You will notice that the "Enforce Internal Load Balancer" is out of compliance. Since we did not set it to Enforce it just audits for the compliance violation. If you were to set Enforcement to Enabled, then it would deny the resource being created.
View recommendations from Azure Security Center
In the portal search for Security Center. Then perform the following steps
- Choose "Compute and Apps" on the left side
- Select "Containers"
- Select your cluster
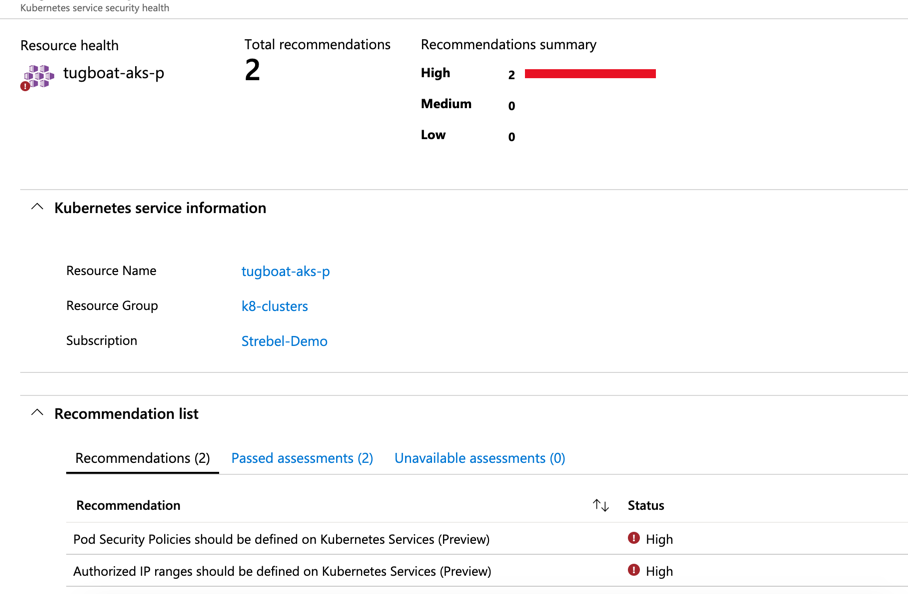
You should see the recommendations blade like the following:
You can now look at the different recommendation that Security Center makes to help apply security best practices for your cluster.
Legal Notices
Microsoft and any contributors grant you a license to the Microsoft documentation and other content in this repository under the Creative Commons Attribution 4.0 International Public License, see the LICENSE file, and grant you a license to any code in the repository under the MIT License, see the LICENSE-CODE file.
Microsoft, Windows, Microsoft Azure and/or other Microsoft products and services referenced in the documentation may be either trademarks or registered trademarks of Microsoft in the United States and/or other countries. The licenses for this project do not grant you rights to use any Microsoft names, logos, or trademarks. Microsoft's general trademark guidelines can be found at http://go.microsoft.com/fwlink/?LinkID=254653.
Privacy information can be found at https://privacy.microsoft.com/en-us/
Microsoft and any contributors reserve all other rights, whether under their respective copyrights, patents, or trademarks, whether by implication, estoppel or otherwise.


