5.1 KiB
| title | page_title | description | slug | tags | published | position |
|---|---|---|---|---|---|---|
| Blazor Server App | First Steps with Blazor Server Apps and Telerik UI for Blazor | Make your first steps with Telerik UI for Blazor and build an app that runs the UI components server-side in Blazor server. | getting-started/server-side | get,started,first,steps,server | true | 15 |
First Steps with Server-Side UI for Blazor
This article explains how to get the Telerik UI for Blazor components in your .NET 6 or 7 Blazor Server app and start using them quickly. You will create a new application from scratch, learn how to add the UI for Blazor components to a project, and finally, add a UI component to a view.
This article applies only to the Blazor Server App template in Visual Studio, which exists up to .NET 7. If you are using newer .NET versions, then follow the [tutorial about Blazor Web Apps]({%slug getting-started/web-app%}).
Prerequisites
Step 1: Create a New Project
-
Open Visual Studio and select Create a new project.
-
Select the Blazor Server App project type, enter a name for your project, and then click Next.
-
Select the desired framework and click Create.
Step 3: Install the Telerik UI for Blazor Components
-
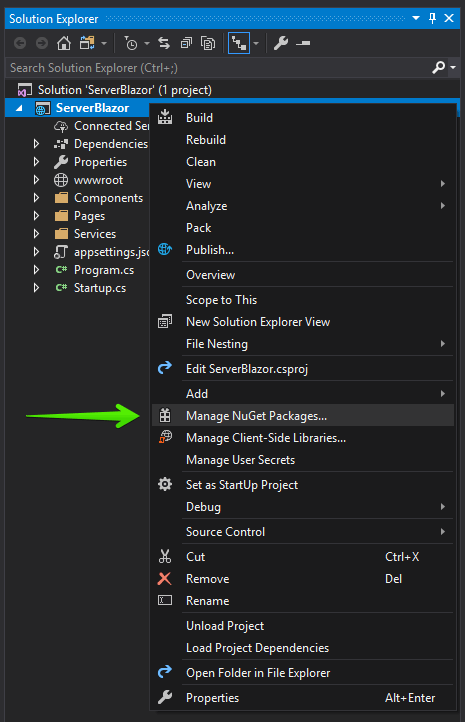
Right-click the Blazor Server project in the solution and select Manage NuGet Packages.
-
Install the Telerik Blazor NuGet package:
-
Select the
telerik.comPackage source that you added earlier. As this is a private NuGet feed, you must authenticate with your Telerik account user name and password. -
Select the Browse tab, find the NuGet package, and click Install. Commercial license holders should install
Telerik.UI.for.Blazor. Trial users should installTelerik.UI.for.Blazor.Trial.
Step 4: Enable the Blazor UI Components
To enable the Telerik UI for Blazor components, you must add several client-side dependencies to the application, include the required @using statements, add the TelerikRootComponent component, and register the Telerik Blazor service.
4.1. Add the Telerik UI for Blazor Client Assets
1. Add the telerik-blazor.js file to the <head> of your main index file:
~/Pages/_Host.cshtmlfor .NET 7~/Pages/_Layout.cshtmlfor .NET 6
HTML
2. To select the appearance and color scheme for the Telerik Blazor components, add the [theme stylesheet as a static asset]({%slug themes-overview%}#using-a-theme).
- Use the
~/Pages/_Host.cshtmlindex file for .NET 7 - Use the
~/Pages/_Layout.cshtmlindex file for .NET 6
4.2. Include @using Statements
In the ~/_Imports.razor file, add the @using directives below. This configures the project to recognize the Telerik components in all files. You can register one or both icon namespaces, depending on the [icon type you will be using]({%slug common-features-icons%}).
_Imports.razor
@using Telerik.Blazor
@using Telerik.Blazor.Components
@using Telerik.SvgIcons
@using Telerik.FontIcons
4.3. Add the TelerikRootComponent
Use a single [TelerikRootComponent]({%slug rootcomponent-overview%}) component as a top-level component in the app.
4.4. Register the Telerik Blazor Service
In the Program.cs file of your Blazor Server project, register the Telerik Blazor Service:
C# @template
Now your Blazor Server project can use the Telerik UI for Blazor components.
Step 5: Add a Component to a View
The final step in this tutorial is to use a Telerik UI for Blazor component in a view and run it in the browser.
- In the
~/Components/Pages/Index.razorview, add aTelerikButtoncomponent.
Video Tutorial
If you prefer video instructions, you can also check the video tutorial below.
See Also
- [Workflow Details for Telerik UI for Blazor]({%slug getting-started/what-you-need%})
- Getting Started Videos for Blazor
- [First Steps with Blazor Web App]({%slug getting-started/web-app%})
- [First Steps with Blazor WebAssembly]({%slug getting-started/client-side%})

