Update README to contain correct link to the Asset Store downloadable. |
||
|---|---|---|
| Assets | ||
| Packages | ||
| ProjectSettings | ||
| docs/images | ||
| .gitignore | ||
| LICENSE | ||
| README.md | ||
README.md
360° Video Heatmaps
360° video is a new medium for storytelling and expression, but as such it also presents significant creative challenges. The rules are unwritten, the vocabulary still being discovered. When someone watches a 360° video in VR, they can look anywhere, possibly missing key parts of the story or even your million-dollar special effects extravaganza. So how do you guide the viewer’s gaze? How do you let the viewer know when they can explore the scene and when they should focus? Determining the answer to such questions — in other words, writing the rules and film-making vocabulary for the 360° video medium — will require experimentation, trying different techniques to see what works and what doesn’t.
Unity Analytics 360° video heatmaps can help you discover the answers by showing you where your viewers look and how they react. When you add the heatmap sender component to your video player, Unity Analytics samples the gaze direction of your viewers and sends that data to the Unity Analytics service. You can then view the collected heatmap data overlaid on the video itself in the Unity Editor.
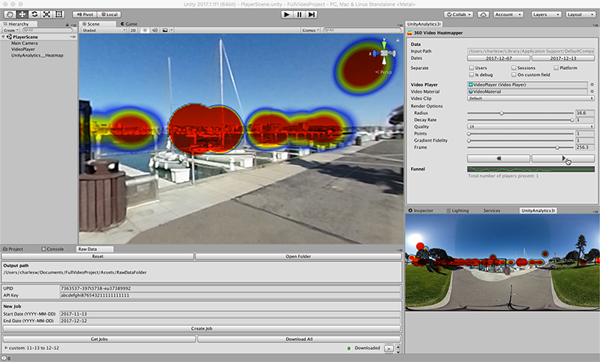
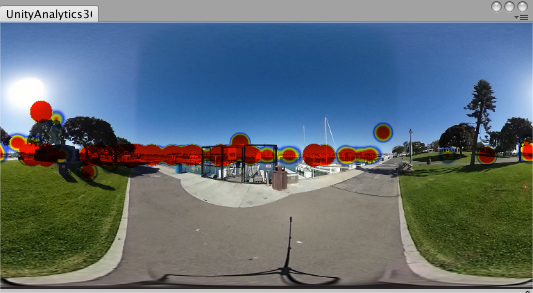
Heatmaps indicate where viewers are looking using color gradients. The more people who look at the same area of the video the hotter that part of the heatmap overlay appears:
Note that the 360° Video heatmaps use statistical sampling appropriate for a large audience. It is not intended for tracking the gaze of a single viewer in precise detail.
Setup
-
Download and import the 360° Video Heatmaps SDK.
-
Enable Unity Analytics for the project
-
Add the Heatmap Sender component to collect heatmap analytics.
-
Create a playback scene for viewing heatmap data.
Requirements
-
Unity 5.6+
-
Unity Video Player component
-
Equirectangular 360° and 180° video (monoscopic and stereoscopic)
-
Video rendered using the included Skybox/Panoramic-Heatmap shader (for heatmap display)
-
Compute shader support (for heatmap display)
If you are displaying video on a computer monitor rather than a VR headset, you must supply controls so that viewers can aim the scene camera. Otherwise, all the heatmap data will be focused on the same spot of the video and won’t provide any useful data for analysis.
Enable Video Heatmap Analytics
Enable analytics for 360° Video Heatmaps on the Unity Analytics Dashboard:
-
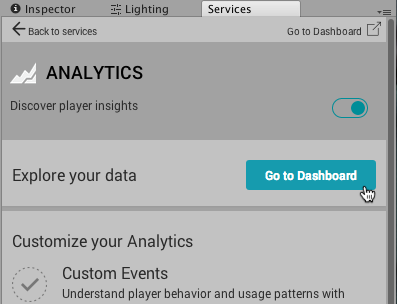
Navigate to your Analytics dashboard:
-
On the dashboard, click the Configure tab.
-
Under Feature Settings, click the Activate Heatmaps button.
Collect Heatmap Analytics Data
To collect heatmap Analytics data for a 360° video, add the HeatmapSender component to the scene Camera.
-
Complete the Setup steps to enable Analytics and install the 360° Video Heatmaps SDK.
-
Select the Camera in your Unity scene.
-
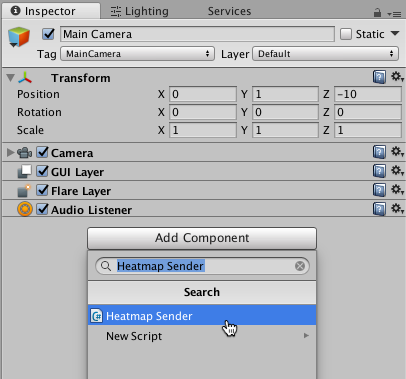
Click Add Component in the camera Inspector window.
-
Type Heatmap Sender in the search field.
-
Click the Heatmap Sender component in the list to add it to the Camera object.
Note that the Heatmap Sender component finds the Video Player object automatically when the scene loads. However, if you have more than one Video Player in a scene, then you must drag the correct Video Player’s object to the Heatmap Sender’s Video Player property.
If you have already created a scene for playing 360° videos using the Unity Video Player component and the panoramic skybox shader, then you are done. Otherwise, set up the Video Player render texture and the Skybox material.
Set up the Video Player
Note: for more information on the Video Player settings, see Panoramic 2D and 3D Video Shader in Unity, the following is just a quick guide.
To set up the Video Player to render into a texture:
-
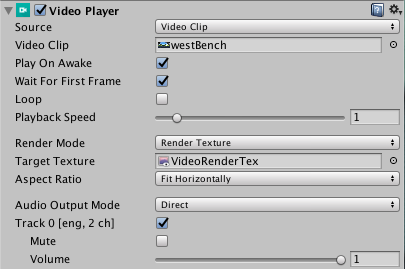
On the Video Player component, set the Render Mode to Render Texture.
-
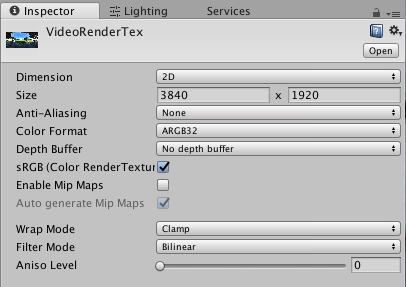
Create a render texture asset appropriate for the video:
-
Drag the render texture to the Video Player’s Target Texture field.
Set up the Skybox
Note: for more information on the Video Player settings, see Panoramic 2D and 3D Video Shader in Unity, the following is just a quick guide.
To set up the skybox to display the video texture:
-
Create a material for the skybox:
-
Create a new Material Asset (menu: Assets > Create > Material).
-
Select the new Material Asset to view its properties in the Inspector.
-
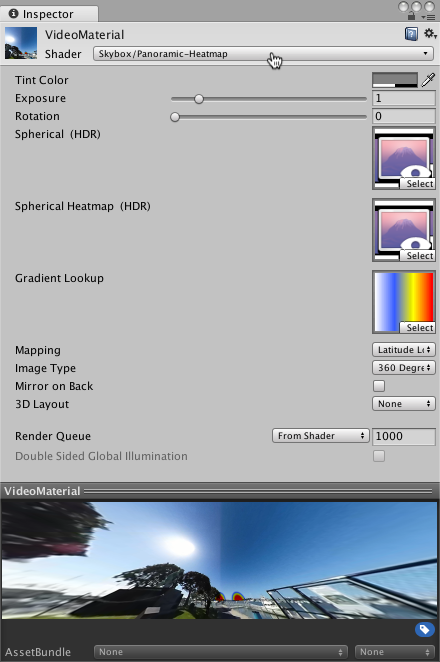
Set the Shader to Skybox/Panoramic-Heatmap. Note: you can use the standard Skybox/Panoramic shader in the video player application that you distribute to viewers, but to see the heatmap data, you must use the heatmap version.
-
Drag the render texture used for the Video Player into the Spherical (HDR) texture field.
-
Set the other shader fields as appropriate for your video clip. (You do not need to set the Spherical Heatmap (HDR) and Gradient Lookup fields, these are set automatically.)
-
-
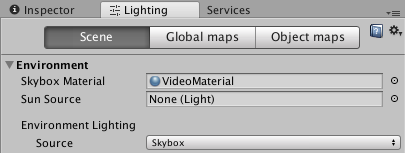
Open the Lighting window (menu: Window > Lighting > Settings).
-
In the Environment section, drag the new material asset to the Skybox Material field.
Setting the sample rate
When you activate the heatmaps feature on the Unity Analytics dashboard, the system automatically creates a Remote Settings key named heatmaps_sample_rate with a value of 10%. This setting means that a viewer has a 10% chance of being included in the test audience. If you have a large audience, a 10% sample rate should be sufficient for most purposes. You can use different sample rates for debug builds of your video player application and release builds.
To set the sample rate:
- Navigate to your Unity Analytics Dashboard for the project.
- Click the Remote Settings tab.
- To set the sample rate for release applications, choose the Release configuration. Otherwise, choose the Development configuration.
- Locate the heatmaps_sample_rate key in the list of settings.
- Click the pencil-shaped edit button to the right of the screen.
- Enter the desired sample rate.
- Click Save.
- Click Sync.
Repeat this process to change the sample rate in the other configuration, if desired.
Note that events are always sent when you run your video player scene from the Unity Editor.
Testing the Analytics setup
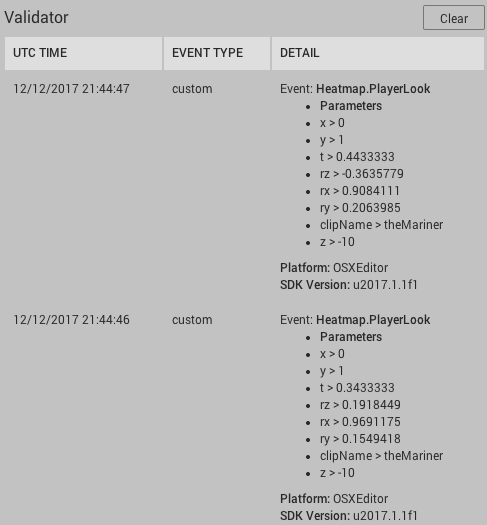
Use the Validator at the bottom of the Analytics Services window to check that the heatmap analytics events are sent when you view a video in the Unity Editor:
-
In the Unity Editor, open the Services window (menu: Window > Services).
-
Click Analytics on the Services window to go to the Analytics section. Note the Validator section at the bottom of the Analytics window.
-
Press Play in the Editor to start the video.
-
Every half second, you should see a custom event named Heatmap.PlayerLook appear in the window:
Viewing 360° video heatmaps
You can view heatmaps superimposed on your 360° videos using the same video player that you used to collect the analytics data — as long as you use the heatmap version of the Skybox/Panorama shader. You can also make a separate heatmap viewer scene if that makes more sense in your project.
The general process for analyzing how viewers watch your video is:
-
Collect data. It can take a few hours for the Unity Analytics Service to process any collected data.
-
Download the processed data using the Raw Data window.
-
View the heatmaps superimposed over the video using the Heatmapper window.
Creating a player scene
To create a scene to display your heatmap data, follow the instructions above to create a Video Player component that renders into a skybox texture. (You do not need a Heatmap Sender component for this scene.)
When setting up the material used for the skybox, you must use the Skybox/Panorama-Heatmap shader.
Download the Collected Data
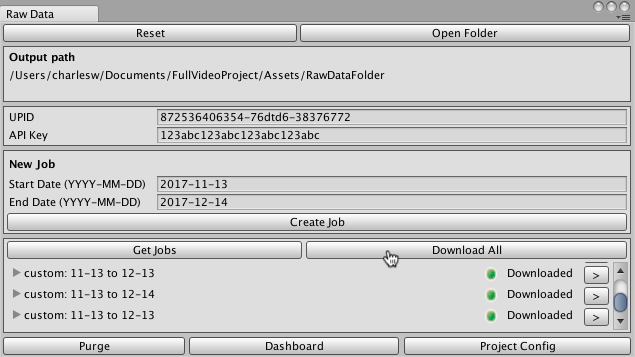
Use the Raw Data window (menu: Window > Unity Analytics > 360 Video Heatmaps > Raw Data) to download the data collected when viewers use your video player application.
To download your heatmap data:
-
Open the Raw Data window.
-
Check that the UPID and API Key have the correct values for the current project. (Click the Project Config button for quick access to the page listing these values.)
-
Set the Start and End Dates as desired, using the format YYYY-MM-DD.
-
Click Create Job. The new job is added to the Job List. Job processing can take a few minutes.
-
Click Get Jobs after a few minutes. When the job is ready to download, a Download button appears for the job.
-
Click the Download button to get the data. The data is downloaded to the location specified in the Output path field and is ready to display.
View the Heatmap Data
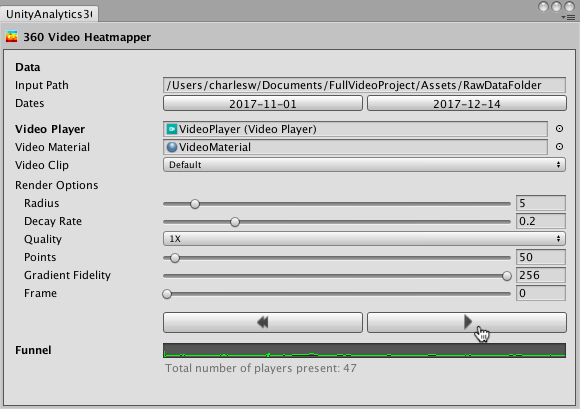
Once the data is collected and you have downloaded it locally, open the Heatmapper window (menu: Window > Unity Analytics > 360 Video Heatmaps > Heatmapper).
First, make sure that the input Path is the same as the Output path listed on the Raw Data window. (If the two paths are different, you must change the Raw Data Output path and redownload the data.)
Next, drag the scene Video Player component to the Video Player field and the skybox material used to render the video to the Video Material field. If you have more than one video clip in the project, set the one to watch in the Video Clip field.
Depending on how much data you have collected, you might want to increase the Radius and Decay Rate settings. These settings make individual points more visible. For information about the other settings, refer to the Heatmapper window topic.
To watch the video with superimposed heatmaps in the Unity Game or Scene views, press the Play button on the Heatmapper window. You can also scrub the video using the Frame slider.
Note that heatmaps are not superimposed over the video when the Editor is in Play mode, only in Edit mode.
The Flattened Heatmap View provides a full-frame, equirectangular view of the video so that you can see the entire frame and heatmaps without having to rotate the camera.
Component and Asset Reference
The 360° Video Heatmaps SDK includes the following components and assets for collecting and viewing 360° video heatmap data. (Other components, scripts, and assets in the SDK package should be considered internal.)
Heatmap Sender component
Attach the HeatmapSender component to the scene camera. This component sends heatmap events to the Analytics Service and reports where the camera is looking (using the camera’s forward direction).
| Property | Function |
|---|---|
| Video Player | The Video Player component playing the 360° video clip. The HeatmapSender component gets the clip name and current frame from the VideoPlayer when sending events to the service. |
Raw Data window
The Raw Data window provides access to the heatmap data collected by the Unity Analytics Service. Open the Raw Data window using the Unity Editor menu: Window > Unity Analytics > 360 Video__ Heatmaps__ > Raw Data.
Before you can display heatmap data, you must create a job and download the data to your local computer using the Raw Data window. See the Download the Collected Data topic.
| Property | Function |
|---|---|
| Reset button | Resets the fields in the window to their default values. |
| Open Folder button | Opens the folder displayed in the Output path field. Examining the folder contents can be useful to verify that your data has been downloaded. |
| Output path | The path where your downloaded Analytics data is saved. The path shown here must match the path shown in the Heatmapper window. |
| UPID | Your Unity Project ID. Obtain this value from the Configure page of your project on the Unity Analytics dashboard. (Click the Project Config button to open the Configure page.) |
| API Key | Your Unity Project API key. Obtain this value from the Configure page of your project on the Unity Analytics dashboard. (Click the Project Config button to open the Configure page.) You should protect this value and keep it secret. It provides access to your Analytics data. |
| Start Date | The beginning of the new job. Data collected before this date is not included. |
| End Date | The cut-off date of the new job. Data collected after this date is not included. |
| Create Job button | Creates the job definition and sends it to the Unity Analytics Service. |
| Get Jobs button | Gets all existing job definition. Note that any jobs created using Raw Data Export on the Analytics dashboard are listed, not just jobs created for 360° video projects. |
| Download Jobs button | Downloads all the jobs in the job list. |
| Job list | Lists all the existing jobs, showing the downloaded status. Click the caret by the job name to view the contents of a job. |
| Continue Job button | Click the > button to the right of a job item to define a new job that includes the dates from the end of that job until the present. This is an easy way to get the next batch of data since the last time you created a job. |
| Purge button | Deletes all the downloaded data. |
| Dashboard button | Opens the Unity Analytics dashboard for the project. |
| Project Config button | Opens the Configure page of Unity Analytics dashboard for the project. You can enable heatmaps on the Configure page as well as access your UPID and API Key. |
Heatmapper window
The Heatmapper window controls the display of the heatmap data. Open the Heatmapper window using the Editor menu: Window > Unity Analytics > 360 Video Heatmaps > Heatmapper.
For information on using the Heatmapper window to view your heatmap data, see the View the Heatmap Data topic.
| Property | Function |
|---|---|
| Input Path | The path where the Heatmapper looks for the heatmap data. The input path of the Heatmapper must match the output path of the Raw Data window. |
| Dates | The date range of the collected analytics data to display. |
| Separate | Whether to view the heatmap data separately according to its various attributes. For example, select Separate by Is Debug to separate out any data collected while playing the video in the Unity Editor (and debug builds). |
| Video Player | Must be set to reference a Video Player in the current scene. |
| Video Material | Must be set to the material used as the Skybox material (and uses the Skybox/Panoramic-Heatmap shader). |
| Video Clip | The clip to play. |
| Radius | The size to render a heatmap data point. |
| Decay Rate | How long a heatmap data point persists across video frames. Set 0 for points to decay and disappear in the next frame; set 1 for points to never decay. |
| Quality | The quality of the heatmap rendering. |
| Points | The maximum number of points to display in a single frame. |
| Gradient Fidelity | |
| Frame | The video frame number. Drag the slider to scrub through the video. |
| Playback buttons | Controls playback of the video with superimposed heatmaps. |
| Funnel | Displays how many viewers were in the current data set at any given frame of the video. |
Flattened Heatmap View
The Flattened Heatmap View displays a "flattened" equirectangular projection of the video with the heatmap overlay. This window enables you to see an entire video frame at once. Open the Flattened Heatmap view using the Editor menu: Window > Unity Analytics > 360 Video Heatmaps > Flattened Heatmap View.
Use the Heatmapper window to control the content and appearance of the Flattened Heatmap View.
Skybox/Panorama-Heatmap shader
The Panorama-Heatmap shader is a version of the Panoramic 2D and 3D Video shader modified to display the heatmap. This shader is required to view heatmaps, but you can use either version in the player that you distribute to viewers.
| Property | Function |
|---|---|
| Spherical (HDR) | A Render Texture asset. |
| Spherical Heatmap (HDR) | The texture used to render the heatmap data. This texture is created and set automatically. Leave blank in your Unity scene setup. |
| Gradient Lookup | Defines the range of colors used for heatmaps. Defined automatically. Leave blank in your Unity scene setup. |
| Mapping | The layout of the 360° video. 360° video heatmaps only supports Latitude Longitude Layout (not the cubemap, Six Frames Layout). |
| Image Type | The angular extent of the video (180° or 360°). |
| 3D Layout | Choose the layout matching the video. Use None for monoscopic videos. |
