6.2 KiB
Main branch
The following instructions are for current main branch only.
Prerequisites
EF Core does not generally need any prerequisites installed to build the code. However, running tests requires certain local databases to be available:
- The SQL Server tests require a local SQL Server installation. This can be:
- SQL Server LocalDb, usually obtained by installing the latest Visual Studio public preview with the "ASP.NET and web development" workload selected.
- SQL Server Express or Developer Edition, on Windows or Linux. When not using LocalDb, make sure to set the environment variable
Test__SqlServer__DefaultConnectionto the connection string that EF Core tests should use.
- The Cosmos tests require that the Azure Cosmos Emulator is installed. Use the default installation options. Make sure to start the emulator each time you restart your machine.
- The Cosmos tests are optional and will be skipped if the emulator is not available. If you are not making Cosmos changes, then you may choose to skip installing the emulator and let the continuous integration system handle Cosmos testing.
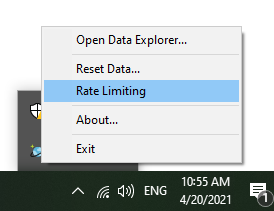
- Tip: Turn off "Rate Limiting" in the emulator to make the Cosmos tests run faster.

- While not strictly necessary, since EF will download an SDK locally if needed, it is recommended to always have tha latest public preview of the .NET SDK installed.
Fork the repository
If you plan to contribute changes back to EF Core, then first create a fork of the EFCore repo on GitHub.
Clone the repository
Using your favorite git client, clone the repository. For example, to clone the main repo:
git clone https://github.com/dotnet/efcore.git
Or if you have created a fork called efcore in your personal GitHub:
git clone https://github.com/myusername/efcore.git
Build
To build the code just call build[.cmd/.sh]. This is an important step since it will install a preview .NET SDK alongside EF Core. This ensures EF Core is being built with the expected SDK and msbuild version. Running build also restores packages and builds all projects. Tests are not run.
build
The build script has different arguments to perform specific actions. The full list of arguments can be found via build -h command. Arguments for common actions are listed in table below. The repository root directory also contains cmd/sh files to invoke some of them directly.
| Build argument | Action | Script file |
|---|---|---|
| -restore | Restore packages. | restore.cmd |
| -build | Build all projects. | build.cmd |
| -test | Run all tests (requires build). | test.cmd |
| -pack | Build and produce NuGet packages. | None |
Building local packages
The build -pack command created all the EF Core NuGet packages and places them in efcore\artifacts\packages. However, these packages will have the same package version no matter how many times they are built. This confuses NuGet package caching, so if you want to build and test with local packages, then specify a new build number for each set of packages. For example:
build /p:OfficialBuildId=20231212.6 -pack
This uses the .NET convention for internal build numbers which is yyyyMMdd.x. Increment "x" with each build.
Using the NuGet packages build like this requires adding the package location to a local "NuGet.Config". For example:
<?xml version="1.0" encoding="utf-8"?>
<configuration>
  <packageSources>
    <add key="nuget.org" value="https://api.nuget.org/v3/index.json" protocolVersion="3" />
    <add key="Local" value="C:\local\code\efcore\artifacts\packages\Debug\Shipping" />
  </packageSources>
</configuration>
Place the "Nuget.Config" file in your solution or project directory.
Using Visual Studio
The command line build (see above) should be run before using the solution with Visual Studio.
The build script installs a preview .NET Core SDK. In order to make sure Visual studio (or any other IDE) is using same SDK, certain environment variables need to be set. To configure your local environment and open solution file in Visual Studio, run following command:
startvs.cmd EFCore.sln
You can inspect the script and use similar configuration for other IDEs.
Note that startvs actually opens whatever the default application is for .sln files. If you have multiple IDEs or multiple versions of Visual Studio installed, then make sure that the appropriate default is set, or edit the script to be explicit.
If you install the latest preview release of the .NET SDK, you may be able to skip using startvs and open the solution directly. While we strive to keep our codebase compatible with the latest preview, we may need to depend on changes that have been made since the latest preview release. If you encounter unexpected errors when opening the solution directly, try using startvs instead, and ensure you're on the latest preview of Visual Studio.
Run tests
Our tests are written using xUnit.net, and can be run with most test runners we have tried.
Tests can be run on the command line (after build) by running test:
test
Solving common build errors
- Check that the package source URLs listed in the Nuget.config file in the root of the repository are accessible.
- Clean the source directory.
git clean -xidwill clean files in the EF source directory. - Clear nuget packages and caches.
nuget.exe locals all -clearwill delete the NuGet caches. (You can get nuget.exe from https://dist.nuget.org/index.html or usedotnet nuget).