|
|
||
|---|---|---|
| images | ||
| src | ||
| .gitattributes | ||
| .gitignore | ||
| README.md | ||
README.md
MVP Summit 2022 - .NET MAUI samples
Hello Microsoft MVPs!

Here you can find demos to learn how to port code and libraries from Xamarin.Forms to .NET MAUI.
Ready?.
Port Xamarin.Forms libraries (or plugins) to .NET MAUI
Let's see how to port code and the implications in each case.
Port Xamarin.Forms Behaviors to .NET MAUI
Behaviors let you add functionality to user interface controls without having to subclass them. Instead, the functionality is implemented in a behavior class and attached to the control as if it was part of the control itself.
In .NET MAUI the same concept works exactly the same, being able to reuse all the code.
Let's see an example.
Xamarin.Forms
using Xamarin.Forms;

namespace Behaviors
{
    public class NumericValidationBehavior : Behavior<Entry>
    {
        protected override void OnAttachedTo(Entry entry)
        {
            entry.TextChanged += OnEntryTextChanged;
            base.OnAttachedTo(entry);
        }

        protected override void OnDetachingFrom(Entry entry)
        {
            entry.TextChanged -= OnEntryTextChanged;
            base.OnDetachingFrom(entry);
        }

        void OnEntryTextChanged(object sender, TextChangedEventArgs args)
        {
            bool isValid = double.TryParse(args.NewTextValue, out double result);
            ((Entry)sender).TextColor = isValid ? Color.Default : Color.Red;
        }
    }
}
.NET MAUI
using Microsoft.Maui.Controls;
using Microsoft.Maui.Graphics;

namespace Behaviors
{
    public class NumericValidationBehavior : Behavior<Entry>
    {
        protected override void OnAttachedTo(Entry entry)
        {
            entry.TextChanged += OnEntryTextChanged;
            base.OnAttachedTo(entry);
        }

        protected override void OnDetachingFrom(Entry entry)
        {
            entry.TextChanged -= OnEntryTextChanged;
            base.OnDetachingFrom(entry);
        }

        void OnEntryTextChanged(object sender, TextChangedEventArgs args)
        {
            bool isValid = double.TryParse(args.NewTextValue, out double result);
            ((Entry)sender).TextColor = isValid ? Colors.Black : Colors.Red;
        }
    }
}
What is the difference?. The code is exactly the same except for one detail, namespaces.
Xamarin.Forms namespace changes to Microsoft.Maui.Controls namespace.
On the other hand, all the basic types such as: Color, Rectangle or Point have become available in Microsoft.Maui.Graphics. For that reason, and because using colors in this Behavior we also need this new namespace.
Port Xamarin.Forms Converters to .NET MAUI
Data bindings usually transfer data from a source property to a target property, and in some cases from the target property to the source property. This transfer is straightforward when the source and target properties are of the same type, or when one type can be converted to the other type through an implicit conversion. When that is not the case, a type conversion must take place.
Suppose you want to define a data binding where the source property is of type int but the target property is a bool. You want this data binding to produce a false value when the integer source is equal to 0, and true otherwise.
You can do this with a class that implements the IValueConverter interface.
Like other Xamarin.Forms concepts, Converters can be reused in .NET MAUI without require code changes.
Let's see an example.
Xamarin.Forms
using System;
using System.Globalization;
using Xamarin.Forms;

namespace Converters
{
    public class IntToBoolConverter : IValueConverter
    {
        public object Convert(object value, Type targetType, object parameter, CultureInfo culture)
        {
            return (int)value != 0;
        }

        public object ConvertBack(object value, Type targetType, object parameter, CultureInfo culture)
        {
            return (bool)value ? 1 : 0;
        }
    }
}
.NET MAUI
using Microsoft.Maui.Controls;
using System;
using System.Globalization;

namespace Converters
{
    public class IntToBoolConverter : IValueConverter
    {
        public object Convert(object value, Type targetType, object parameter, CultureInfo culture)
        {
            return (int)value != 0;
        }

        public object ConvertBack(object value, Type targetType, object parameter, CultureInfo culture)
        {
            return (bool)value ? 1 : 0;
        }
    }
}
What is the difference?. The code is exactly the same except for one detail, namespaces.
Xamarin.Forms namespace changes to Microsoft.Maui.Controls namespace.
Port Xamarin.Forms Effects to .NET MAUI
Xamarin.Forms user interfaces are rendered using the native controls of the target platform, allowing Xamarin.Forms applications to retain the appropriate look and feel for each platform. Effects allow the native controls on each platform to be customized without having to resort to a custom renderer implementation.
With the new extensibility possibilities of .NET MAUI Handlers, the use of Effects will probably decrease but even so, there is the same concept and porting effects is simple.
Xamarin.Forms
The process for creating an effect in each platform-specific project is as follows:
- Create a subclass of the PlatformEffect class.
- Override the OnAttached method and write logic to customize the control.
- Override the OnDetached method and write logic to clean up the control customization, if required.
- Add a ResolutionGroupName attribute to the effect class. This attribute sets a company wide namespace for effects, preventing collisions with other effects with the same name. Note that this attribute can only be applied once per project.
- Add an ExportEffect attribute to the effect class. This attribute registers the effect with a unique ID that's used by Xamarin.Forms, along with the group name, to locate the effect prior to applying it to a control. The attribute takes two parameters – the type name of the effect, and a unique string that will be used to locate the effect prior to applying it to a control.
Creating the Effect on Each Platform
using System;
using Xamarin.Forms;
using Xamarin.Forms.Platform.Android;

[assembly: ResolutionGroupName("MyCompany")]
[assembly: ExportEffect(typeof(EffectsDemo.Droid.FocusEffect), nameof(EffectsDemo.Droid.FocusEffect))]
namespace EffectsDemo.Droid
{
    public class FocusEffect : PlatformEffect
    {
        Android.Graphics.Color originalBackgroundColor = new Android.Graphics.Color(0, 0, 0, 0);
        Android.Graphics.Color backgroundColor;

        protected override void OnAttached()
        {
            try
            {
                backgroundColor = Android.Graphics.Color.LightGreen;
                Control.SetBackgroundColor(backgroundColor);
            }
            catch (Exception ex)
            {
                Console.WriteLine("Cannot set property on attached control. Error: ", ex.Message);
            }
        }

        protected override void OnDetached()
        {
        }

        protected override void OnElementPropertyChanged(System.ComponentModel.PropertyChangedEventArgs args)
        {
            base.OnElementPropertyChanged(args);
            try
            {
                if (args.PropertyName == "IsFocused")
                {
                    if (((Android.Graphics.Drawables.ColorDrawable)Control.Background).Color == backgroundColor)
                    {
                        Control.SetBackgroundColor(originalBackgroundColor);
                    }
                    else
                    {
                        Control.SetBackgroundColor(backgroundColor);
                    }
                }
            }
            catch (Exception ex)
            {
                Console.WriteLine("Cannot set property on attached control. Error: ", ex.Message);
            }
        }
    }
}
The OnAttached method calls the SetBackgroundColor method to set the background color of the control to light green, and also stores this color in a field. This functionality is wrapped in a try/catch block in case the control the effect is attached to does not have a SetBackgroundColor property. No implementation is provided by the OnDetached method because no cleanup is necessary.
The OnElementPropertyChanged override responds to bindable property changes on the Xamarin.Forms control. When the IsFocused property changes, the background color of the control is changed to white if the control has focus, otherwise it's changed to light green. This functionality is wrapped in a try/catch block in case the control the effect is attached to does not have a BackgroundColor property.
Consuming the Effect in XAML
The following XAML code example shows an Entry control to which the FocusEffect is attached:
<Entry Text="Effect attached to an Entry" ...>
    <Entry.Effects>
        <local:FocusEffect />
    </Entry.Effects>
    ...
</Entry>
The FocusEffect class subclasses the RoutingEffect class, which represents a platform-independent effect that wraps an inner effect that is usually platform-specific. The FocusEffect class calls the base class constructor, passing in a parameter consisting of a concatenation of the resolution group name (specified using the ResolutionGroupName attribute on the effect class), and the unique ID that was specified using the ExportEffect attribute on the effect class. Therefore, when the Entry is initialized at runtime, a new instance of the Effects.FocusEffect is added to the control's Effects collection.
public class FocusEffect : RoutingEffect
{
    public FocusEffect () : base ($"Effects.{nameof(FocusEffect)}")
    {
    }
}
.NET MAUI
We can reuse all the effects code by simply changing the namespace from Xamarin.Forms to Microsoft.Maui.Controls.
using Microsoft.Maui.Controls;
using System;
using System.ComponentModel;

namespace Effects.Effects
{
    public class FocusRoutingEffect : RoutingEffect
    {

    }

#if WINDOWS
	public class FocusPlatformEffect : Microsoft.Maui.Controls.Compatibility.Platform.UWP.PlatformEffect
    {
		public FocusPlatformEffect() : base()
		{
		}

		protected override void OnAttached()
		{
			try
			{
				(Control as Microsoft.UI.Xaml.Controls.Control).Background = new Microsoft.UI.Xaml.Media.SolidColorBrush(Microsoft.UI.Colors.Cyan);
				(Control as Microsoft.Maui.MauiTextBox).BackgroundFocusBrush = new Microsoft.UI.Xaml.Media.SolidColorBrush(Microsoft.UI.Colors.White);
			}
			catch (Exception ex)
			{
                System.Diagnostics.Debug.WriteLine("Cannot set property on attached control. Error: ", ex.Message);
			}

		}

		protected override void OnDetached()
		{
		}
	}
#elif __ANDROID__
    public class FocusPlatformEffect : Microsoft.Maui.Controls.Compatibility.Platform.Android.PlatformEffect
    {
        Android.Graphics.Color originalBackgroundColor = new Android.Graphics.Color(0, 0, 0, 0);
        Android.Graphics.Color backgroundColor;

        protected override void OnAttached()
        {
            try
            {
                backgroundColor = Android.Graphics.Color.LightGreen;
                Control.SetBackgroundColor(backgroundColor);
            }
            catch (Exception ex)
            {
                Console.WriteLine("Cannot set property on attached control. Error: ", ex.Message);
            }
        }

        protected override void OnDetached()
        {
        }

        protected override void OnElementPropertyChanged(PropertyChangedEventArgs args)
        {
            base.OnElementPropertyChanged(args);
            try
            {
                if (args.PropertyName == "IsFocused")
                {
                    if (((Android.Graphics.Drawables.ColorDrawable)Control.Background).Color == backgroundColor)
                    {
                        Control.SetBackgroundColor(originalBackgroundColor);
                    }
                    else
                    {
                        Control.SetBackgroundColor(backgroundColor);
                    }
                }
            }
            catch (Exception ex)
            {
                Console.WriteLine("Cannot set property on attached control. Error: ", ex.Message);
            }
        }
    }
#elif __IOS__
	public class FocusPlatformEffect : Microsoft.Maui.Controls.Compatibility.Platform.iOS.PlatformEffect
    {
		UIKit.UIColor backgroundColor;

		protected override void OnAttached()
		{
			try
			{
				Control.BackgroundColor = backgroundColor = UIKit.UIColor.FromRGB(204, 153, 255);
			}
			catch (Exception ex)
			{
				Console.WriteLine("Cannot set property on attached control. Error: ", ex.Message);
			}
		}

		protected override void OnDetached()
		{
		}

		protected override void OnElementPropertyChanged(PropertyChangedEventArgs args)
		{
			base.OnElementPropertyChanged(args);

			try
			{
				if (args.PropertyName == "IsFocused")
				{
					if (Control.BackgroundColor == backgroundColor)
					{
						Control.BackgroundColor = UIKit.UIColor.White;
					}
					else
					{
						Control.BackgroundColor = backgroundColor;
					}
				}
			}
			catch (Exception ex)
			{
				Console.WriteLine("Cannot set property on attached control. Error: ", ex.Message);
			}
		}
	}
#endif
}
Where if we have an important change is when registering the effect.
In Xamarin.Forms we use the ExportAttribure to register the effect with a unique ID that's used by Xamarin.Forms, along with the group name, to locate the effect prior to applying it to a control. As with Renderers, this attribute makes use of Assembly Scanning which is slow and penalizes performance.
In .NET MAUI we use the AppHostBuilder and ConfigureEffects to register effects.
appBuilder
    .ConfigureEffects(effects =>
    {
        effects.Add<FocusRoutingEffect, FocusPlatformEffect>();
    });
Renderers
What is the Compatibility package?
To make the transition from Xamarin.Forms to .NET MAUI as smooth as possible, the Compatability package is added that adds Xamarin.Forms functionality allowing to reuse code such as Custom Renderers without require to make changes.
Xamarin.Forms Custom Renderers?
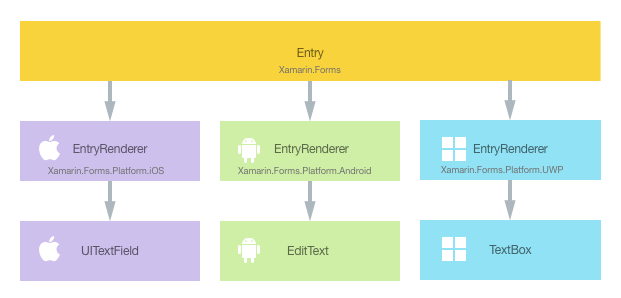
Xamarin.Forms user interfaces are rendered using the native controls of the target platform, allowing Xamarin.Forms applications to retain the appropriate look and feel for each platform. Custom Renderers let developers override this process to customize the appearance and behavior of Xamarin.Forms controls on each platform.
Let's see an example. We are going to create a custom Entry.
using Xamarin.Forms;

namespace Renderers
{
    public class CustomEntry : Entry
    {

    }
}
Android Implementation
using Android.Content;
using Renderers;
using Renderers.Droid.Renderers;
using Xamarin.Forms;
using Xamarin.Forms.Platform.Android;

[assembly: ExportRenderer(typeof(CustomEntry), typeof(CustomEntryRenderer))]
namespace Renderers.Droid.Renderers
{
    public class CustomEntryRenderer : EntryRenderer
    {
        public CustomEntryRenderer(Context context) : base(context)
        {
        }

        protected override void OnElementChanged(ElementChangedEventArgs<Entry> e)
        {
            base.OnElementChanged(e);

            if (Control != null)
            {
                Control.SetBackgroundColor(global::Android.Graphics.Color.LightGreen);
            }
        }
    }
}
As we can see we are only modifying the background color of the native control. Something really simple, but enough for the purpose of this document, to learn how to reuse renderers without changing the code.
Reuse the Renderer
The Renderer in .NET MAUI use exactly the same code:
using Android.Content;
using Compatibility;
using Compatibility.Droid.Renderers;
using Microsoft.Maui.Controls;
using Microsoft.Maui.Controls.Compatibility;
using Microsoft.Maui.Controls.Compatibility.Platform.Android;

[assembly: ExportRenderer(typeof(CustomEntry), typeof(CustomEntryRenderer))]
namespace Compatibility.Droid.Renderers
{
    public class CustomEntryRenderer : EntryRenderer
    {
        public CustomEntryRenderer(Context context) : base(context)
        {
        }

        protected override void OnElementChanged(ElementChangedEventArgs<Entry> e)
        {
            base.OnElementChanged(e);

            if (Control != null)
            {
                Control.SetBackgroundColor(global::Android.Graphics.Color.LightGreen);
            }
        }
    }
}
The only changes are replace some namespace to use Microsoft.Maui.Controls.Compatibility.
And is everything is ready?
Not quite, instead of using assembly scanning, .NET MAUI uses the Startup class to perform tasks like registering Handlers or Renderers.
public class Startup : IStartup
{
    public void Configure(IAppHostBuilder appBuilder)
    {
        appBuilder
            .UseMauiApp<App>()
            .ConfigureMauiHandlers(handlers =>
            {
#if __ANDROID__
                handlers.AddCompatibilityRenderer(typeof(CustomEntry), typeof(Droid.Renderers.CustomEntryRenderer));
#endif
            });
    }
}
Port a Xamarin.Forms Custom Renderer to a .NET MAUI Custom Handler
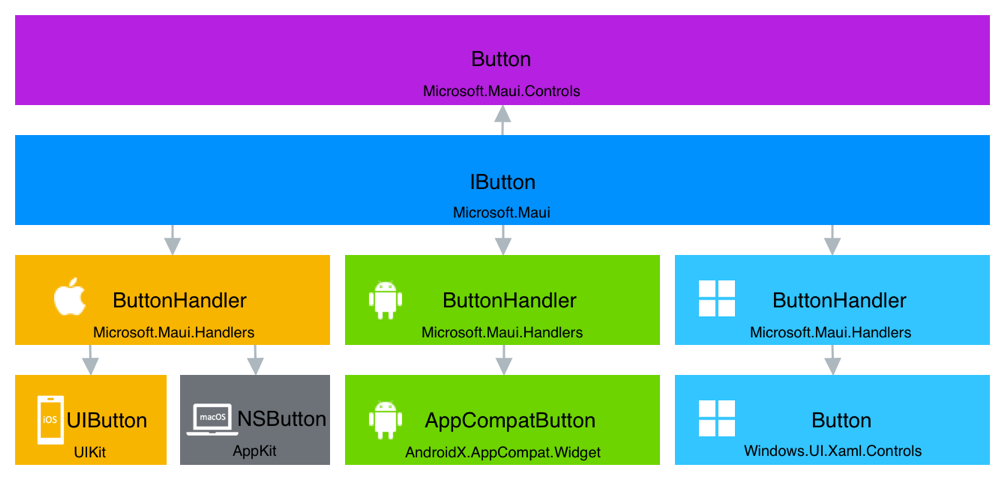
Xamarin.Forms and .NET MAUI user interfaces are rendered using the native controls of the target platform, allowing applications to retain the appropriate look and feel for each platform. Using Xamarin.Forms Custom Renderers let developers override this process to customize the appearance and behavior of controls on each platform.
For different reasons, among which we can highlight the improvement in performance, more extensibility possibilities, in .NET MAUI we have the concept of Custom Handler. It is similar to the Custom Renderer concept but different elsewhere.
Let's see step by step how to convert a renderer to a handler!. To focus on the key concepts of Renderers and Handlers we are going to create a custom Entry, a well-known control. On the other hand, we are going to use Android simply because both from Windows and from macOS you can launch the demos.
Custom Renderer
Every Xamarin.Forms control has an accompanying renderer for each platform that creates an instance of a native control. The process for creating a renderer is as follows:
- Create a Xamarin.Forms custom control.
- Consume the custom control from Xamarin.Forms.
- Create the custom renderer for the control on each platform.
Creating the Custom Entry Control
A custom control can be created by subclassing the View class:
public class CustomEntry : View
{

}
The CustomEntry control is created in the .NET Standard library project and is simply an control to capture text. To customize the appearance and behavior of the control we can add BindableProperties and events.
public static readonly BindableProperty TextProperty =
    BindableProperty.Create(nameof(Text), typeof(string), typeof(Entry), string.Empty);


public string Text
{
    get { return (string)GetValue(TextProperty); }
    set { SetValue(TextProperty, value); }
}
Consuming the Custom Control
The CustomEntry control can be referenced in XAML in the .NET Standard library project by declaring a namespace for its location and using the namespace prefix on the control element.
<ContentPage ...
    xmlns:local="clr-namespace:CustomRenderer;assembly=CustomRenderer"
    ...>
    ...
    <local:CustomEntry Text="In Shared Code" />
    ...
</ContentPage>
Creating the Custom Renderer on each Platform
The process for creating the custom renderer class is as follows:
- Create a subclass of the ViewRenderer class that renders the native control.
- Override the OnElementChanged method that renders the native control and write logic to customize the control. This method is called when the corresponding Xamarin.Forms control is created.
- Override the OnElementPropertyChanged method that respond to any BindableProperty change.
- Add an ExportRenderer attribute to the custom renderer class to specify that it will be used to render the Xamarin.Forms control. This attribute is used to register the custom renderer with Xamarin.Forms.
The ViewRenderer class exposes the OnElementChanged method, which is called when the Xamarin.Forms control is created to render the corresponding native control. This method takes an ElementChangedEventArgs parameter that contains OldElement and NewElement properties. These properties represent the Xamarin.Forms element that the renderer was attached to, and the Xamarin.Forms element that the renderer is attached to, respectively. In the sample application the OldElement property will be null and the NewElement property will contain a reference to the CustomEntry control.
An overridden version of the OnElementChanged method in the CustomEntryRenderer class is the place to perform the native control customization. A typed reference to the native control being used on the platform can be accessed through the Control property. In addition, a reference to the Xamarin.Forms control that's being rendered can be obtained through the Element property, although it's not used in the sample application.
protected override void OnElementChanged(ElementChangedEventArgs<CustomEntry> e)
{
    base.OnElementChanged(e);

    if (e.OldElement == null)
    {
        EditText editText = new EditText(Context);

        _defaultTextColors = editText.TextColors;
        _defaultPlaceholderColors = editText.HintTextColors;

        SetNativeControl(editText);
    }

    UpdateText();
    UpdateTextColor();
    UpdatePlaceholder();
    UpdatePlaceholderColor();
    UpdateCharacterSpacing();
    UpdateHorizontalTextAlignment();
    UpdateVerticalTextAlignment();
}
The OnElementPropertyChanged override responds to bindable property changes on the Xamarin.Forms control.
protected override void OnElementPropertyChanged(object sender, PropertyChangedEventArgs e)
{
    if (e.PropertyName == CustomEntry.TextProperty.PropertyName)
        UpdateText();
    else if (e.PropertyName == CustomEntry.TextColorProperty.PropertyName)
        UpdateTextColor();
    if (e.PropertyName == CustomEntry.PlaceholderProperty.PropertyName)
        UpdatePlaceholder();
    else if (e.PropertyName == Entry.PlaceholderColorProperty.PropertyName)
        UpdatePlaceholderColor();
    else if (e.PropertyName == Entry.CharacterSpacingProperty.PropertyName)
        UpdateCharacterSpacing();
    else if (e.PropertyName == Entry.HorizontalTextAlignmentProperty.PropertyName)
        UpdateHorizontalTextAlignment();
    else if (e.PropertyName == Entry.VerticalTextAlignmentProperty.PropertyName)
        UpdateVerticalTextAlignment();

    base.OnElementPropertyChanged(sender, e);
}
Nothing really new so far, just a small review on how to work with Custom Renderers in Xamarin.Forms, let's go to .NET MAUI?
But first, why switch from Renderers to .NET MAUI architecture?
To understand the motivations that drive the change, even knowing the implications in the number of changes necessary, we need to know what is wrong or improvable in the renderers.
Do you remember the ExportRenderer attribute that you use to register the Renderer? This tells Xamarin.Forms that at startup, making use of assembly scanning, it should search all the libraries referenced and using this attribute, and if it finds it, register the renderer. It's easy to use, but ... assembly scanning is slow and penalizes startup.
OnElementChanged method usually causes confusion. When to use OldElement?, and NewElement?, when do I create my default values or subscribe to events?, and when do I unsubscribe?. Cause confusion is a problem, but it is even bigger problem if not having a easy way to subscribe/unsubscribe causes to sometimes unsubscribe (for example) and... penalizes performance.
All those private methods to update properties of the native control are a big problem. You may need to make a small change and due to lack of access (again, private methods here and there!), you end up creating a Custom Renderer larger than necessary, etc.
Solving these problems, and other minor ones is the fundamental objective of the Handlers.
Custom Handlers
The process for creating the custom handler class is as follows:
- Create a subclass of the ViewHandler class that renders the native control.
- Override the CreateNativeView method that renders the native control.
- Create the Mapper dictionary that respond to property changes.
- Register the handler using the AddHandler method in the Startup class.
Creating the Custom Entry Control
Handlers can be accessed through a control-specific interface provided derived from IView interface. This avoids the cross-platform control having to reference its handler, and the handler having to reference the cross-platform control. The mapping of the cross-platform control API to the platform API is provided by a mapper.
In this way we start creating the interface that defines our control:
public interface ICustomEntry : IView
{
    public string Text { get; }
    public Color TextColor { get; }
    public string Placeholder { get; }
    public Color PlaceholderColor { get; }
    public double CharacterSpacing { get; }
    public TextAlignment HorizontalTextAlignment { get; }
    public TextAlignment VerticalTextAlignment { get; }

    void Completed();
}
A custom control can be created by subclassing the View class and implementing the control interface:
public class CustomEntry : View, ICustomEntry
{

}
Creating the Custom handler on each Platform
Create a subclass of the ViewHandler class that renders the native control.
public partial class CustomEntryHandler : ViewHandler<ICustomEntry, EditText>
{

}
It seems like a trivial change, we pass from inheriting from ViewRenderer to ViewHandler, but it's much more!.
ViewRenderer in Xamarin.Forms create a parent element, in the case of Android a ViewGroup, which was used for auxiliary positioning tasks. ViewHandler DOES NOT create any parent element which helps to reduce the visual hierarchy and therefore, improve the performance.
Inheriting from ViewHandler, we have to implement the CreateNativeView method.
protected override EditText CreateNativeView()
{
    return new EditText(Context);
}
Do you remember that we previously reviewed how OnElementChanged was used in Xamarin.Forms?. In this method we create the native control, initialize default values, subscribe to events, etc. However, it requires a wide diversity of knowledge: what is OldElement and NewElement, etc.
.NET MAUI simplifies and distributes everything that we did previously in the OnElementChanged method in different methods in a simpler way.
We create the native control in the CreateNativeView method. On the other hand, we have other methods like ConnectHandler and DisconnectHandler.
protected override void ConnectHandler(EditText nativeView)
{
    _defaultTextColors = nativeView.TextColors;
    _defaultPlaceholderColors = nativeView.HintTextColors;

    _watcher.Handler = this;
    nativeView.AddTextChangedListener(_watcher);

    base.ConnectHandler(nativeView);
}

protected override void DisconnectHandler(EditText nativeView)
{
    nativeView.RemoveTextChangedListener(_watcher);
    _watcher.Handler = null;

    base.DisconnectHandler(nativeView);
}
ConnectHandler is the ideal place to initialize, subscribe events, etc and in the same way we can dispose, unsubscribe events etc in DisconnectHandler.
The Mapper
The Mapper is a new concept introduced by Handlers. It is nothing more than a dictionary with the properties (and actions) defined in the interface of our control (remember, we use interfaces in the Handler). It replaces everything that was done in the OnElementPropertyChanged method in Xamarin.Forms.
public static PropertyMapper<ICustomEntry, CustomEntryHandler> CustomEntryMapper = new PropertyMapper<ICustomEntry, CustomEntryHandler>(ViewHandler.ViewMapper)
{
    [nameof(ICustomEntry.Text)] = MapText,
    [nameof(ICustomEntry.TextColor)] = MapTextColor,
    [nameof(ICustomEntry.Placeholder)] = MapPlaceholder,
    [nameof(ICustomEntry.PlaceholderColor)] = MapPlaceholderColor,
    [nameof(ICustomEntry.CharacterSpacing)] = MapCharacterSpacing,
    [nameof(ICustomEntry.HorizontalLayoutAlignment)] = MapHorizontalLayoutAlignment,
    [nameof(ICustomEntry.VerticalLayoutAlignment)] = MapVerticalLayoutAlignment
};
The Mapper maps properties to static methods.
public static void MapText(CustomEntryHandler handler, ICustomEntry entry)
{
    handler.NativeView?.UpdateText(entry);
}
The Mapper, in addition to simplifying the management of property changes (notifies the properties when initializing the control and also, each time one property changes) allows us more extensibility options.
For example:
using Microsoft.Maui; using Microsoft.Maui.Controls;
public partial class App : Application
{
    public App()
    {
        InitializeComponent();

#if __ANDROID__
        CustomEntryMapper[nameof(ICustomEntry.Text)] = (handler, view) =>
        {
            (handler.NativeView as Android.Widget.EditText).Text = view.text + "custom";
        };
#endif
    }
}
Registering the handler
Unlike Xamarin.Forms using the ExportRenderer attribute which in turn made use of Assembly Scanning, in .NET MAUI the handler registration is slightly different.
appBuilder
    .UseMauiApp<App>()
    .ConfigureMauiHandlers(handlers =>
    {
#if __ANDROID__
        handlers.AddHandler(typeof(CustomEntry), typeof(CustomEntryHandler));
#endif
    });
We make use of AppHostBuilder and the AddHandler method to register the Handler. In the end, it requires, as in Xamarin.Forms, a line to indicate that we want to register the Handler, but the use of Assembly Scanning is avoided, which is slow and expensive, penalizing startup.