109 KiB
Information in this document, including URL and other Internet Web site references, is subject to change without notice. Unless otherwise noted, the example companies, organizations, products, domain names, e-mail addresses, logos, people, places, and events depicted herein are fictitious, and no association with any real company, organization, product, domain name, e-mail address, logo, person, place or event is intended or should be inferred. Complying with all applicable copyright laws is the responsibility of the user. Without limiting the rights under copyright, no part of this document may be reproduced, stored in or introduced into a retrieval system, or transmitted in any form or by any means (electronic, mechanical, photocopying, recording, or otherwise), or for any purpose, without the express written permission of Microsoft Corporation.
Microsoft may have patents, patent applications, trademarks, copyrights, or other intellectual property rights covering subject matter in this document. Except as expressly provided in any written license agreement from Microsoft, the furnishing of this document does not give you any license to these patents, trademarks, copyrights, or other intellectual property.
The names of manufacturers, products, or URLs are provided for informational purposes only and Microsoft makes no representations and warranties, either expressed, implied, or statutory, regarding these manufacturers or the use of the products with any Microsoft technologies. The inclusion of a manufacturer or product does not imply endorsement of Microsoft of the manufacturer or product. Links may be provided to third party sites. Such sites are not under the control of Microsoft and Microsoft is not responsible for the contents of any linked site or any link contained in a linked site, or any changes or updates to such sites. Microsoft is not responsible for webcasting or any other form of transmission received from any linked site. Microsoft is providing these links to you only as a convenience, and the inclusion of any link does not imply endorsement of Microsoft of the site or the products contained therein.
© 2020 Microsoft Corporation. All rights reserved.
Microsoft and the trademarks listed at https://www.microsoft.com/en-us/legal/intellectualproperty/Trademarks/Usage/General.aspx are trademarks of the Microsoft group of companies. All other trademarks are property of their respective owners.
Contents
- OSS PaaS and DevOps hands-on lab step-by-step
- Abstract and learning objectives
- Overview
- Solution architecture
- Requirements
- Exercise 1: Run starter application
- Exercise 2: Migrate the database to Cosmos DB
- Exercise 3: Containerize the app
- Exercise 4: Set up Web App for Containers
- Exercise 5: Configure CI/CD pipeline
- Task 1: Enable Continuous Deployment on Web App
- Task 2: Prepare GitHub account for service integrations
- Task 3: Open a connection to Jenkins
- Task 4: Configure Continuous Integration with Jenkins
- Task 5: Trigger CI build
- Task 6: Install Docker on the Jenkins VM
- Task 7: Add continuous delivery to Jenkins build job
- Task 8: Trigger CI-CD pipeline
- Exercise 6: Create Azure Functions for order processing
- Exercise 7: Create Logic App for sending email notifications
- After the hands-on lab
OSS PaaS and DevOps hands-on lab step-by-step
Abstract and learning objectives
In this hands-on lab, you implement a solution for integrating and deploying complex open-source software (OSS) workloads into Azure PaaS. You migrate an existing MERN (MongoDB, Express.js, React.js, Node.js) stack application from a hosted environment into Azure Web App for Containers, migrate a MongoDB instance into Cosmos DB, enhance application functionality using serverless technologies, and fully embrace modern DevOps tools.
At the end of this hands-on lab, you will be better able to migrate and deploy OSS applications into Azure PaaS using modern DevOps methodologies and Docker containers.
Overview
Best For You Organics Company is one of the leading online health food suppliers in North America, serving customers in Canada, Mexico, and the United States. They launched their highly-successful e-commerce website, which sells subscriptions to their meal service, in 2016, and have been steadily increasing their subscriber-base since. Their service caters to working professionals looking for convenient, reliable access to healthy meal choices, and pre-packaged recipes without having to spend too much time preparing the meals.
Their CIO is a big proponent of open-source software, and their web application uses the MERN stack (MongoDB, Express.js, React.JS, Node.js). They host their code in a private GitHub repository. They currently have a continuous integration workflow, triggered by each code check-in/commit in GitHub, using Jenkins.
As their service has grown, they have found that the management of VM and server infrastructure is a real challenge. They want to learn more about how Platform as a Service (PaaS) solutions for OSS applications on Azure might be able to help. Their goal is to focus their expenditures and efforts on their core business, rather than infrastructure. The development team at Best For You Organics has indicated they have some experience with Docker. They are interested in what options might be available for using containers to deploy their application into a cloud environment. They are also interested in learning more about identity management.
The development team has also expressed that they would like to continue using GitHub as their code repository but is interested in improving upon their DevOps pipeline. They currently use Jenkins for their builds and are interested in any tools available in a cloud offering that could help with release management, or other aspects of a fully-integrated, modern DevOps pipeline. Ultimately, their goal is to automate and simplify deployments through CI/CD capabilities and deliver updates faster and more reliably.
Solution architecture
Below is a diagram of the solution architecture you will build in this lab. Please study this carefully, so you understand the whole of the solution as you are working on the various components.
The solution begins with developers using Visual Studio Code (VS Code) as their code editor. In VS Code, they can leverage rich integrations with GitHub, Docker, and Azure. From a high level, developers will package the entire OSS application inside a custom Docker container using the Docker extension in VS Code. The image will be pushed to an Azure Container Registry as part of a continuous integration/continuous delivery (CI/CD) pipeline using GitHub and Jenkins. This Docker image will then be deployed to a Web App for Containers instance, as part of their continuous delivery process using The Azure App Service Jenkins plugin.
The MongoDB database will be imported into Azure Cosmos DB, using mongoimport.exe, and access the database from the application will continue to use the MongoDB APIs. The database connection string in the application will be updated to point to the new Cosmos DB.
Serverless architecture is applied to order processing and customer notifications. Azure Functions are used to automate the processing of orders, billing credit cards, and updating the database as order processing is completed. Logic Apps are applied to send SMS notifications via a Twilio connector to customers, informing them that their order has been processed and shipped.
In this hands-on lab, you will assist them with completing the OSS application and database migrations into Azure. You will implement a containerized solution. For this, you will create a custom Docker image and push it to an Azure Container Registry. You will then configure a CI/CD pipeline to deploy the application to a Web App for Containers instance. You will also help them implement functionality enhancements using serverless architecture services in Azure.
Requirements
- Microsoft Azure subscription must be pay-as-you-go or MSDN.
- Trial subscriptions will not work.
- Linux virtual machine configured with:
- Visual Studio Code
- Azure CLI
- Docker
- Node.js and npm
- MongoDB Community Edition
Exercise 1: Run starter application
Duration: 30 minutes
In this exercise, you create a local copy of the starter application on your Lab VM, add some sample data to the local MongoDB database, and run the application.
Task 1: Connect to your Lab VM
In this task, you create an RDP connection to your Lab VM. If you are already connected, skip to Task 2.
-
In the Azure portal and select Resource groups from the Azure services list.
-
Select the hands-on-lab-SUFFIX resource group from the list.
-
Select LabVM from the list of available resources.
-
On the LabVM Overview blade, select Connect from the toolbar and then select RDP from the drop-down menu.
-
On the Connect with RDP screen, select Download RDP File.
-
Open the download file to launch a Remote Desktop Client (RDP) application.
-
Select Connect on the Remote Desktop Connection dialog.
-
Select Yes to connect, if prompted that the identity of the remote computer cannot be verified.
-
Enter the following credentials (or the non-default credentials if you changed them):
- Username: demouser
- Password: Password.1!!
-
Select OK to log into the Lab VM.
Task 2: Grant permissions to Docker
In this task, you will grant permissions to the demouser account to access the Unix socket needed to communicate with the Docker engine.
-
On your Lab VM, open a Bash shell by selecting the Start menu and then expanding Debian, Applications, and Shells.
-
At the command prompt, enter the following command:
sudo usermod -a -G docker $USER -
After running the command, reboot the Lab VM using the following command at the bash shell:
sudo reboot -
Log back in using the same credentials:
- Username: demouser
- Password: Password.1!!
-
After logging back in, relaunch the bash shell and run the following command to test that the demouser account has proper permissions:
docker run hello-world
Task 3: Integrate GitHub into VS Code
In this task, you will install the GitHub extension in VS Code and configure a service integration with your GitHub account. This integration will allow you to push your code changes to GitHub directly from VS Code.
-
On your Lab VM, open VS Code under Programming on the Start menu.
-
In VS Code, select the Extensions icon from the left-hand menu, enter "github" into the Extensions search box, and select the GitHub extension.
-
Select Install in the Extension: GitHub window.
-
To connect VS Code with your GitHub account, you need to generate a Personal access token.
-
Open a browser window and navigate to your GitHub account (https://github.com).
-
Within your GitHub account, select your user profile icon in the top right, then select Settings from the menu.
-
On the Settings screen, select Developer settings at the bottom of the Personal settings menu on the left-hand side of the screen.
-
On the Developer settings page, select Personal access tokens from the left-hand menu.
-
Select Generate new token.
-
Enter a token description, such as "VS Code Integration", and then check the box next to repo under Select scopes, which will select all the boxes under it.
-
Select Generate token near the bottom of the screen.
-
Select the copy button next to the token that is generated.
Important: Make sure you copy the new personal access token before you navigate away from the screen, or you will need to regenerate the token. Save the copied token by pasting it into a text editor for future reference. This will also be used as your password when pushing changes to GitHub.
-
Open VS Code on your Lab VM.
-
Select the View menu, then select Command Palette from the menu.
-
In the box that appears at the top center of the VS Code window, enter "Set Personal Access Token," then select GitHub: Set Personal Access Token, when it appears.
-
Paste the Personal access token you copied from GitHub into the box and press Enter.
-
VS Code is now connected to your GitHub account.
-
Close VS Code.
Task 4: Clone the starter application
In this task, you will clone the starter application, creating a local copy on your Lab VM.
-
On your Lab VM, open a browser and navigate to your GitHub account (https://github.com).
-
Within your GitHub account, navigate to the forked copy of the
MCW-OSS-PaaS-and-Devopsapplication page, select Clone or download, then select the copy link next to the web URL. -
Open a new bash shell, and enter the following command:
cd ~ -
Next, enter the following command, replacing
[EMAIL]with the email address you used when creating your GitHub account. This will associate your git email address with the commits made from the Lab VM.git config --global user.email "[EMAIL]" -
At the prompt, enter the following command, replacing
[CLONE-URL]with URL you copied from GitHub in step 2 above:git clone [CLONE-URL] -
Now, change the directory to the cloned project by entering the following at the prompt:
cd MCW-OSS-PaaS-and-DevOps -
Finally, issue a command to open the starter project in VS Code by typing:
code . -
A new VS Code window will open, with the
MCW-OSS-PaaS-and-DevOpsfolder opened. -
You are now ready to begin working with the project in VS Code.
Task 5: Launch the starter application
In this task, you will seed the MongoDB with sample data, then run the application locally, connected to your MongoDB instance. This task is to verify the connection to MongoDB and that it contains the seeded plan data before we migrate the application and data to Azure Cosmos DB.
-
Return to VS Code, select Terminal from the menu, and select New Terminal.
-
This will open a new bash terminal window at the bottom of the VS Code dialog.
-
Change directories to the
Hands-on lab/lab-filesfolder by running the following command. Important: Be sure to include the quotes around the path, since it contains a space.cd "Hands-on lab/lab-files" -
At the bash prompt, use the
npm installcommand to ensure the required components are installed on your Lab VM.sudo npm install -
Next, enter the following to seed the local MongoDB database with plans, user accounts, and orders.
node data/Seed.jsNote: If you receive an error that the service is not running, start the MongoDB service by executing the
sudo service mongod startcommand at the shell prompt. -
Next, build the application using the following:
sudo npm run build -
Finally, enter the following to start the web server for the application. You will see a
connection successfulmessage in the terminal window.npm start -
Open a browser and navigate to http://localhost:3000 to view the landing page of the starter application. You will see three plans listed on the application home page, which are pulled from the local MongoDB database.
-
Return to the VS Code integrated terminal window, and press CTRL+C to stop the application.
Exercise 2: Migrate the database to Cosmos DB
Duration: 30 minutes
In this exercise, you update the starter application's database connection string to point to your Azure Cosmos DB account. You then, use mongoimport.exe to migrate the data in your MongoDB database into Cosmos DB collections, and verify with the application that you are connected to your Cosmos DB database.
Task 1: Create and scale collections
In this task, you create the collections needed for your database migration and increase each collection's throughput from the default 400 RUs to 2,500 RUs. This is done to avoid throttling during the migration, and reduce the time required to import data.
To learn more about RUs and throughput provisioning in Cosmos DB, read Request Units in Azure Cosmos DB.
-
Navigate to your Azure Cosmos DB account in the Azure portal by selecting Resource groups from the Azure home page, and then select the best-for-you-db-SUFFIX Azure Cosmos DB account resource from the list.
-
On the Cosmos DB blade, select Data Explorer from the left-hand menu and then select New Collection.
-
In the Add Collection dialog, enter the following:
- Database id: Choose Create new, and enter best-for-you-organics.
- Provision database throughput: Uncheck this box.
- Collection id: Enter orders.
- Storage capacity: Select Fixed (10 GB).
- Throughput: Enter 2500.
- Select OK to create the collection.
-
On the Collections blade, select New Collection again to create another collection.
-
On the Add Collection dialog, enter the following:
- Database id: Select Use existing and select the best-for-you-organics database from the list.
- Collection id: Enter users.
- Storage capacity: Select Fixed (10 GB).
- Throughput: Enter 2500.
- Select OK to create the collection.
-
Repeat steps 4 and 5, this time entering plans as the collection name.
-
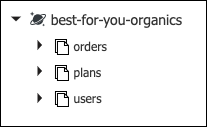
The best-for-you-organics database will have three collections listed under it when you are complete.
Task 2: Update database connection string
In this task, you will retrieve the connection string for your Azure Cosmos DB database and update the starter application's database connection string.
-
On the Azure Cosmos DB account blade, select Connection String under Settings in the left-hand menu, and copy the PRIMARY connection string.
-
Return to VS Code.
-
Open
app.jsfrom theHands-on lab/lab-filesdirectory of the application and locate the line that starts with var databaseUrl (line 16). -
Replace the value of the databaseUrl variable with the Cosmos DB connection string you copied from the Azure portal.
-
The connection string copied from the portal does not specify the name of the database, so you now need to add that to the connection string. Scroll to the end of the value you just pasted in and locate 10255/?ssl= in the string.
-
Between the "/" and the "?" insert best-for-you-organics to specify the database name.
-
Save
app.js. -
In the VS Code integrated terminal, enter the following command to rebuild the application:
sudo npm run build -
When the build completes, start the application by typing the following:
npm start -
Return to your browser and refresh the application page. Note: You may need to press CTRL+F5 in your browser window to clear the browser cache while refreshing the page.
Note: Notice the three plans that were displayed on the page previously are no longer there. The application is now pointing to your Azure Cosmos DB, and the plans collection does not contain any data yet.
-
Now, let's move on to copying the data from the local MongoDB instance into Cosmos DB.
Task 3: Import data to the API for MongoDB using mongoimport
In this task, you will use mongoimport.exe to import data to your Cosmos DB account. There is a shell script located in the MCW-OSS-PaaS-and-DevOps project, which handles exporting the data out of your MongoDB into JSON files on the local file system. These files will be used for the import into Cosmos DB.
-
On your Lab VM, open a new integrated bash prompt in VS Code by selecting the + next to the shell dropdown in the integrated terminal pane.
-
At the prompt, enter the following command to grant execute permissions on the export script:
chmod +x "Hands-on lab/lab-files/data/mongo-export.sh" -
Next, run the script by entering the following command:
"Hands-on lab/lab-files/data/mongo-export.sh" -
The script creates the folder ~/MongoExport, and exports each of the collections in your MongoDB to JSON files. Navigate to the MongoExport directory for your user account by running the following command:
cd ~/MongoExport -
You are now ready to import the data into Azure Cosmos DB using
mongoimport.exe. -
You will use the following command template for executing the data import:
mongoimport --host <your_hostname>:10255 -u <your_username> -p <your_password> --db <your_database> --collection <your_collection> --ssl --sslAllowInvalidCertificates --type json --file <your_collection>.json -
To get the values needed for the template command above, return to the Connection string blade for your Azure Cosmos DB account in the Azure portal. Leave this window up, as you will need the HOST, USERNAME, and PRIMARY PASSWORD values from this page to import data to your Cosmos DB account.
-
Replace the values as follows in the template command above:
<your_hostname>: Copy and paste the Host value from your Cosmos DB Connection String blade.<your_username>: Copy and paste the Username value from your Cosmos DB Connection String blade.<your_password>: Copy and paste the Primary Password value from your Cosmos DB Connection String blade.<your_database>: Enter "best-for-you-organics"<your_collection>: Enter "plans" (Note there are two instances of<your-collection>in the template command).
-
Your final command should look something like:
mongoimport --host best-for-you-db.documents.azure.com:10255 -u best-for-you-db -p miZiDmNrn8TnSAufBvTQsghbYPiQOY69hIHgFhSn7Gf10cvbRLXvqxaherSKY6vQTDrvHHqYyICP4OcLncqWew== --db best-for-you-organics --collection plans --ssl --sslAllowInvalidCertificates --type json --file plans.json -
Copy and paste the final command at the command prompt to import the plans collection into Azure Cosmos DB.
Note: You will see a message indicating the number of documents imported, which should be 3 for plans.
-
Verify the import by selecting Data Explorer in your Cosmos DB account in the Azure portal, expanding plans, and selecting Documents. You will see the three documents imported listed.
-
Repeat step 8 for the users and orders collections, replacing the
<your_collection>values with:- users:
mongoimport --host best-for-you-db.documents.azure.com:10255 -u best-for-you-db -p miZiDmNrn8TnSAufBvTQsghbYPiQOY69hIHgFhSn7Gf10cvbRLXvqxaherSKY6vQTDrvHHqYyICP4OcLncqWew== --db best-for-you-organics --collection users --ssl --sslAllowInvalidCertificates --type json --file users.json- orders:
mongoimport --host best-for-you-db.documents.azure.com:10255 -u best-for-you-db -p miZiDmNrn8TnSAufBvTQsghbYPiQOY69hIHgFhSn7Gf10cvbRLXvqxaherSKY6vQTDrvHHqYyICP4OcLncqWew== --db best-for-you-organics --collection orders --ssl --sslAllowInvalidCertificates --type json --file orders.json -
To verify the starter application is now pulling properly from Azure Cosmos DB, return to your browser running the starter application (http://localhost:3000), and refresh the page. You should now see the three plans appear again on the home page. These were pulled from your Azure Cosmos DB database.
-
You have successfully migrated the application and data to use Azure Cosmos DB with MongoDB APIs.
-
Return to the Integrated terminal window of VS Code, which is running the application, and press CTRL+C to stop the application.
Task 4: Install Azure Tools extensions for VS Code
In this task, you install the Azure Tools extensions for VS Code to take advantage of the integration with Azure Cosmos DB. This extension pack allows you to view and interact with your Cosmos DB databases, collections, and documents directly from VS Code.
-
Select the Extensions icon, enter "azure tools" into the search box, select the Azure Tools extension, and then select Install in the Extension: Azure Account window.
-
In the left-hand menu of VS Code, you should now see an Azure icon. Select that, and then select Sign in to Azure.
Note: If you don't see the Azure icon, restart VS Code, and reopen the
MCW-OSS-PaaS-and-DevOpsproject folder. -
Enter your Azure account credentials in the browser window that appears.
-
If presented with a prompt to enter a password for a new keyring, enter "Password.1!!" as the password and select Continue.
-
Once you have signed in, you will receive a message that you can close the browser window.
-
Back in VS Code, you should now see your Azure account listed under Azure Cosmos DB, along with your Azure account email listed in the status bar of VS Code.
-
From here, you can view your databases, collections, and documents, as well as edit documents directly in VS Code, and push the updated documents back into your database.
Task 5: Decrease collection throughput
In this task, you will decrease the throughput of your collections. Azure Cosmos DB uses an hourly billing rate, so reducing the throughput after the data migration will help save costs.
-
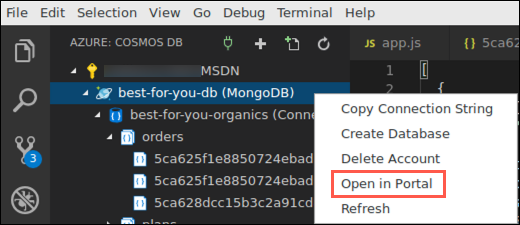
From the Azure Cosmos DB menu pane in Visual Studio Code, right-click on the best-for-you-db database and then select Open in Portal.
-
In the Azure portal, select Scale from the left-hand menu, under Collections on the Azure Cosmos DB account blade.
-
Expand the orders collection and select Scale & Settings.
-
Change the Throughput value to 400 and select Save.
-
Repeat steps 3 & 4 for the plans and users collections.
Exercise 3: Containerize the app
Duration: 30 minutes
This exercise walks you through containerizing the existing Best For You Organics Company MERN application using Docker, pushing the image to an Azure Container Registry, then deploying the image to Web App for Containers directly from VS Code.
Task 1: Open Azure Container Registry with Docker extension in VS Code
The Docker extension for VS Code is used to simplify the management of local Docker images and commands, as well as the deployment of a built app image to Azure.
-
On your Lab VM, return to VS Code and the open
MCW-OSS-PaaS-and-DevOpsstarter project. -
You should see a Containers icon in the left-hand menu of Visual Studio Code. Select the Containers icon. Expand Registries and then expand Azure. If you do not see Azure listed, select Connect registry and select Azure from the list of registries. You should see the bestforyouregistry you created above listed.
Note: If you don't see the Containers icon in the left-hand menu, close and reopen VS Code, and the
MCW-OSS-PaaS-and-DevOpsproject.
Task 2: Create a Docker image and run the app
In this task, you use VS Code and the Docker extension to add the necessary files to the project to create a custom Docker image for the MCW-OSS-PaaS-and-DevOps app.
-
On your Lab VM, return to VS Code, and the
MCW-OSS-PaaS-and-DevOpsproject. -
Open the VS Code Command Palette, by selecting View from the menu, then Command Palette.
-
Enter "add docker" into the Command Palette and select Docker: Add docker files to workspace.
-
At the Select Application Platform prompt, select Node.js.
-
At the Include optional Docker Compose files? prompt, select Yes.
-
Ensure port "3000" is entered on the next screen, and press Enter.
-
This will add Dockerfile, along with several configuration files for Docker compose to the project.
-
Select Dockerfile from the file navigator and observe the contents. This file provides the commands required to assemble a Docker image for the
MCW-OSS-PaaS-and-DevOpsapplication. -
Currently, the Docker extension for Visual Studio Code places the generated Docker files in the root directory of the project. Because the project files are all located in the
lab-filesdirectory, we need to move the generated files into that folder. Select the.dockerignore,docker-compose.debug.yml,docker-compose.yml, andDockerfilefiles, and then drag and drop them into theHands-on lab/lab-filesfolder. Respond Yes if prompted about moving the files. -
Next, you will tell Docker to build an image for your app. Select the Terminal menu in Visual Studio Code, and then select New Terminal.
-
In the new terminal window, change the directory to the
Hands-on lab/lab-filesfolder by executing the following command:cd "Hands-on lab/lab-files" -
With the next command you will provide a registry, image name, and tag, using the following format. This format will allow the image to be pushed to your container registry.
[registry]/[image name]:[tag] -
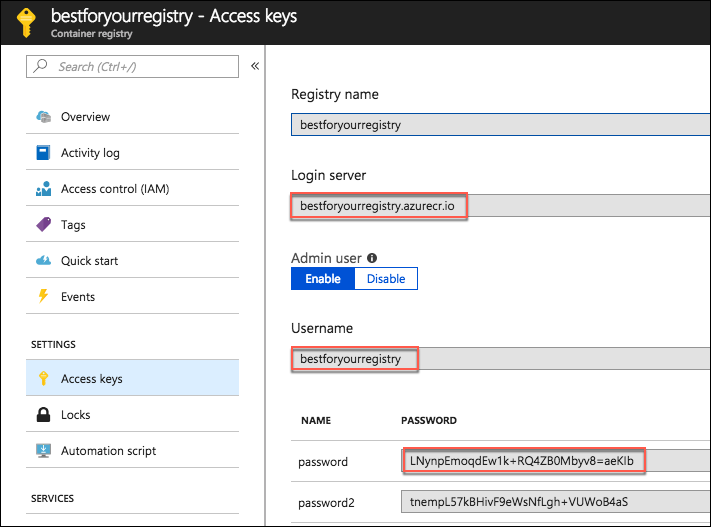
For this, you will need the Login server value from your Azure Container registry's Access keys blade.
-
At the terminal prompt, enter the following, where
[Login server]is the Login server value from Azure:docker build --rm -f "Dockerfile" -t [Login server]/best-for-you-organics:latest .Note: Be sure to include the "." at the end of the line.
-
For example:
docker build --rm -f "Dockerfile" -t bestforyouregistry.azurecr.io/best-for-you-organics:latest . -
Press Enter, which will trigger the build of the image. You will see the following output in the terminal window:
-
Once the build completes, select the Docker icon in the left-hand menu of Visual Studio Code and then expand Images. You will see the
best-for-you-organicsimage. -
You can also use the
docker imagescommand in the Integrated terminal to list the images.
Task 3: Run the containerized app
In this task, you run the app from the container you built in the previous task.
-
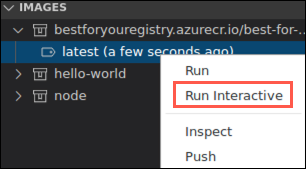
In the Images area of the Docker extension in VS Code, expand the
best-for-you-organicsimage and then right-click on thelatestimage and select Run Interactive.Note: If you receive an error that the address is already in use, return to the terminal window where you ran the application using the
npm startcommand and pressCTRL+Cto stop the application. Then, try the above action again. -
Notice in the Interactive terminal that a docker run command is issued. Using the VS Code Docker extension, you can issue some docker commands without needing to work from the command line.
-
Verify the web app and container are functioning by opening a browser window and navigating to http://localhost:3000.
-
In the Integrated terminal of VS Code, for the interactive session, press CTRL+C to stop the container.
Task 4: Push the image to Azure Container Registry
In this task, you are going to push the image to your Azure Container Registry.
-
In the Azure portal, navigate to the hands-on-lab-SUFFIX resource group, and select the bestforyouregistrySUFFIX Container registry from the list of resources.
-
On the bestforyouregistrySUFFIX blade, select Access keys under settings in the left-hand menu and then select Enable under Admin user.
-
Leave this page up as you will be referencing the Login server, Username, and password in the next task.
-
Return to the Integrated terminal window in VS Code and enter the following command to log in to your Azure Container Registry, replacing the bracketed values with those from the container registry access keys page.
docker login [Login Server] -u [Username] -
For example:
docker login bestforyouregistry.azurecr.io -u bestforyouregistry -
Copy and paste the Container registry password when prompted to complete the login process.
-
Once you are successfully logged in, expand the bestforyouregistry image in the Docker extension section of the VS Code, right-click on the latest image, and select Push.
-
If prompted to set the default registry path, select Yes.
-
Note the "docker push" command issued in the terminal window.
-
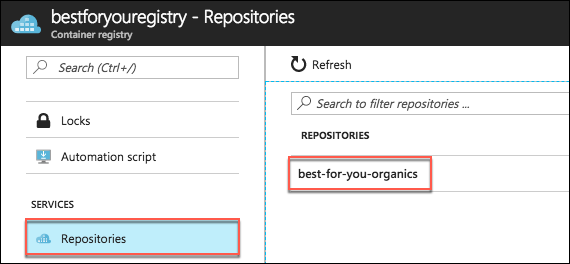
To verify the push, return to the bestforyouregistry Registry container blade in the Azure portal, and select Repositories under Services on the left-hand side, and note the best-for-you-organics repository.
Exercise 4: Set up Web App for Containers
Duration: 10 minutes
In this exercise, you deploy the containerized app to a Web App for Containers instance from the image stored in your Azure Container Registry.
Task 1: Provision Web App for Containers
-
In the Azure portal, select the Show portal menu icon and then select +Create a resource from the menu.
-
Enter "web app for containers" into the Search the Marketplace box, select Web App for Containers from the results, and then select Create.
-
On the Web App Create Basics Tab, enter the following:
Project Details:
- Subscription: Select the subscription you are using for this lab.
- Resource group: Select Create new and enter hands-on-lab-web-SUFFIX for the name of the new resource group.
Instance Details:
- Name: Enter best-for-you-app-SUFFIX (the name must be globally unique).
- Publish: Select Docker Container.
- Operating System: Select Linux.
- Region: Select the region you are using for resources in this hands-on lab.
App Service Plan:
- Linux Plan: Accept the default assigned value, which will create a new App Service plan.
- Sku and size: Select Change size, choose Dev/Test, select the B1 pricing tier, and select Apply.
-
Select Next: Docker.
-
On the Docker tab, enter the following:
- Options: Select Single Container.
- Image source: Select Azure Container Registry.
- Registry: Select bestforyouregistrySUFFIX.
- Image: Select best-for-you-organics.
- Tag: Select latest.
- Startup File: Leave blank.
-
Select Review + create, and then select Create.
Task 2: Navigate to the deployed app
In this task, you navigate to the deployed app and log in to verify it is functioning correctly.
-
When you receive the notification that the Web App for Containers deployment has completed, navigate to the Web App by selecting the notifications icon, and selecting Go to resource.
-
On the Overview blade of App Service, select the URL for the App Service.
-
A new browser window or tab will open, and you should see the
MCW-OSS-PaaS-and-DevOpsapplication's home page displayed. -
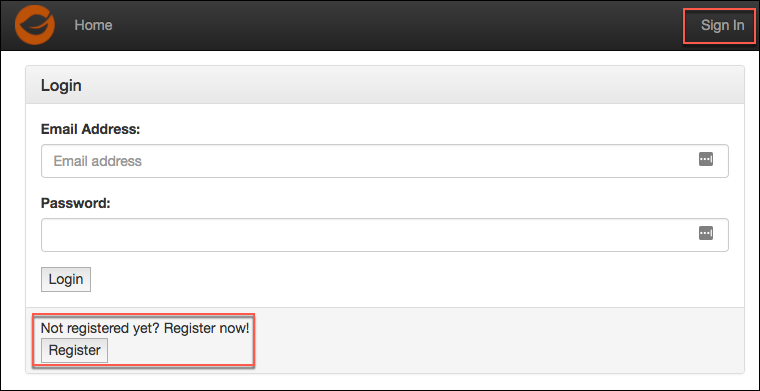
Select Sign In on the top right of the page and login with the following credentials to verify everything is working as expected:
- Email address: demouser@bfyo.com
- Password: Password.1!!
Exercise 5: Configure CI/CD pipeline
Duration: 60 minutes
In this exercise, you are going to use Jenkins to implement a continuous integration (CI) and continuous delivery (CD) pipeline to deploy the containerized MERN app to Web App for Containers in Azure.
Task 1: Enable Continuous Deployment on Web App
In this task, you will turn Continuous Deployment on for your Web App.
-
Return to your Web App for Containers blade in the Azure portal, select Container settings from the left-hand menu, and then select On under Continuous Deployment.
-
Select Save.
Task 2: Prepare GitHub account for service integrations
In this task, you add a Jenkins service integration into your GitHub account. This integration enables a Jenkins CI build job to be triggered when code is checked in to your GitHub repository.
-
On your Lab VM, navigate to your Jenkins VM in the Azure portal by selecting Resource groups from the Azure services list, and then selecting your hands-on-lab-SUFFIX or hands-on-lab-jenkins-SUFFIX resource group from the list.
-
On the resource group blade, select your Jenkins virtual machine.
-
On the Overview blade of your Jenkins virtual machine, locate the DNS name, and copy the value.
-
Return to your forked
MCW-OSS-PaaS-and-DevOpsapplication page in GitHub, select Settings, then select Webhooks from the left-hand menu, and then select Add Webhook. -
If prompted, enter your GitHub account password to continue.
-
On the Add webhook page, enter the following:
- Payload URL: Enter http://YOUR-JENKINS-URL/github-webhook/, replacing
YOUR-JENKINS-URLwith the Jenkins DNS name you copied from the Azure portal. Important: Make sure to include the trailing backslash ("/"). - Content type: Select application/json.
- Secret: Leave blank.
- Under Which events would you like to trigger this webhook?, select Just the push event.
- Active: Check this box.
- Payload URL: Enter http://YOUR-JENKINS-URL/github-webhook/, replacing
-
Select Add webhook.
-
A warning will be displayed. This is a permissions error that will be resolved in a later step.
-
Next, you need to grant the Jenkins user access to your GitHub repository by adding a deploy key in the GitHub settings. Return to your Jenkins virtual machine page in the Azure portal, select Connect, and then SSH from the drop-down menu.
-
On the Connect via SSH with client dialog, copy the Run the example command below to connect to your VM value.
-
Paste the copied command into a text edit so that it can be modified prior to execution.
-
Edit the command to remove
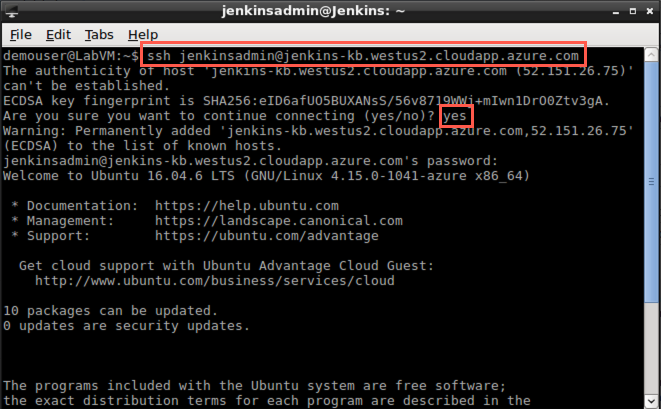
-i <private key path>, since the Jenkins instance was configured to use password authentication. The command should now look something like the following:ssh jenkinsadmin@jenkins-mcw.westus2.cloudapp.azure.com -
Open a new bash shell and paste the modified SSH command at the prompt. Enter "yes" if prompted about continuing to connect and enter the jenkinsadmin password,
Password.1!!, when prompted. -
At the
jenkinsadmin@Jenkinsprompt, enter:ssh-keygen -
Press Enter to accept the default file in which to save the key.
-
Press Enter to use an empty passphrase, and re-enter it to confirm.
Note: The use of an empty password is done only for simplicity in this hands-on lab. This is not recommended for actual environments.
-
Copy the location into which your public key has been saved.
-
Show the public key using the following command, replacing
[KEY-PATH]with the location of your public key.cat [KEY-PATH] -
Copy the key displayed so that it can be added to GitHub.
-
Return to the Settings page of your forked repo in your GitHub account in the browser, select the Deploy keys option from the left-hand menu, and then select Add deploy key.
-
Enter "Jenkins" for the title, paste the SSH key you copied above into the Key field, removing any trailing spaces, and select Add key.
-
To ensure that everything is working, return to the Jenkin's bash shell, and enter the below command which will check the connection to GitHub.
ssh git@github.com -
Enter "yes" when prompted about continuing.
-
You should see a message like the following, indicating a successful authentication and closed connection.
-
The GitHub side of the integration with Jenkins is complete. Next, you will configure Jenkins as part of your CI/CD pipeline.
Task 3: Open a connection to Jenkins
In this task, you create an SSH tunnel to the Jenkins server and configure it for use with the MERN application.
-
Return to your Jenkins VM blade in the Azure portal.
-
On the Overview blade of your Jenkins VM, locate the DNS name, and copy the value.
-
Open a new browser window or tab and paste the copied DNS name into the browser's address bar to navigate to your Jenkins server.
-
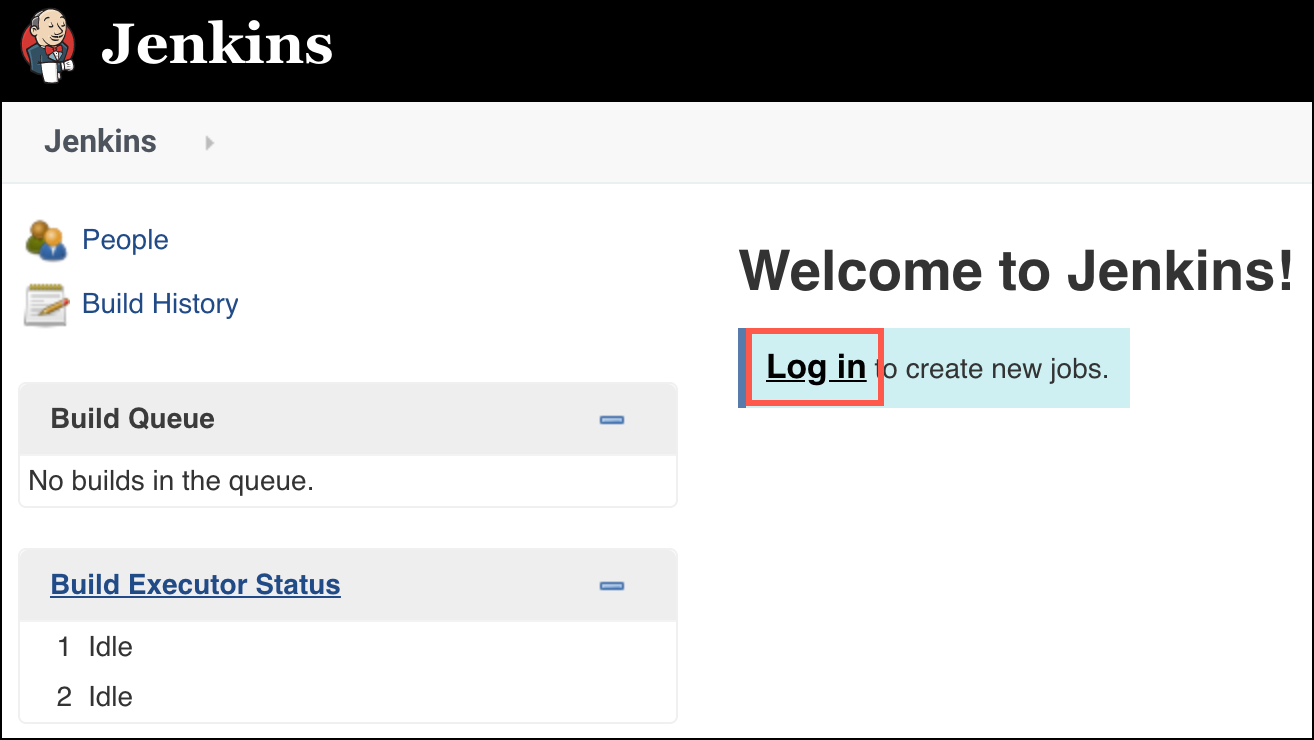
Select Log in on the Welcome to Jenkins screen.
-
On the Jenkins on Azure screen, you will see a message that this Jenkins instance does not support https, so logging in through a public IP address has been disabled. You will need to create an SSH tunnel to connect to the Jenkins instance securely.
-
To set up an SSH tunnel to Jenkins, copy the ssh command provided in the Jenkins on Azure window, as highlighted in the screenshot below.
-
Open a new bash shell, and at the command prompt paste the copied ssh command, replacing "username" with jenkinsadmin. The command will resemble the following:
ssh -L 127.0.0.1:8080:localhost:8080 jenkinsadmin@jenkins-kb.westus.cloudapp.azure.com -
If prompted that authenticity of the Jenkins host cannot be established, enter "yes" to continue.
-
Enter the jenkinsadmin password, "Password.1!!"
-
After you have started the SSH tunnel, open a new browser tab or window, and navigate to http://localhost:8080/.
-
As you did above, select Log in on the Welcome to Jenkins screen. This will launch the Getting Started dialog.
-
To get the initial password, return to the SSH tunnel bash window, and run the following command:
sudo cat /var/lib/jenkins/secrets/initialAdminPassword -
Copy the password returned and paste it into a text editor, such as Notepad.exe or Leafpad on the LabVM.
-
Return to the Getting Started screen in your browser, paste the password into the Administrator password box, and select Continue.
-
From the Jenkins dashboard, select Manage Jenkins from the left-hand menu and then select Manage Plugins.
-
With the Available tab selected, install the NodeJS plug-in by entering nodejs into the Filter box, and selecting the NodeJS plug-in in the results, and then selecting Install without restart.
-
With the Available tab still selected, enter GitHub into the Filter box.
-
Locate and select the GitHub plugin.
-
Select Install without restart.
-
Select Manage Jenkins from the left-hand menu.
-
Select Global Tool Configuration.
-
Find NodeJS and select Add NodeJS next to NodeJS installations.
-
Enter bestforyounode as the Name, ensure Install automatically is checked, and accept the default (latest) version of nodejs.
-
Select Save.
Task 4: Configure Continuous Integration with Jenkins
In this task, you create a simple Jenkins continuous integration (CI) pipeline, which builds the MCW-OSS-PaaS-and-DevOps application with every code commit into GitHub.
-
Return to the Jenkins dashboard, and select New Item from the left-hand menu.
-
Enter "best-for-you-build" as the name, select Freestyle project, and select OK.
-
On the General tab of the project page:
- Select GitHub project, and enter the URL for your forked copy of the
MCW-OSS-PaaS-and-DevOpsproject page in your GitHub account. - Uncheck Restrict where this project can be run, if it is checked.
- Select GitHub project, and enter the URL for your forked copy of the
-
Next, scroll down to the Source Code Management section, select Git, and enter the URL to your project, including the ".git" extension.
-
Scroll down to the Build Triggers section and select GitHub hook trigger for GITScm polling.
-
Scroll down to the Build Environment section, and select Provide Node & npm bin/ folder to PATH, select your NodeJS Installation from the list, and leave the default values for npmrc file and Cache location.
-
In the Build section, select Add build step, and select Execute shell from the options.
-
In the Execute shell Command block, enter:
cd "Hands-on lab/lab-files" npm install npm run build -
Finally, select Save.
-
Your Jenkins CI build job should now be triggered whenever a push is made to your repository.
Task 5: Trigger CI build
In this task, you commit your pending changes in VS Code to your GitHub repo and trigger the Jenkins CI build job.
-
Return to VS Code on your Lab VM, and the open
MCW-OSS-PaaS-and-DevOpsproject. -
Observe that the source control icon on the left-hand navigation bar has a badge indicating you have uncommitted changes. Select the icon.
-
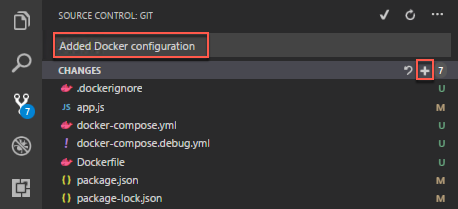
In the SOURCE CONTROL: GIT pane enter a commit message, such as "Added Docker configuration," and select + next to CHANGES to stage all the pending changes.
-
Select the checkmark to commit the changes.
-
Next, select the ellipsis to the right of the checkmark, and select Push from the dropdown.
-
When prompted, select Allow to authorize Visual Studio Code to access Github.
-
Select Continue in the browser window that opens to authorize access to your GitHub account.
-
On the Authorize GitHub for VSCode window, select Authorize github.
-
Ensure you see "Success!" in the following screen.
-
Select Allow in the dialog that appears and follow any additional prompts to complete the authorization within Visual Studio Code.
-
Return to your best-for-you-build job in Jenkins, and locate the Build History block on the left-hand side. Select #1 to view the details of the build job, caused by your GitHub commit.
-
If the build is still running, you can select Console Output from the left-hand menu to view the ongoing build activities.
-
Once the build completes, you can see the changes you committed on the build page.
-
You have successfully set up your CI pipeline.
Task 6: Install Docker on the Jenkins VM
In this task, you install Docker CE on your Jenkins VM, so it can be used to build images from the build artifacts produced by your CI build.
-
The first step is to ensure no older versions of Docker are installed on your Jenkins VM. Using the SSH tunnel bash terminal you opened previously, navigate to the command prompt, and enter:
sudo apt-get remove docker docker-engine docker.io -
Next, you need to set up a Docker repository on the host machine. The begin, update the
aptpackage index:sudo apt-get update -
Install the necessary packages to allow
aptto use a repository over HTTPS, enteringywhen prompted to continue.sudo apt-get install \ apt-transport-https \ ca-certificates \ curl \ software-properties-common -
Add Docker's official GPG key.
curl -fsSL https://download.docker.com/linux/ubuntu/gpg | sudo apt-key add - -
Verify that you now have the key with fingerprint
9DC8 5822 9FC7 DD38 854A E2D8 8D81 803C 0EBF CD88, by searching for the last eight characters of the fingerprint:sudo apt-key fingerprint 0EBFCD88 -
You should see output similar to:
pub 4096R/0EBFCD88 2017-02-22 Key fingerprint = 9DC8 5822 9FC7 DD38 854A E2D8 8D81 803C 0EBF CD88 uid Docker Release (CE deb) <docker@docker.com> sub 4096R/F273FCD8 2017-02-22 -
Next, enter the following commands to set up the stable repository.
sudo add-apt-repository \ "deb [arch=amd64] https://download.docker.com/linux/ubuntu \ $(lsb_release -cs) \ stable" -
You are now ready to install Docker CE. Start by updating the
aptpackage index.sudo apt-get update -
Install the latest version of Docker CE, entering
ywhen prompted to continue.sudo apt-get install docker-ce -
Verify that Docker CE is installed correctly by running the
hello-worldimage.sudo docker run hello-world -
The final step is to add permission to the
jenkinsuser to Docker.sudo usermod -a -G docker jenkins sudo chmod 664 /run/docker.sock -
Now, restart the Jenkins service, entering the jenkinsadmin password,
Password.1!!, when prompted.service jenkins restart
Task 7: Add continuous delivery to Jenkins build job
In this task, you add continuous deployment (CD) to the Jenkins build pipeline. This uses a post-build action to create a new Docker image from the build, push that image to your Azure Container Registry, and deploy the image to your Web App for Containers instance.
-
In a new browser window, navigate to your Container registry in the Azure portal by selecting Resource groups from the Azure services list, selecting the hands-on-lab-SUFFIX resource group from the list, and then selecting the Container registry resource.
-
On the Container registry blade, select Access keys from the left-hand menu and leave this page open for the following steps.
-
Restarting the Jenkins service terminates any existing connections. Return to your Jenkins dashboard and select Log in on the toolbar.
-
On the login screen, enter the following:
- Username: admin
- Password: Enter the initial admin password you copied into a text editor previously.
As a reminder, the initial admin password was retrieved by executing the following command from the SSH tunnel bash window:
sudo cat /var/lib/jenkins/secrets/initialAdminPassword -
Once logged back in, select the best-for-you-build project. When prompted to log in, use the initial admin password you retrieve in the bash shell previously and copied into a text editor.
-
Select Configure from the left-hand menu.
-
On the configure screen, scroll down to the Build section and select the Execute shell block you created previously.
-
Return to the Container registry Access keys blade in the Azure portal, copy the values specified below and paste them into the appropriate values in the
docker buildcommand below.-
Login server: Copy the Azure Container Registry's Login server value, and paste into the command below as the
ACR_URLvalue. -
Username: Copy the Username value for your Azure Container Registry, and paste into the command below as the
ACR_USERNAMEvalue. -
Password: Enter the password value for your Azure Container Registry, and paste into the command below as the
ACR_PASSWORDvalue.
ACR_URL="<your-container-registry-login-server>" ACR_USERNAME="<your-container-registry-username>" ACR_PASSWORD="<your-container-registry-password>" docker build --tag "${ACR_URL}/best-for-you-organics:latest" . docker login $ACR_URL --username $ACR_USERNAME --password $ACR_PASSWORD docker push "${ACR_URL}/best-for-you-organics:latest" -
-
You final command should look similar to the following:
ACR_URL="bestforyouregistrykb.azurecr.io" ACR_USERNAME="bestforyouregistrykb" ACR_PASSWORD="uddDqqTdBdxaI=QMmTqTfAg75cJHnfcj" docker build --tag "${ACR_URL}/best-for-you-organics:latest" . docker login $ACR_URL --username $ACR_USERNAME --password $ACR_PASSWORD docker push "${ACR_URL}/best-for-you-organics:latest" -
Copy the completed command text and paste it below the
npm run buildline within the Execute shell Command box. The Execute shell command should now look similar to the following: -
Select Save.
Task 8: Trigger CI-CD pipeline
In this task, you commit changes to the MCW-OSS-PaaS-and-DevOps starter application and trigger the full CI/CD pipeline through Jenkins, resulting in the updated application being added to a new Docker image, pushed to ACR, and deployed to Web App for Containers.
-
Return to VS Code on your Lab VM, open the
.dockerignorefile, and delete the line containing DockerFile* from the file. This will allow Jenkins to use the file to build the container in the Jenkins CI/CD pipeline. -
Next, open the
src/components/plan/Plans.jsfile, and insert the following markup between<div class="container">and<Grid>:<h3>Welcome to Best For You Organics Company</h3> -
Save the updated files.
-
As you did in Task 4, above, select the Source Control icon from the left-hand menu, enter a commit comment, select + to stage the change, and select the checkmark to commit the change, and push to GitHub. Enter your credentials if prompted. This will trigger the Jenkins CI/CD pipeline.
-
Return to your Jenkins dashboard, and select the best-for-you-build project, and select the latest build number under Build History.
-
On the Build page, select Console Output from the left-hand menu.
-
On the Console Output page, you can monitor the build progress. When it completes after a few minutes, you will see a SUCCESS message similar to the following:
-
When the deployment is complete, you can verify the changes deployed successfully by navigating to your Web App for Containers instance in hands-on-lab-web-SUFFIX resource group in the Azure portal and selecting the URL on the overview blade. The deployment of the container can take several minutes to complete, so refreshes may take a few minutes to show the new header.
Tip: It may help to open the app in an Incognito or InPrivate browser window, as the old page may be cached.
-
You should see the home page, with a new header above the three plans on the page.
Exercise 6: Create Azure Functions for order processing
Duration: 45 minutes
In this task, you create the Azure Functions that handle order processing. The first function sends unprocessed order details into a storage queue. This function uses a timer trigger and checks the processed field on order documents, ensuring only unprocessed orders are sent to the processing queue. A second function simulates order processing and sends notifications to the user who placed the order.
Task 1: Configure storage queues
In this task, you add two storage queues to the storage account provisioned when you created your Function App. These queues are used to store orders and notifications that need to be processed.
-
In the Azure portal, select Resource groups from the Azure services list and then select the hands-on-lab-func-SUFFIX resource group.
-
Select the bestforyouordersSUFFIX storage account that was created when you provisioned your Function App.
-
Select Queues from the Services area of the Overview blade.
-
On the Queue service blade, select +Queue to add a new queue.
-
In the Add queue dialog, enter orderqueue for the Queue name, and select OK.
-
Select +Queue again, and this time enter "notificationqueue" for the Queue name.
Task 2: Create a timer triggered function
In this task, you create a function that function sends all new orders to a queue for processing and shipping. The function uses a Timer trigger and an output binding to an Azure Storage Queue.
-
In the Azure portal, navigate to your Function App by selecting it from the list of resources in the hands-on-lab-func-SUFFIX resource group.
-
From the left-hand menu on your Function Apps blade, select Functions, then select + Add.
-
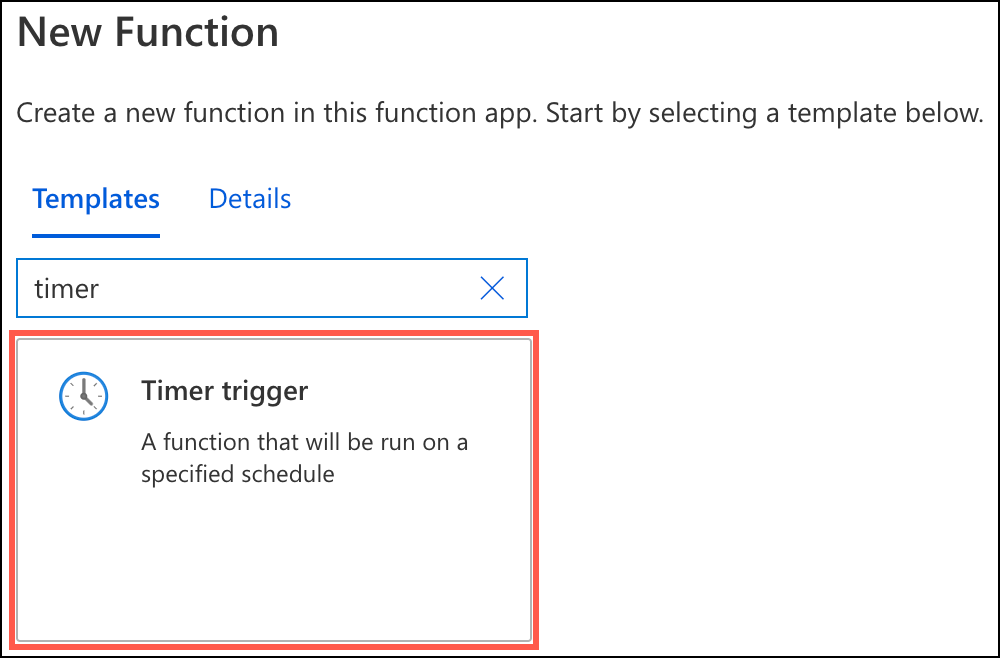
In the trigger search box, enter "timer" and select the Timer trigger.
-
In the Timer trigger dialog, enter the following:
- Name: Enter OrdersTimerTrigger.
- Schedule: Leave the default value,
0 */5 * * * *. This will execute the trigger every 5 minutes. - Select Create Function.
-
After the function is created, select Integration under Developer on the new function's left-hand menu.
-
Next, select + Add Output.
-
In the Create Output dialog, enter the following:
- Binding Type: Select Azure Queue Storage.
- Message parameter name: Enter
outputQueue. - Queue name: Enter
orderqueue(all lowercase, as casing matters) - Storage account collection: Select AzureWebJobsStorage from the list (this is the bestforyouordersSUFFIX storage account you created when you provisioned your Function App).
- Select OK.
-
Now, return to the bestforyouorders Function App page in the Azure portal and in the left-hand menu, and then select Advanced Tools under the Development Tools section. On the Advanced Tools blade, select Go.
-
In the new browser window that opens, select Debug console -> PowerShell from the top menu.
-
In the Kudu file browser, navigate to
home\site\wwwroot. -
In the
wwwrootfolder, select + and then select New file to add a new file. -
Enter
package.jsonas the name of the file and press Enter. -
After creating the new file, select the pencil (Edit) icon next to it.
-
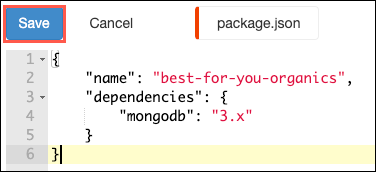
Copy and paste the following JSON into the file editor and then select Save.
{ "name": "best-for-you-organics", "dependencies": { "mongodb": "3.x" } } -
In the Kudu Remote Execution Console, run the following at the command prompt:
npm installNote: The addition of the
mongodbdependency is necessary because the Cosmos DB MongoDB API cannot be used to bind a Function App to Cosmos DB. Only the SQL API is currently compatible with Function App triggers. -
Return to your Function App blade in the Azure portal, select Functions from the left-hand menu and then select the OrdersTimerTrigger function in the list of functions.
-
On the OrdersTimerTrigger blade, select Code + Test from the left-hand menu.
-
To get the code for the
OrdersTimerTriggerfunction, go into the project in VS Code, expand theHands-on lab/lab-files/AzureFunctionsfolder, and open theOrdersTimerTrigger.jsfile. -
Replace the
urivariable value on line 4 of theOrdersTriggerTimer.jsfile with the primary connection string for your Cosmos DB, which you can retrieve from the Connection String blade of your Azure Cosmos DB account. -
Copy all of the code within the file.
-
Return to your
OrdersTimerTriggerfunction in the Azure portal and paste the code into theindex.jsblock, overwriting all the existing code. Yourindex.jsfile should now look like the following: -
Select Save on the Function toolbar.
-
Next, select Test/Run on the toolbar.
-
Observe the function running in the Logs block.
-
Return to the starter application in your browser window, and select Sign In.
-
On the Login screen, enter the following credentials, and select Login:
- Email address: demouser@bfyo.com
- Password: Password.1!!
-
After logging in, you will be returned to the home page. Choose Select this plan for any of the plans.
-
On the Place Order screen, select Place Order. This will create a new order in the Cosmos DB
orderscollection. Within 5 minutes, the Timer trigger of your function will fire and then send the order on to theorderqueuefor processing. -
Finally, verify items are being written to the order queue, by going to the queue in the Azure Storage account, and observing that items have been added to the
orderqueue.
Task 3: Create Queue function
In this task, you create a second function, which is triggered by the output of the OrdersTimerTrigger function. This simulates the order processing and adds items to the notificationqueue if the order processing is complete, and the sendNotifications property is true for the order.
This uses an Azure Storage Queue trigger, and an input dataset from Cosmos DB, pulling in customers. The output dataset is the Azure Cosmos DB orders table. The update sets processed = true and the processedDate to today's date.
-
In the Azure portal, navigate to the bestforyouorders Function app, select Functions from the left-hand menu and then select + Add.
-
On the New Function dialog, enter "queue" onto the search filter and select Azure Queue Storage trigger from the list.
-
On the Queue trigger New Function dialog, enter the following:
- New Function: Enter
ProcessOrders. - Queue name: Enter
orderqueue. - Storage account connection: Select AzureWebJobsStorage.
- Select Create Function.
- New Function: Enter
-
When the function has been created, select Integration on the ProcessOrders Function blade.
-
On the Integration blade, select Azure Queue Storage (myQueueItem) under Trigger.
-
On the Edit Trigger dialog, change the Message parameter name to "orderToProcess" and select Save.
-
Now, select + Add output
-
On the Create Output dialog, enter the following:
- Binding Type: Select Azure Queue Storage.
- Message parameter name: Enter
outputQueue. - Queue name: Enter
notificationqueue(all lowercase, as casing matters). - Storage account collection: Select AzureWebJobsStorage from the list.
- Select OK.
-
Now, select the ProcessOrders function on the Integration blade.
-
To get the code for the ProcessOrders function, go into the project in VS Code, expand the
Hands-on lab/lab-files/AzureFunctionsfolder, selectProcessOrders.js, and copy all the code in the file. -
Return to the ProcessOrders Function in the Azure portal and paste the code into the
index.jsblock, overwriting all the existing code, and select Save. Yourindex.jsfile should now look like the following: -
Next, select Logs below the code block, so you can observe the Function being called during the next steps.
-
To trigger the function, return to the starter application in your browser window. If you are still logged in, select Logout. Then, select Sign In, and on the Sign In screen, select Register.
Note: You may need to select Logout if you are still logged in with the demouser account.
-
Complete the registration form. Be sure to include a valid email address so you can receive notifications of order processing in the next exercise. (If you opt not to enter a valid email address, you can still complete the next Exercise, but will not receive the email notifications that your order has been processed.)
- You only need to enter data into the First name, Last name, and email address fields. All other fields have been pre-populated to save time.
- The password has been set to
Password.1!!. If you choose to enter a different password, note that when you log into the account.
-
After registering, you should be automatically logged into the site. If not, select Sign In from the Home page, enter the email address you provided during registration and the password (
Password.1!!) on the login screen, and then select Login. -
Select the Select this plan button for any plan on the home page, and on the Order screen, select Place Order.
-
Return to your ProcessOrders function page in the Azure portal and observe the logs.
Note: It can take up to five minutes for the OrdersTimerTrigger to fire. The ProcessOrders function will fire immediately after the OrderTimerTrigger function.
-
Your order was sent to the notificationqueue and is pending the notification being sent to your email address.
Exercise 7: Create Logic App for sending email notifications
Duration: 30 minutes
In this exercise, you create Logic App, which triggers whenever an item is added to the notificationqueue Azure Storage Queue. The Logic App sends an email message to the email address included in the notificationqueue message.
Task 1: Create a SendGrid account
In this task, you will create a SendGrid account through the Azure portal to send email notifications to customers, informing them that their order has been processed and is on its way.
-
In the Azure portal, select the Show portal menu icon and then select +Create a resource from the menu.
-
Enter "SendGrid" into the Search the Marketplace box.
-
On the SendGrid blade, select Create.
-
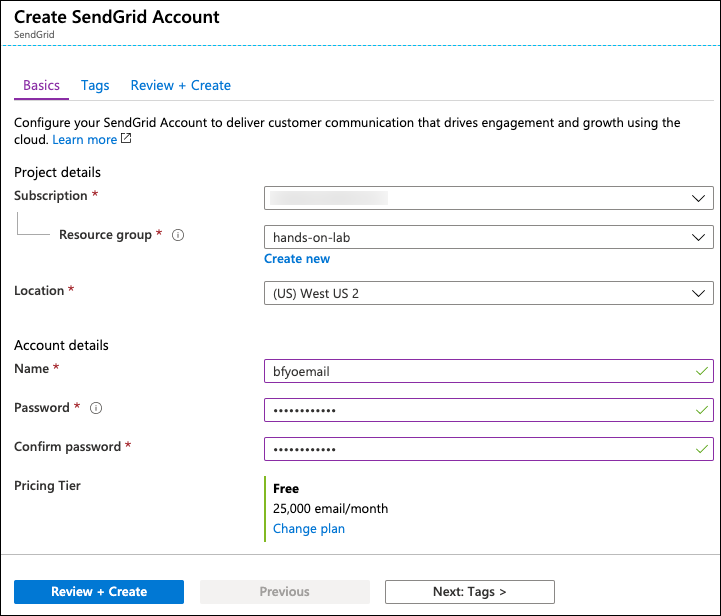
On the Create a new SendGrid Account Basics tab, enter the following:
Project details:
- Subscription Select the subscription you are using for this hands-on lab.
- Resource group: Choose Use existing and select the hands-on-lab-SUFFIX resource group.
- Location: Select the location you are using for resources in this hands-on lab.
Account details:
- Name: bfyoemail
- Password: Password.1!!
- Pricing tier: Select the Free plan.
Contact details:
-
Enter your information into the required fields (First Name, Last Name, Email, Company, and Website)
Note: Website is not listed as a required field, but currently, the deployment fails if this is not populated.
-
Select Review + create and then select Create to provision the SendGrid account.
-
When the SendGrid account finishes provisioning, select Go to resource from the notifications pane in the Azure portal.
-
On the SendGrid account blade, select Manage from the toolbar.
-
If prompted, select Send Confirmation Email and follow the prompts in the email you receive to confirm your account.
-
On the SendGrid page that opens, expand Settings in the left-hand menu, select API Keys, and then select Create API Key.
-
On the Create API Key page, enter the following:
- API Key Name: Enter
bfyo-api-key. - API Key Permissions: Select Full Access.
- Select Create & View.
- API Key Name: Enter
-
Leave the API Key Created screen that appears open. You will be copying the key and pasting it into your Logic App in the next task.
Task 2: Create a Logic App
In this task, you create a new Logic App, which uses the SendGrid connector to send email notifications to users, informing them that their order has processed and shipped.
-
In the Azure portal, navigate to the OrderNotifications Logic App in the hands-on-lab-SUFFIX resource group.
-
In the Logic App Designer, select Blank Logic App under Templates.
-
In the blank logic app template, select All and then select Azure Queues under Connectors.
-
Select When there are messages in a queue under Triggers.
-
On the When there are messages in a queue dialog, enter bestforyouorders for the, Connection Name select the bestforyouorders Storage account from the list and select Create.
-
In the next When there are messages in a queue dialog, select notificationqueue from the Queue Name list, and set the interval to 1 minute.
-
Select + New step.
-
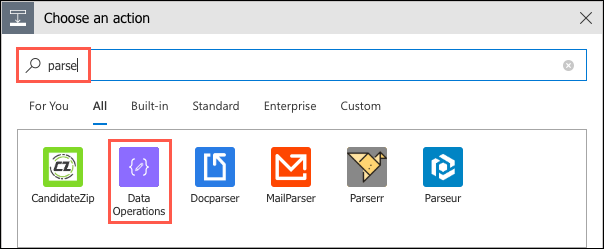
In the Choose an action box, enter "parse," and select Data Operations.
-
Under Data Operations, select Parse JSON.
-
In the Parse JSON box, select the Content box, select Add dynamic content +, then select Message Text from the input parameters list that appears.
-
Next, select Use sample payload to generate schema below the Schema box.
-
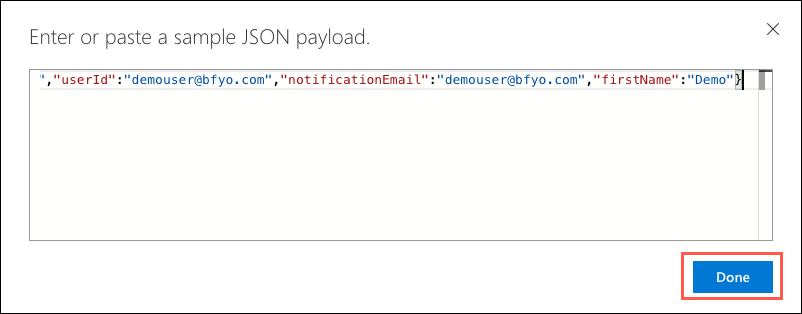
In the dialog that appears, paste the following JSON into the sample JSON payload box, then select Done.
{ "orderId": "5a6748c5d0d3199cfa076ed3", "userId": "demouser@bfyo.com", "notificationEmail": "demouser@bfyo.com", "firstName": "Demo" } -
You will now see the schema for messages coming from the notification queue in the Schema box.
-
Select + New step.
-
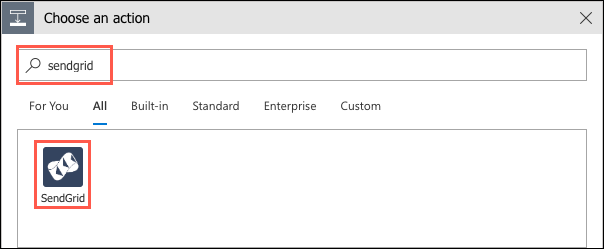
In the Choose an action box, enter "sendgrid," and select SendGrid under Connectors.
-
In the SendGrid connector dialog, select Send email (V4).
-
In the SendGrid box, enter the following:
- Connection Name: Enter
bfyo-sendgrid. - SendGrid Api Key: Return to the API Key Created screen in your SendGrid account, and then copy and paste the API key you generated.
- Select Create.
- Connection Name: Enter
-
In the Send email (V4) box, enter the following:
- From: Enter your email address.
- To: Click in the box, select Add dynamic content, and then select the notificationEmail property. NOTE: If under the Parse JSON Dynamic Content section, you see a message that there were not any outputs to match the input format, select See more in the message.
- Subject: Enter "Order: " and then select orderId from the dynamic content dialog.
- Email body: Select firstName from the dynamic content dialog, and then enter ", Your Best For You Organics Company order has shipped."
-
Select + New step.
-
In the Choose an action dialog, enter "queues" into the search box, and select Delete message under Actions.
-
Select notificationqueue for the Queue Name.
-
For Message ID, select the Message ID parameter from the dynamic content parameter list.
-
For Pop Receipt, select the Pop Receipt parameter from the dynamic content parameter list.
-
Select Save on the Logic Apps Designer toolbar.
-
The Logic App will begin running immediately, so if you entered your valid email address when you registered your account in the Best for You Organics starter app, and placed an order, you should receive an email message within a minute or two of selecting Save.
After the hands-on lab
Duration: 10 minutes
In this exercise, you will de-provision all Azure resources that you created in support of this hands-on lab.
Task 1: Delete Azure resource groups
-
In the Azure portal, select Resource groups from the left-hand menu and locate and delete the following resource groups.
- hands-on-lab-SUFFIX
- hands-on-lab-func-SUFFIX
- hands-on-lab-jenkins-SUFFIX
- hands-on-lab-web-SUFFIX
Task 2: Delete WebHooks and Service Integrations
-
In your GitHub account:
- Delete the Jenkins service integration.
- Delete the Personal Access Token you created for integration with VS Code.
You should follow all steps provided after attending the Hands-on lab.


