12 KiB
Guide: Container Image Tag Release Pipeline
This section describes an example of how to extend your manifest generation pipeline by pre-prending a pipeline to automate incrementing your container image tag names in your high-level definition. Morever we cover a rudimentary way to perform container promotion with Azure DevOps.
We recommend following the guide to create a manifest generation pipeline with Azure DevOps first before attempting this scenario.
Prerequisites
- Permissions: The ability to create Pipelines in your Azure DevOps Organization.
- High Level Deployment Description: Either your own Fabrikate high level definition for your deployment or a sample one of ours. We provide a sample HLD repo that builds upon the cloud-native Fabrikate definition. The one used in this example can be found here.
Setup
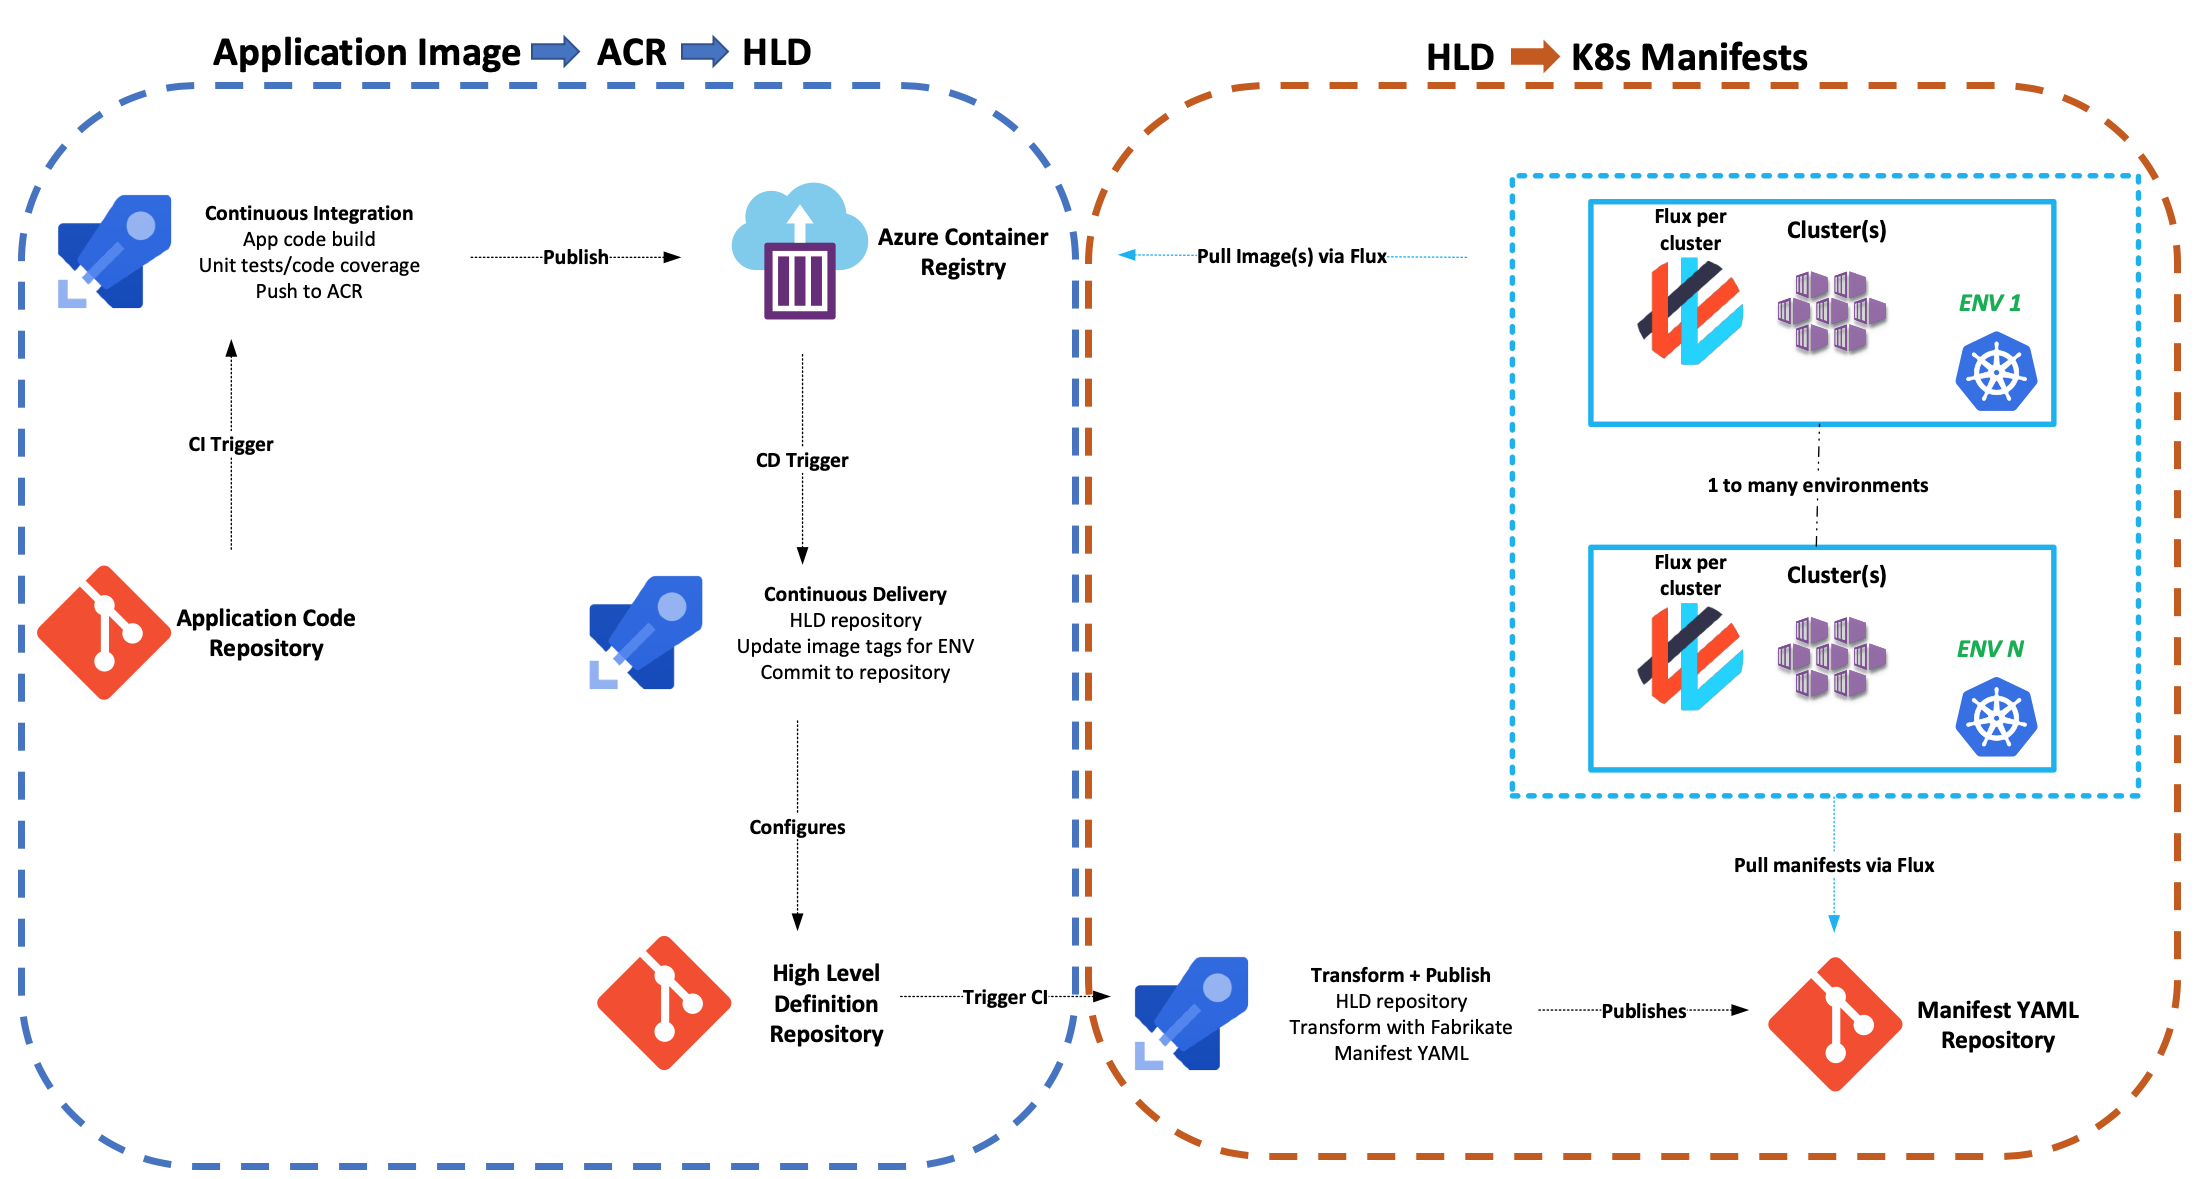
The GitOps workflow can be split into two components:
- Application Pipeline -> High-Level Definition Image Tag Pipeline
- Manifest Generation Pipeline
We will be focusing on the first step in this example.
Application Pipeline -> High-Level Definition Image Tag Pipeline
1. Create Repositories and Personal Access Tokens
Create both high level definition (HLD) and resource manifest repos and the personal access tokens that you'll use for the two ends of this CI/CD pipeline. We have instructions for how to do that in two flavors:
2. Create Application Code Pipeline
Using Azure DevOps we created an Azure Pipelines YAML file that describes the build and Docker images publish to Azure Container Registry (ACR). Below is an example of this yaml pipelines.
trigger:
- master

pool:
  vmImage: 'Ubuntu-16.04'

variables:
  GOBIN:  '$(GOPATH)/bin' # Go binaries path
  GOROOT: '/usr/local/go1.11' # Go installation path
  GOPATH: '$(system.defaultWorkingDirectory)/gopath' # Go workspace path
  modulePath: '$(GOPATH)/src/github.com/$(build.repository.name)' # Path to the module's code

steps:
- script: |
    mkdir -p '$(GOBIN)'
    mkdir -p '$(GOPATH)/pkg'
    mkdir -p '$(modulePath)'
    shopt -s extglob
    shopt -s dotglob
    mv !(gopath) '$(modulePath)'
    echo '##vso[task.prependpath]$(GOBIN)'
    echo '##vso[task.prependpath]$(GOROOT)/bin'
  displayName: 'Set up the Go workspace'

- script: |
    go version
    go get -v -t -d ./...
    if [ -f Gopkg.toml ]; then
        curl https://raw.githubusercontent.com/golang/dep/master/install.sh | sh
        dep ensure
    fi
    docker run --rm -v "$PWD":/go/src/github.com/andrebriggs/goserver -w /go/src/github.com/andrebriggs/goserver iron/go:dev go build -ldflags "-X main.appVersion=$(build.BuildNumber)" -v -o bin/myapp
    az login --service-principal --username "$(SP_APP_ID)" --password "$(SP_PASS)" --tenant "$(SP_TENANT)"
    az acr build -r $(ACR_NAME) --image go-docker-k8s-demo:$(build.BuildNumber) .
  workingDirectory: '$(modulePath)'
  displayName: 'Get dependencies, build image, then publish to ACR'
This Azure Pipeline Build YAML file will be based on the application code that you are trying to build and deploy. The YAML shown is an example from: https://github.com/andrebriggs/go-docker-k8s-demo. You should create your own application that pushes your own container registry.
3. Add Environments to High Level Definition Repo
Most Kubernetes deployments will utilize multiple environments. Our Bedrock GitOps process allows you to configure values for multiple environments. We can do this by adding (ENV_NAME).yaml files to the config directory of your high-level definition repository.
High-Level-Definition-Repo
├── azure-pipelines.yaml
├── config
│   ├── common.yaml
│   └── DEV.yaml
│   └── QA.yaml
│   └── PROD.yaml
│   └── STAGING.yaml
├── manifests
│   ├── ...
└── README.md
In the example above, notice we have a configuration for environments we have container promotion to occur on. You can see an example on a HLD repo here. The environment names (bolded) match the names of Azure DevOps release pipeline stage we will cover next.
4. Create Azure Pipeline Release
The Azure Pipeline Release will be triggered off of the Azure Pipeline Build that was created in Step 2, and will accomplish the following objectives:
- Clone the HLD repo
- Download and Install Fabrikate
- Execute
fab setto manipulate HLDs - Git commit and push to HLD repo
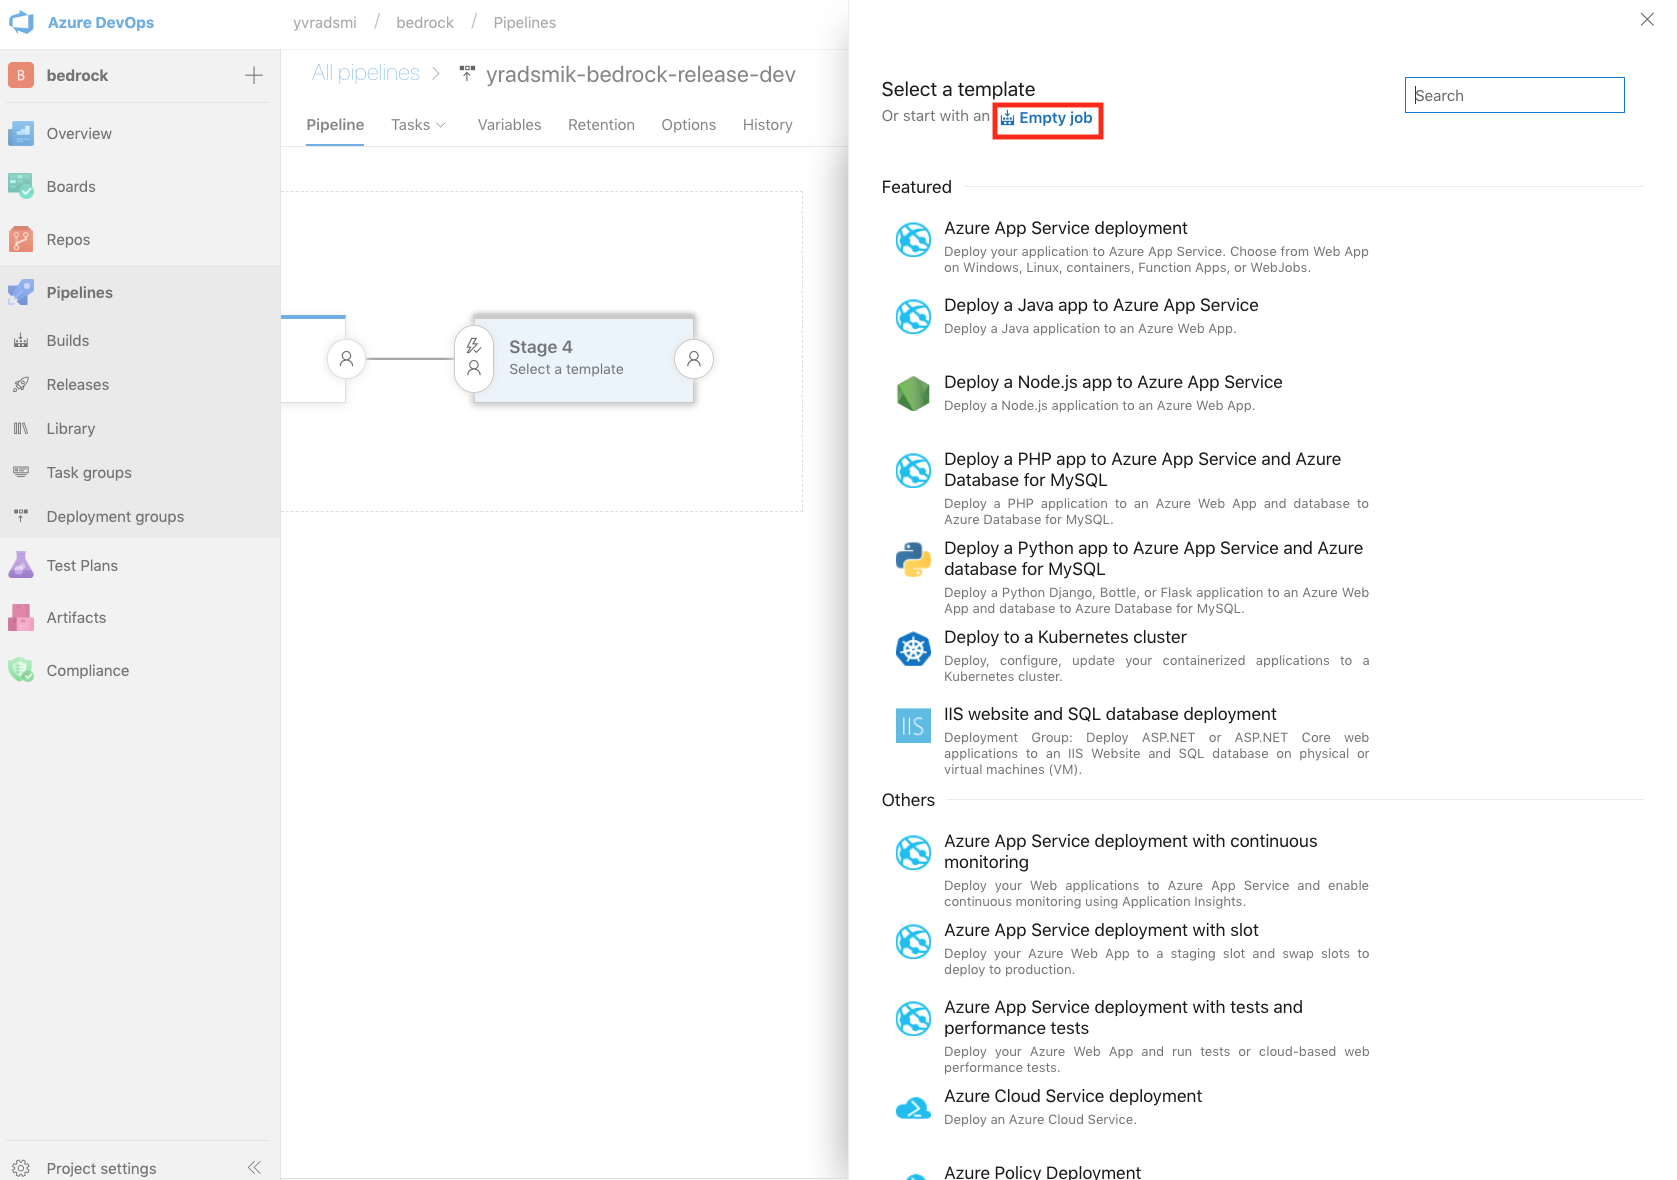
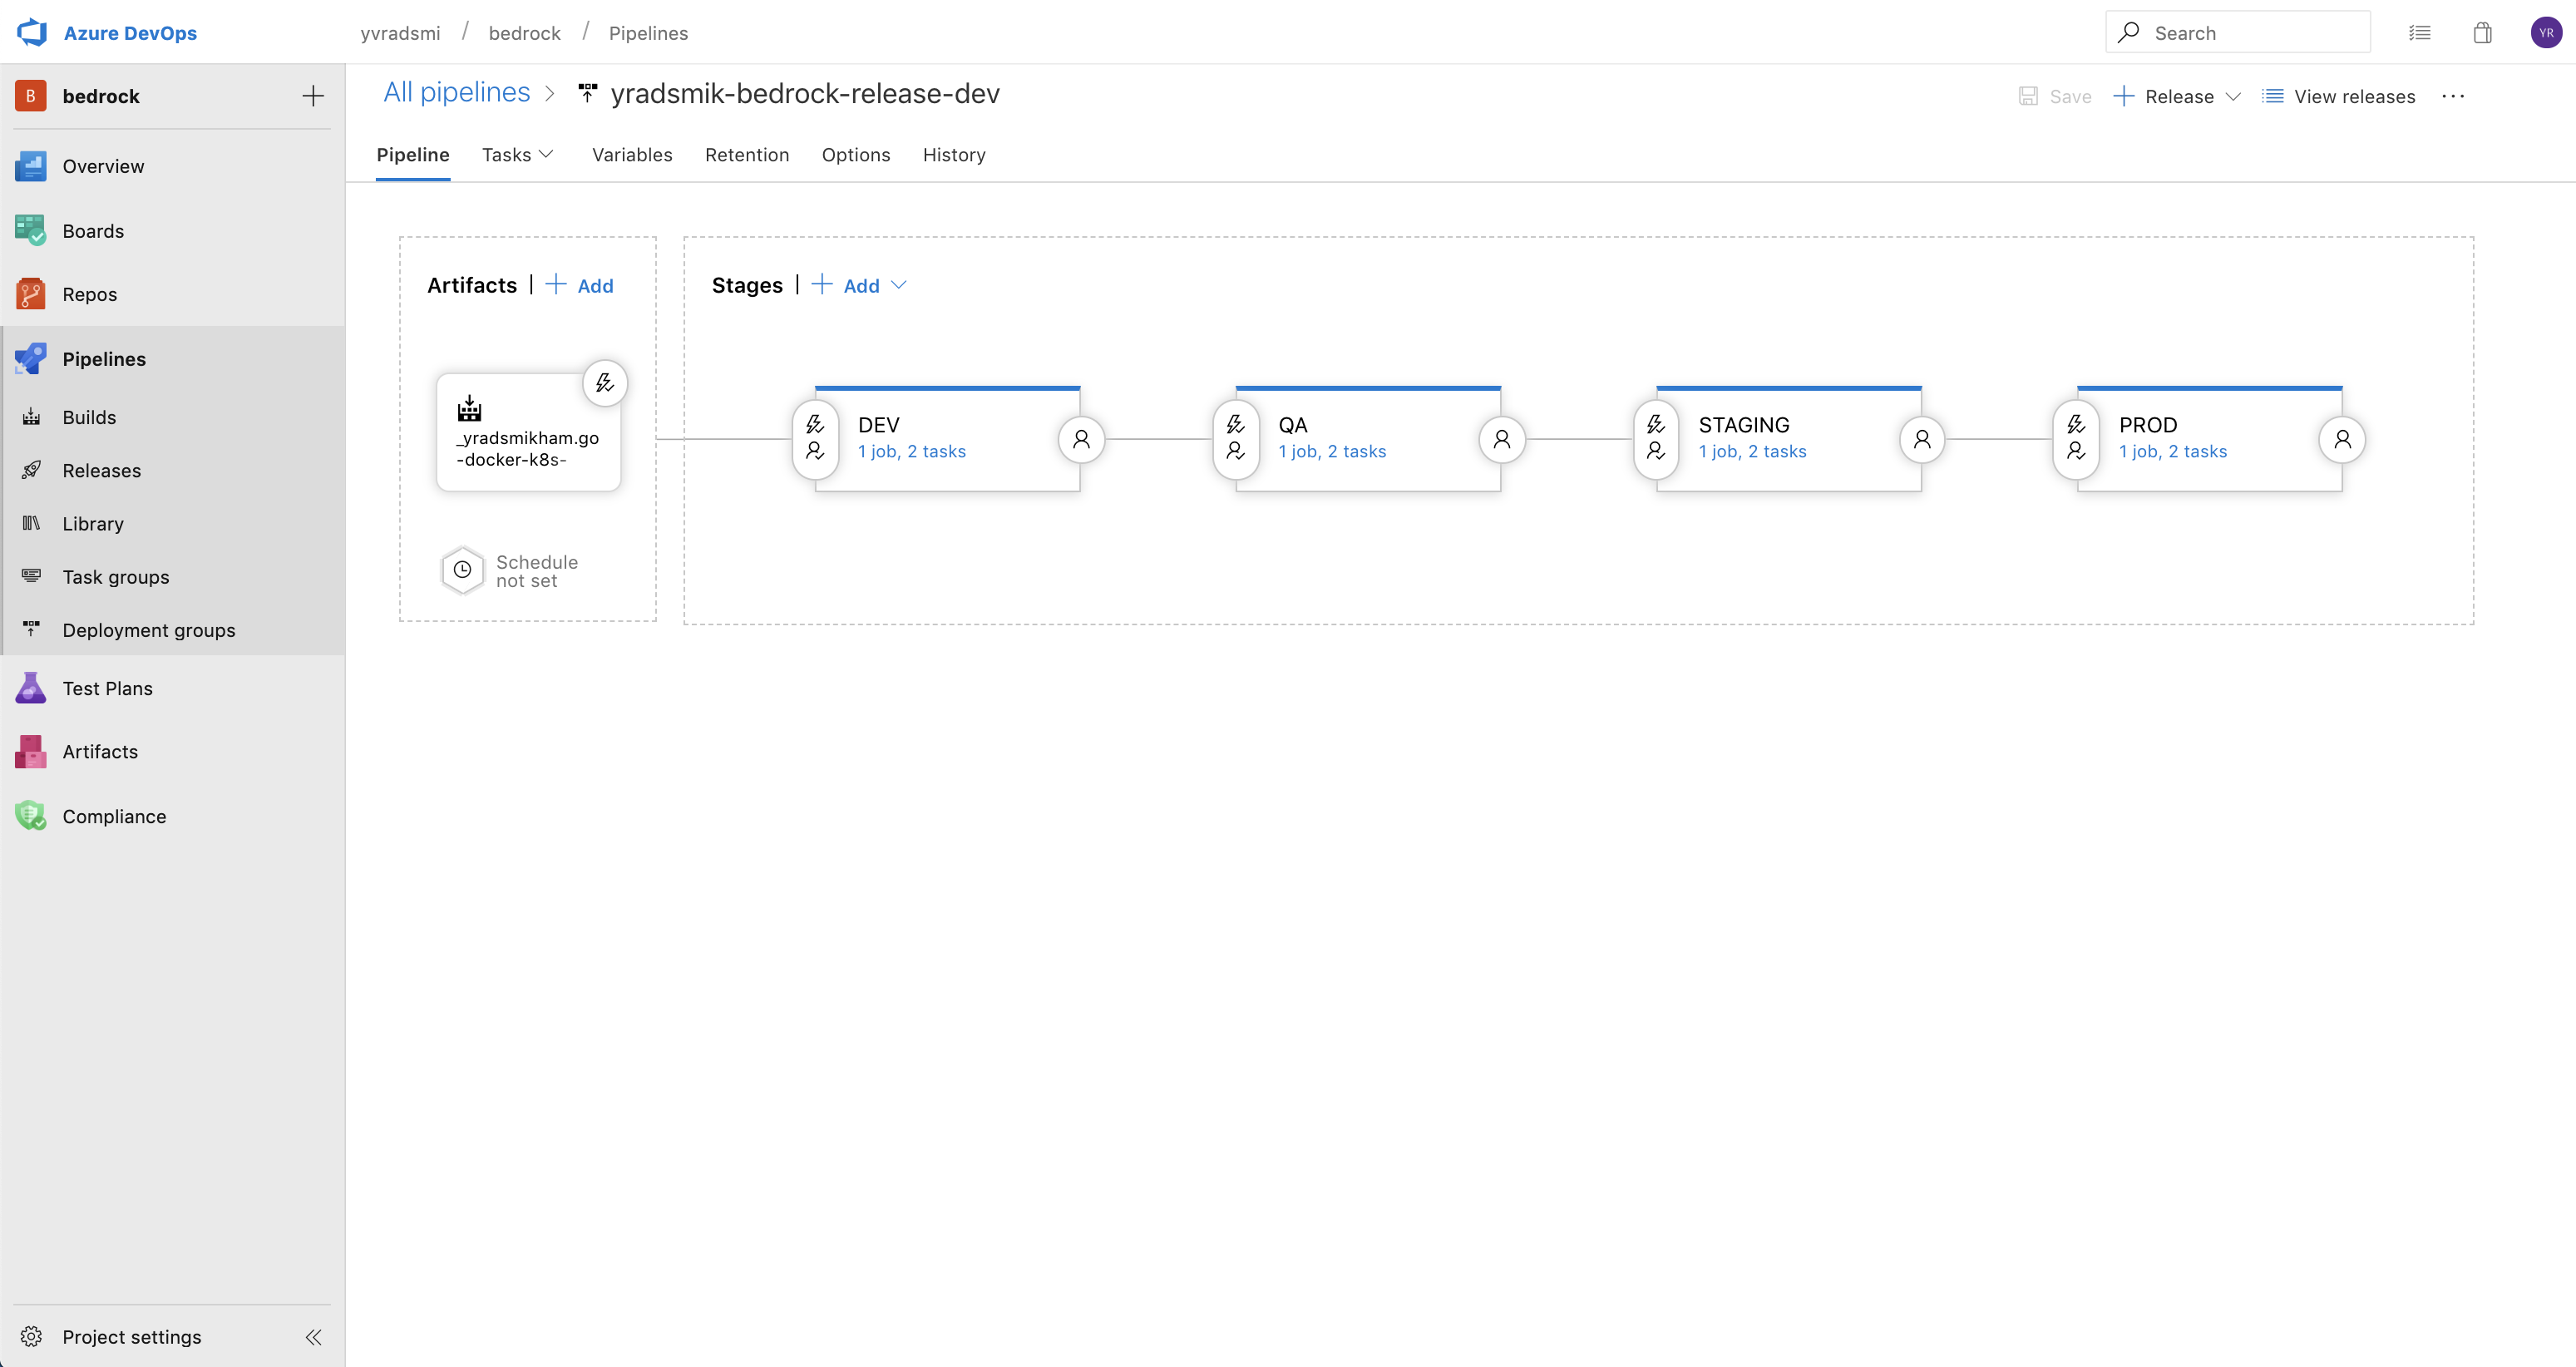
To start off, you can create the first stage (e.g. Dev) using an Empty Job template. For this example, the different stages in the pipeline resemble environments in your DevOps workflow.
If the stages succeeding Dev are the same as the Dev stage, you can highlight the Dev stage and click Add > Clone Stage.
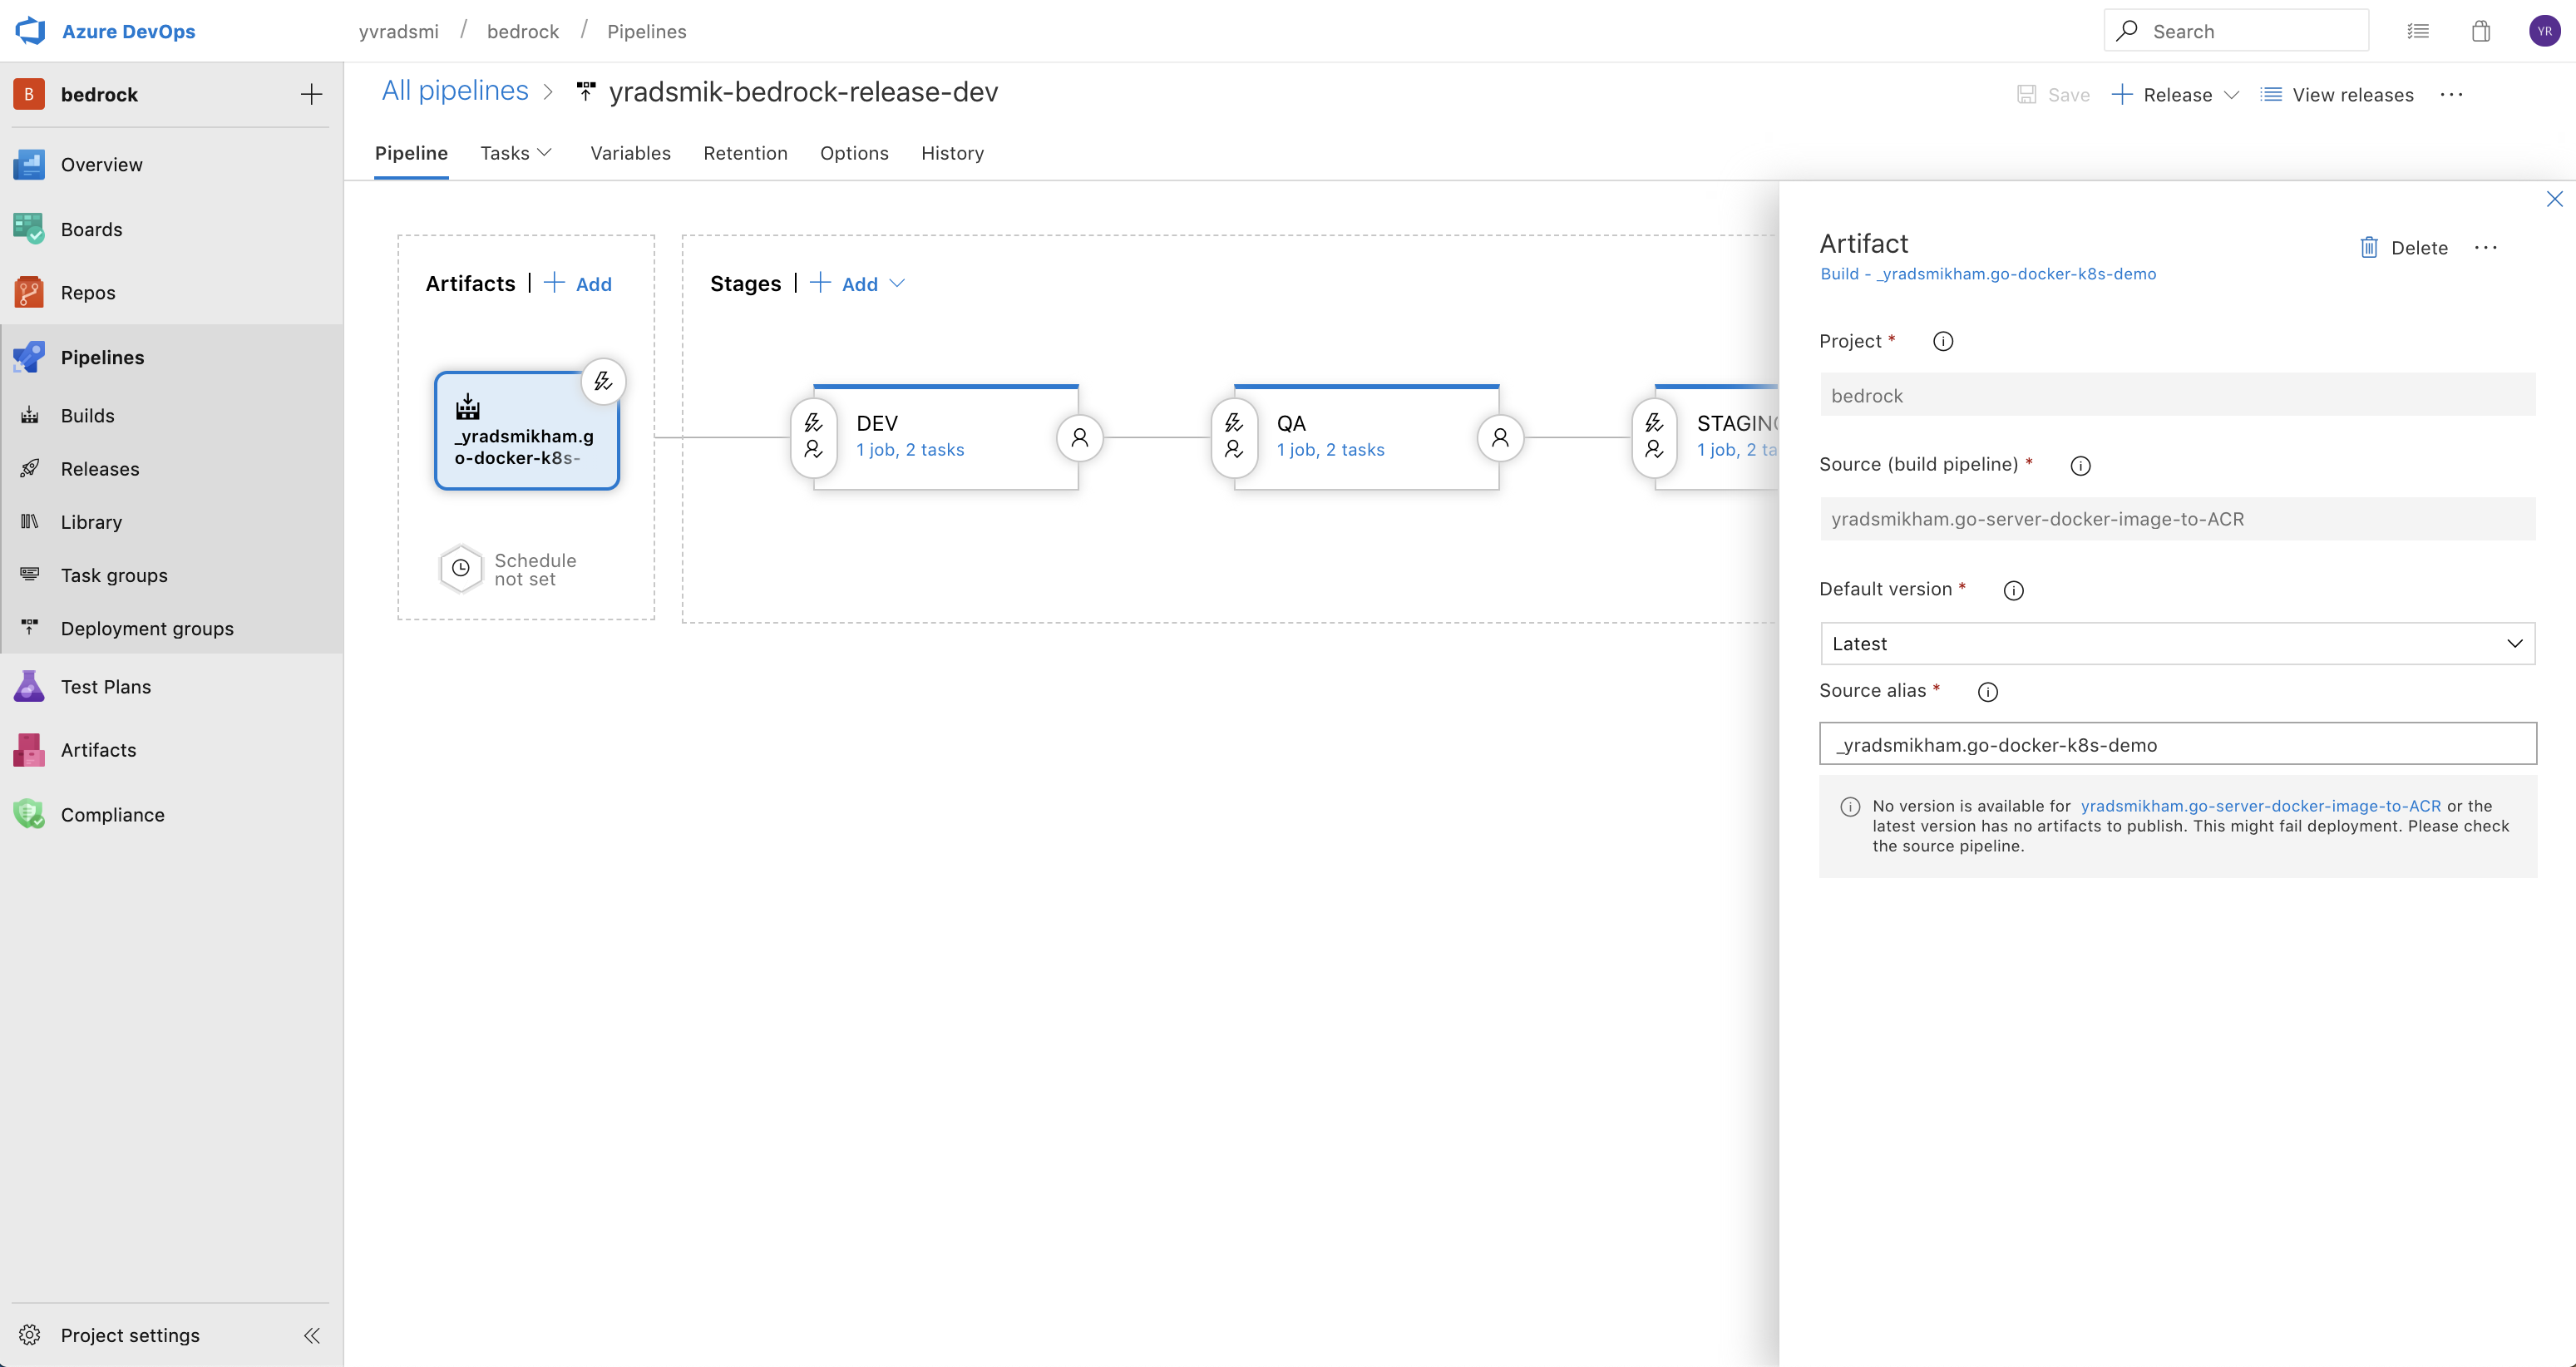
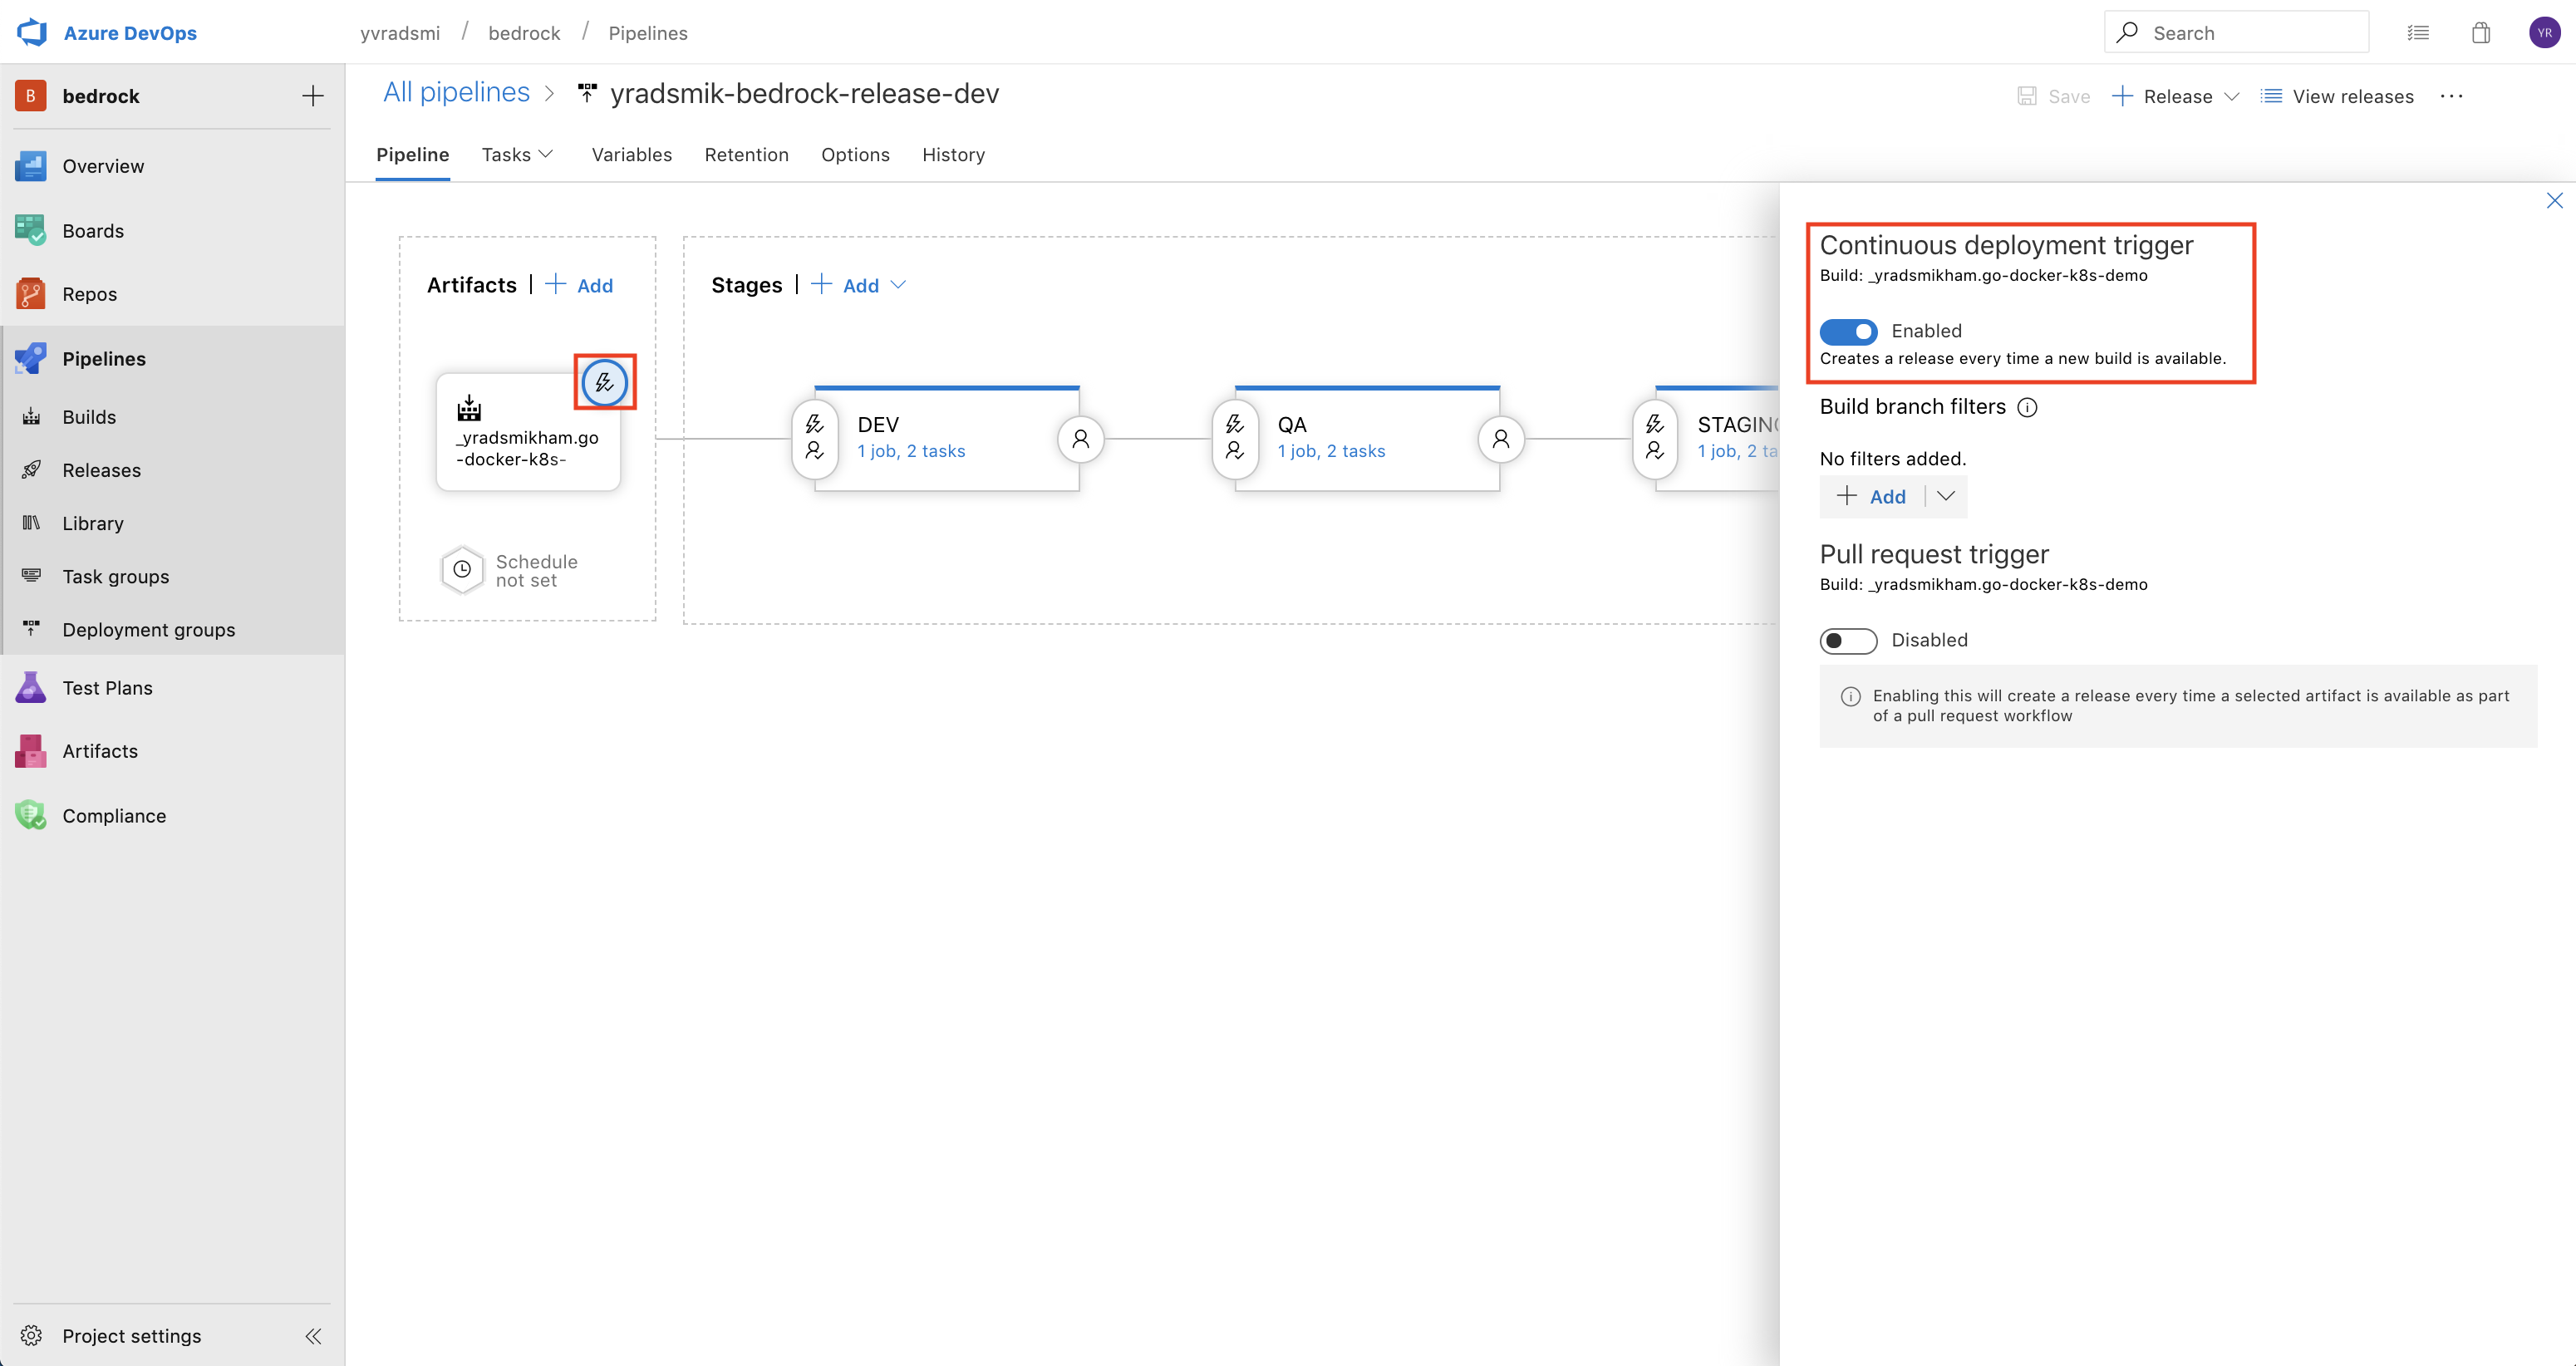
The artifact that is used can be an ACR resource or an Azure Pipeline Build. If you would like to set it up using an ACR, there are some detailed instructions available here. Here, we are triggering the Release off of another Azure Pipeline Build, and enabling continuous deployment trigger.
The Release should look similar to the following, where updates to the build artifact will automatically trigger the execution of tasks within the stages.
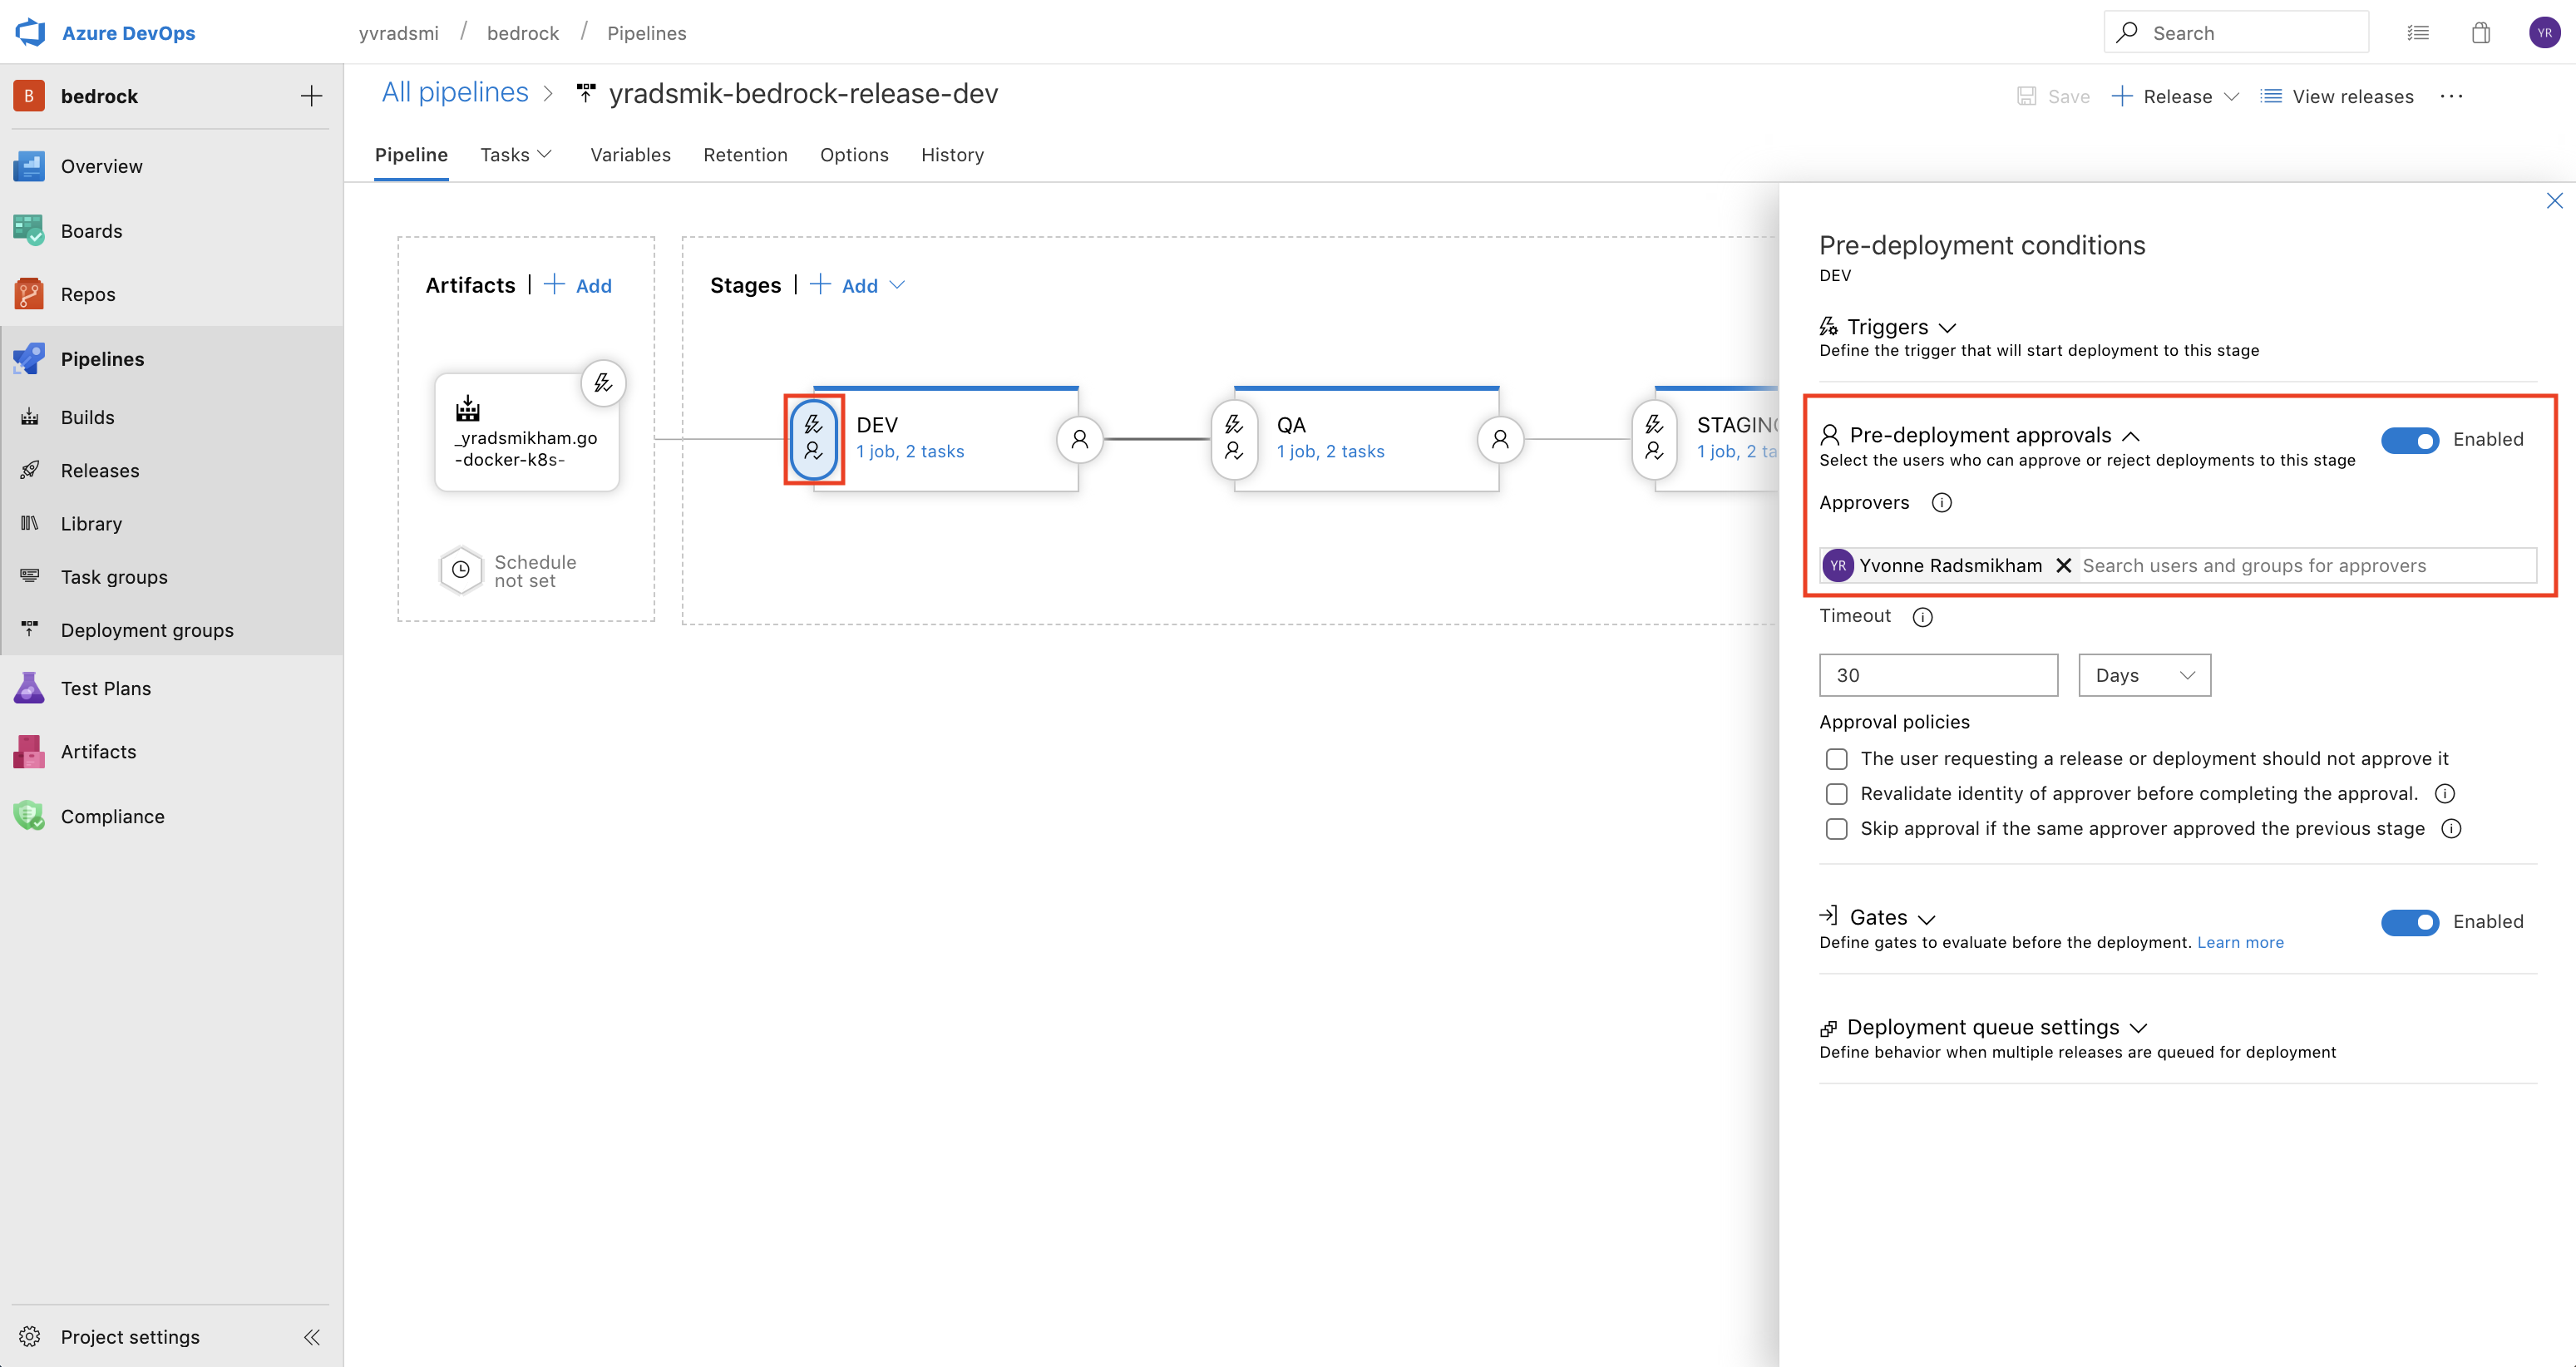
Each stage should require manual approval from a specific user in order to proceed to the next stage.
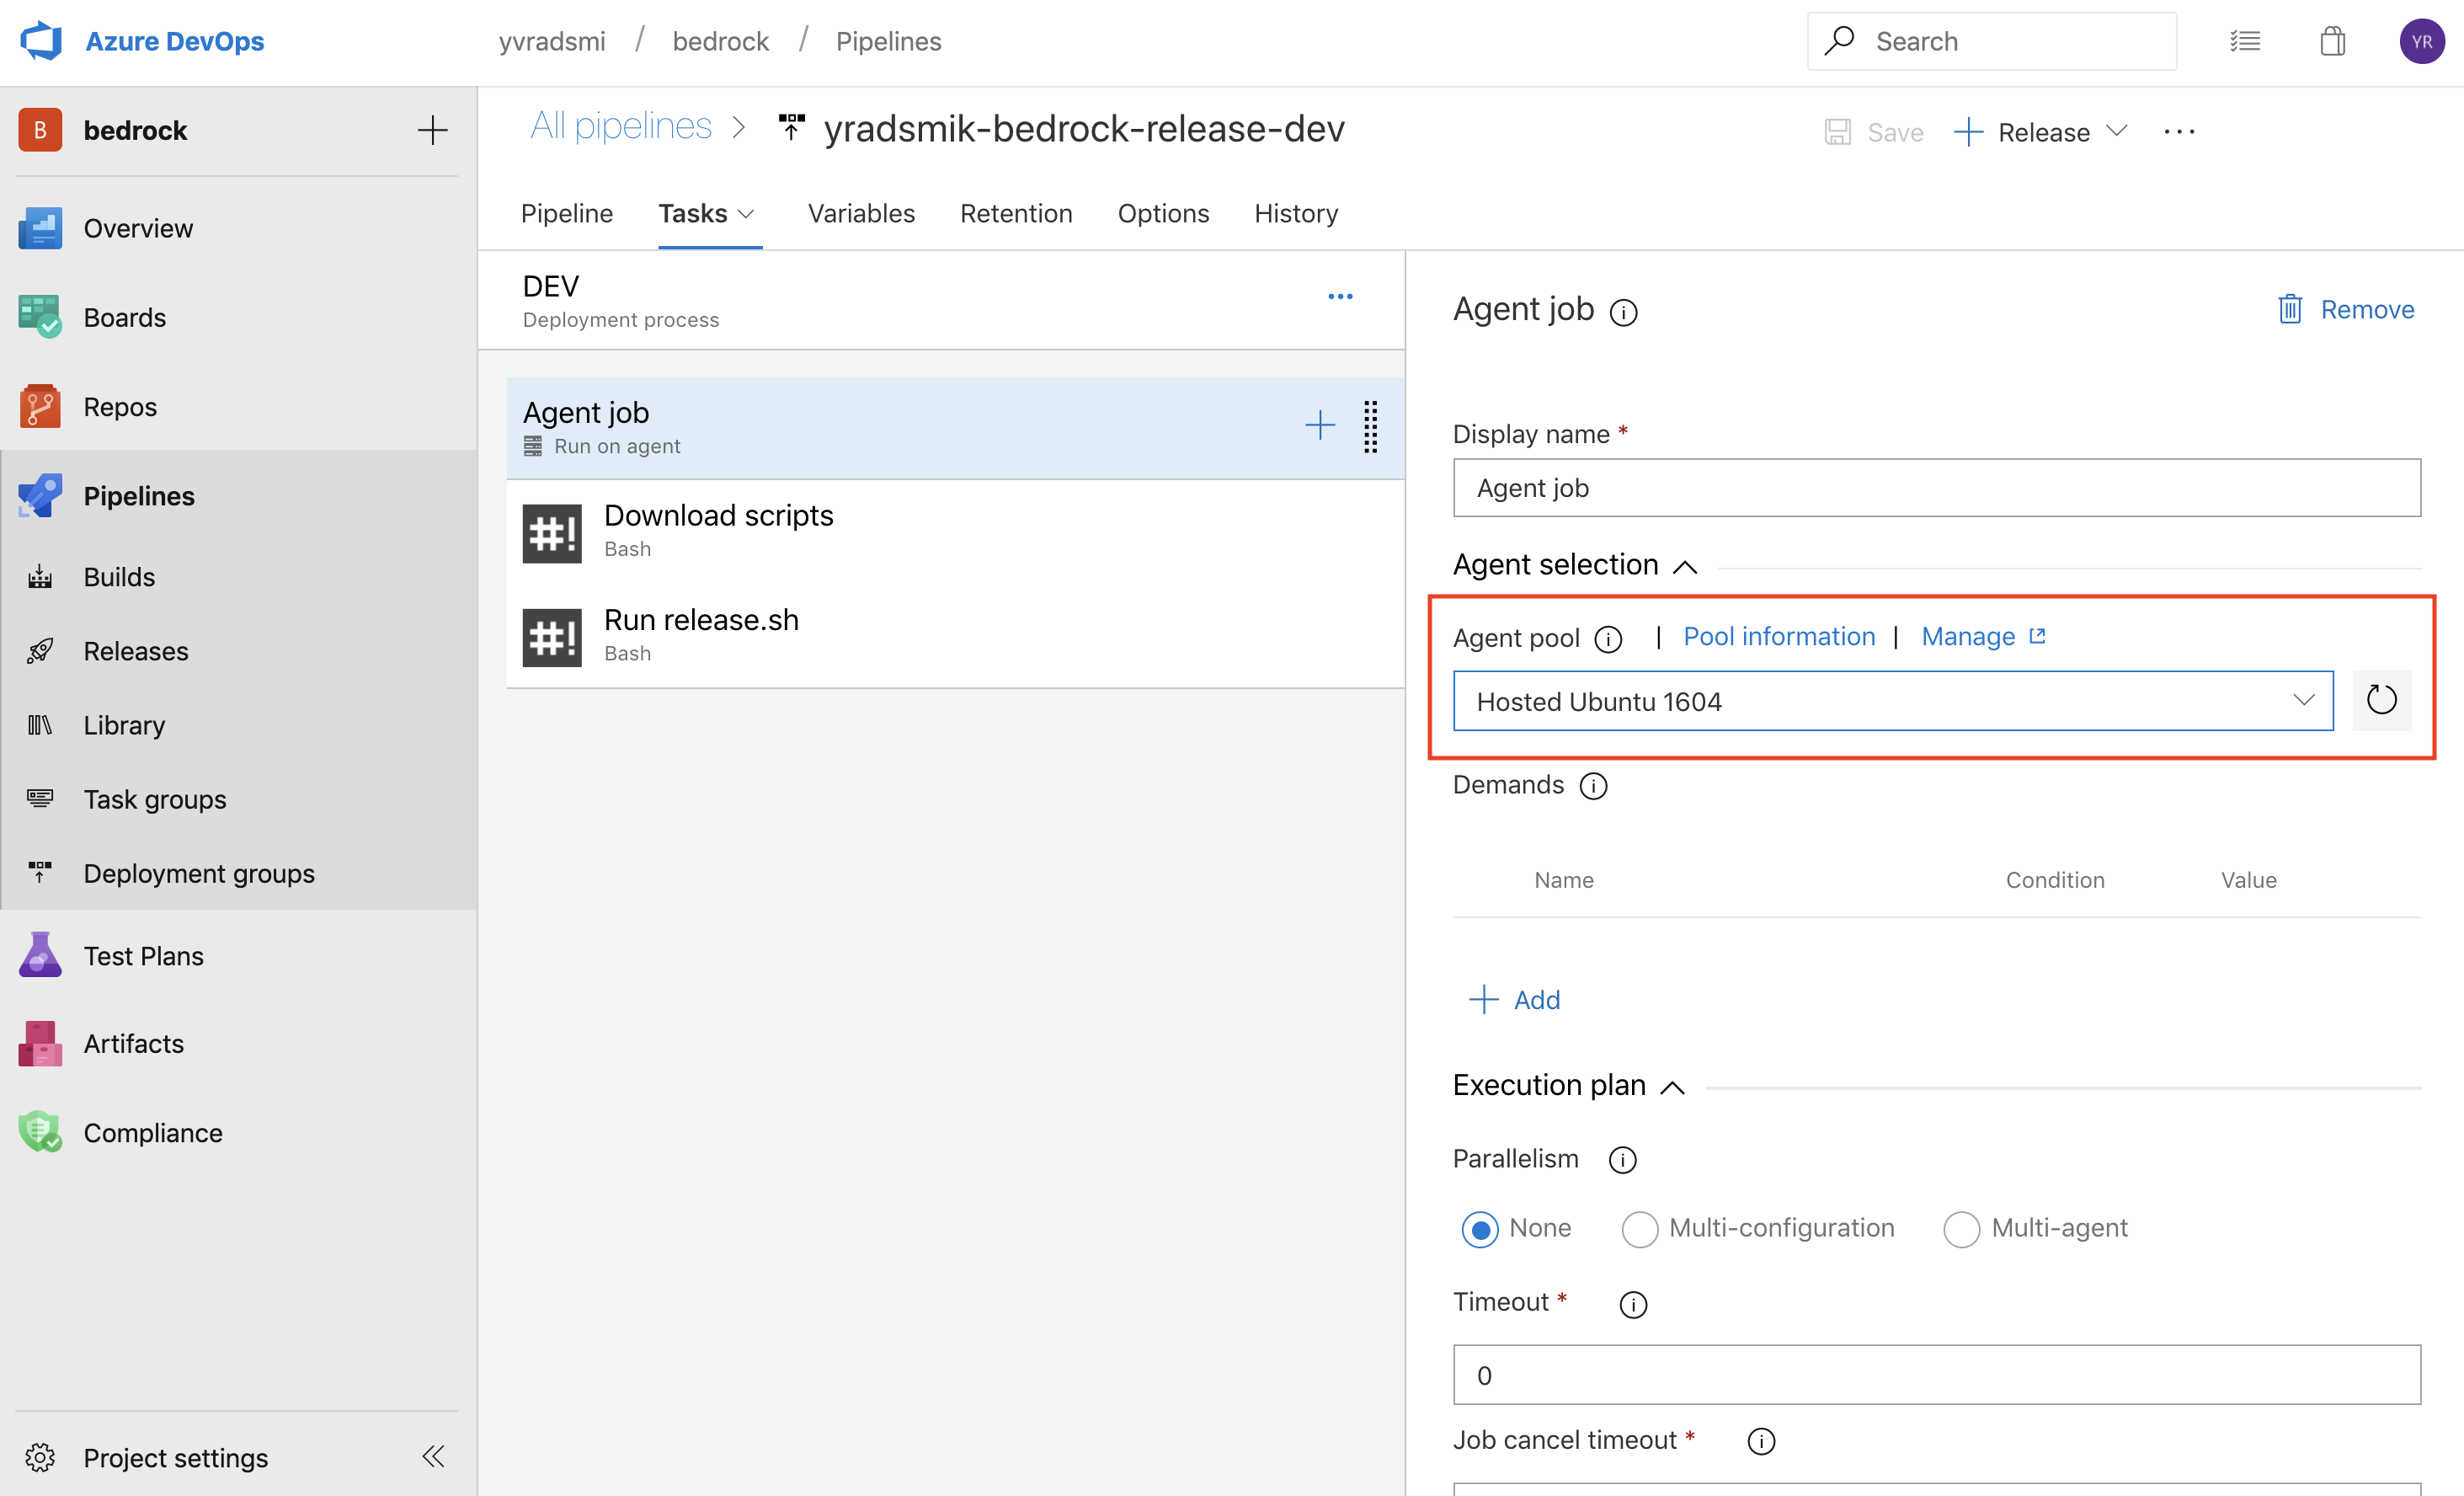
Moving on to Tasks and highlighting Agent Job will bring up a side panel that allows you to select an Agent Pool that is appropriate for the task. Because the scripts will use Fabrikate, an Ubuntu 1604 Agent Pool is recommended.
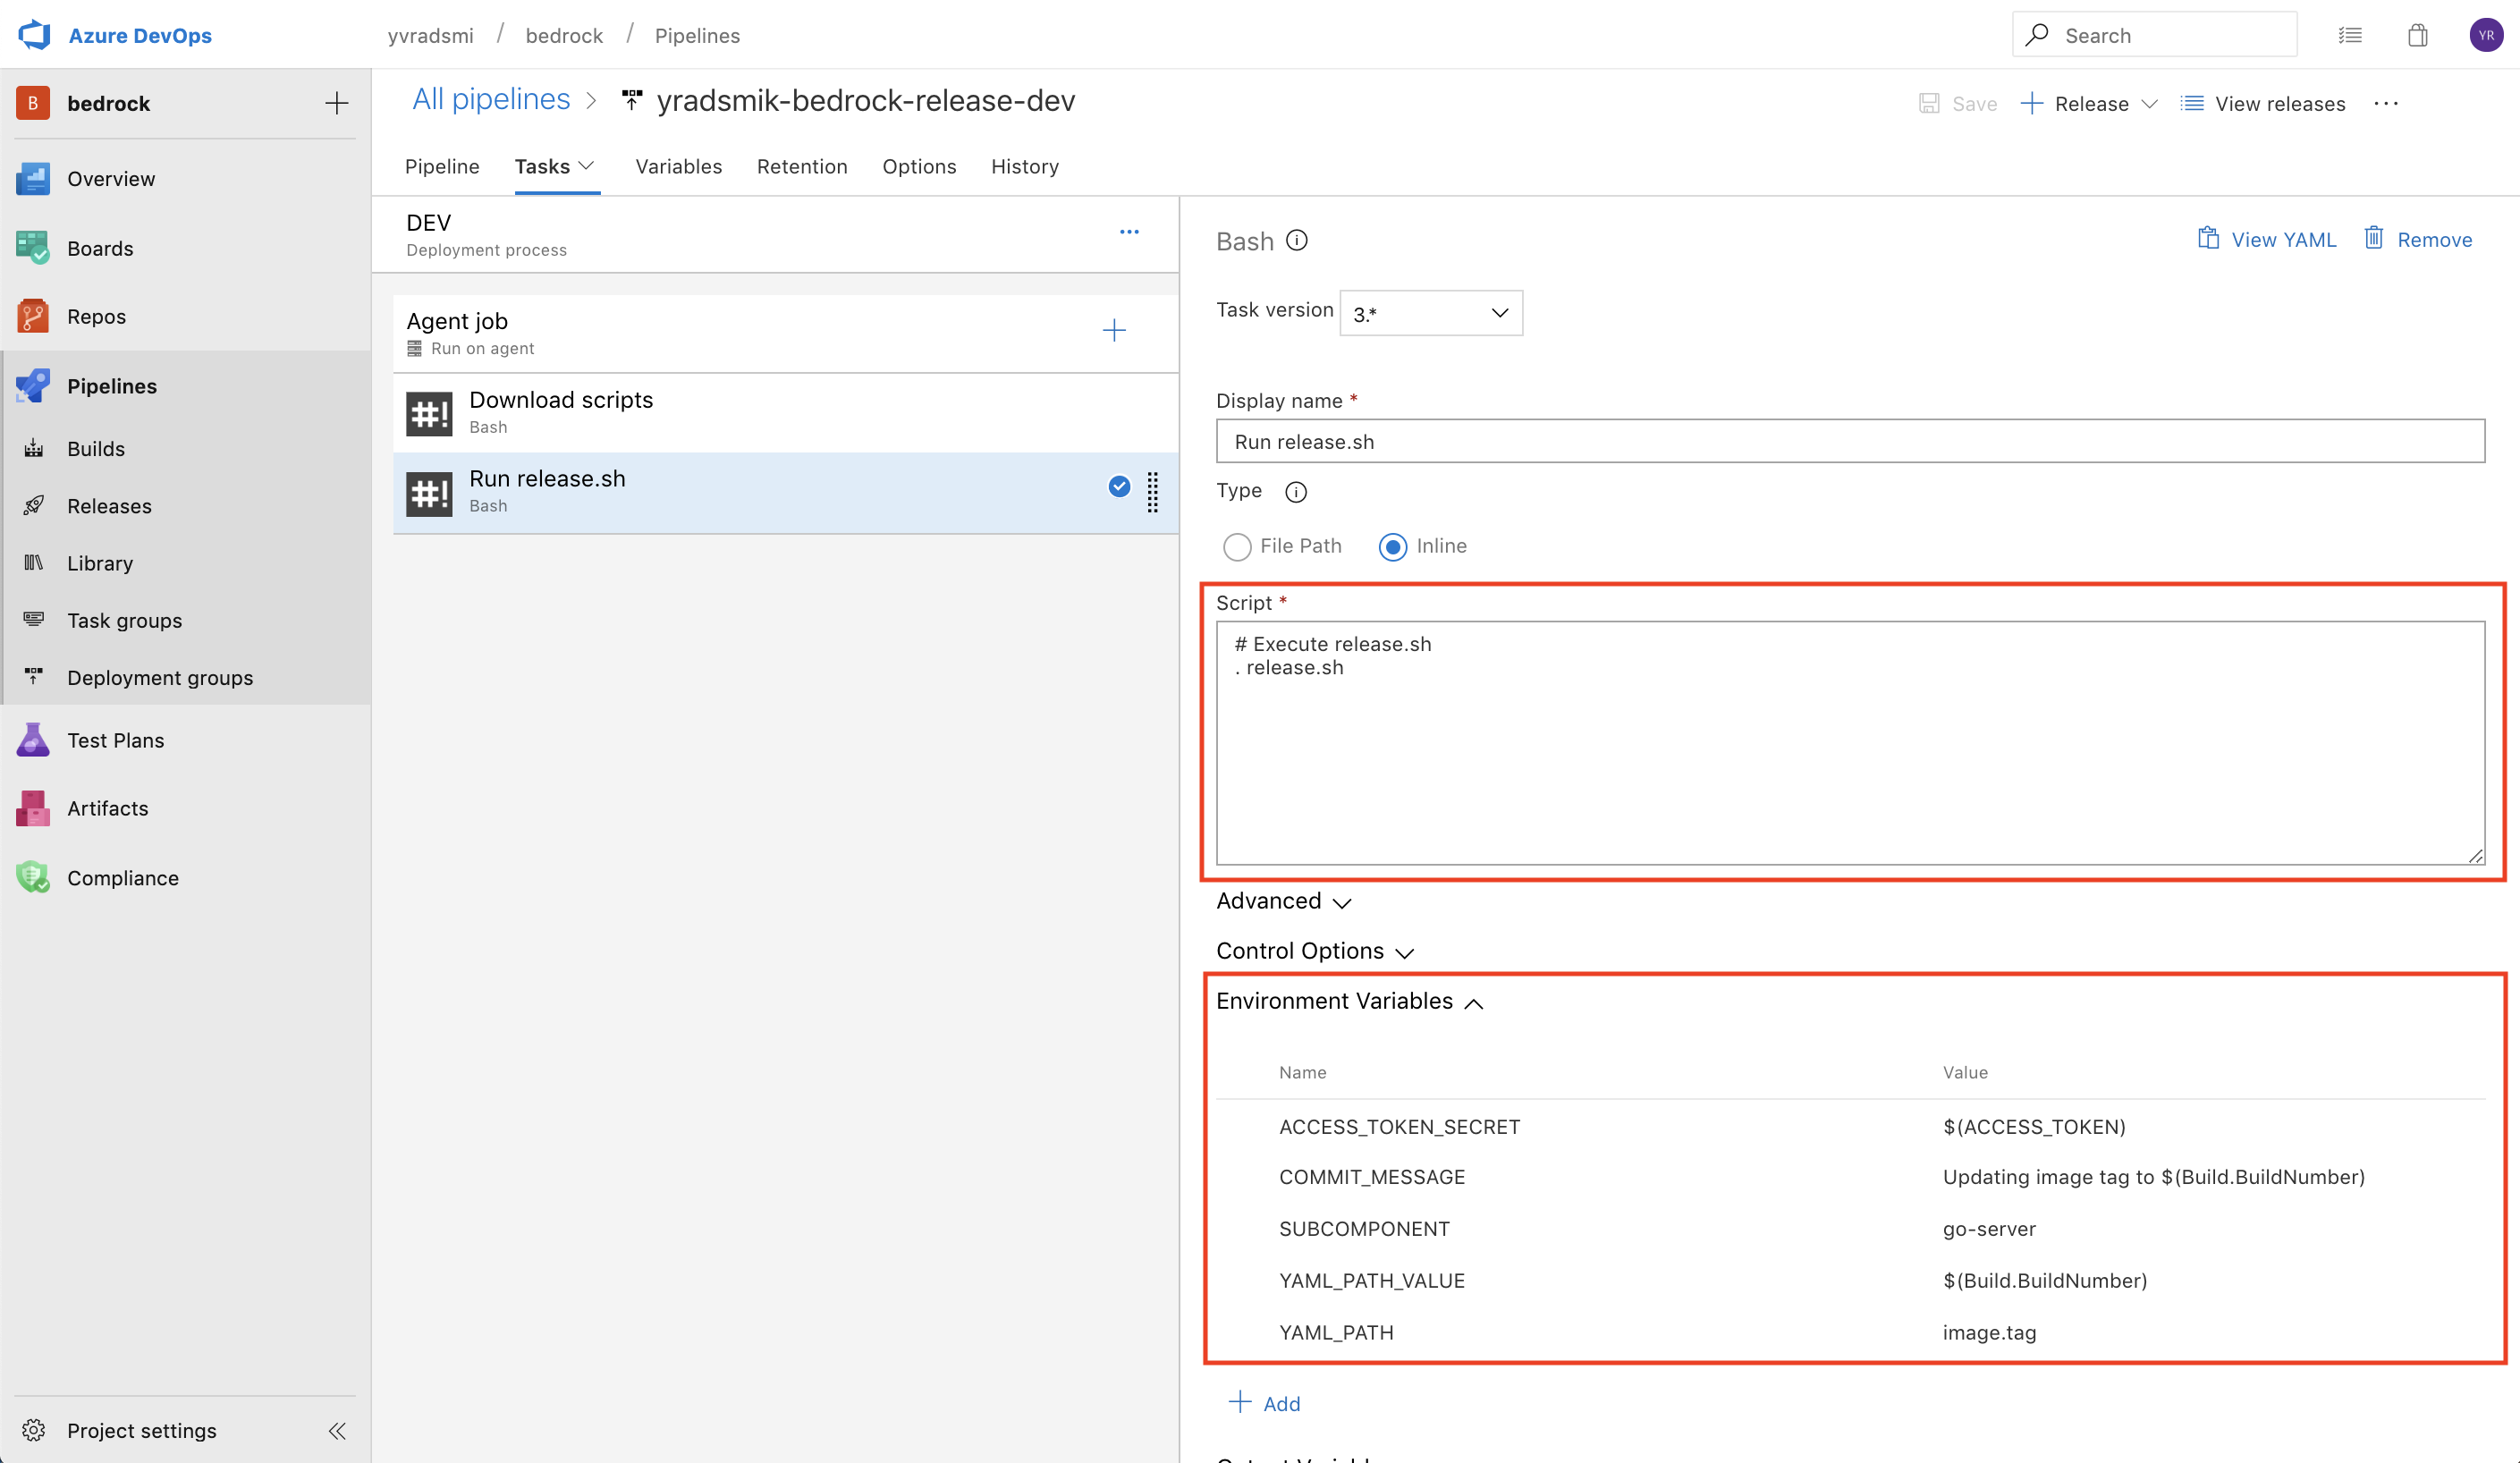
The stages each involve two tasks: Download scripts, and Run release.sh. The Download scripts task downloads the build.sh and release.sh from the Microsoft/Bedrock repo. The inline script for Download scripts is as follows:
# Download build.sh
curl https://raw.githubusercontent.com/Microsoft/bedrock/master/gitops/azure-devops/build.sh > build.sh
chmod +x ./build.sh

curl https://raw.githubusercontent.com/Microsoft/bedrock/master/gitops/azure-devops/release.sh > release.sh
chmod +x ./release.sh
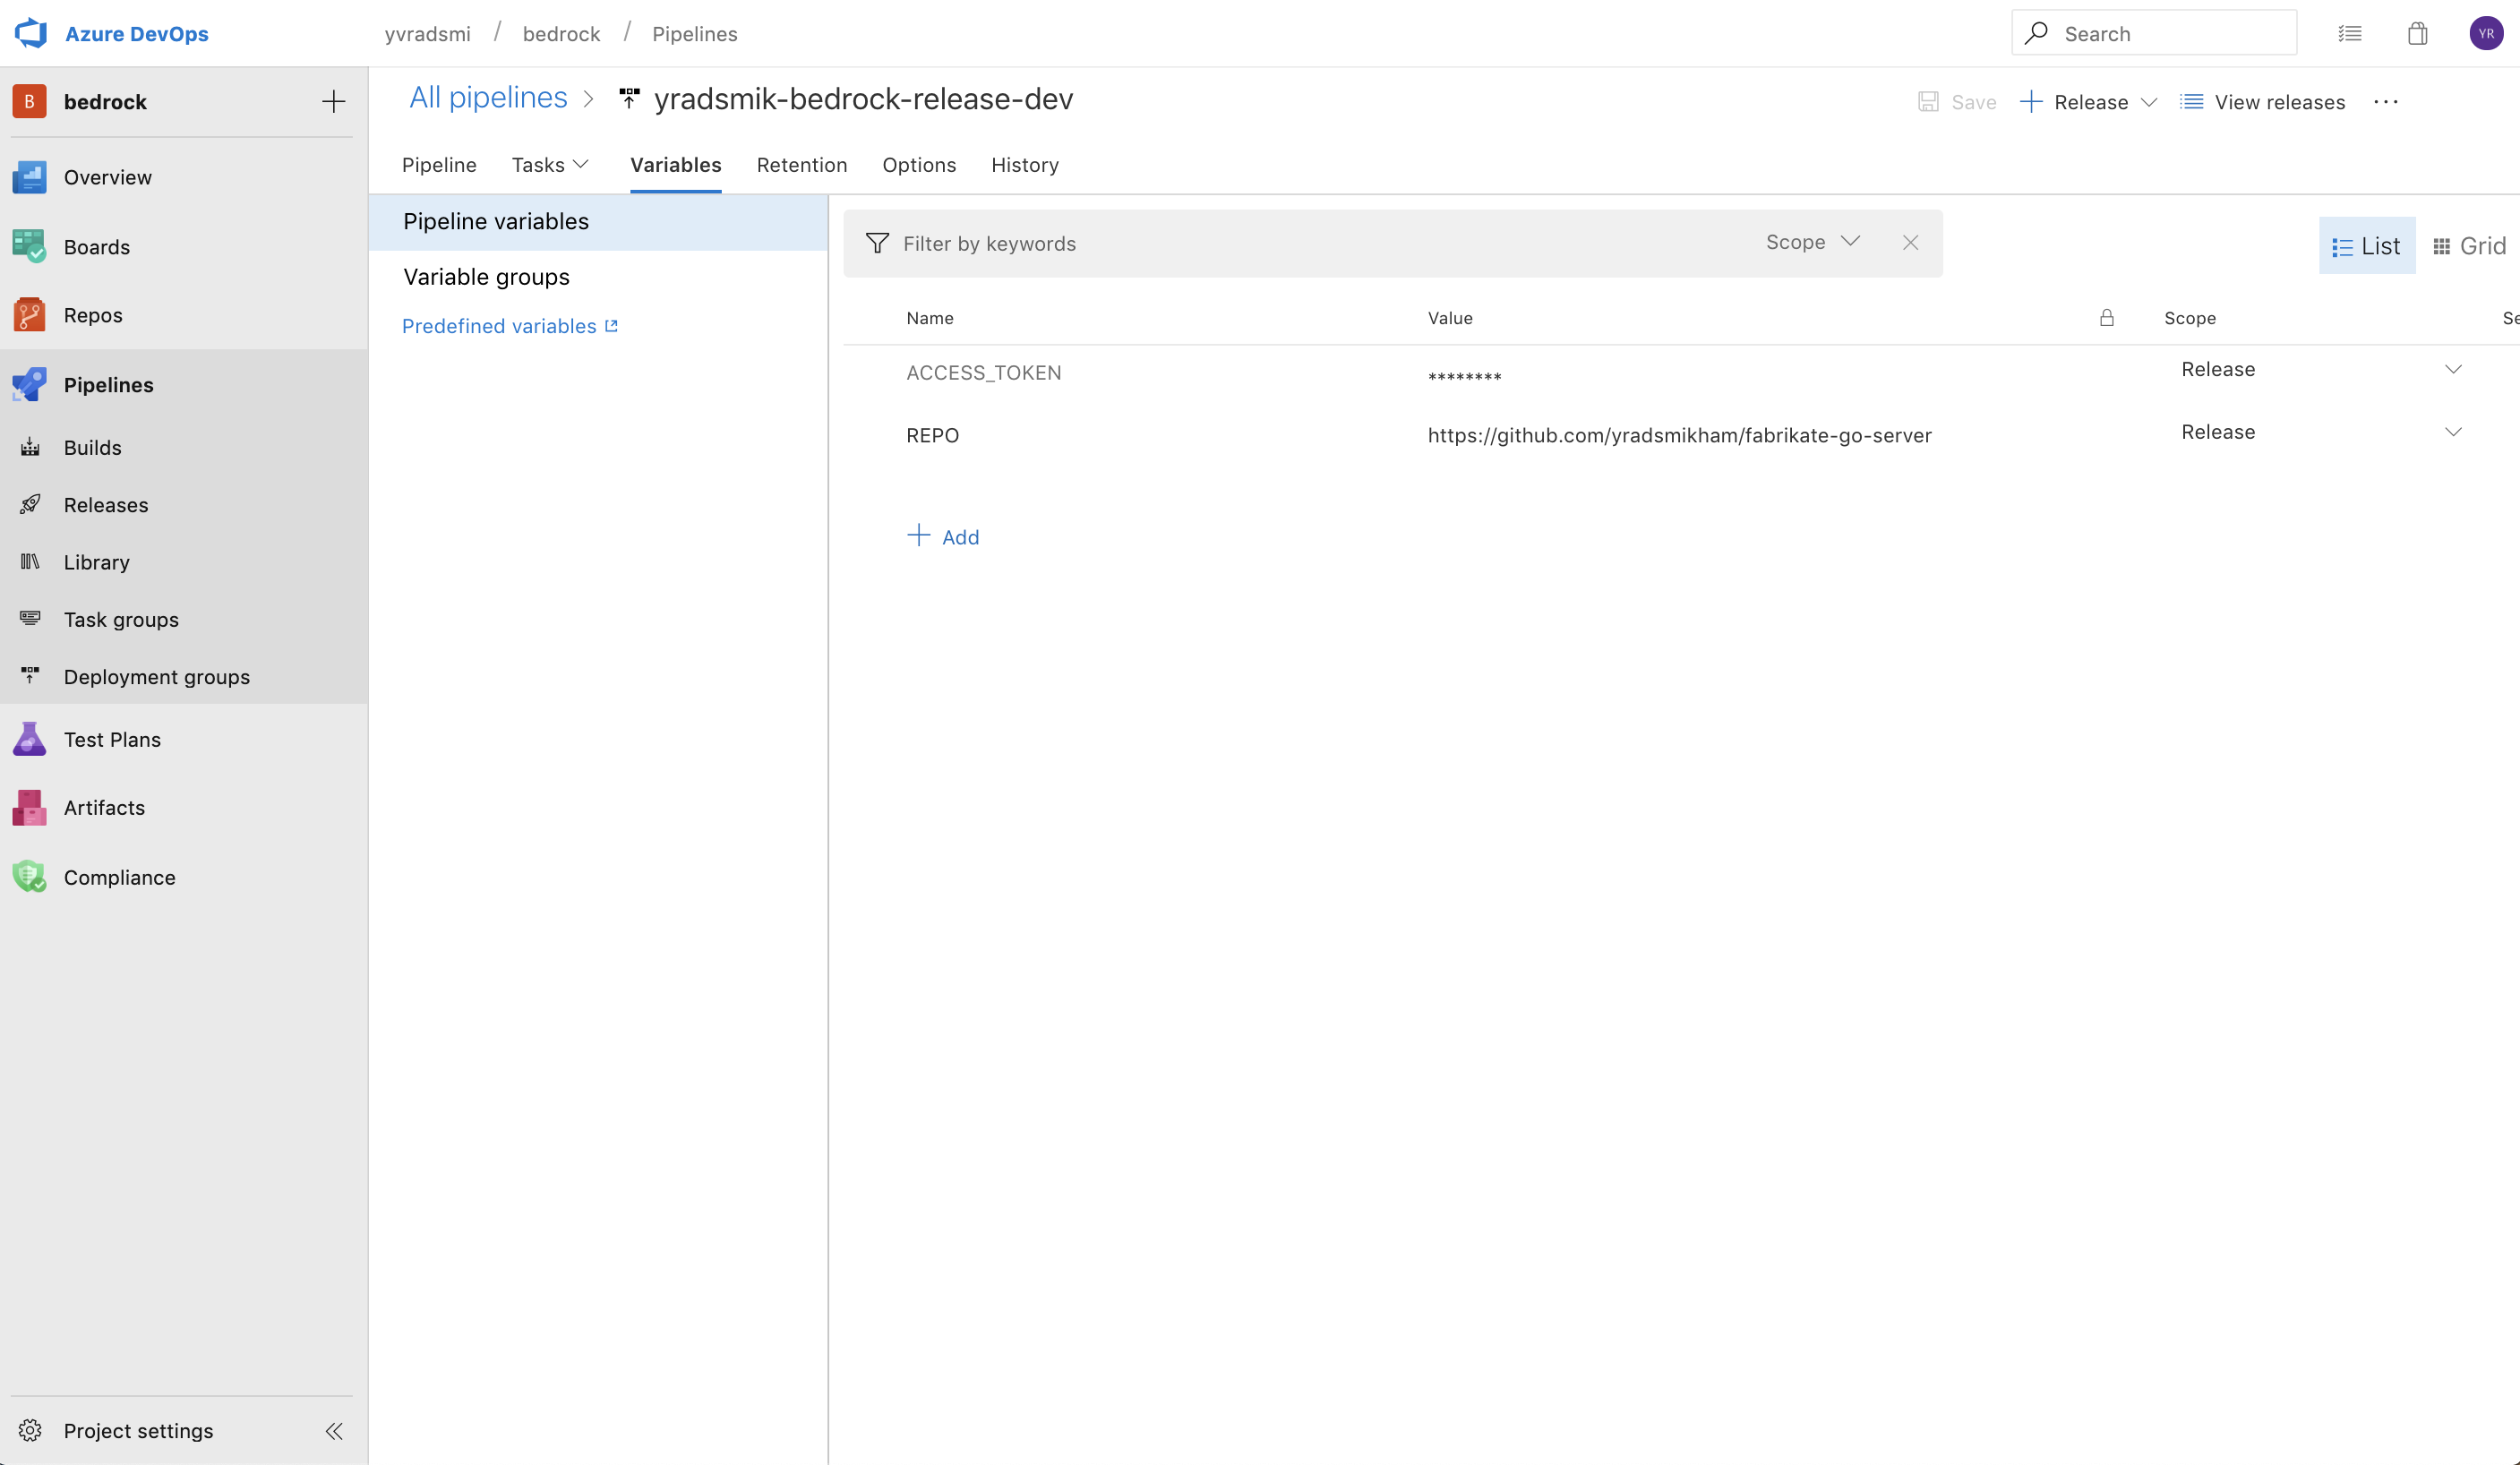
The ACCESS_TOKEN and REPO variables are specifically used in the build.sh, which is sourced in the release.sh. As described before, the ACCESS_TOKEN is the Personal Access Token that grants access to your git account. In this case, the REPO variable is set to be the HLD repo. You will need to add these variables as Pipeline Variables under the Variables tab.
Additionally, add the following environment variables and the inline script to the Run releash.sh task:
Environment Variables:
ACCESS_TOKEN_SECRET: $(ACCESS_TOKEN)
COMMIT_MESSAGE: custom message used when committing and pushing to git
SUBCOMPONENT: the subcomponent within your Fabrikate HLD that should be manipulated
YAML_PATH: the yaml path to the subkey to set (e.g. data.replicas)
YAML_PATH_VALUE: the value to the subkey
Also add the following environment variable
FAB_ENV_NAME: the value of environment this task belongs to for example DEV or QA or PROD etc.
This ensures that when release runs, fabrikate will update the right environment configuration as it executes
fab set --environment "$FAB_ENV_NAME" --subcomponent "$SUBCOMPONENT" "$YAML_PATH=$YAML_PATH_VALUE"
As the subcomponent definition is updated HLD build pipeline will trigger and update the manifest repo with changes only for a specific environment.
Now add
Inline Script:
# Execute release.sh
. release.sh
Make sure to incorporate these changes for every stage in the pipeline above.
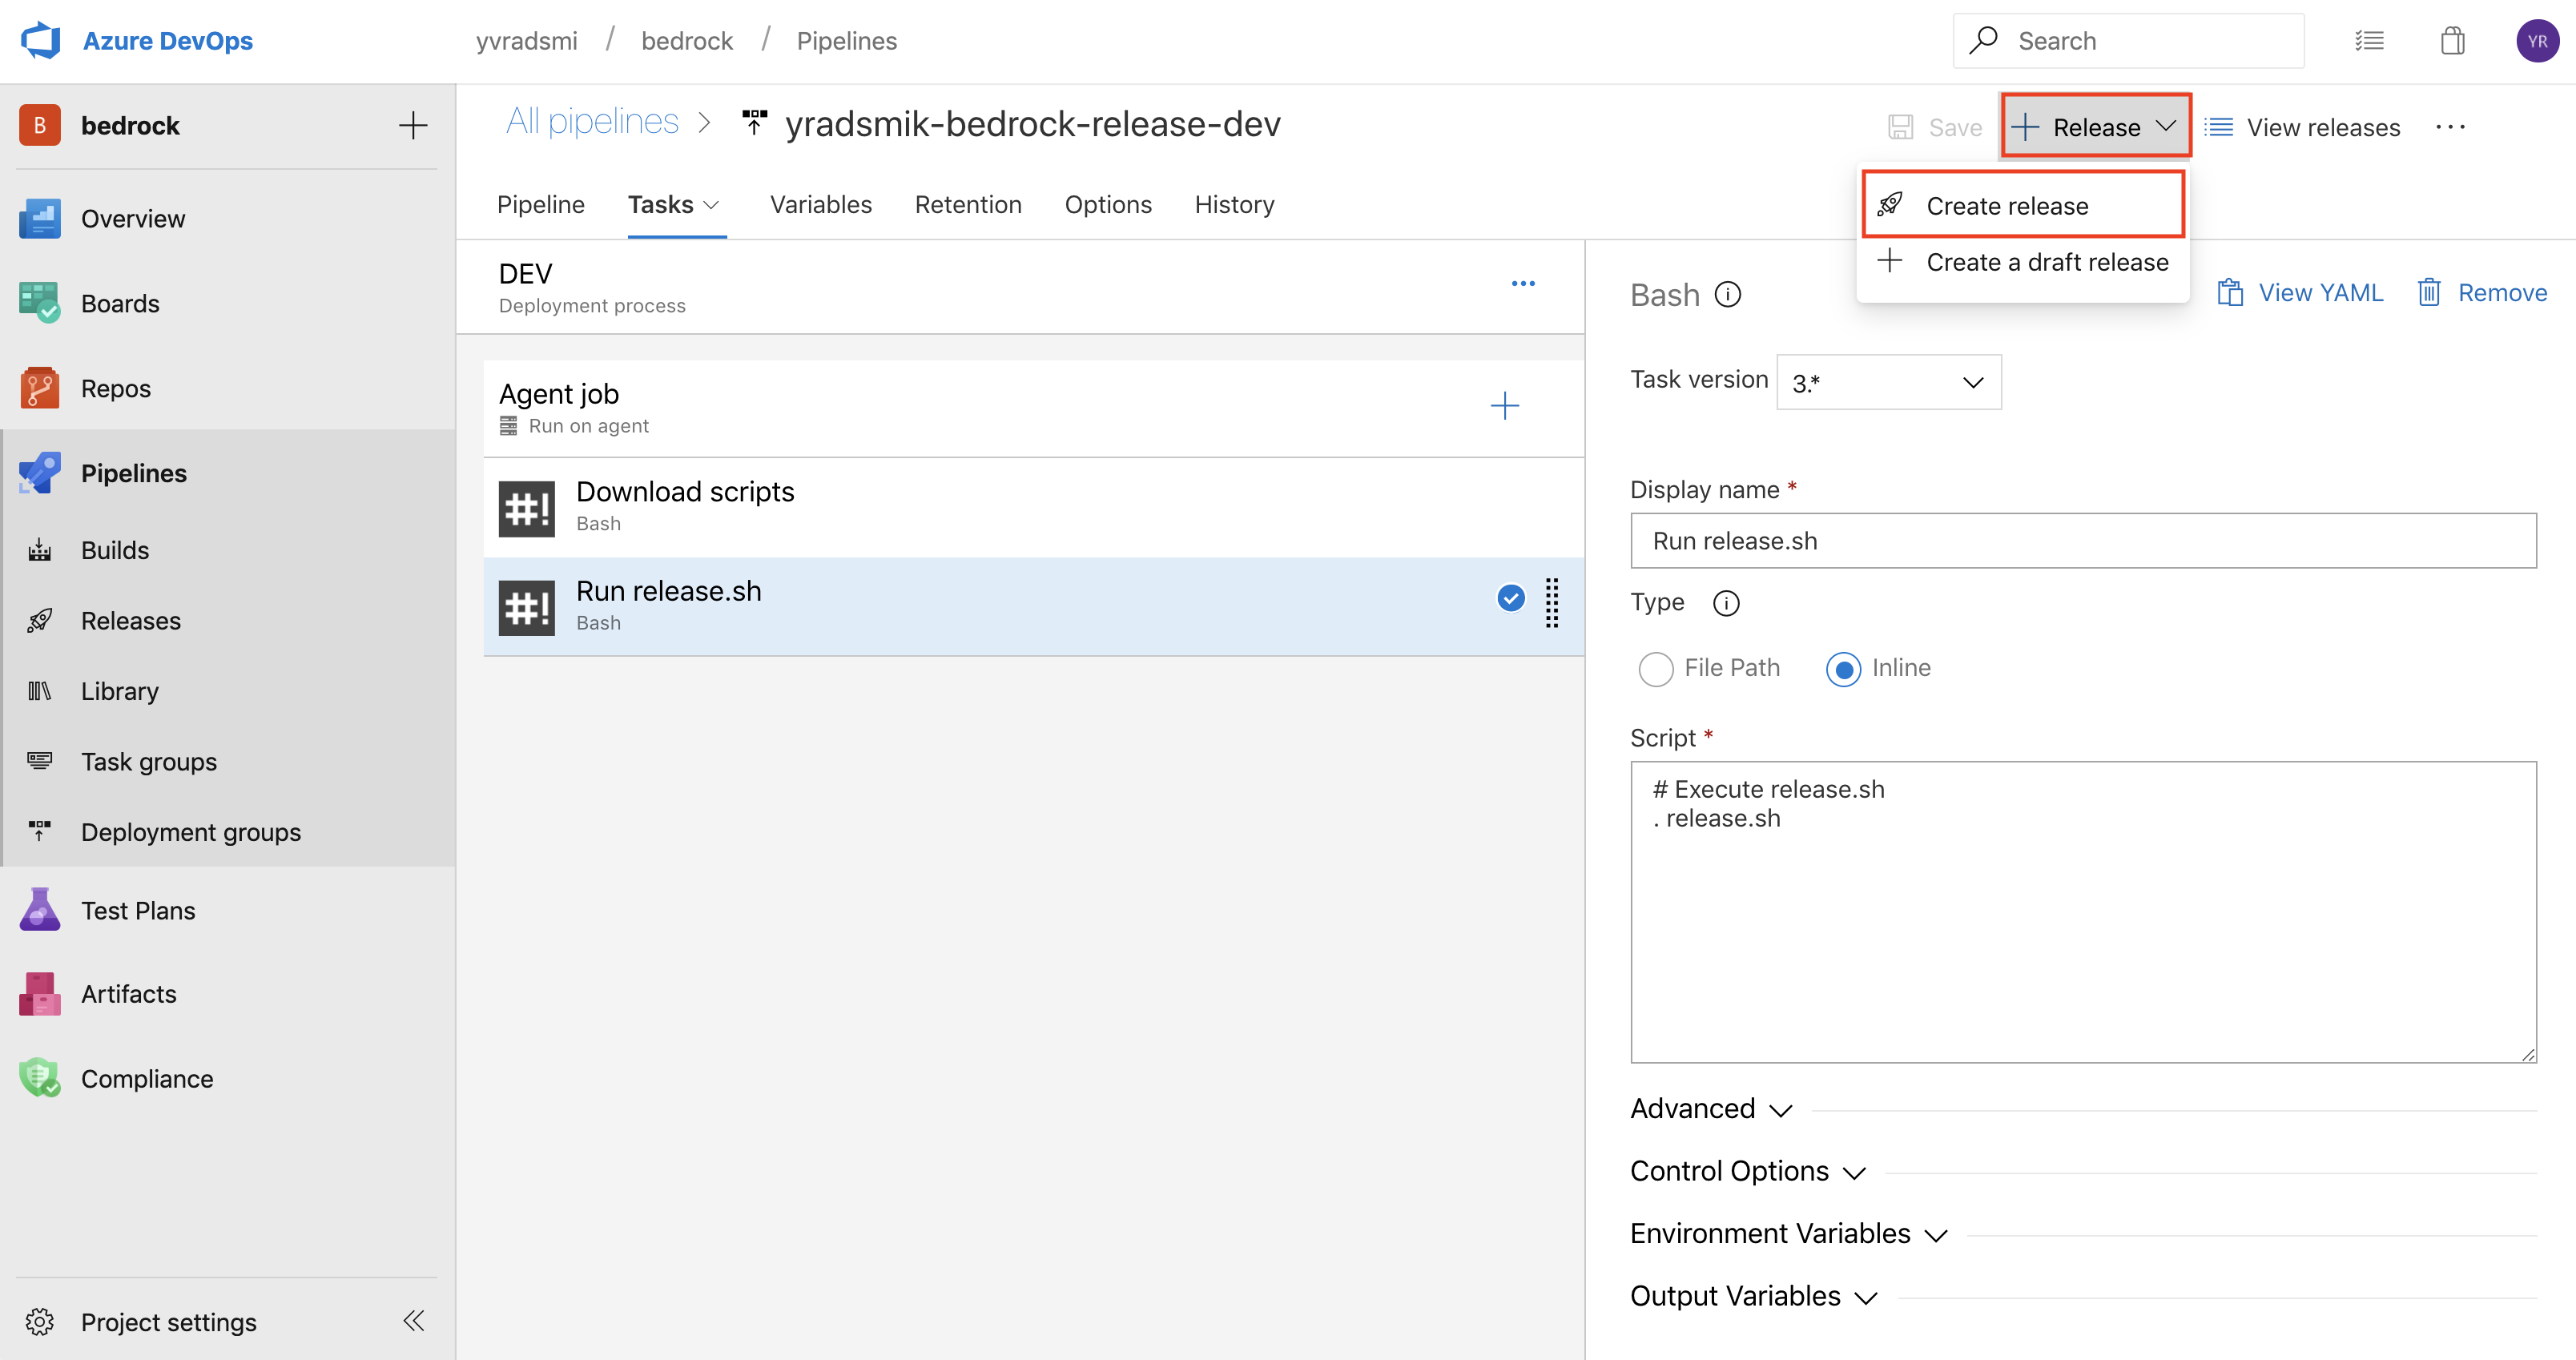
When this is all complete, click Save, and run your first Release! You can do this by navigating to the Release drop down at the top right, and then selecting Create release.
After the Release runs successfully, the new application image that was generated in the Pipeline Build (Step #2) should now be referenced appropriately in the HLD.
5. Clone a Release
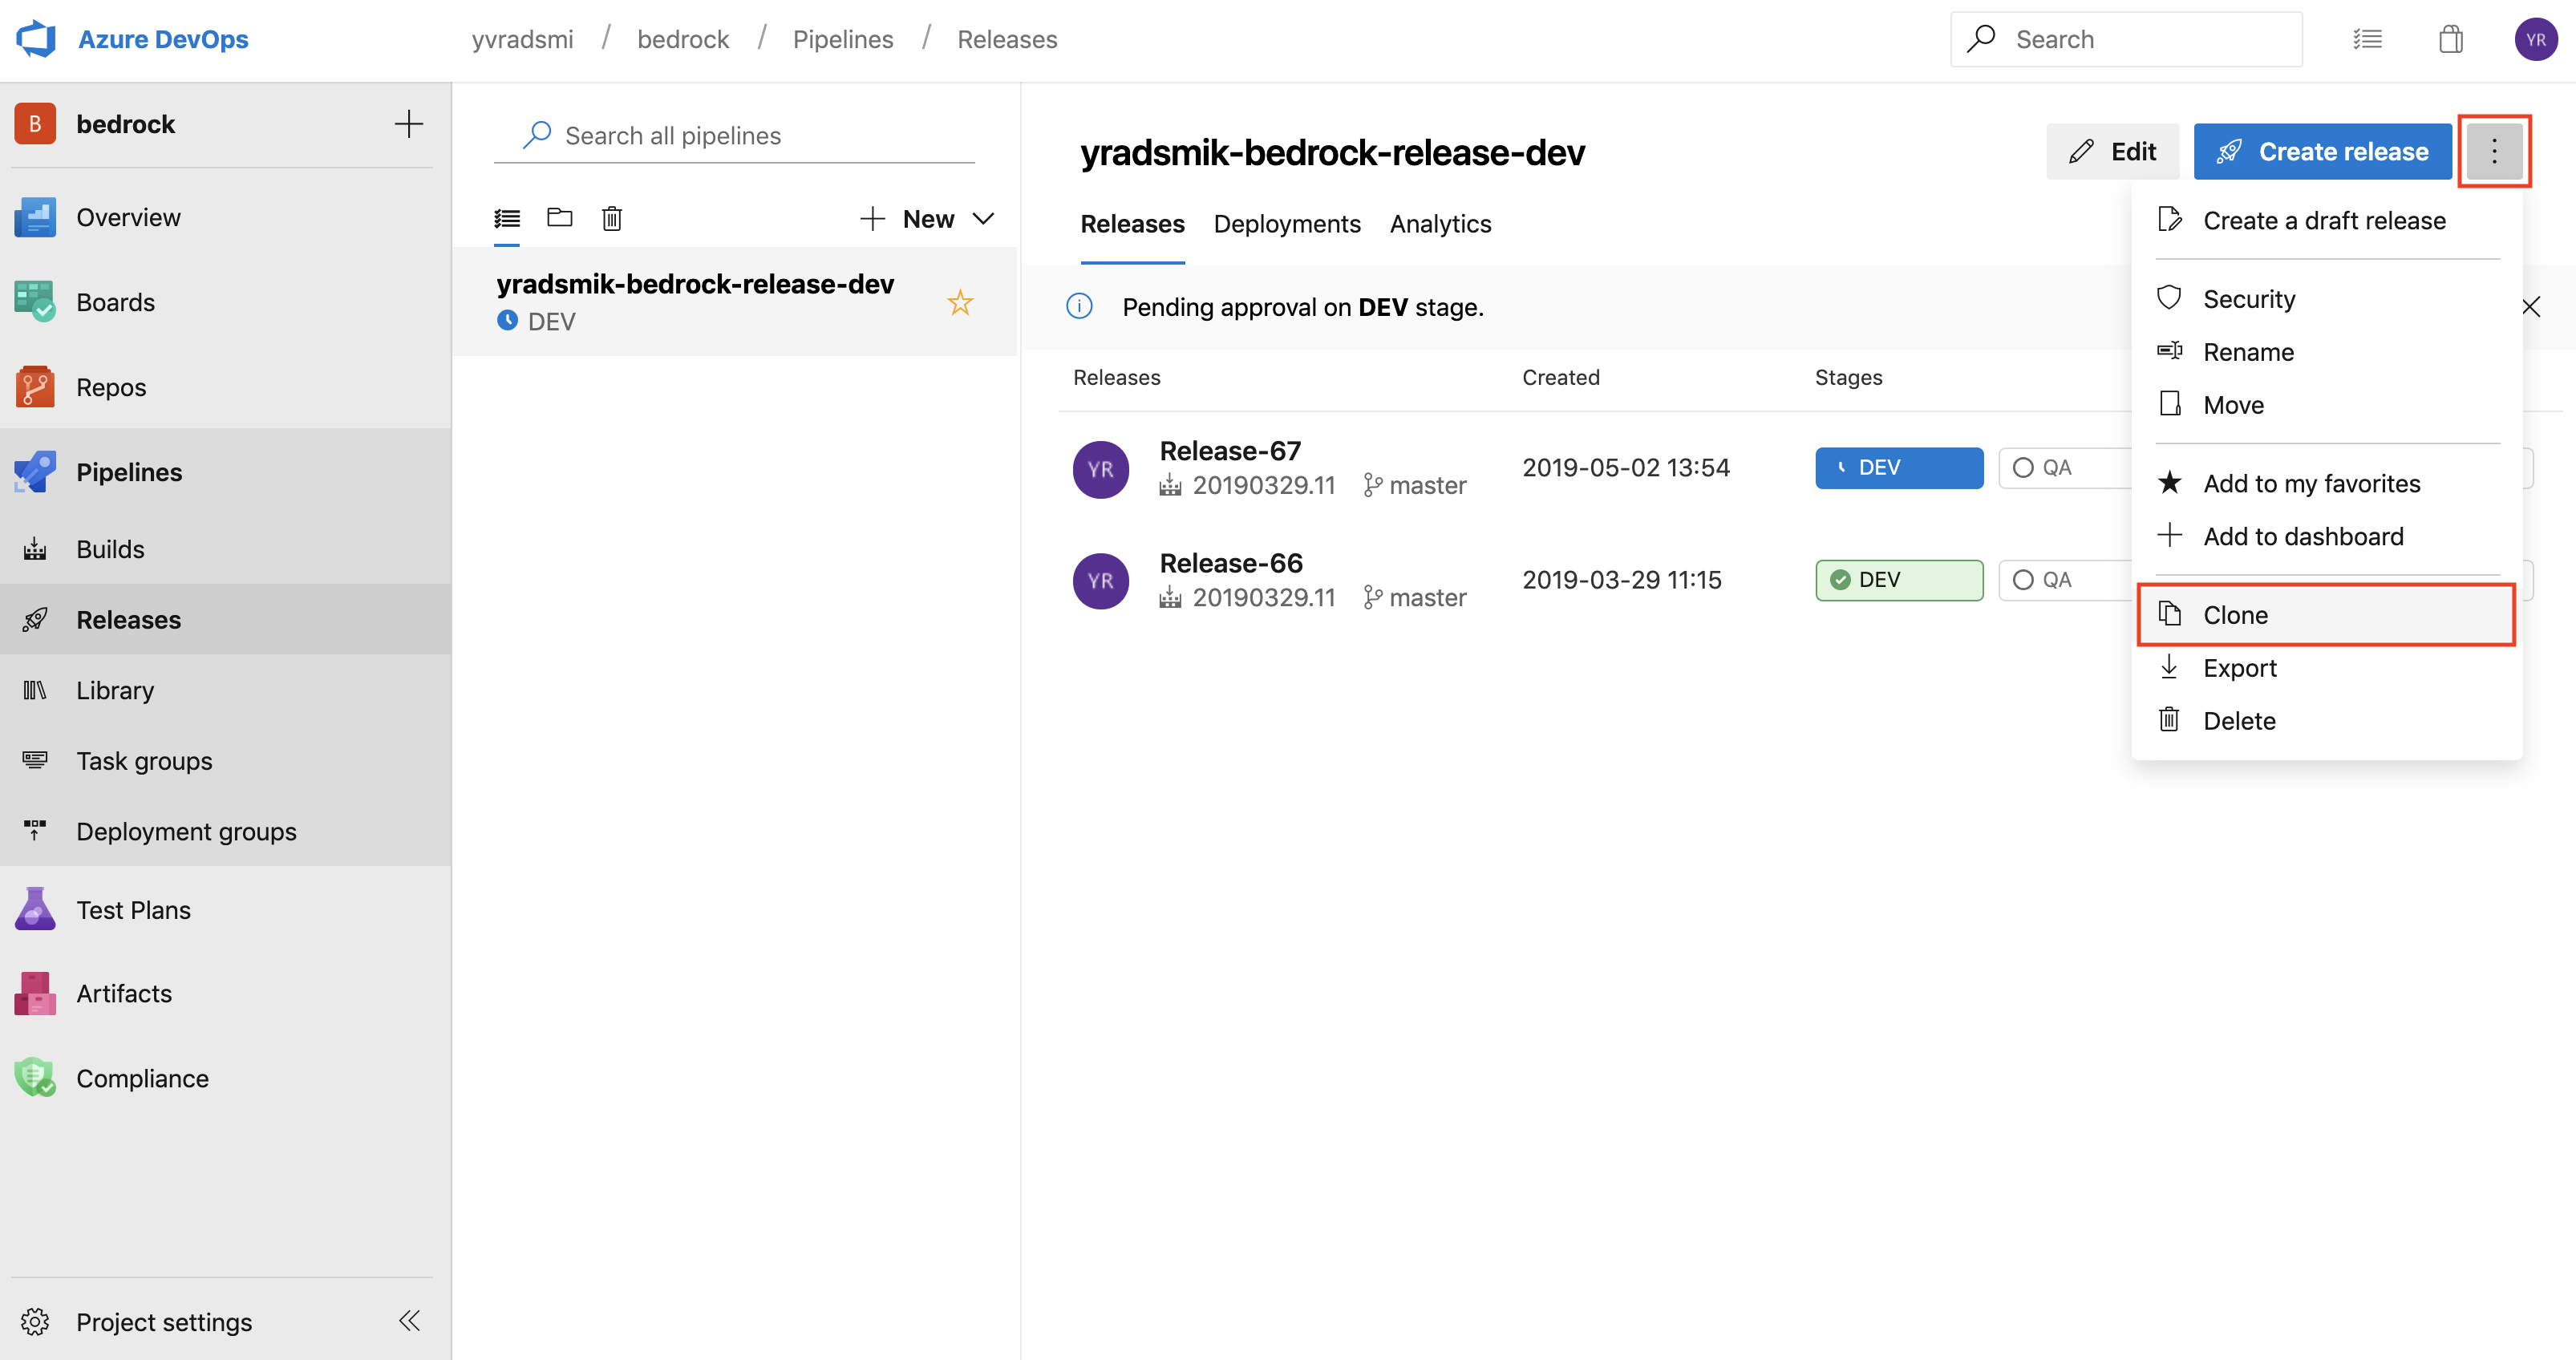
Often, it might be useful to reuse an existing Release, than have to reconfigure a new one. You can clone a Release by selecting a Release in the left panel, clicking on the elipsis at the top right, and then selecting Clone.
6. Update Manifest Generation Pipeline To Be Environment Aware
Now that we have created a release pipeline with environment specific configurations we need to make sure that manifest generation pipeline knows to generate yaml for these environments. Below is a snippet from an example azure-pipeline.yaml build file in a high-level definition repo.
 - task: ShellScript@2
    displayName: Transform fabrikate definitions and publish to YAML manifests to repo
    inputs:
      scriptPath: build.sh
    condition: 'ne(variables[''Build.Reason''], ''PullRequest'')'
    env:
      ACCESS_TOKEN_SECRET: $(ACCESS_TOKEN)
      COMMIT_MESSAGE: $(Build.SourceVersionMessage)
      REPO: $(MANIFEST_REPO)
      FAB_ENVS: 'DEV,QA,STAGING WEST,STAGING EAST,STAGING CENTRAL,PROD WEST,PROD EAST,PROD CENTRAL'
The bolded key and values represent specific environments we want Fabrikate to generate yaml for. Notice that the comma delimited values contain a subset of the environment names we configured as Azure DevOps release pipeline stages and HLD repo configuration.
Once we add the appropriate FAB_ENVS values the manifest generation pipeline will produce resource manifests for each directory
Resource-Manifest-Repo
├── DEV
│   ├── ...
├── QA
│   ├── ...
├── PROD
│   ├── ...
├── STAGE
│   ├── ...
Further reference:
Create a service connection to ACR
In order to add the ACR as an artifact or reference it in azure-pipelines.yml for a Docker build task, you will need to add a service connection.
First, we will create a docker registry service connection which will help you in referencing the ACR in the build pipeline (azure-pipelines.yml) without specifying credentials.
- Go to
Project Settingsand click onService connectionsunderPipelines. - Add
New service connectionof typeDockerregistry - Enter details for your connection name, select the appropriate subscription and the ACR name.

- You may now use a task of the kind below, to reference this newly created service connection:
- task: Docker@2
  inputs:
    containerRegistry: 'helloringsazure_connection'
    repository: 'hellorings'
    command: 'buildAndPush'
    Dockerfile: '**/src/Dockerfile'
    tags: 'hello-rings-$(Build.SourceBranchName)-$(Build.BuildId)'
Next, you need to add a connection for the resource group that the ACR is created on, which will help in adding an artifact to the release pipeline.
- Go to
Project Settingsand click onService connectionsunderPipelines. - Add
New service connectionof typeAzure Resource Manager - Enter the details for the resource group which your ACR lives in.

- You should now be able to link this ACR in your release pipeline by adding an artifact.

- Make sure to turn on the
Continuous Deployment Triggerif you would like the release to be triggered automatically when a new build is pushed to ACR.
