74 KiB

Lab: Migrating to Azure SQL Managed Instance
A Microsoft Lab from the SQL Server team

Migrate to Azure SQL Managed Instance
In this lab you'll migrate a database from SQL Server 2008 to Azure SQL Database Managed Instance.
(Make sure you check out the Prerequisites page before you start. You'll need all of the items loaded there before you can proceed with the workshop.)
In this lab you will use the Azure Database Migration Service (DMS) to migrate the TailspinToys database from an on-premises SQL 2008 R2 database to SQL MI. At the end of the Lab, you'll also explore some of the security and performance features available.
The activities in this lab include:
Lab Exercise 1: Migrate the database to SQL Managed instance
Activity 1: Create a SMB network share on the SQLServer2008VM
Activity 2: Change MSSQLSERVER service to run under sqlmiuser account
Activity 3: Create a backup of TailspinToys database
Activity 4: Retrieve SQL MI, SQL Server 2008 VM, and service principal connection information
Activity 5: Create a service principal
Activity 6: Create and run an online data migration project
Activity 7: Perform migration cutover
Activity 8: Verify database and transaction log migration
Activity 9: Update the application
Lab Exercise 2: Improve database security with Advanced Data Security
Activity 1: Enable Advanced Data Security
Activity 2: Configure SQL Data Discover and Classification
Activity 3: Review Advanced Data Security Vulnerability Assessment
Lab Exercise 3: Use online secondary for read-only queries
Activity 1: View Leaderboard report in Tailspin Toys web application
Activity 2: Update read only connection string
Activity 3: Reload leaderboard report in the Tailspin Toys web application
Lab Exercise 4: After the Migration
 Lab Exercise 1: Migrate the database to SQL Managed instance
In this section, you will use the Azure Database Migration Service (DMS) to migrate the TailspinToys database from the on-premises SQL 2008 R2 database to SQL MI. Tailspin Toys mentioned the importance of their gamer information web application in driving revenue, so for this migration you will target the Business Critical service tier.
The Business Critical service tier is designed for business applications with the highest performance and high-availability (HA) requirements. To learn more, read the Managed Instance service tiers documentation.
 Activity 1: Create an SMB network share on the SQLServer2008VM
In this task, you will create a new SMB network share on the SqlServer2008 VM. This will be the folder used by DMS for retrieving backups of the TailspinToys database during the database migration process. By creating the share, you're making it possible for services like DMS to access items in the share if you authenticate to it. You can read more about the SMB protocol here.
 Steps
Steps
- In the Azure portal, navigate to your SqlServer2008 VM by selecting Resource groups from the left-hand navigation menu, selecting the hands-on-lab-SUFFIX resource group, and selecting the SqlServer2008 VM from the list of resources. On the SqlServer2008 Virtual Machine's Overview blade, select Connect on the top menu:
Note:
If you were provided with an environment for these labs, the "SUFFIX" part of the hands-on-lab-SUFFIX will be used in several portions of the lab. You should note this value from the credentials provided. Any time "SUFFIX" is referenced, use this number. Do not use other "SUFFIX" values or you will disrupt another attendees' environment.

-
On the Connect to virtual machine blade, select Download RDP File, then open the downloaded RDP file.
-
Select Connect on the Remote Desktop Connection dialog:

-
Enter the following credentials when prompted, and then select OK:
- Username: sqlmiuser
Note:
Password should be consistent among all labs. Your instructor will provide the password for in-class Labs.
-
Select Yes to connect, if prompted that the identity of the remote computer cannot be verified:

-
On the SqlServer2008 VM, open Windows Explorer by selecting its icon on the Windows Task bar:

-
In the Windows Explorer window, expand Computer in the tree view, select Windows (C:), and then select New folder in the top menu:

-
Name the new folder dms-backups, then right-click the folder and select Share with and Specific people in the context menu:

-
In the File Sharing dialog, ensure the sqlmiuser is listed with a Read/Write permission level, and then select Share:

-
In the Network discovery and file sharing dialog, select the default value of No, make the network that I am connected to a private network:

-
Back on the File Sharing dialog, note the path of the shared folder,
\\SQLSERVER2008\dms-backups, and select Done to complete the sharing process.
Activity 2: Change the MSSQLSERVER service to run under sqlmiuser account
In this task, you will use the SQL Server Configuration Manager to update the service account used by the SQL Server (MSSQLSERVER) service to the sqlmiuser account. This is done to ensure the SQL Server service has the appropriate permissions to write backups to the shared folder.
Steps
-
On your SqlServer2008 VM, select the Start menu, enter sql configuration into the search bar, and then select SQL Server Configuration Managed from the search results:

Note:
Be sure to choose SQL Server Configuration Manager, and not SQL Server 2017 Configuration Manager, which will not work for the installed SQL Server 2008 R2 database. -
In the SQL Server Configuration Manager dialog, select SQL Server Services from the tree view on the left, then right-click SQL Server (MSSQLSERVER) in the list of services and select Properties from the context menu:

-
In the SQL Server (MSSQLSERVER) Properties dialog, select This account under Log on as, and enter the following:
- Account name: sqlmiuser
Note:
Password should be consistent among all labs, ask your instructor if you don't know what your password is. Properties")
-
Select OK
-
Select Yes in the Confirm Account Change dialog:

-
You will now see the Log On As value for the SQL Server (MSSQLSERVER) service changed to
./sqlmiuser:
Activity 3: Create a backup of TailspinToys database
To perform online data migrations, DMS looks for backups and logs in the SMB shared backup folder on the source database server. In this task, you will create a backup of the TailspinToys database using SSMS, and write it to the SMB network share you created in the previous task. The backup file needs to include a checksum, so you will add that during the backup steps.
Steps
-
On the SqlServer2008 VM, open Microsoft SQL Server Management Studio 17 by entering sql server into the search bar in the Windows Start menu:

-
In the SSMS Connect to Server dialog, enter SQLSERVER2008 into the Server name box, ensure Windows Authentication is selected, and then select Connect:

-
Once connected, expand Databases under SQLSERVER2008 in the Object Explorer, and then right-click the TailspinToys database. In the context menu, select Tasks and then Back Up:

-
In the Back Up Database dialog, you will see
C:\TailspinToys.baklisted in the Destinations box. This is no longer needed, so select it, and then select Remove: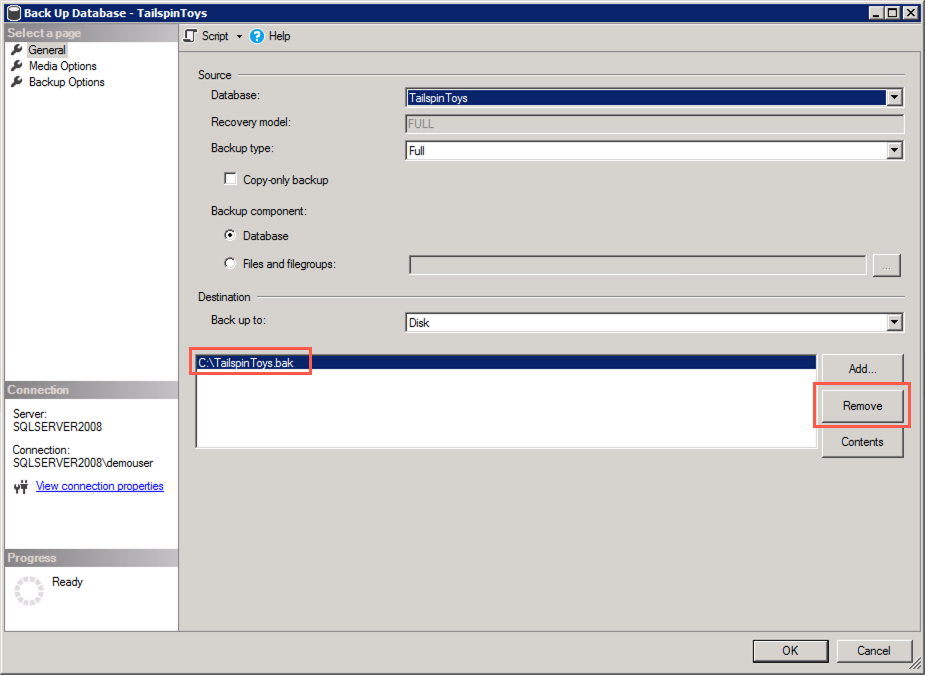
-
Next, select Add to add the SMB network share as a backup destination:

-
In the Select Backup Destination dialog, select the Browse (...) button:

-
In the Locate Database Files dialog, select the
C:\dms-backupsfolder, enter TailspinToys.bak into the File name field, and then select OK:
-
Select OK to close the Select Backup Destination dialog
-
In the Back Up Database dialog, select the Media Options in the Select a page pane, and then set the following:
- Select Back up to the existing media set and then select Overwrite all existing backup sets
- Under Reliability, check the box for Perform checksum before writing to media. This is required by DMS when using the backup to restore the database to SQL MI:

-
Select OK to perform the backup
-
You will receive a message when the backup is complete. Select OK:

Activity 4: Retrieve SQL MI, SQL Server 2008 VM, and service principal connection information
Note:
If you're doing this lab as part of a workshop and were provided an environment to use, this step has already been completed. You can review, but there is nothing you need to do. Please refer to instructor guidance.
In this task, you will use the Azure Cloud shell to retrieve the information necessary to connect to your SQL MI and SqlServer2008 VM from DMS.
Steps
-
In the Azure portal, select the Azure Cloud Shell icon from the top menu:

-
In the Cloud Shell window that opens at the bottom of your browser window, select PowerShell:

-
If prompted that you have no storage mounted, select the subscription you are using for this hands-on lab and select Create storage:

Note:
If creation fails, you may need to select Advanced settings and specify the subscription, region and resource group for the new storage account. -
After a moment, you will receive a message that you have successfully requested a Cloud Shell, and be presented with a PS Azure prompt:

-
At the prompt, you will retrieve information about SQL MI in the hands-on-lab-SUFFIX resource group by entering the following PowerShell command, replacing SUFFIX with your unique identifier or specfic "SUFFIX" assigned to you for the labs:
az sql mi list --resource-group hands-on-lab-SUFFIX -
Within the output of the above command, locate and copy the value of the
fullyQualifiedDomainNameproperty. Paste the value into a text editor, such as Notepad.exe, for later reference:
-
Next, you will enter a second command to retrieve the public IP address of the SqlSerer2008 VM, which you will use to connect to the database on that server. Enter the following PowerShell command, replacing SUFFIX with your unique identifier or specfic "SUFFIX" assigned to you for the labs:
az vm list-ip-addresses -g hands-on-lab-SUFFIX -n SqlServer2008 -
Within the output of the command above, locate and copy the value of the
ipAddressproperty within thepublicIpAddressesobject. Paste the value into a text editor, such as Notepad.exe, for later reference:
-
(Leave the Azure Cloud Shell open for the next set of tasks)
Activity 5: Create a service principal
Note:
If you're doing this lab as part of a workshop and were provided an environment to use, this step has already been completed. You can review, but there is nothing you need to do. Please refer to instructor guidance.
In this task, you will use the Azure Cloud Shell to create an Azure Active Directory (Azure AD) application and service principal (SP) that will provide DMS access to Azure SQL MI. You will grant the SP permissions to the hands-on-lab-SUFFIX resource group.
Note:
You must have rights within your Azure AD tenant to create applications and assign roles to complete this task. If you are blocked by this, but still want to do a migration with Azure Database Migration Services, you can perform an offline migration. In Activity 6, select offline instead of online migration in Step 3, and instead of Step 7, you can refer to this section of a migrating to Azure SQL Database Managed Instance offline tutorial.
Steps
Note:
If you're doing this lab as part of a workshop and were provided an environment to use, this step has already been completed. You can review, but there is nothing you need to do. Please refer to instructor guidance.
-
Next, you will issue a command to create a service principal named tailspin-toys and assign it contributor permissions to your hands-on-lab-SUFFIX resource group.
-
First, you need to retrieve your subscription ID. Enter the following at the Cloud Shell prompt:
az account list --output table -
In the output table, locate the subscription you are using for this hands-on lab, and copy the SubscriptionId value into a text editor for use later.
-
Next, enter the following command at the Cloud Shell prompt, replacing
{SubscriptionID}with the value you copied above and{ResourceGroupName}with the name of your hands-on-lab-SUFFIX resource group, and then pressEnterto run the command:az ad sp create-for-rbac -n "tailspin-toys" --role owner --scopes subscriptions/{SubscriptionID}/resourceGroups/{ResourceGroupName}
-
Copy the output from the command into a text editor, as you will need the
appIdandpasswordin the next task. The output should be similar to:{ "appId": "aeab3b83-9080-426c-94a3-4828db8532e9", "displayName": "tailspin-toys", "name": "http://tailspin-toys", "password": "76ff5bae-8d25-469a-a74b-4a33ad868585", "tenant": "d280491c-b27a-XXXX-XXXX-XXXXXXXXXXXX" } -
To verify the role assignment, select Access control (IAM) from the left-hand menu of the hands-on-lab-SUFFIX resource group blade, and then select the Role assignments tab and locate tailspin-toys under the OWNER role.

-
Next, you will issue another command to grant the CONTRIBUTOR role at the subscription level to the newly created service principal. At the Cloud Shell prompt, run the following command:
az role assignment create --assignee http://tailspin-toys --role contributor
Activity 6: Create and run an online data migration project
In this task, you will create a new online data migration project in DMS for the TailspinToys database.
Steps
-
In the Azure portal, navigate to the Azure Database Migration Service by selecting Resource groups from the left-hand navigation menu, selecting the hands-on-lab-SUFFIX resource group, and then selecting the tailspin-dms Azure Database Migration Service in the list of resources:

Note:
If you were provided with an environment for these labs, the "SUFFIX" part of the hands-on-lab-SUFFIX will be used in several portions of the lab. You should note this value from the credentials provided. Any time "SUFFIX" is referenced, use this number. Do not use other "SUFFIX" values or you will disrupt another attendees' environment.
- On the Azure Database Migration Service blade, select +New Migration Project:
Note:
If you were provided an environment for this lab, your Database Migration Service may be paused due to inactivity. You can select Start Service to start it, if you get the message "The service is currently unavailable for migration."

-
On the New migration project blade, enter the following:
- Project name: Enter OnPremToSqlMi
- Source server type: Select SQL Server
- Target server type: Select Azure SQL Database Managed Instance
- Choose type of activity: Select Online data migration and select Save

-
Select Create and run activity
-
On the Migration Wizard Select source blade, enter the following:
- Source SQL Server instance name: Enter the Public IP address of your SqlServer2008 VM that you copied into a text editor in the previous task. For example, 13.66.228.107
Note:
If you're doing this lab as part of a workshop and were provided an environment to use, please refer to instructor guidance to obtain your SQL Server VM's Public IP address.- User Name: Enter WorkshopUser
- Password: Enter your password
- Connection properties: Check both Encrypt connection and Trust server certificate
Note:
The Password should be consistent among all labs. Your instructor will provide the password if you are taking this Lab in person.
-
Select Save
-
On the Migration Wizard | Select target blade, enter the following:
- Application ID: Enter the
appIdvalue from the output of the `az ad sp create-for-rbac' command you executed in the last task - Key: Enter the
passwordvalue from the output of the `az ad sp create-for-rbac' command you executed in the last task
Note:
If you're doing this lab as part of a workshop and were provided an environment to use, please refer to instructor guidance to obtain the Application ID and Application secret key.- Subscription: Select the subscription you are using for this hand-on lab
- Target Azure SQL Managed Instance: Select the mi-SUFFIX instance
Note:
If you're doing this lab as part of a workshop and were provided an environment to use, the "SUFFIX" should be the same as the "SUFFIX" for your Resource Group. Do not use other "SUFFIX" values or you will disrupt another attendees' environment.- SQL Username: Enter sqlmiuser
- Password: Enter your password

- Application ID: Enter the
-
Select Save
-
On the Migration Wizard Select databases blade, select TailspinToys:

-
Select Save
-
On the Migration Wizard | Configure migration settings blade, enter the following configuration:
- Network share location: Enter \\SQLSERVER2008\dms-backups. This is the path of the SMB network share you created during the before the hands-on lab exercises
Note:
If you're doing this lab as part of a workshop and were provided an environment to use, if SQLSERVER2008 errors, use the SQL VM Private IP Address which was provided to you (e.g. \\10.0.0.5\dms-backups)- Windows User Azure Database Migration Service impersonates to upload files to Azure Storage: Enter SQLSERVER2008\sqlmiuser
- Password: Enter your password
- Subscription containing storage account: Select the subscription you are using for this hands-on lab
- Storage account: Select the sqlmistoreUNIQUEID storage account from the drop-down

-
Select Save on the Configure migration setting blade
-
On the Migration Wizard Summary blade, enter the following:
- Activity name: Enter TailspinToysMigration

-
Select Run migration
-
Monitor the migration on the status screen that appears. Select the refresh icon in the toolbar to retrieve the latest status:

-
Continue selecting Refresh every 5-10 seconds, until you see the status change to Log files uploading or Log Shipping in progress (when the log files are done uploading, it changes to Log Shipping in progress, but you don't need to wait for that to happen). When either status appears, move on to the next task:

Activity 7: Perform migration cutover
Since you performed the migration as an "online data migration," the migration wizard will continue to monitor the SMB network share for newly added log files. This allows for any updates that happen on the source database to be captured until you cut over to the SQL MI database. In this task, you will add a record to one of the database tables, backup the logs, and complete the migration of the TailspinToys database by cutting over to the SQL MI database.
Steps
-
In the migration status window in the Azure portal and select TailspinToys under database name to view further details about the database migration:

-
On the TailspinToys screen you will see a status of Restored for the
TailspinToys.bakfile:
-
To demonstrate log shipping and how transactions made on the source database during the migration process will be added to the target SQL MI database, you will add a record to one of the database tables.
-
Return to SSMS on your SqlServer2008 VM and select New Query from the toolbar:

-
Paste the following SQL script, which inserts a record into the
Gametable, into the new query window:USE TailspinToys; GO INSERT [dbo].[Game] (Title, Description, Rating, IsOnlineMultiplayer) VALUES ('Space Adventure', 'Explore the universe with are newest online multiplayer gaming experience. Build your own rocket ships, and take off for the stars in an infinite open world adventure.', 'T', 1) -
Execute the query by selecting Execute in the SSMS toolbar:

-
With the new record added to the
Gamestable, you will now backup the transaction logs, which will be shipped to DMS. Select New Query again in the toolbar, and paste the following script into the new query window:USE master; GO BACKUP LOG TailspinToys TO DISK = 'c:\dms-backups\TailspinToysLog.trn' WITH CHECKSUM GO -
Execute the query by selecting Execute in the SSMS toolbar:
-
Return to the migration status page in the Azure portal. On the TailspinToys screen, select Refresh you should see the TailspinToysLog.trn file appear, with a status of Uploaded:

Note: If you don't see it the transaction logs entry, continue selecting Refresh every few seconds until it appears.
-
Once the transaction logs are uploaded, they need to be restored to the database. Select Refresh every 10-15 seconds until you see the status change to Restored, which can take a minute or two:

-
After verifying the transaction log status of Restored, select Start Cutover:

-
On the Complete cutover dialog, verify pending log backups is
0, check Confirm, and select Apply:
-
You will be given a progress bar below the Apply button in the Complete cutover dialog. When the migration is complete, you will see the status as Completed:

Note:
This will take between 10-30 minutes, so it might be a good time to take a break, or to review what you've done so far. Sometimes the progress bar is delayed, select Refresh from the panel to the left (don't worry, it won't close your cutover) to update manually, every ~5 minutes. -
Close the Complete cutover dialog by selecting the X in the upper right corner of the dialog, and do the same thing for the TailspinToys blade. This will return you to the TailspinToysMigration blade. Select Refresh, and you should see a status of Completed from the TailspinToys database.

-
You have now successfully migrated the
TailspinToysdatabase to Azure SQL Managed Instance.
Activity 8: Verify database and transaction log migration
In this task, you will connect to the SQL MI database using SSMS, and quickly verify the migration.
Steps
-
Return to SSMS on your SqlServer2008 VM, and then select Connect and Database Engine from the Object Explorer menu:

-
In the Connect to Server dialog, enter the following:
- Server name: Enter the fully qualified domain name of your SQL managed instance, which you copied from the Azure Cloud Shell in a previous task
Note:
If you were provided an environment for this lab, the fully qualified domain name (also referenced as "MiFQDN" or "FQDN") has been provided to you in your environment details.- Authentication: Select SQL Server Authentication
- Login: Enter sqlmiuser
- Password: Enter your password
- Check the Remember password box

-
Select Connect
-
You will see you SQL MI connection appear below the SQLSERVER2008 connection. Expand Databases in the SQL MI connection and select the
TailspinToysdatabase:
-
With the
TailspinToysdatabase selected, select New Query on the SSMS toolbar to open a new query window. -
In the new query window, enter the following SQL script:
SELECT * FROM Game -
Select Execute on the SSMS toolbar to run the query. You will see the records contained in the
Gametable displayed, including the newSpace Adventureyou added after initiating the migration process:
-
You are now done using the SqlServer2008 VM. Close any open windows and log off of the VM. You will use the "JumpBox" VM for the remaining tasks of this hands-on-lab.
Activity 9: Update the application
With the TailspinToys database now running on SQL MI in Azure, the next step is to make the required modifications to the TailspinToys gamer information web application.
Note: SQL Managed Instance has a private IP address in its own VNet, so to connect an application you need to configure access to the VNet where Managed Instance is deployed. To learn more, read Connect your application to Azure SQL Database Managed Instance.
Note: Due to time constraints, the lab will deal with switching the app running on a Jumpbox VM locally from leveraging data in SQL Server 2008 to SQL MI (but not the deployment to Azure or integrating the App Service with the Virtual Network). In the extended version of these labs, or if you have time at the end of the lab, you can do that.
In this activity, you will create an RDP connection to the JumpBox VM, and then using Visual Studio on the JumpBox, run the TailspinToysWeb application on the VM.
Steps
Note:
If you were provided an environment for this lab, you may already be in the JumpBox VM. If you are, you can skip to step 9.
-
In the Azure portal, select Resource groups in the Azure navigation pane, and select the hands-on-lab-SUFFIX resource group from the list:

-
In the list of resources for your resource group, select the JumpBox VM:

-
On your JumpBox VM blade, select Connect from the top menu:

-
On the Connect to virtual machine blade, select Download RDP File, then open the downloaded RDP file:

-
Select Connect on the Remote Desktop Connection dialog:

-
Enter the following credentials when prompted, and then select OK:
- Username: sqlmiuser

-
Select Yes to connect, if prompted that the identity of the remote computer cannot be verified:

-
Once logged in, the repository containing all of these files can be cloned to
C:/users/[username]/sqlworkshops/SQLGroundtoCloudby opening the command prompt and running the following command:
git clone https://github.com/microsoft/sqlworkshops-azuresqllabs.git
Note:
If you're doing this lab as part of a workshop and were provided an environment to use, or you have already cloned the repository earlier in the workshop, you do not need to clone the workshop again.
-
Open the
C:/users/[username]/sqlworkshops/SQLGroundtoCloudfolder. In thelab-filesfolder, double-clickTailspinToysWeb.slnto open the solution in Visual Studio:
-
If prompted about how you want to open the file, select Visual Studio 2019 and then select OK:

-
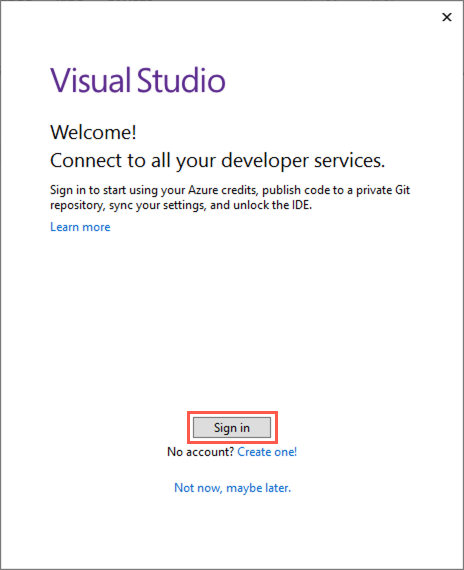
Select Sign in and enter your Azure account credentials when prompted:
Note:
If you're doing this lab as part of a workshop and were provided an environment to use, please use the Azure account credentials provided to you. If you are not prompted, you can skip to the next step for now.
-
At the security warning prompt, uncheck Ask me for every project in this solution, and then select OK:

-
Open
appsettings.jsonand enter your SQL 2008 VM information and password in the Connection strings section:
"ConnectionStrings": {
    "TailspinToysContext": "Server=tcp:<your-sql-2008-vm-public-ip>,1433;Database=TailspinToys;User ID=WorkshopUser;Password=<your-password>;Trusted_Connection=False;Encrypt=True;TrustServerCertificate=True;",
    "TailspinToysReadOnlyContext": "Server=tcp:<your-sql-2008-vm-public-ip>,1433;Database=TailspinToys;User ID=WorkshopUser;Password=<your-password>;Trusted_Connection=False;Encrypt=True;TrustServerCertificate=True;"
  }
Note:
Use the same login "WorkshopUser" and password from previous activities.
- Save the file:

- Run the application (IIS Express button):

- You should now see the app running locally and view the site and it's data which is accessing the on-prem data (Select
Leaderboard):


-
Stop the application by closing the browser.
-
Now, in order to have the app run with the data in SQL MI, update
appsettings.jsonby replacingServer=tcp:<your-sql-2008-vm-public-ip>,1433;with the fully qualified domain name for your MI (something likeServer=mi-SUFFIX.fdsor39943234j3oj4.database.windows.net;). Then, replaceWorkshopUserwithsqlmiuser, as that's how you log into your SQL MI.
Note:
If your passwords forWorkshopUserandsqlmiuserare different, don't forget to update to the correct password as well.
- Save the file:
- Run the application (IIS Express button):
- You should see the same results as before, but this time, the data is coming from your SQL MI in Azure:
Note: If you want to complete an extension of this lab where you deploy the web app to Azure and integrate the App Service within the virtual network using point-to-site and VNet integration, see exercises 3 and 4 in the non-abbreviated lab here.
Lab Exercise 2: Improve database security with Advanced Data Security
Advanced Data Security is a unified package for advanced SQL security capabilities. It includes functionality for discovering and classifying sensitive data, surfacing and mitigating potential database vulnerabilities, and detecting anomalous activities that could indicate a threat to your database. It provides a single go-to location for enabling and managing these capabilities.
In this exercise, you'll enable Advanced Data Security, configure Data Discovery and Classification, and review the Vulnerability Assessment. At the end, you'll also receive a pointer to a Dynamic Data Masking lab extension.
Activity 1: Enable Advanced Data Security
In this task, you will enable Advanced Data Security (ADS) for all databases on the Managed Instance.
Steps
-
In the Azure portal, select Resource groups from the left-hand menu, select the hands-on-lab-SUFFIX resource group, and then select the TailspinToys Managed database resource from the list:

-
On the TailspinToys Managed database blade, select Advanced Data Security from the left-hand menu, under Security, and then select Enable Advanced Data Security on the managed instance:

-
Within a few minutes, ADS will be enabled for all databases on the Managed Instance. You will see the three tiles on the Advanced Data Security blade become enabled when it has been enabled:

Activity 2: Configure SQL Data Discovery and Classification
In this task, you will look at the SQL Data Discovery and Classification feature of Advanced Data Security. Data Discovery and Classification introduces a new tool for discovering, classifying, labeling & reporting the sensitive data in your databases. It introduces a set of advanced services, forming a new SQL Information Protection paradigm aimed at protecting the data in your database, not just the database. Discovering and classifying your most sensitive data (business, financial, healthcare, etc.) can play a pivotal role in your organizational information protection stature.
Note: This functionality is currently available in Preview for SQL MI through the Azure portal.
Steps
-
On the Advanced Data Security blade, select the Data Discovery & Classification tile:

-
In the Data Discovery & Classification blade, select the info link with the message We have found 40 columns with classification recommendations:

-
Look over the list of recommendations to get a better understanding of the types of data and classifications are assigned, based on the built-in classification settings. In the list of classification recommendations, select the recommendation for the Sales - CreditCard - CardNumber field:

-
Due to the risk of exposing credit card information, Tailspin Toys would like a way to classify it as highly confidential, not just Confidential, as the recommendation suggests. To correct this, select + Add classification at the top of the Data Discovery and Classification blade:

-
Expand the Sensitivity label field, and review the various built-in labels you can choose from. You can also add your own labels, should you desire:

-
In the Add classification dialog, enter the following:
- Schema name: Select Sales
- Table name: Select CreditCard
- Column name: Select CardNumber (nvarchar)
- Information type: Select Credit Card
- Sensitivity level: Select Highly Confidential

-
Select Add classification
-
You will see the Sales - CreditCard - CardNumber field disappear from the recommendations list, and the number of recommendations drop by 1
-
Other recommendations you can review are the HumanResources - Employee fields for NationalIDNumber and BirthDate. Note that these have been flagged by the recommendation service as Confidential - GDPR. As Tailspin Toys maintains data about gamers from around the world, including Europe, having a tool which helps them discover data which may be relevant to GDPR compliance will be very helpful:

-
Check the Select all check box at the top of the list to select all the remaining recommended classifications, and then select Accept selected recommendations:

-
Select Save on the toolbar of the Data Classification window. It may take several minutes for the save to complete:

Note: This feature is still in preview. If you receive an error when saving, try returning to the Advanced Data Security blade, and selecting the Data Discovery & Classification tile again to see the results.
-
When the save completes, select the Overview tab on the Data Discovery and Classification blade to view a report with a full summary of the database classification state:

Activity 3: Review Advanced Data Security Vulnerability Assessment
In this task, you will review an assessment report generated by ADS for the TailspinToys database and take action to remediate one of the findings in the TailspinToys database. The SQL Vulnerability Assessment service is a service that provides visibility into your security state, and includes actionable steps to resolve security issues, and enhance your database security.
Steps
-
Return to the Advanced Data Security blade for the
TailspinToysManaged database and then select the Vulnerability Assessment tile:
-
On the Vulnerability Assessment blade, select Scan on the toolbar:

-
When the scan completes, you will see a dashboard, displaying the number of failing checks, passing checks, and a breakdown of the risk summary by severity level:

Note: Scans are run on a schedule, so if you see a message that no vulnerabilities are found your database may not have been scanned yet. You will need to run a scan manually. To do this, select the Scan button on the toolbar, and follow any prompts to start a scan. This will take a minute or so to complete.
-
In the scan results, take a few minutes to browse both the Failed and Passed checks, and review the types of checks that are performed. In the Failed list, locate the security check for Transparent data encryption. This check has an ID of VA1219:

-
Select the VA1219 finding to view the detailed description:

The details for each finding provide more insight into the reason. Note the fields describing the finding, the impact of the recommended settings, and details on remediation for the finding.
-
You will now act on the recommendation remediation steps for the finding, and enable Transparent Data Encryption for the
TailspinToysdatabase. To accomplish this, you will switch over to using SSMS on your JumpBox VM for the next few steps.Note:
Transparent data encryption (TDE) needs to be manually enabled for Azure SQL Managed Instance. TDE helps protect Azure SQL Database, Azure SQL Managed Instance, and Azure Data Warehouse against the threat of malicious activity. It performs real-time encryption and decryption of the database, associated backups, and transaction log files at rest without requiring changes to the application. -
On your JumpBox VM, open Microsoft SQL Server Management Studio 18 from the Start menu, and enter the following information in the Connect to Server dialog.
- Server name: Enter the fully qualified domain name of your SQL managed instance, which you copied from the Azure Cloud Shell in a previous task
- Authentication: Select SQL Server Authentication
- Login: Enter sqlmiuser
- Password: Enter your password
- Check the Remember password box

-
In SSMS, select New Query from the toolbar, paste the following SQL script into the new query window:
ALTER DATABASE [TailspinToys] SET ENCRYPTION ON
You turn transparent data encryption on and off on the database level. To enable transparent data encryption on a database in Azure SQL Managed Instance use must use T-SQL.
-
Select Execute from the SSMS toolbar. After a few seconds, you will see a message that the "Commands completed successfully":

-
You can verify the encryption state and view information the associated encryption keys by using the sys.dm_database_encryption_keys view. Select New Query on the SSMS toolbar again, and paste the following query into the new query window:
SELECT * FROM sys.dm_database_encryption_keys
-
Select Execute from the SSMS toolbar. You will see two records in the Results window, which provide information about the encryption state and keys used for encryption:

By default, service-managed transparent data encryption is used. A transparent data encryption certificate is automatically generated for the server that contains the database.
-
Return to the Azure portal and the Advanced Data Security - Vulnerability Assessment blade of the
TailspinToysmanaged database. On the toolbar, select Scan to start a new assessment of the database: -
When the scan completes, select the Failed tab, enter VA1219 into the search filter box, and observe that the previous failure is no longer in the Failed list:

-
Now, select the Passed tab, and observe the VA1219 check is listed with a status of PASS:

Using the SQL Vulnerability Assessment, it is simple to identify and remediate potential database vulnerabilities, allowing you to proactively improve your database security.
Note: If you want to complete an extension of this lab where you also explore the capabilities of Dynamic Data Masking, see exercise 6 and 4 in the non-abbreviated lab here.
Lab Exercise 3: Use an online secondary for read-only queries
In this exercise, you will look at how you can use the automatically created online secondary for reporting, without feeling the impacts of a heavy transactional load on the primary database. Each database in the SQL MI Business Critical tier is automatically provisioned with several AlwaysON replicas to support the availability SLA. Using Read Scale-Out allows you to load balance Azure SQL Database read-only workloads using the capacity of one read-only replica.
Activity 1: View Leaderboard report in Tailspin Toys web application
In this task, you will open a web report using the web application you deployed to your App Service.
Steps
-
Return to your JumpBox VM, and run the web application:
-
In the TailspinToys web app, select Leaderboard from the menu:

Note the
READ_WRITEstring on the page. This is the output from reading theUpdateabilityproperty associated with theApplicationIntentoption on the target database. This can be retrieved using the SQL querySELECT DATABASEPROPERTYEX(DB_NAME(), "Updateability").
Activity 2: Update read only connection string
In this task, you will enable Read Scale-Out for the TailspinToys database, using the ApplicationIntent option in the connection string. This option dictates whether the connection is routed to the write replica or to a read-only replica. Specifically, if the ApplicationIntent value is ReadWrite (the default value), the connection will be directed to the database’s read-write replica. If the ApplicationIntent value is ReadOnly, the connection is routed to a read-only replica.
Steps
-
Stop the application by closing the browser
-
In order to have the app connect to the read-only replica, open
appsettings.json. In theTailspinToysReadOnlyContextline, paste the following parameter to end the line:ApplicationIntent=ReadOnly; -
The
TailspinToysReadOnlyContextconnection string should now look something like the following:Server=mi-SUFFIX.15b8611394c.database.windows.net;Database=TailspinToys;User ID=sqlmiuser;Password=<your-password>;Trusted_Connection=False;Encrypt=True;TrustServerCertificate=True;ApplicationIntent=ReadOnly;
Activity 3: Reload leaderboard report in the Tailspin Toys web application
In this task, you will refresh the Leaderboard report in the Tailspin Toys web app, and observe the results.
Steps
- Save the
appsettings.jsonfile in Visual Studio:
- Run the application (IIS Express button):
-
Return to the TailspinToys gamer information website you opened previously, on the Leaderboard page. The page should now look similar to the following:

Notice the
updateabilityoption is now displaying asREAD_ONLY. With a simple addition to your database connection string, you are able to send read-only queries to the online secondary of your SQL MI Business critical database, allowing you to load-balance read-only workloads using the capacity of one read-only replica. The SQL MI Business Critical cluster has built-in Read Scale-Out capability that provides free-of charge built-in read-only node that can be used to run read-only queries that should not affect performance of your primary workload.
Note:
If you are attending this lab as part of a day-long workshop, this may still read as READ-WRITE, if the lab was configured using Instance Pools, since Instance Pools currently only support General Purpose (not Business Critical which is needed here). You have finished the activities for Module 5. Return to it here, review, and refer to instructor guidance.
Lab Exercise 4: After the Migration
In this Lab, you used the Azure Database Migration Service (DMS) to migrate the TailspinToys database from the on-premises SQL 2008 R2 database to SQL MI. You then updated the web application to use the SQL MI created, and enabled advanced security features. Finally, you set up your application to leverage the online secondary replica to handle heavy read workloads.
Now that Tailspin Toys has completed a migration for their gaming database. They'll want to leverage the post-migration validation and optimization guide to ensure data completeness and uncover and resolve performance issues.
If and when Tailspin Toys chooses to scale their migration to other instances and databases, they can leverage the same process you've seen in Labs 4 and 5, but should also refer to the guidance Microsoft provides on scaling a migration to Azure.
 For Further Study
- Microsoft Hands On Labs offers free self-paced lab environments as well as a request form for instructor led lab environments. As of last update, there are about eight labs available around Azure SQL (assessment, migration, app innovation, row level security, managed instance, and more).
- Microsoft Hands On Demos is similar to Hands On Labs, but offers easy to set up demos that are free for certain internals and partners. As of last update, there are about seven demos available around Azure SQL.
- Azure Database Migration Guide contains lots of resources that will help in guiding and supporting database migrations to Azure.
- The Azure Architecture Documentation contains many migration patterns as well as full code samples, scenarios, and guidance about how to migrate on-prem estates. There are useful, detailed scenarios about rehosting to SQL MI and SQL VMs, as well as guidance of how to scale a migration, after you've done a PoC.
- MCW: Migrating SQL Databases to Azure contains extended labs from what you've seen in these exercises. There is an opportunity to see how the networking was configured, and deeper dives around the network and setup.
- How to Deploy an Azure Infrastructure and Best Practices for setting up networking are also two very useful resources when moving to Azure.
- Best practices for costing and sizing workloads migrated to Azure
- Best practices for securing and managing workloads migrated to Azure