README.md
Azure Resource Manager (ARM) Tools for Visual Studio Code (Preview)
Important notice
The ARM Tools extension is now in Maintenance Mode. That means that we will continue to support currently implemented features and capabilities, but we will not be able to prioritize adding new features. To take advantage of the best experience for deploying to Azure with infrastructure-as-code, we recommend switching to Bicep. Please note, that while this VS Code extension is in maintenance mode, ARM Template deployments as a whole are still fully supported and new features are still being added to the ARM Template language and runtime to support new capabilities in Bicep. If you wish to use these same capabilities directly in Bicep, they will be supported from a runtime perspective, but not in the ARM Tools VS Code extension.
Overview
The Azure Resource Manager (ARM) Tools for Visual Studio Code provides language support, resource snippets, and resource auto-completion to help you create and validate Azure Resource Manager templates.
Getting Started
The following guides detail how to use the ARM Tools extension features.
- Snippets
- Azure schema integration
- Parameter file support
- Linked template support
- Template navigation
- Completions
- Other features
- Extension configuration
Snippets
Snippets are used to create basic templates and add elements such as parameters, resources, and outputs to existing templates.
Create a new ARM template
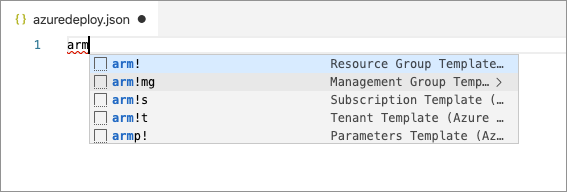
When in an empty JSON file, typing arm produces a list of scaffolding snippets. These snippets can be used to create an empty template for any ARM deployment scope (Tenant, Subscription, Management Group, and Resource Group).
Notice that adding scaffolding for an ARM template changes the Visual Studio Code language mode to Azure Resource Manager Template.
Add Azure resource to an ARM template
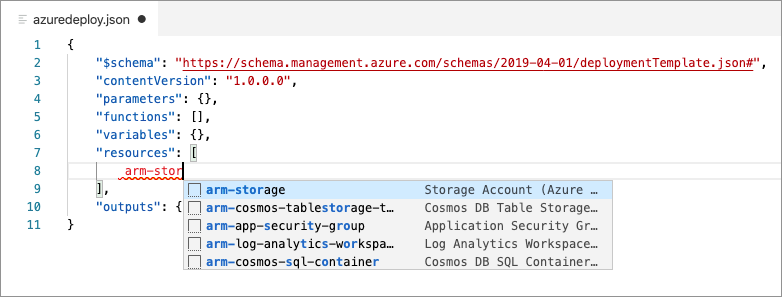
Once you are working in an ARM template, placing your cursor in the resource and typing arm, CTRL + Space, or { produces a list of 70+ snippets for Azure resources. Selecting a snippet adds an instance of the resource type to the ARM template.
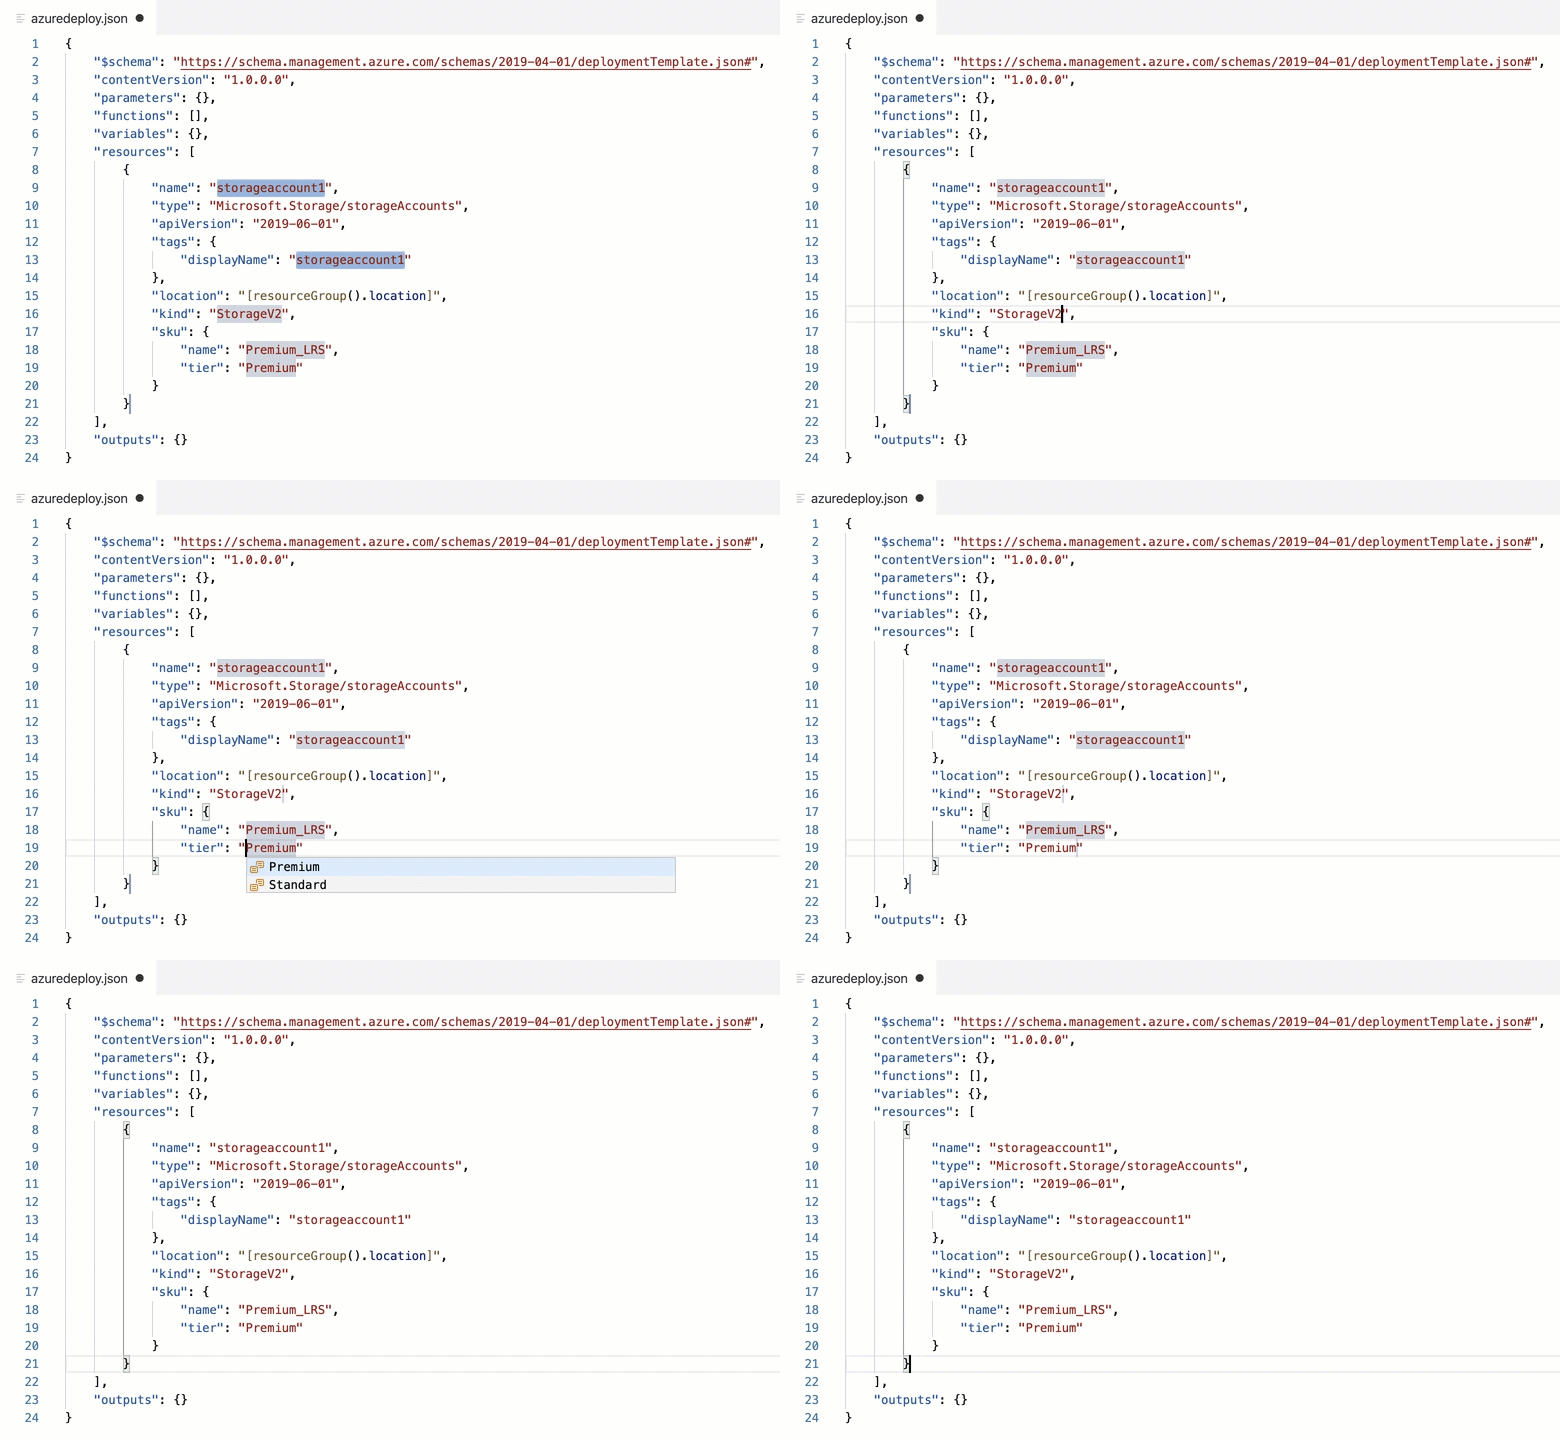
Each snippet includes tab stops to help navigate through commonly modified configurations. Press the tab key to navigate to the next stop, and shift + tab to navigate to the previous stop. As seen in the following example, some stops are pre-populated with a list of common values for quick selection.
Snippet Reference
The following table lists the available ARM Tools snippets.
| Snippet | Description |
|---|---|
arm! |
Adds the framework for a full deployment template file for resource group deployments. |
arm!s |
Adds the framework for a full deployment template file for subscription deployments. |
arm!mg |
Adds the framework for a full deployment template file for management group deployments. |
arm!t |
Adds the framework for a full deployment template file for tenant deployments. |
armp! |
Adds the framework for a full deployment template parameters file. |
"" |
While in the parameters section adds a parameter to the template. |
"" |
While in the variables section adds a variable to the template. |
{} |
While in the functions section add a new user-defined function. |
arm- or the resource name |
Displays 70+ snippets for creating Azure resources. For example, type arm-ubuntu to add all five resources necessary for a basic Ubuntu virtual machine. |
"" |
While in the outputs section adds an output to the template. |
Azure schema completion and validation
The ARM Tools extension uses Azure schemas to provide resource completion and validation. These schemas help you verify that Azure resources are configured correctly before deployment time.
Schema Completions
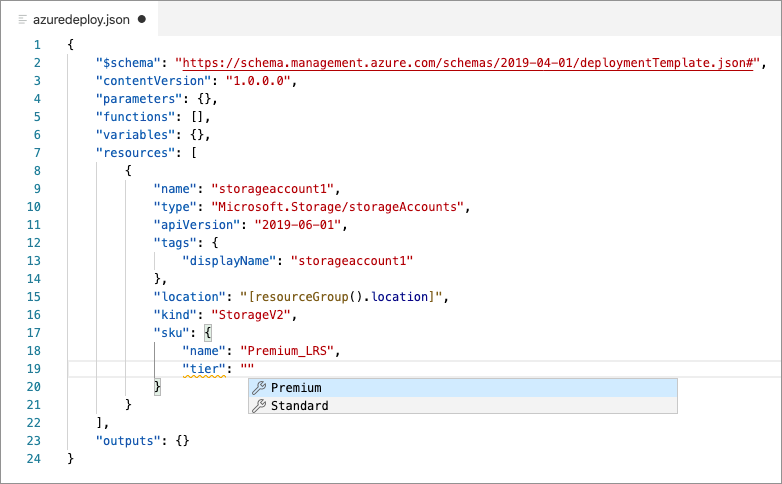
Entering double quotes "" or selecting ctrl + space while the cursor is in a resource declaration provides potential properties and property values for each Azure resource.
In the following example, the potential values for an Azure Storage account tier are returned from the Azure Storage schema.
Schema Validation
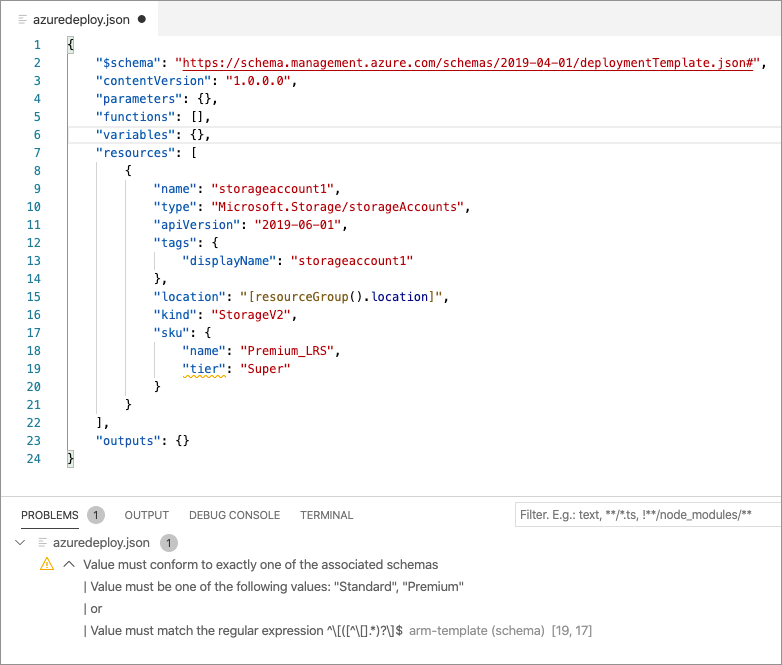
If an invalid property or property value is specified, a validation warning is shown. In the following example, an invalid value has been provided for the storage account tier (line 19). Notice that the warning message includes a list of valid values.
Parameter files
Associating a parameter file with an ARM template enables full validation across both the parameter file and template. A parameter file association can be made by either creating a new parameter file from an existing template or by associating an existing parameter file to the template.
Create a new parameter file
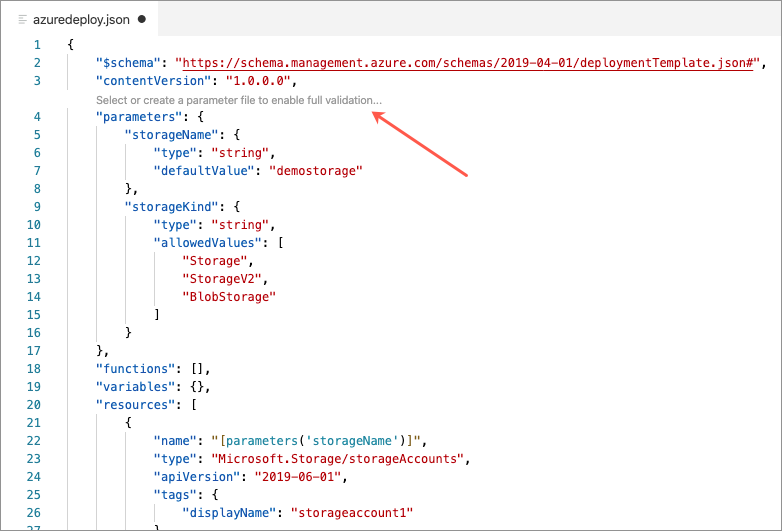
To create a new parameter file from an existing template, click on the code lens text `Select or create a parameter file to enable full validation...
Select New from the context menu.
Selecting All parameters adds every parameter from the template into the new parameter file. Selecting Only required parameters adds only parameters that do not have a default value specified in the template file.
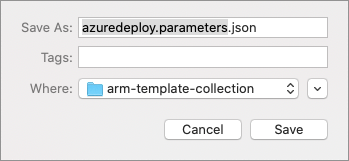
Select a name and location for the parameter file.
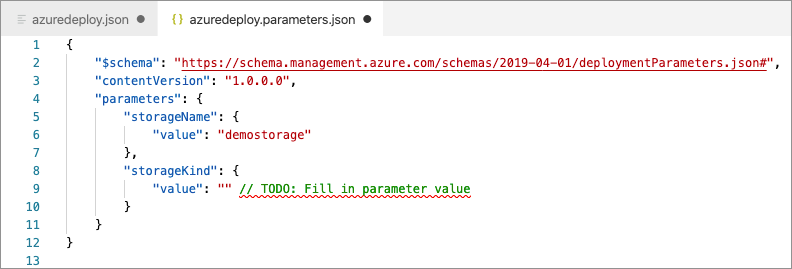
Once done, a parameter file has been created. Where needed, remove the TODO comment and add a parameter value.
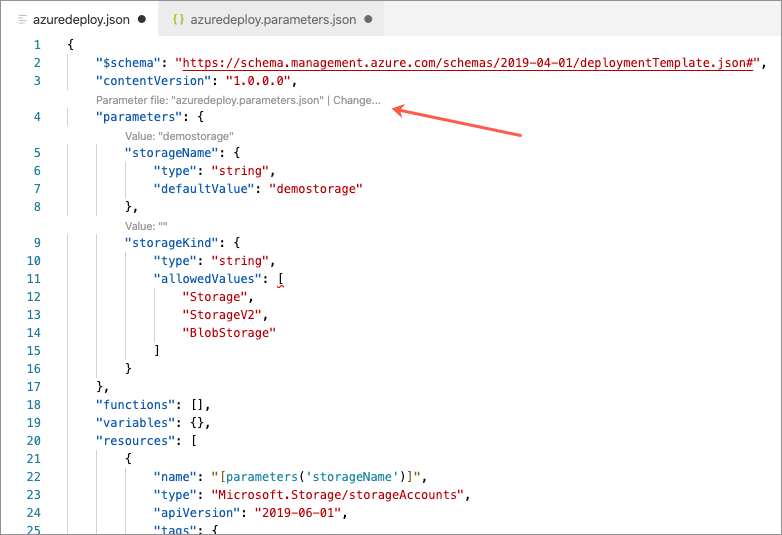
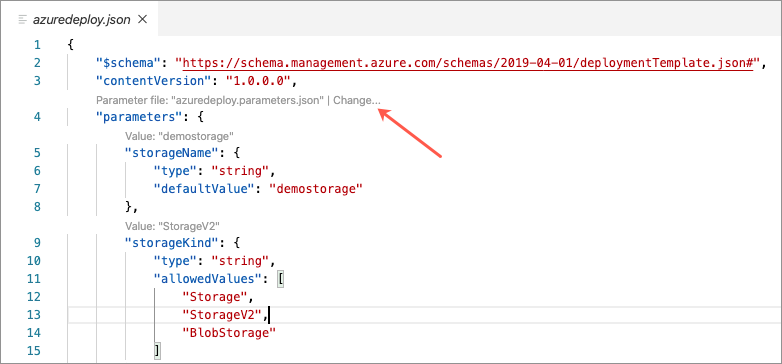
Also, notice that on the template file that the code lens text has been updated to reflect the current parameter file association. This association is also shown on the Visual Studio Code staus bar.
Associate an existing parameter file
To create an association with an existing parameter file, click on the code lens text `Select or create a parameter file to enable full validation'.
If a parameter file with a matching name (template name + ".parameter") is found, it can be selected from the list. If a matching file is not found, select Browse from the list and then select the parameter file.
Parameter validation
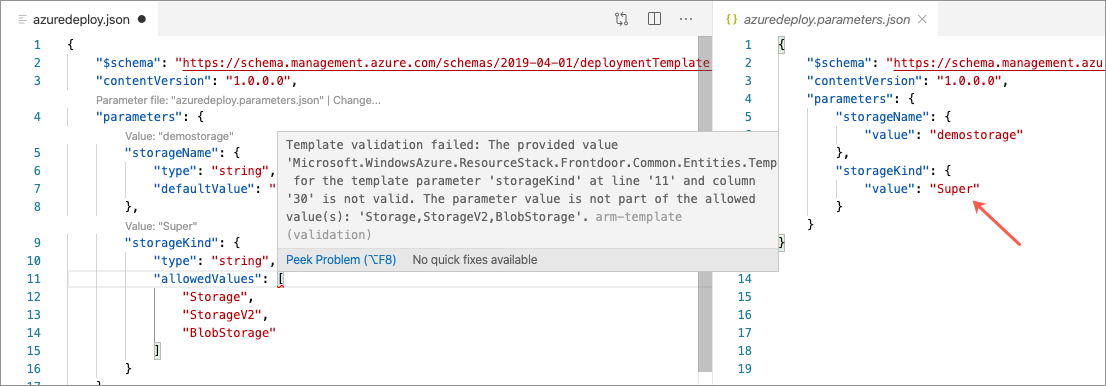
Once a parameter file has been associated with a template, the extension provides parameter validation across both files. In the following example, a parameter is specified with a set of allowed values. In the parameter file, a value is specified that is not part of the allowed values list. Because of this, the extension produces an error.
Add missing parameters
To add missing parameters to an existing parameter file, ensure that an association has been created, click somewhere inside "parameters", and then click the light bulb icon.
Select the option to add only required or all missing parameters.
Enter a value for the added parameters and also remove the 'TODO' comment.
Rename a parameter
Right-click on the parameter name and select Rename Symbol. This action renames the parameter and all template and parameter file references to the parameter.
Remove or update parameter file association
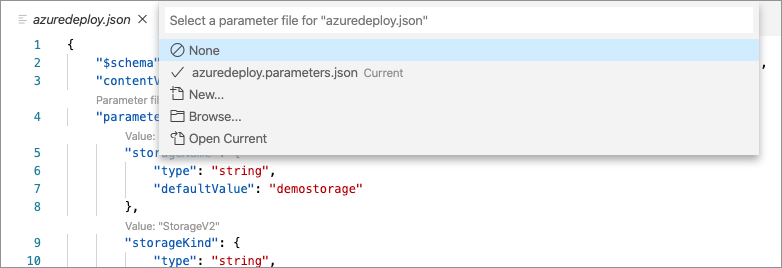
Click on the code lens option for changing a parameter association.
Select a new parameter file or create a new parameter file to update the association. Select None to remove the parameter file association.
Linked Template Support
When a linked template is referenced, it gets validated using the parameter values that are passed in.
Linked template support requires that all top-level parameters have a value. This means that a parameter file is associated with the template OR all top-level parameter definitions have a default value.
Scenarios supported:
- Relative path (requires Microsoft.Resources/deployments apiVersion 2020-06-01 or higher for use in template specs and 2020-10-01 for use in direct deployments):
{
  name: "linkedDeployment1",
  type: "Microsoft.Resources/deployments",
  apiVersion: "2020-10-01",
  properties: {
    mode: "Incremental",
    templateLink: {
      // Relative to current template's folder
      relativePath: "child.json",
    },
    parameters: {},
  },
}
- Full URI:
{
  name: "linkedDeployment1",
  type: "Microsoft.Resources/deployments",
  apiVersion: "2020-10-01",
  variables: {
    templateUri: "https://raw.githubusercontent.com/Azure/azure-quickstart-templates/master/101-vm-simple-windows/azuredeploy.json",
  },
  properties: {
    mode: "Incremental",
    templateLink: {
      uri: "[variables('templateUri)]",
    },
    parameters: {},
  },
}
- Relative to deployed template location
{
  name: "linkedDeployment1",
  type: "Microsoft.Resources/deployments",
  apiVersion: "2020-10-01",
  properties: {
    mode: "Incremental",
    templateLink: {
      // When the template is deployed from a staging location, the URI be relative to the deployed
      // location.
      // While editing, this will be relative to the current template's local file folder.
      uri: "[uri(deployment().properties.templateLink.uri, 'child.json')]",
    },
    parameters: {},
  },
}
Additional features:
- CTRL-click on relativePath value or click on code lens to navigate to linked template
- "Light-bulb" and snippet support to fill in parameter values for a linked template

Template navigation
The ARM tools extension for VS Code offers several features for navigating around an ARM template.
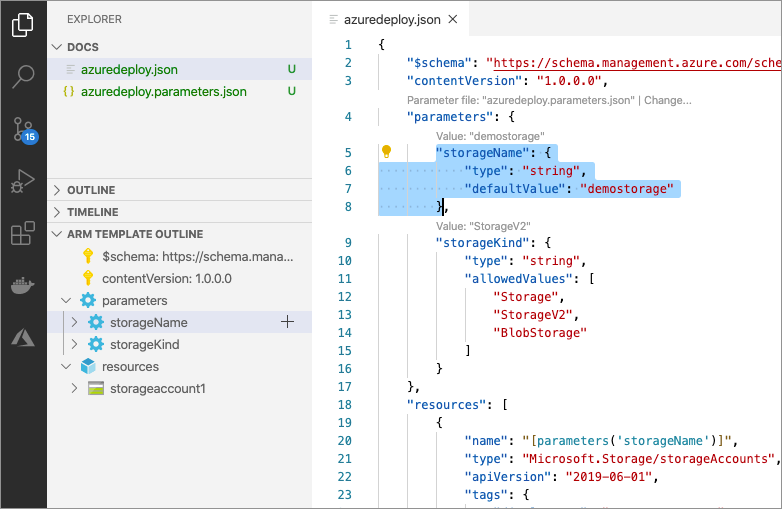
ARM template outline
The ARM template outline is used to navigate to and select any element of an ARM template.
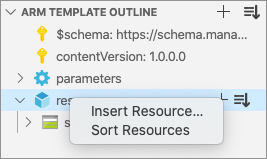
In addition to navigation, several features such as insert item and template sorting can be engaged using the buttons found on the ARM template outline.
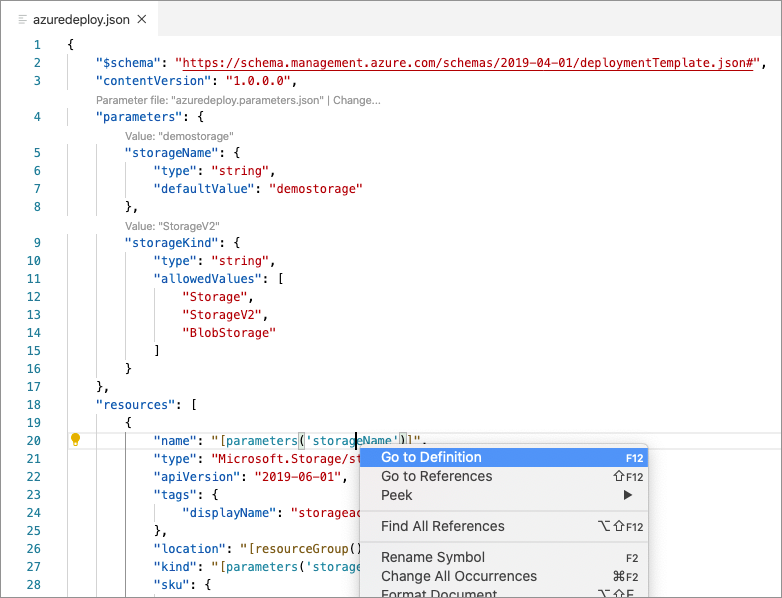
Go to Definition
Go to definition can be used to navigate to parameter, variable and user-defined function definitions. To use go to definition, place your cursor on the parameter, variable or function name and press F12 or right-click and select Go to Definition.
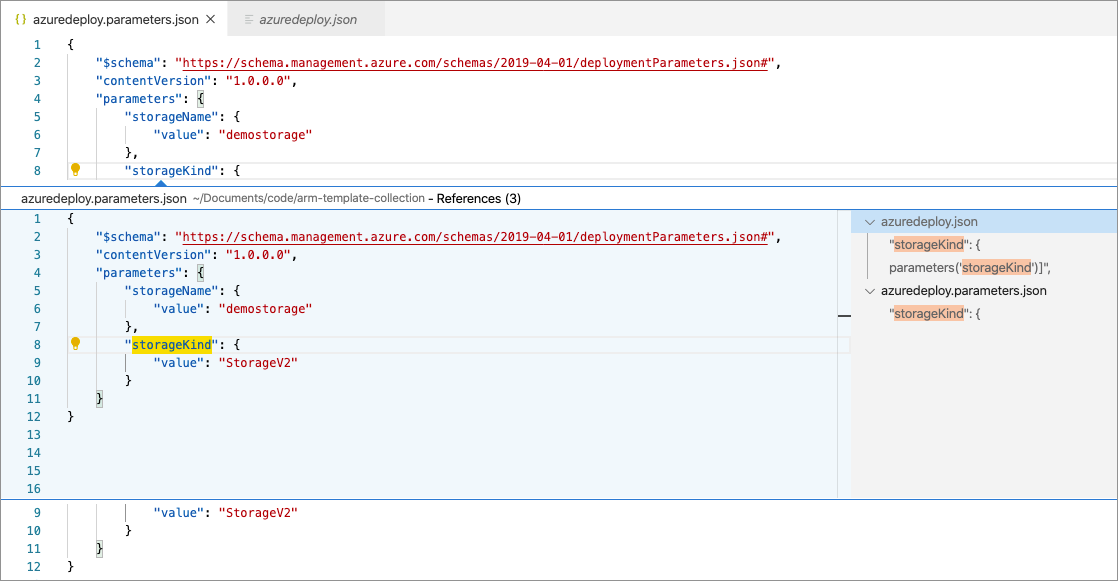
Find all references
Right-click on a parameter, variable, or user-defined function name and select Go to References. Double-clicking on any reference moves your cursor to the reference location.
Completions
The ARM Tools extension provides code completions for many built-in functions, for example resourceId and variables, as well as for entries inside a dependsOn list and parameter values in a parameter file.
Other features
Insert Item
In addition to adding snippets from the code editor, the Insert Item feature can be used to insert new parameters, user-defined functions, variables, resources, and outputs. To do so right-click the code editor, select Insert Item and follow the on-screen prompts.
You can also right-click on any element in the ARM Template Outline view to initiate the insert item process.
Thanks to Nils Hedström @nilshedstrom for implementing this feature!
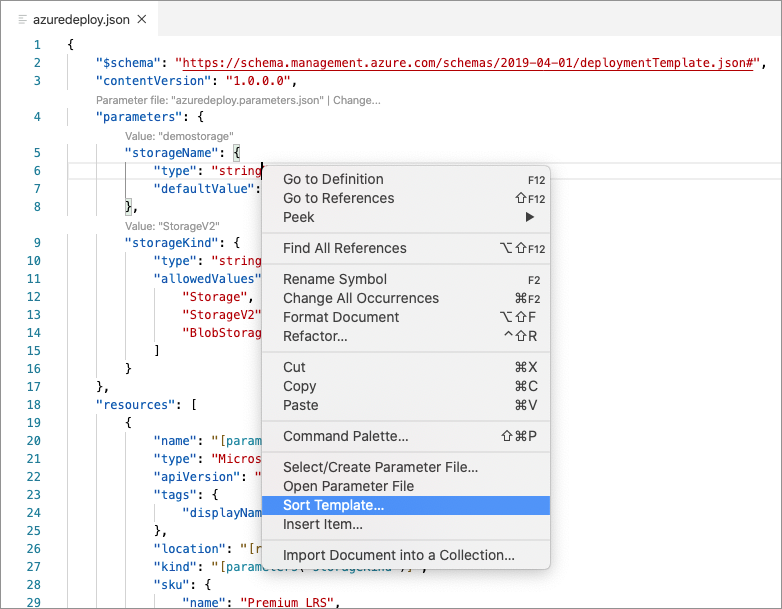
Sort template
To sort elements of an ARM template alphabetically, right-click on the template and select Sort Template....
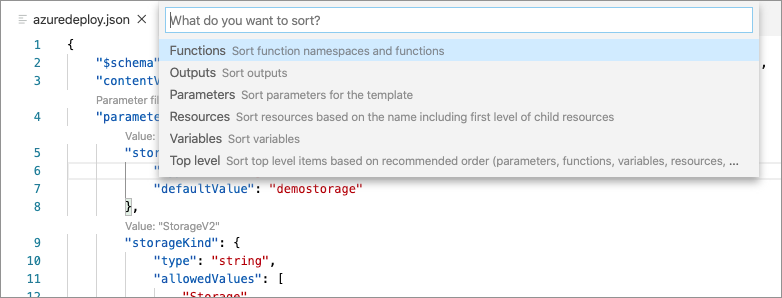
Select the element that you want to sort.
Template sorting can also be engaged using the ARM template outline.
Thanks to Nils Hedström @nilshedstrom for implementing this feature!
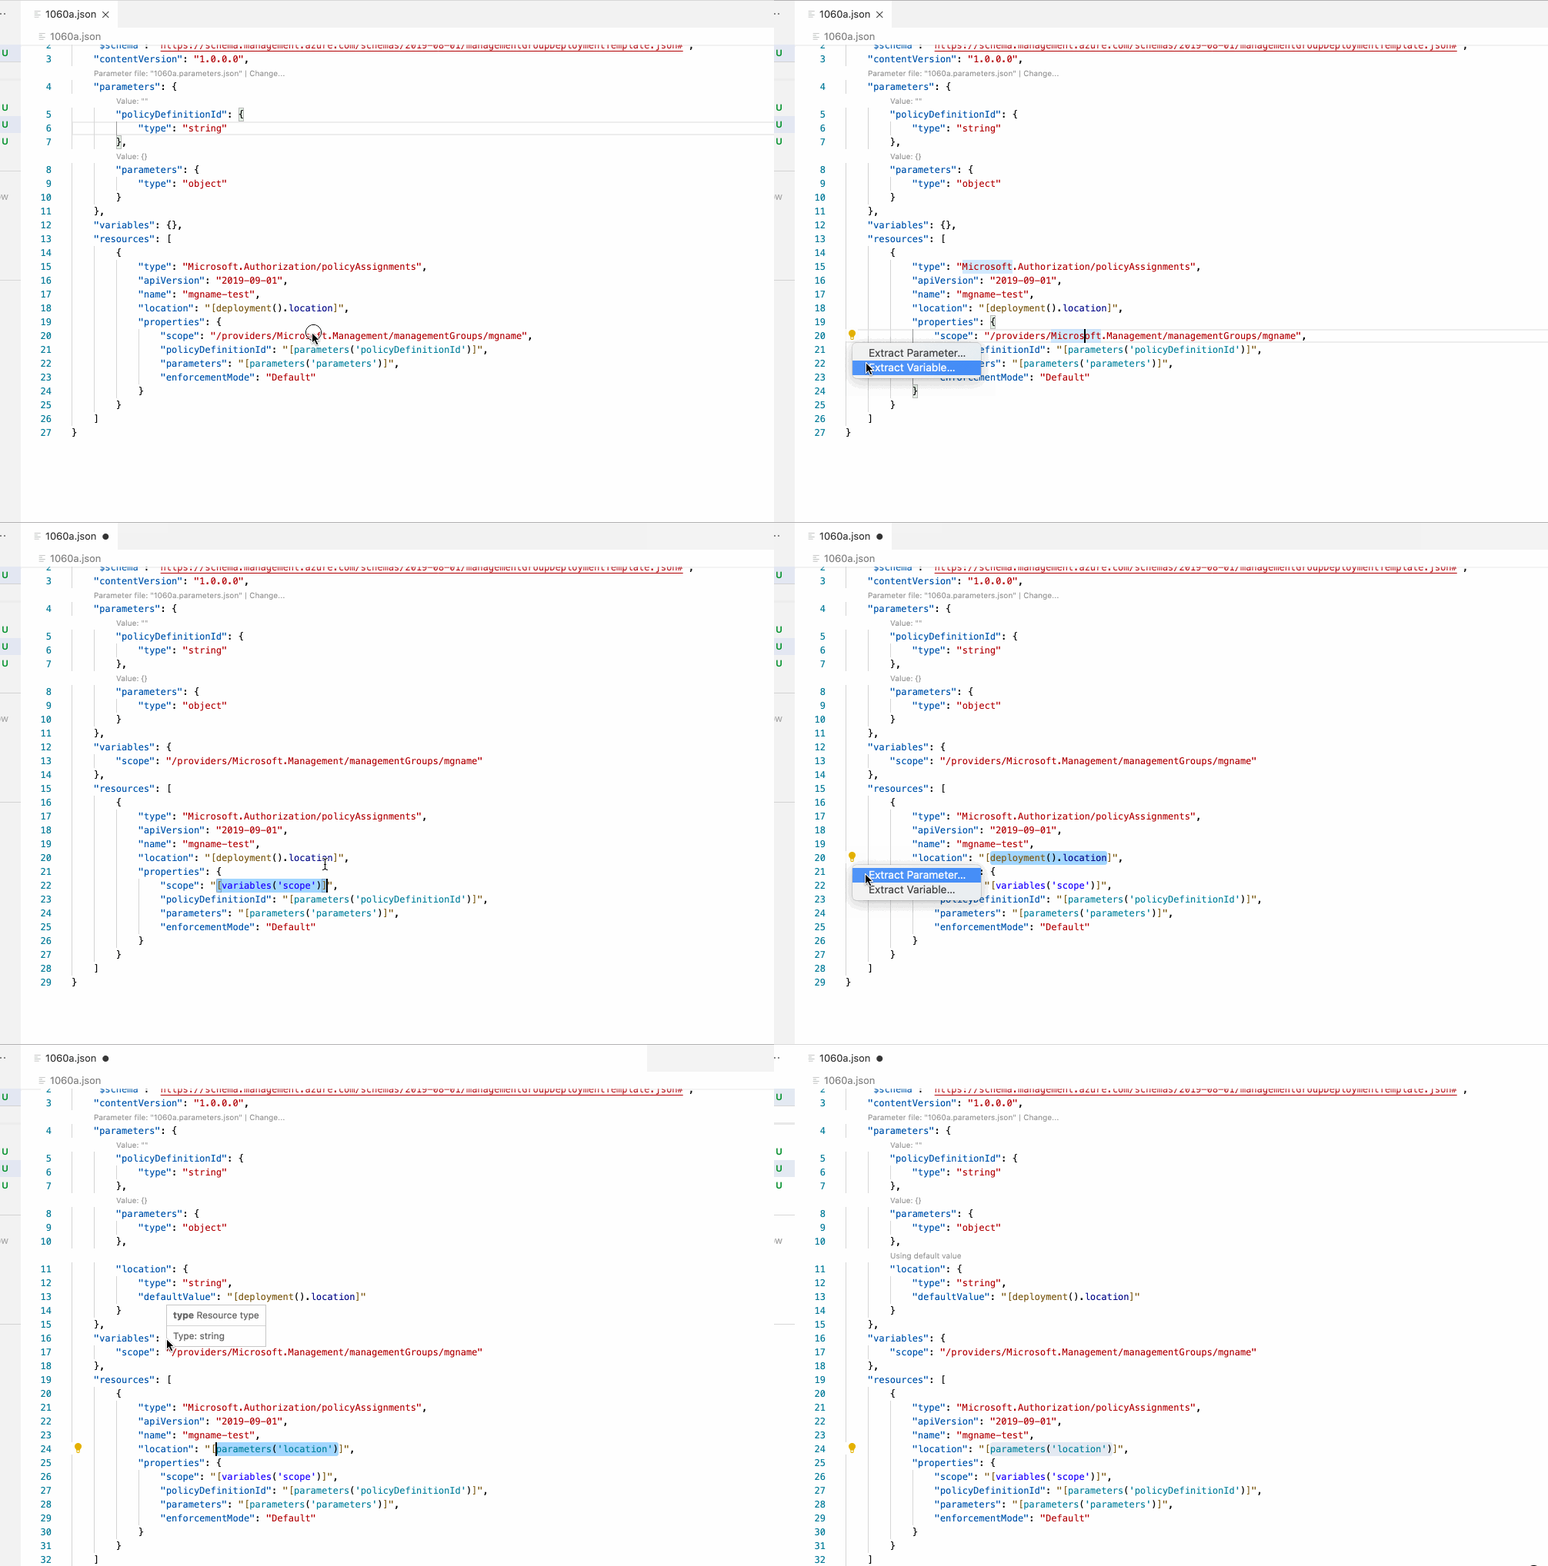
Extract to variable or parameter
Select a JSON string or a subset of an expression string then select the lightbulb to extract it to a variable or parameter.
Thanks to Nils Hedström @nilshedstrom for implementing this feature!
Hover to format complex expressions or multi-line strings
To assist with navigating complex expressions or multi-line strings, VS Code has a "Go to Bracket" command. You can use the command palette or a keyboard shortcut:
- Mac: Cmd+Shift+\
- Windows: Ctrl+Shift+\
- Windows with Spanish keyboard: Ctrl+Shift+|
- Windows with German keyboard: Ctrl+Shift+^
Miscellaneous Features
- Signature help for TLE function parameters
- Peek for variable and parameter definitions
- Find all references (Shift + F12) for variables and parameters
- Rename (F2) variables and parameters and their references, as well as user-defined functions or namespaces
- Hover for parameter description
- TLE brace matching
- User-defined template functions, see Azure documentation
- Variable iteration ("copy blocks"), see Azure documentation
- Sort template and template sections alphabetically
- Nested templates (with inner or outer scope)
- Quick fix to add missing parameter values in the parameter file or in nested templates
Extension configuration
You may be interested in adjusting the following extension configurations. These can be configured in VS Code User Settings.
| Configuration | Description |
|---|---|
| azureResourceManagerTools.autoDetectJsonTemplates | Auto-detects ARM template and sets editor language type to Azure Resource Manager Template. |
| azureResourceManagerTools.checkForLatestSchema | Check if the root schema for deployment templates is using an out-of-date version and suggest updating it to the latest version. |
| azureResourceManagerTools.checkForMatchingParameterFiles | Check if an opened template file has a matching parameter file and prompt to create an association. |
| azureResourceManagerTools.codelens.enable | Set to false to disable all code lens functionality. |
| azureResourceManagerTools.codelens.parameters | Set to false to disable code lens for parameters. |
Automatic Detection of deployment template files
By default, the extension recognizes a .json or .jsonc file as a deployment template file based on the $schema specified in the file (for instance, https://schema.management.azure.com/schemas/2018-05-01/deploymentTemplate.json#) and will switch the editor language to "Azure Resource Manager Template" automatically. If you do not want that behavior, you can set the azureResourceManagerTools.autoDetectJsonTemplates setting to false and use the below methods to determine which files to treat as deployment templates.
Besides automatic detection, you can also use the files.associations setting to set up your own specific associations based on specific files paths or patterns to mark them as deployment templates, e.g.
"files.associations": {
    "*.azrm.json": "arm-template" // Treat these files as deployment templates
}
Troubleshooting
Use the following wiki article to help troubleshoot these known issues.
- This extension requires .NET Core for full functionality, but we were unable to download and install a local copy for the extension.
- Resource schema warning: "For full schema validation, consider updating the value to one of the following..."
Related Links
- VS Code Azure Resource Manager snippets and cross-platform deployment scripts
- Azure Quickstart Templates
Visualizing ARM Templates
Another helpful extension for authoring ARM templates is the ARM Viewer for VS Code extension. This extension displays a graphical preview of ARM templates. The view will show all resources with the official Azure icons and also linkage between the resources.
You can find details on its features and usage by visiting the GitHub repo here: https://github.com/benc-uk/armview-vscode#usage
Contributing
There are several ways you can contribute to our repo:
- Ideas, feature requests, and bugs: We are open to all ideas and we want to get rid of bugs! Use the Issues section to report a new issue, provide your ideas or contribute to existing threads.
- Documentation: Found a typo or strangely worded sentences? Submit a PR!
- Snippets: Have a fix for a snippet or a new snippet idea? File an Issue or submit a PR!
- Code: Contribute bug fixes, features or design changes:
- Clone the repository locally and open in VS Code.
- Install TSLint for Visual Studio Code.
- Open the terminal (press
CTRL+`) and runnpm install. - To build, press
F1and type inTasks: Run Build Task. - Debug: press
F5to start debugging the extension.
Legal
Before we can accept your pull request you will need to sign a Contribution License Agreement. All you need to do is to submit a pull request, then the PR will get appropriately labeled (e.g. cla-required, cla-norequired, cla-signed, cla-already-signed). If you already signed the agreement we will continue with reviewing the PR, otherwise, the system will tell you how you can sign the CLA. Once you sign the CLA all future PR's will be labeled as cla-signed.
Code of Conduct
This project has adopted the Microsoft Open Source Code of Conduct. For more information see the Code of Conduct FAQ or contact opencode@microsoft.com with any additional questions or comments.
Telemetry
VS Code collects usage data and sends it to Microsoft to help improve our products and services. Read our privacy statement to learn more. If you don’t wish to send usage data to Microsoft, you can set the telemetry.enableTelemetry setting to false. Learn more in our FAQ.
License
The source code in our public repository is licensed under the MIT license and may be locally built and used in accordance with this license.
When the extension is published to the VS Code Marketplace, it is bundled with the Azure Resource Manager language service binaries. The extension as bundled and published this way is licensed under a traditional Microsoft product license.


