Add Mozilla Code of Conduct |
||
|---|---|---|
| .circleci | ||
| bin | ||
| config | ||
| docs | ||
| functions | ||
| lib | ||
| .editorconfig | ||
| .eslintrc.yaml | ||
| .gitignore | ||
| .npmrc | ||
| CODE_OF_CONDUCT.md | ||
| LICENSE | ||
| README.md | ||
| package-lock.json | ||
| package.json | ||
| renovate.json | ||
| serverless.local.yml-dist | ||
| serverless.yml | ||
README.md
watchdog-proxy

This is a simple proxy which interfaces with Microsoft's PhotoDNA Service.
Systems Diagram
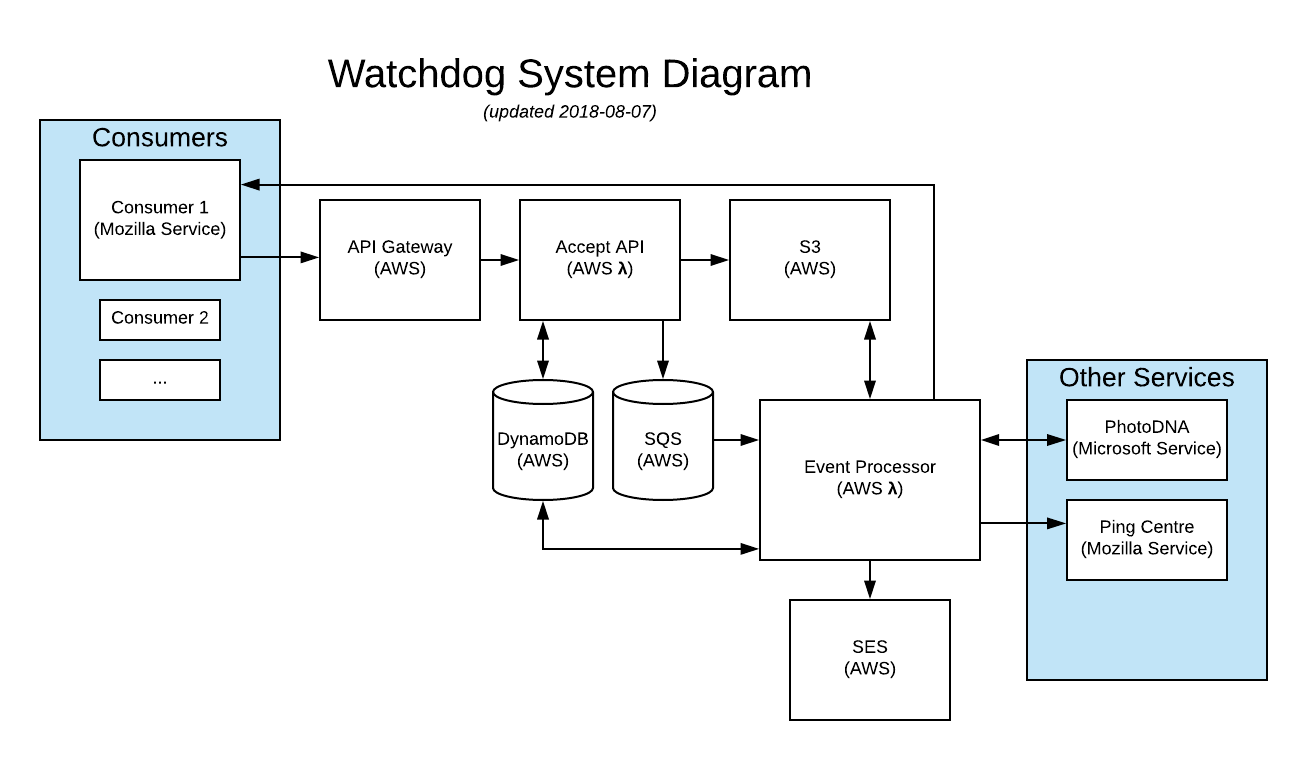
Quick summary of operation
- A third-party Consumer sends an HTTP POST request to the AWS API gateway to invoke the Accept lambda function
- The Accept function authenticates the Consumer's credentials supplied via Hawk against a DynamoDB table
- If the credentials & parameters are valid, details of the Consumer's submission are sent to the SQS queue and the uploaded image is saved in a private S3 bucket.
- An Event Processor lambda function is invoked by the AWS queue poller for each SQS message
- The Event Processor function calls the upstream web service (i.e. PhotoDNA) with the details of a Consumer submission
- On a response from the upstream web service, the Event Processor makes a request back to a URL included in the Consumer submission
- Finally, on success, the Event Processor deletes the message from the SQS queue to acknowledge completion
Note: images in the S3 bucket are not currently deleted, though objects in the bucket have a 30-day expiration
Development
Useful NPM scripts
npm run lint- check JS syntax & formattingnpm run test- run JS testsnpm run watch- start a file watcher that runs tests & lintnpm run prettier- clean up JS formattingnpm run deploy- deploy a stack configured for productionnpm run deploy:dev- deploy a stack configured for development (e.g. withENABLE_DEV_AUTH=1)npm run info- display information about the currently deployed stack (e.g. handy for checking the stack's API URL)npm run logs -- -f accept -t- watch logs for the functionacceptnpm run client -- [--id <id> --key <key> --url <url>]- make an authenticated request, defaults to an auto-detected service URL for your stack with credentials devuser / devkeynpm run client -- --url https://watchdog-proxy.dev.mozaws.net- make an authenticated request to the dev stacknpm run client -- --help- see further options accepted by the client
Quickstart Notes
First, ensure node.js 8.11.1 or newer is installed. Then, the steps to get started look something like this:
git clone git@github.com:mozilla/watchdog-proxy.git
cd watchdog-proxy
npm install
npm start
After cloning the repository and installing dependencies, npm start will launch several file watchers that build assets as needed, run unit tests, and check code quality as you edit files.
For local development, create your own version of serverless.local.yml:
- Copy
serverless.local.yml-disttoserverless.local.yml - Edit
serverless.local.yml - Change at least the
stageproperty to a name that's unique to you
You don't need to create this file if you intend to use environment variables to configure deployment. In fact, this file will override many environment variables if you use it.
The next step is to get the service running on AWS. You'll need to sign up for an account or request a Dev IAM account from Mozilla Cloud Operations. (The latter is available only to Mozillians.)
Optional: Install AWS CLI. This gives you tools to work with AWS from the command line.
If you already have an AWS key ID and secret, you can follow the quick start docs for Serverless to configure your credentials
If you don't already have an AWS key ID and secret, follow the guide to acquire and configure these credentials.
Try deploying the service to AWS:
npm run deploy:dev
You should see output like the following:
$ npm run deploy:dev
Serverless: Packaging service...
Serverless: Excluding development dependencies...
Serverless: Creating Stack...
Serverless: Checking Stack create progress...
.....
Serverless: Stack create finished...
Serverless: Uploading CloudFormation file to S3...
Serverless: Uploading artifacts...
Serverless: Uploading service .zip file to S3 (6.39 MB)...
Serverless: Validating template...
Serverless: Updating Stack...
Serverless: Checking Stack update progress...
...........................................................................
Serverless: Stack update finished...
Service Information
service: watchdog-proxy
stage: lmorchard
region: us-east-1
stack: watchdog-proxy-lmorchard
api keys:
  None
endpoints:
  GET - https://30r00qsyhf.execute-api.us-east-1.amazonaws.com/lmorchard/accept
functions:
  accept: watchdog-proxy-lmorchard-accept
  pollQueue: watchdog-proxy-lmorchard-pollQueue
  processQueueItem: watchdog-proxy-lmorchard-processQueueItem
If everything was successful, you should now have a running stack with an HTTPS resource to accept requests listed as one of the endpoints. Copy the listed endpoint URL and keep it handy.
To send your first request, use the client script with the GET endpoint URL:
npm run client
With no options, this command should attempt to auto-detect the endpoint URL for your deployed stack. You can check to see the results of this request working its way through the stack with the following log commands:
# Client request is accepted into the queue
npm run logs -- -f accept
# Client request is received from the queue
npm run logs -- -f pollQueue
# Queued job is processed
npm run logs -- -f processQueueItem
# Upstream service receives a request
npm run logs -- -f mockUpstream
# Client callback service receives a negative result
npm run logs -- -f mockClientNegative
# Client callback service receives a positive result
npm run logs -- -f mockClientPositive
If you want to remove this stack from AWS and delete everything, run npm run remove
The Serverless docs on workflow are useful.
Custom stable domain name for local development
By default, no custom domain name is created. You can use the semi-random domain name serverless offers on deployment and with serverless info.
If you want to create a domain name for local development (e.g. watchdog-proxy-lmorchard.dev.mozaws.net):
- Edit your
serverless.local.ymlto contain an enabledcustomDomainsection with appropriate details - Run
npx serverless create_domain- this only needs to be done once, to create the new custom domain name in Route53 and an accompanying CloudFront distribution - Run
npm run deploy:devto update your stack
Read this Serverless Blog post for more details: https://serverless.com/blog/serverless-api-gateway-domain/
Deployment
Environment variables
When using serverless deploy to deploy the stack, you can use several environment variables to alter configuration. Note that many of these are currently overridden by a serverless.local.yml file, if present.
LOG_LEVEL- (default: "info") one of the following severity levels for log verbosity in increasing order: critical, error, warn, info, debug, verbose, traceLOG_DEBUG- (default: "0") set to "1" to debug logging itselfLOG_FORMAT- (default: "heka") set to "pretty" for human-readable, "heka" for JSON format readable by HekaSTAGE- Stage for building and deploying - one ofdev,stage, orproductionNODE_ENV- Useproductionfor a more optimized production build,developmentfor a development build with more verbose logging and other conveniencesPREFIX- a prefix string used in constructing the names of resources and functions, by default a combination of service and stage namesHITRATE_TABLE- name of the DynamoDB table used for tracking rate limiting, overrides the automatically named default valueCREDENTIALS_TABLE- name of the DynamoDB table containing user credentials, overrides the automatically named default valueQUEUE_NAME- name of the SQS queue used to manage incoming jobs, overrides the automatically named default valueQUEUE_ARN- ARN of the SQS queue used to manage incoming jobs - might seem redundant withQUEUE_NAME, but it's required forproductionstage to trigger theprocessQueueItemfunction with SQS events (done automatically fordevstage)CONTENT_BUCKET- name of the S3 bucket used for storing images and job results, overrides the automatically named default valueGIT_COMMIT- The value reported by the__version__resource ascommit. If not set, Serverless config will attempt to run thegitcommand to discover the current commit.EMAIL_FROM- email address from which alerts on positive matches are sent, must be verified in AWS SESEMAIL_TO- email address to which all alerts on positive matches will be sent (along with positive_email parameter in requests), blank by defaultEMAIL_EXPIRES- number of seconds for which links in a positive alert email should remain valid, defaults to one month (2592000 seconds)UPSTREAM_SERVICE_URL- the URL of the production upstream web service (i.e. PhotoDNA)UPSTREAM_SERVICE_KEY- the private subscription key for the upstream web serviceENABLE_DEV_AUTH=1- This enables a hardcoded user id / key for development (off by default)DISABLE_AUTH_CACHE=1- Authentication credentials are cached in memory in theacceptAPI function. This lasts until AWS recycles the container hosting the function. Setting this variable disables the cache.MOCK_POSITIVE_CHANCE- a number from 0.0 to 1.0 representing the probability that the mock upstream endpoint will respond with a positive matchMETRICS_URL- Override for Ping Centre service URL used for internal metrics. By default, the stage or production Ping Centre URL is used based onNODE_ENVMETRICS_PING_PERIOD- Number of milliseconds to wait between periodic metrics pings reporting on queue status (default: 1000)SENTRY_DSN- DSN for use with Sentry error reporting
You can see these variables used by scripts defined in package.json for development convenience.
Production deployment
For a production deployment involving just the functions and no other resources, define most resources using environment variables like so:
STAGE=production \
NODE_ENV=production \
PREFIX=watchdog \
HITRATE_TABLE=$PREFIX-hitrate \
CREDENTIALS_TABLE=$PREFIX-credentials \
CONTENT_BUCKET=watchdog-content \
QUEUE_NAME=$PREFIX-messages \
QUEUE_ARN=arn:aws:sqs:$AWS_REGION:$AWS_ACCOUNT_ID:$QUEUE_NAME \
UPSTREAM_SERVICE_URL=https://api.microsoftmoderator.com/photodna/v1.0/Match \
UPSTREAM_SERVICE_KEY={secret service key} \
npm run deploy
This should select the production config settings, which defines functions but omits resources or IAM statements. So, all those dependencies should be created separately and identified via environment variables.
Managing client credentials
Managing client credentials for Hawk authentication is currently a manual process of direct edits to the Credentials table in Dynamo DB - no tooling has been created for this yet.
Each item in the Credentials table consists of these properties:
id-the client's IDkey- a secret keyalgorithm- the HMAC hash algorithm to use
The id and key properties are mandatory and should both be unique values.
Neither of these are hashed, since the Hawk algorithm requires access to them
in plaintext. The id value will appear in log messages and metric pings, but
key should remain secret.
The algorithm property is optional - if empty, a default of "sha256" will
be used. The algorithm used should be given to the client implementor along with
the id and key, because it is necessary as part of constructing a Hawk auth
request.
The set of alternate values for algorithm are described as part of the
crypto.createHmac function supplied by node.js - TL;DR:
The algorithm is dependent on the available algorithms supported by the version of OpenSSL on the platform. Examples are 'sha256', 'sha512', etc. On recent releases of OpenSSL, openssl list -digest-algorithms (openssl list-message-digest-algorithms for older versions of OpenSSL) will display the available digest algorithms.