| Getting Started |
|---|
In this lesson we learn how to render models using skinned vertices for smooth animations.
Setup
First create a new project using the instructions from the previous lessons: Using DeviceResources and Adding the DirectX Tool Kit which we will use for this lesson.
Background
In the previous lesson, we learned the use of ModelBone as general metadata and for doing rigid-body animation of meshes. The other common use for model bones is as a 'skeleton' to control vertices for vertex skinning animation.
Like XNA Game Studio, the DirectX Tool Kit does not provide a specific implementation of an animation control system. There are numerous approaches, and each have their own strengths and weaknesses. In this lesson, we'll cover the animation system in the Visual Studio Mesh Content Pipeline (CMO) and the legacy DirectX SDK sample animation system (SDKMESH v1), providing some basic code for using them. Neither solution is ideal, but they do a good job of demonstrating the techniques and some trade-offs.
Rendering a skinned model
Start by saving teapot.cmo into your new project's directory, and then from the top menu select Project / Add Existing Item.... Select "teapot.cmo" and click "OK".
If you are using a Universal Windows Platform app or Xbox project rather than a Windows desktop app, you need to manually edit the Visual Studio project properties on the
teapot.cmofile and make sure "Content" is set to "Yes" so the data file will be included in your packaged build.
Now download Animation.cpp and Animation.h into your project directory. Use Project / Add Existing Item... to add them to your project. This is a simple helper class we'll describe more later on in the lesson.
In the Game.h file, add to the list of header includes:
#include "Animation.h"
In the Game.h file, add the following variables to the bottom of the Game class's private declarations:
DirectX::SimpleMath::Matrix m_world;
DirectX::SimpleMath::Matrix m_view;
DirectX::SimpleMath::Matrix m_proj;

std::unique_ptr<DirectX::CommonStates> m_states;
std::unique_ptr<DirectX::IEffectFactory> m_fxFactory;
std::unique_ptr<DirectX::Model> m_model;

DirectX::ModelBone::TransformArray m_drawBones;

DX::AnimationCMO m_animation;
In Game.cpp, add to the TODO of CreateDeviceDependentResources:
m_states = std::make_unique<CommonStates>(device);

m_fxFactory = std::make_unique<EffectFactory>(device);

size_t animsOffset;
m_model = Model::CreateFromCMO(device, L"teapot.cmo",
    *m_fxFactory,
    ModelLoader_CounterClockwise | ModelLoader_IncludeBones,
    &animsOffset);

DX::ThrowIfFailed(
    m_animation.Load(L"teapot.cmo", animsOffset)
);
m_animation.Bind(*m_model);

m_drawBones = ModelBone::MakeArray(m_model->bones.size());

m_model->UpdateEffects([&](IEffect* effect)
    {
        auto skin = dynamic_cast<SkinnedEffect*>(effect);
        if (skin)
        {
            skin->SetPerPixelLighting(true);
        }
    });

m_world = Matrix::Identity;
In Game.cpp, add to the TODO of CreateWindowSizeDependentResources:
static const XMVECTORF32 c_cameraPos = { 100.f, 100.f, 200.f, 0.f };
static const XMVECTORF32 c_lookAt = { 0.f, 25.f, 0.f, 0.f };

auto size = m_deviceResources->GetOutputSize();
m_view = Matrix::CreateLookAt(c_cameraPos.v, c_lookAt.v, Vector3::UnitY);
m_proj = Matrix::CreatePerspectiveFieldOfView(XM_PI / 4.f,
    float(size.right) / float(size.bottom), 0.1f, 1000.f);
In Game.cpp, add to the TODO of OnDeviceLost:
m_states.reset();
m_fxFactory.reset();
m_model.reset();
In Game.cpp, add to the TODO of Render:
size_t nbones = m_model->bones.size();

m_animation.Apply(*m_model, nbones, m_drawBones.get());

m_model->DrawSkinned(context, *m_states, nbones, m_drawBones.get(),
    m_world, m_view, m_proj);
In Game.cpp, add to the TODO of Update:
m_animation.Update(elapsedTime);

float time = float(timer.GetTotalSeconds());

m_world = XMMatrixRotationY(time);
Build and render to see a dancing teapot:
CMO animation
Most of the 'magic' here is taking place inside AnimationCMO, so here's an explanation of what's happening.
-
When loading the
CMO, we provide theanimsOffsetoptional parameter which provides the offset to the start of the animation clip or clips inside theCMOfile. -
We call the Load method on the
AnimationCMOclass which takes theanimsOffsetto simplify parsing. It then loads the animation data contained in theCMOfile in the form of keys and 4x4 matrices:
struct Clip
{
    float StartTime;
    float EndTime;
    uint32_t keys;
};

struct Keyframe
{
    uint32_t BoneIndex;
    float Time;
    DirectX::XMFLOAT4X4 Transform;
};
Because
CMOfiles can contain multiple clips, the Load method takes a defaulted parameter for the name of the clip. Our test file here just has one.
-
The call to the Bind method for
CMOanimation just allocates aModelBone::TransformArray(calledm_animBonesbelow). -
We call the Update method to compute the current animation time. In the case of
CMOanimation, we also force looping behavior for simplicity. -
Before we can draw the model, we then call Apply with the results returned in the
boneTransformsparameter. This takes the current animation time and determines each model bone transformation from theKeyframedata. Then it callsModel::CopyAbsoluteBoneTransformsto evaluate the bone hierarchy. Finally it multiplies the results by the "Inverse Bind Pose" for each bone:
// Compute local bone transforms
model.CopyBoneTransformsTo(nbones, m_animBones.get());

// Apply keyframes
if (m_animTime >= m_startTime)
{
    size_t k = 0;
    for (auto kit : m_keys)
    {
        if (kit.second > m_animTime)
        {
            break;
        }

        m_animBones[kit.first] = m_transforms[k];
        ++k;
    }
}

// Compute absolute locations
model.CopyAbsoluteBoneTransforms(nbones, m_animBones.get(),
    boneTransforms);

// Adjust for model's bind pose.
for (size_t j = 0; j < nbones; ++j)
{
    boneTransforms[j] = XMMatrixMultiply(model.invBindPoseMatrices[j],
        boneTransforms[j]);
}
The 'bind pose' is the 'starting position' of the model on which the animations are based.
- Finally, we draw the model using the
Model::DrawSkinnedmethod with the computed bone transform matrices.
Skinned models with bone influences
The CMO animation system is an example of 'direct-mapped' bones where the bone indices in the vertex data directly map to the Model's bone array. This is simple, but means that each mesh in the model file is limited to the same set of MaxBones (72). The SDKMESH animation system uses 'bone-influences' which maps the vertex data index to the model bone index.
Now save soldier.sdkmesh, soldier.sdkmesh_anim, head_diff.dds, head_norm.dds, jacket_diff.dds, jacket_norm.dds, pants_diff.dds, pants_norm.dds, upBody_diff.dds, and upbody_norm.dds into your new project's directory. From the top menu select Project / Add Existing Item..., then select "soldier.sdkmesh", "soldier.sdkmesh_anim", and the eight DDS files followed by "OK".
If you are using a Universal Windows Platform app or Xbox project rather than a Windows desktop app, you need to manually edit the Visual Studio project properties on the
soldier.sdkmeshandsoldier.sdkmesh_animfiles and make sure "Content" is set to "Yes" so the data file will be included in your packaged build.
In the Game.h file, modify the type of the m_animation in the Game class's private declarations:
DX::AnimationSDKMESH m_animation;
In Game.cpp, modify the TODO of CreateDeviceDependentResources:
m_model = Model::CreateFromSDKMESH(device, L"soldier.sdkmesh",
   *m_fxFactory,
   ModelLoader_Clockwise | ModelLoader_IncludeBones);

DX::ThrowIfFailed(
   m_animation.Load(L"soldier.sdkmesh_anim")
);
m_animation.Bind(*m_model);

m_drawBones = ModelBone::MakeArray(m_model->bones.size());
In Game.cpp, modify the TODO of CreateWindowSizeDependentResources:
static const XMVECTORF32 c_cameraPos = { 0.f, 0.f, 1.5f, 0.f };
static const XMVECTORF32 c_lookAt = { 0.f, 0.25f, 0.f, 0.f };
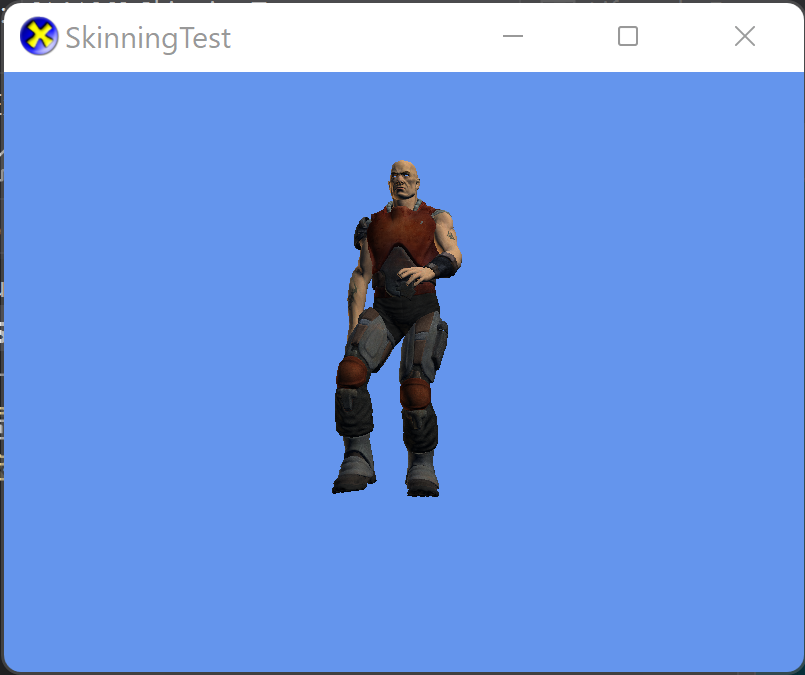
Build and run to see a walking "dude" model:
SDKMESH animation
-
For
SDKMESHthe animation data is in a distinct file. When we call Load it takes the.sdkmesh_animfile. This is more flexible and allows more animations to be added over time, and potentially 'retargeted' to a different model with the same bone names. -
The Bind method matches up the name of the bones in the animation file with the names in the skeleton, as well as allocating
m_animBones. -
The Update method accumulates delta time. There's nothing to do for looping, because
SDKMESHanimation assumes looping. -
The Apply method is where the differences really show. In
SDKMESHthe animation data is provided at a fixed 'frame-rate', and each key is represented as a Vector3 for translation, a quaternion for rotation, and a Vector3 for scale.
auto tick = static_cast<uint32_t>(
    static_cast<float>(header->AnimationFPS) * m_animTime);
tick %= header->NumAnimationKeys;

// Compute local bone transforms
auto frameData = reinterpret_cast<SDKANIMATION_FRAME_DATA*>(
    m_animData.get()
    + header->AnimationDataOffset);

for (size_t j = 0; j < nbones; ++j)
{
    if (m_boneToTrack[j] == ModelBone::c_Invalid)
    {
        m_animBones[j] = model.boneMatrices[j];
    }
    else
    {
        auto frame = &frameData[m_boneToTrack[j]];
        auto data = &frame->pAnimationData[tick];

        XMVECTOR quat = XMVectorSet(
            data->Orientation.x,
            data->Orientation.y,
            data->Orientation.z,
            data->Orientation.w);
        if (XMVector4Equal(quat, g_XMZero))
            quat = XMQuaternionIdentity();
        else
            quat = XMQuaternionNormalize(quat);

        XMMATRIX trans = XMMatrixTranslation(
            data->Translation.x,
            data->Translation.y,
            data->Translation.z);
        XMMATRIX rotation = XMMatrixRotationQuaternion(quat);
        XMMATRIX scale = XMMatrixScaling(
            data->Scaling.x,
            data->Scaling.y,
            data->Scaling.z);

        m_animBones[j] = XMMatrixMultiply(
          XMMatrixMultiply(rotation, scale), trans);
    }
}

// Compute absolute locations
model.CopyAbsoluteBoneTransforms(nbones, m_animBones.get(),
    boneTransforms);

// Adjust for model's bind pose.
for (size_t j = 0; j < nbones; ++j)
{
    boneTransforms[j] = XMMatrixMultiply(model.invBindPoseMatrices[j],
        boneTransforms[j]);
}
- Finally,
Model::DrawSkinneddraws the final position.
Pros and cons
-
The
CMOanimation system is extremely simple, and has the advantage of being built-in to Visual Studio's Content Pipeline. -
The key limitation of
CMOis that while storing the transformations as a 4x4 matrix is simple, it has a number of problems. First, since animations always contain affine transformations it wastes 25% of the space. Second, by using full matrices, it's complicates animation blending and tweening. TheSDKMESHuse of the individual components is both more compact, and easy to interpolate. -
The main disadvantage of
SDKMESHis that the fixed frame-rate means the animation data is a lot larger than it could be for typical animations.
More to explore
- Vertex skinning is supported by SkinnedEffect, SkinnedNormalMapEffect, SkinnedPBREffect, and SkinnedDGSLEffect using the
IEffectSkinninginterface.
Next lesson: Using advanced shaders
Credits
The CMO animation was adopted from the Visual Studio Starter Kit code written by Roberto Sonnino.
The SDKMESH animation was adopted from the DXUT code written by Shanon Drone.
For Use
- Universal Windows Platform apps
- Windows desktop apps
- Windows 11
- Windows 10
- Windows 8.1
- Windows 7 Service Pack 1
- Xbox One
Architecture
- x86
- x64
- ARM64
For Development
- Visual Studio 2022
- Visual Studio 2019 (16.11)
- clang/LLVM v12 - v18
- MinGW 12.2, 13.2
- CMake 3.20
Related Projects
DirectX Tool Kit for DirectX 12
Tools
All content and source code for this package are subject to the terms of the MIT License.
This project has adopted the Microsoft Open Source Code of Conduct. For more information see the Code of Conduct FAQ or contact opencode@microsoft.com with any additional questions or comments.

